
Redarc Portable Solar Panel with Controller - 200 Watt Solar Panel
(0 reviews)
Price: $1,054.00
In Stock
Redarc Portable Solar Panel with Controller - 200 Watt Solar Panel
Item # RED75VR
Retail:$1,159.40
Our Price: $1,054.00
You Save: $105.40
In Stock


- All Info
- Q & A (0)
- Videos (2)
- Photos
Redarc Portable Solar Panel - RED75VR
- With Solar Charge Controller
- AGM
- Calcium
- Flooded Lead Acid
- Gel
- 101 - 200 Watts
- 5.1 - 10 Amps
- Redarc
This portable 200-watt solar charging system lets you place the solar panel where you need it for maximum sunlight. Helps extend your off-grid campout if you have moderate energy demands, like powering a few lights, a fan, and charging devices.
Features:
- Portable solar system charges your battery to power appliances and charge devices while camping off-grid
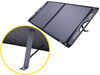
- Park in the shade and place the solar panel in the sun for maximum charge
- Monocrystalline solar panel charges your battery at 200 watts an hour in optimal daylight conditions
- Smaller size compared to polycrystalline panels with the same wattage
- Weatherproof materials stand up to the elements
- Folding frame improves storage and portability
- 20-Amp PWM solar controller automatically adjusts solar panel output for a consistent charge
- Allows panel to stay connected safely for extended periods
- Displays charge progress and charge level with LED indicators
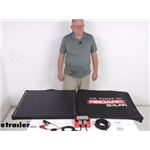
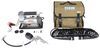
- Kit includes all major components (hardware not included)
- 1 Solar panel with built-in Anderson cable and adjustable stand
- 1 20-amp controller with Anderson input and output
- 1 Anderson to alligator clip cable
Specs:
- Application: 12V or 24V battery systems
- Works with sealed, AGM, or gel lead acid batteries
- Battery monitor - sold separately - required for flooded or calcium batteries
- Solar panel dimensions:
- Open: 54" long x 31-1/2" wide x 1" tall
- Closed: 27" long x 31-1/2" wide x 2" tall
- Solar controller dimensions: 6" long x 4-1/16" wide x 1-1/8" tall
- Solar panel rated power: 200 watts
- Solar controller maximum power rating:
- 240 watts for 12V systems
- 480 watts for 24V systems
- Amperage:
- Solar panel output: 10 amps
- Solar panel short circuit current: 10.48 amps
- Solar controller current limit: 20 amps
- Solar panel voltages:
- Output system: 12V DC
- Open circuit: 24V
- Maximum power: 20V
- Operating temperature:
- Solar panel: -40 F to 185 F
- Solar controller: -31 F to 131 F
- Solar panel weight: 20.9 lbs
- 2-Year limited warranty
Note: Not intended for use with lithium batteries.
This portable Redarc solar system can help extend your off-grid campout if you have moderate energy demands. It provides an easy way to charge your RV batteries with clean, renewable power. Using the 200-watt solar panel, this system collects solar energy to create DC power that passes through a solar charge controller into your battery. It's great if you run lights or a fan on the single battery of your small travel trailer, or if you have a portable power station for keeping your phones and chargeable devices topped up.
The adjustable legs let you prop the panel up to face directly at the sun while you park yourself in the shade. The solar controller will monitor the battery, maintaining it and preventing it from being overcharged.
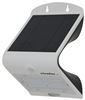
Monocrystalline Solar Panel

The charging process starts with the solar panel, which mounts permanently with screws or other mounting hardware (sold separately). When solar energy interacts with the silicon cells in the panel, it generates a flow of DC electrical current that charges your battery. Each of the monocrystalline cells is made from a single crystal of silicon, so the electrons that create the current have more space to move, making this panel more efficient than one with polycrystalline cells. And in optimal sunlight conditions, the panel produces 200 watts per hour.
Smart Solar Controller Charges and Protects Battery
The solar controller prevents harmful overcharging by adjusting the power generated by the solar panel before it reaches your batteries. It uses pulse width modulation technology to regulate the output through pulses that provide a consistent charge. Typically, PWM controllers are a good fit for smaller systems, rather than using more expensive MPPT solar controllers.

The controller is compatible with multiple battery types and includes preset charging profiles for sealed/gel an AGM batteries. The optional remote - sold separately - is required for flooded/wet cell and calcium batteries.
LED indicators provide information on the current solar panel output. The lights will tell you if the panel is providing a charge, if the battery is charging, and if the battery is fully charged. This will charge a battery reading at least 9V in a 12V system, or a battery bank reading 18V in a 24V system.
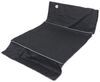
Heavy-Duty Carrying Case

The durable, padded carrying case has a soft interior to help protect your panel during storage and transport. An opening at the top allows you to carry the panel with the integrated handles attached to the panel. You can also conveniently stash your cables in the zippered pocket on the back.
Optional Remote Monitor Offers More Info and Options

While this kit will work perfectly for a hands-off approach to giving your battery an extra boost, the optional Redarc Remote Monitor (RED83VR - sold separately) is an easy way to upgrade your setup. This remote would be required if you want to use this system with flooded or calcium, as it is the only way to change the solar controller's battery type.
This monitor's digital display lets you see the solar array's charging status, read your battery's voltage, check electrical usage, and other info.
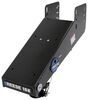
SRPA0240 Redarc 20-Amp Solar Charge Controller
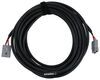
SRC0018 Extension Cable for Redarc Solar Panels - 16' Long
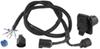
SRC0009 Anderson to Battery Clamp Cable for Redarc Solar Charge Controller - 5' Long
SPFP1200 Redarc Monocrystalline Portable Solar Panel - 200 Watts - RV Solar Panel
Installation Details Alternate Instructions


Video of Redarc Portable Solar Panel with Controller - 200 Watt Solar Panel


Videos are provided as a guide only. Refer to manufacturer installation instructions and specs for complete information.


Video Transcript for Redarc Portable Solar Panel with Solar Charge Controller Review
What's up everybody it's AJ with etrailer.com. Today we're gonna be checking out, this solar panel from REDARC, it's going to be 200 Watts and it's also made to be portable. So you just fold it out, set up wherever you need it, let's say you're going, camping in your rig, or maybe you have a rooftop tent and you're not around any power. So you can set this up wherever you are point it towards the sun and get some charge on that battery. Let's check it out. When it comes to solar panels, usually they have two routes you can go, monocrystalline or polycrystalline.
This one's going to be monocrystalline. And now this is a little more expensive, but it's more efficient. So I like that, when you get this set up on like an overcast day, you might not get a hundred percent of the sun usage, I want it to be efficient and use whatever it can get and charge my battery. Now, as far as amp output, it puts out 10 amps. And again, that's on a clear sky day, a hundred percent usage of that sun.
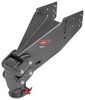
That's what it can put out and put to your battery. On the backside of our solar panel, you can see it's got the kickstands here built in. So you just bring those out and that just lets them sit at an angle, that way it just doesn't sit flat on the ground. They can kind of be angled towards that sun. And then the connection point is going to be an Anderson connection.
So that's nice. It's really easy to unplug or plug back in, when you're going to set it up. Another piece that comes with the kit is going to be the charge controller. And this is a very important piece because, especially if you're adding a solar panel to your setup, you don't have one existing, you're going to need all of these. You have to have this to hook up your solar panel to your battery.
And now what it does is you plug in your solar panel here, it says solar input, and then we have a battery output there. So we hook up the battery Anderson connection right there. And what it does, is it regulates the power coming from the sun and the solar panel, regulates it so that it doesn't overdo the battery. Doesn't overcharge or send too much of a signal to the battery that it cannot handle. Take a closer look at our charge controller. You can see, we have a key up here that lets you know what the different lights mean. The lights are going to be down here. So we have the solar panel one and the battery one. Solar panel one is blinking. So we can just look at our key over here and see that, that means it's charging. So it's all good. Then the battery one is solid green, which means it's connection and the battery is fine. So that's nice to have this key built in. It's not just a sticker either. So it's going to hold up. I like having that to reference, cause you got error codes here on the side too. So you kind of want to know when you see a red light, what that means. Our included charge controller can handle 20 amps. So if you want to pick up a second to a 100 watt solar panel, you'd be able to get that and get the splitter cable and you could run them parallel or in series all the way to your charge controller with that splitter. That would make it one connection, you'd plug it in here. And since this is 20 amps and together, those would have a combined output of 20 amps, you'd be just fine. Something I will note about it though, is you can see on the side, the mounting holes they're on the charge controller. Now this one needs to be mounted close to your battery, so you can have that hooked up, clear the batteries on the outside of our rig today. So it's mostly not ideal, I mean it does have an IP 55 rating on it, so it can be outside for a little bit, but I would want it to last. So I'd want to mount it in the basement or somewhere in there. So if your battery's in there, I think this is going to work really well. If it's not like this, maybe go with the Go Power Solar Panels. They have those where the regulator or the charge controller is on the backside of the solar panel. So when you go to undo it, it's gonna be mounted right there, you don't have to worry about loudness anywhere. It's going to be right there with the solar panel. That's another option to look at too. The way we have it connected to the battery is these alligator clips. They do have a nice clip on them, they have an inline fuse too, to protect if there is any backfeed, it'll blow the fuse and not harm your equipment. There is other options that hook up to your battery. They offer another one that is ring terminals. So you can just mount in straps to those, and that's more of a permanent connection option. The included cable is 16 feet long. So that's the nice thing about this being portable, instead of having it mounted on your roof all the time. If you want to park in the shade, you can just set this up, go 16 feet out, and put it anywhere towards the sun. Now, if you think you need a little bit longer than that, they do offer an extension cable, that's about 32 feet. The solar panel kit isn't designed to work with lithium ion batteries. It will work with AGM, calcium and lead acid. If you're looking for an option for lithium ion, I would look at the Go Power Solar Panels. Those are going to be ready to go with those. The caveats using it with the different batteries is it comes pre-programmed to work with the AGM batteries. Now to switch it to calcium or lead acid, you're gonna have to get the remote display and that's what you're gonna use to change the charge profile. So you'll have it plugged in right here. It's a monitor that you get separately and it has a readout on amperage and even the battery charge on there. So it is helpful beyond that, but you will need that to switch to the profiles of either calcium or lead acid. At first, I was a little annoyed that I had to get a separate thing just to switch the charging profiles. I didn't know that it did things beyond what, just switching those profiles. I really liked when we did have it, we had hands-on with it, looking at it and it told you how much you we're getting from the way it was set up. So it was nice to be able to like. I've been standing in front of the solar panel, I would watch it drop in real time, so it was kind of cool stats to have. So you can arrange it and get the best out of wherever you are. You can also mount it on the inside of your rig that way you don't need to go outside to see how it's doing. You can just monitor it from wherever is most convenient for you. We've got all packed back up, just to show you how easy it is, to setup. So we're going to start with the case. You just unzip both sides and see, this comes right off there. We can remove the solar panel. I set this down, and then you step out of that pocket in a second, but then I'll take this, just separate it here at the handle, and you can see the kickstand's in there. So I'm going to flip it around and set it up just like that. We'll bring out these kickstands on the back. When you do it, you should fully fold it out and then lean it back. Move it out just a little bit more and lean it back on those kickstands. So then we'll come back to our pocket, unzip that, we can get our cables out. Always want to make sure you hook up the battery first. We're going to take the included alligator clips, I got out of the pocket. We'll do positive and negative. Then we'll bring that Anderson connection to our charge controller. This is the battery side. So we're going to plug that into battery output and then we'll go back and run the other cord. On the solar panel side of things, we'll hook up this connection right here. Then we take our cord and make the final connection to the charge controller. Now you're all set up. Overall, I think it's a good portable solar panel kit. I like that it comes with pretty much everything you need to get it hooked up. Besides that controller on the side you have to get, if you have to switch the charging profiles, otherwise though it does have everything you need. Even with that cable, you can set this up, fold it out when you're ready to do. And then when you're done with it, you can easily fold it up and put it away in your basement door. It comes with a carrying case with the pouch, even hold the other accessories that comes with it. That way you can just keep it all together and in the same spot. So whether you are in a camping tent or you've got a rig like this, I think it's going to work well for you when you're off the grid and you don't have any power. Well I think that does it. Thanks for hanging out, and I hope this helped..
0
0
See what our Experts say about this Redarc Portable Solar Panel
- Can Redarc 200 Watt Solar Panel be Used With RV Pre-Wired With Go Power SolarYes, you can use the Redarc 200 watt solar panel with your RV that is pre-wired for solar, but you would not be able to use just the Solar Panel # RED86VR. Solar panels require a charge controller to regulate the battery charge so you would need to get the panel and the controller in one, with the following part number: - Redarc Portable Solar Panel with Solar Charge Controller - 200 Watt Solar Panel # RED75VR The # RED75VR will work with a pre-wired RV, but you will need an adapter for...
view full answer... - Can Redarc Portable Solar Panel with Solar Charge Controller Charge 6 Volt Battery BankYes, since the 6 bolt batteries of your travel trailer are wired so that they output in 12 volts the Redarc Portable Solar Panel with Solar Charge Controller # RED75VR would work to charge them.
view full answer...
Do you have a question about this Portable Solar Panel?
Info for this part was:

Installed by:
Andrew K

Installed by:
Jeff D

Expert Research:
Jameson C

Video Edited:
Jacob T

Updated by:
Kathleen M

Updated by:
Wilson B

Updated by:
Noah M

Updated by:
Cody B

Updated by:
Carrie F

Edited by:
Daron K

Written by:
Alex H

Video by:
Aidan B
At etrailer.com we provide the best information available about the products we sell. We take the quality of our information seriously so that you can get the right part the first time. Let us know if anything is missing or if you have any questions.
Product Experts Available Now!
Call 1-800-940-8924
Thank you! Your comment has been submitted successfully. You should be able to view your question/comment here within a few days.
Error submitting comment. Please try again momentarily.