Brake Controller and 7-Way Trailer Connector Install on 2007 Nissan Xterra
Question:
My vehicle is a 2008 Nissan Xterra without the tow package. I will be towing a home made tear trailer of 1000 lbs or less w/ electric brakes, and later, a RV trailer approaching 4,500 lbs. My Xterra has a receiver hitch but no wiring or brake controller for the trailers. I will have a battery for trailer accessories on the trailers and want that battery to be kept charged by the Xterra but not allow it to drain the Xterra battery. Besides the part #43605, what other parts do I need to complete the installation on truck and trailer less light package. Thanks
asked by: Roy N
Expert Reply:
Since you will have trailer brakes and a battery, you will need at least a 6-Way connector, but I suggest going ahead and using a 7-Way as they are more universal. You will also need a brake controller to manage the electric trailer brakes. I will explain each of these parts, give some suggested part numbers, and help get you started with the installation.
First, as you know, you will need a 4-Pole trailer connector. A 4-Pole provides the light functions on the trailer and will serve as the base and backbone of your wiring system. Part # 43605 is the correct part number to use for a 4-Pole.
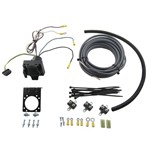
The next step will be wiring a 7-Way connector onto your Xterra. A 7-Way is most widely used trailer connector other than the base 4-Way. It provides 3 additional circuits that serve the electric brakes, provide 12V power for charging, and the last is typically used for reverse lights. The last circuit can be omitted if not needed. We have put together a kit for setting up 7-Way connectors on vehicles without tow packages. The kit is part # ETBC7.
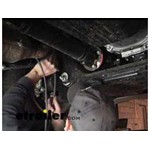
Once you have the 4-Pole installed, attach the 7-Way bracket to the vehicle and install the 7-Way. The 4-Pole lead coming from the back of the 7-Way will attach the 4-Pole you previously installed. You will have 4 loose wire leads that will be the remainder of the 7-Way wiring.
Attach the white wire to the vehicle frame as the ground. The purple lead is the reverse light circuit, if you are not going to use it, tape up the end and zip-tie it out of the way. The black and blue wires are then run up to the front of the vehicle using the included length of jacketed 2-wire.
Run the black wire up to the vehicle battery. This circuit will supply power to the trailer battery. You can use the 30 or 40 amp circuit breaker, included in ETBC7, depending on the battery specifications. Run the blue wire into the cab, underneath the dash, for the brake controller. Once this is done, your 7-Way is complete and the last thing to do is the brake controller.
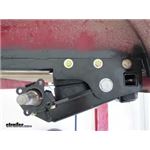
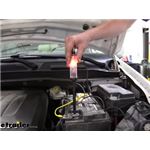
Our most popular brake controller is the Tekonsha Prodigy P2 part # 90885. You would mount this brake controller under your dash, somewhere where you can manipulate it easily while driving. You will splice the blue wire on the controller to the blue wire that you ran in from the 7-way. Run the black wire to the vehicle battery to power the brake controller, use a 30-amp breaker for this wire. The white wire will be grounded to the negative battery terminal. The red wire will be run to the brake pedal light switch. Follow the brake pedal arm up under the dash. You should find a switch on the pedal or that the pedal touches. Splice the red wire to the wire exiting the switch that shows voltage when the brake pedal is pushed. You may need a circuit tester, like part # PTW2993, to identify this wire correctly. It would be a useful tool for the rest of the install as well.
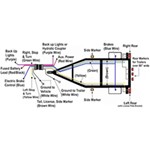
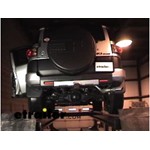
I have included links to some really helpful info pages we have on our site. There is a page that will walk you through wire the trailers with 7-Way connectors as well. I have also included two videos of ETBC7 and the Tekonsha Prodigy being installed on a Toyota FJ Cruiser that should prove to be very helpful.


Products Referenced in This Question
Tekonsha Prodigy P2 Trailer Brake Controller - 1 to 4 Axles - Proportional

- Trailer Brake Controller
- Proportional Controller
- Electric
- Electric over Hydraulic
- Automatic Leveling
- Under-Dash Box
- Dash Mount
- Up to 4 Axles
- LED Display
- Up to 360 Degrees
- Tekonsha
more information >
Universal Installation Kit for Trailer Brake Controller - 7-Way RV and 4-Way Flat - 10 Gauge Wires

- Accessories and Parts
- Trailer Brake Controller
- Installation Kits
- etrailer
more information >

Product Page this Question was Asked From
Plug-N-Tow (R) Vehicle Wiring Harness with 4-Pole Trailer Connector
 Vehicle Wiring Harness with 4-Pole Trailer Connector")
- Custom Fit Vehicle Wiring
- Trailer Hitch Wiring
- Powered Converter
- Custom Fit
- 4 Flat
- Hopkins
more information >
Featured Help Information
Instructions
Miscellaneous Media


Continue Researching
- Shop: Suspension Enhancement
- Shop: Trailer Wiring
- Shop: Brake Controller
- Video: Air Lift Vehicle Suspension - Rear Axle Suspension Enhancement - AL59562 Review
- Shop: Air Lift Ride Control Air Helper Springs - Rear Axle
- Shop: Curt T-Connector Vehicle Wiring Harness with 4-Pole Flat Trailer Connector
- Search Results: c56225
- Shop: Curt T-Connector Vehicle Wiring Harness for Factory Tow Package - 7-Way Trailer Connector
- Shop: Universal Installation Kit for Trailer Brake Controller - 7-Way RV and 4-Way Flat - 10 Gauge Wires
- Q&A: Trailer Wiring Recommendation for 2006 Nissan Xterra without Trailer Connector
- Q&A: What is the Correct Trailer Wiring Harness for a 2008 Nissan Xterra without a Factory Tow Package
- Q&A: Is a Module Needed To Safely Install Trailer Lighting on a 2007 Nissan Xterra
- Q&A: Troubleshooting Trailer Lights Not Working When Connected to Nissan Xterra
- Search Results: brake controller wiring
- Search Results: brake controller
- Search Results: ha81789~hbc
- Search Results: curt brake controller
- Search Results: curt trailer brake controller
- Search Results: c56226
- Shop: Curt Echo Under-Dash Bluetooth Brake Controller w/ OneControl App - 1 to 4 Axles - Proportional
- Shop: Curt Custom Wiring Adapter for Trailer Brake Controllers - Dual Plug In
- Shop: Hayes Energize III+ Trailer Brake Controller - 1 to 3 Axles - Proportional
- Q&A: What is Needed for a Complete Tow Package for 2005 Nissan Xterra 4wd
- Shop: Tonneau Cover
- Q&A: Vehicle Wiring Harness 4-Way Flat for 2007 Nissan Xterra Relays and Pigtail
- Q&A: What is the Difference Between a 4-Way and 7-Way Trailer Connector
- Article: Brake Controller 7- and 4-Way Installation Kit (ETBC7)
- Article: Brake Controller Installation: Starting from Scratch
- Article: Routing the Power Wire for a Trailer Wiring Harness
- Video: Best 2005 Nissan Xterra Trailer Wiring Options

on Custom Fit Vehicle Wiring