
Routing the Power Wire for a Trailer Wiring Harness
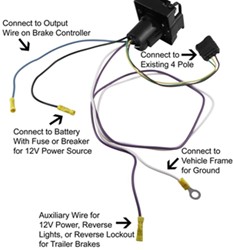
Some trailer wiring harness 4-Way and 7-Way connectors require a power wire to be routed from the harness to the vehicle battery. The power wire is required on trailer wiring harnesses for some vehicles because the electrical system on those vehicles cannot handle the amperage draw associated with trailer lights. The power converters and ModuLites used in these applications connect to the vehicle battery to provide the power for the trailer lights, protecting the vehicle's sensitive electrical system. On vehicles that require a 7-Way connector, a power wire will typically be routed to the battery via a 40-amp circuit breaker to allow the 12-volt circuit in the connector to function. Note that the power wire should not be connected to any power source other than the battery. For instance, you should never connect the power wire to the 12-volt socket found in some vehicles' cargo areas. Connecting the power wire to an alternative power source could overload the circuit and damage your vehicle's wiring.

How Do I Route the Wire?
First, you need to know where the battery is located. Typical locations include:
- Under the hood
- Under the back seat
- In the trunk/cargo area
Once you know where your battery is located, you can decide which of 3 methods will work best for you. There are 3 ways or paths you can take when routing the power wire to the vehicle battery.
- Route the wire through the frame under the vehicle
- Route the wire through the vehicle itself
- Connect directly from the battery if it is located in the trunk at the back of the vehicle
Each method has its pros and cons. You can use any method, or a combination of methods, for the results that suit your specific needs and application.
Method 1: Under the Vehicle
The most basic method is also the fastest and easiest way to route the power wire from your wiring harness or 7-Way to the battery. First you should follow the installation instructions for the wiring harness or 7-Way leading up to routing the power wire.
In most vehicles, the power converter will be located in the trunk or cargo area or behind a tail light of the vehicle. On some vehicles, the power converter is mounted underneath the vehicle on the outside. A 7-Way is mounted outside of the vehicle at the back.
Read in more detail about how to install a 7-Way
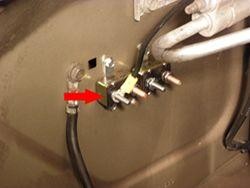
- Using the extra wire that comes with the harness, or 10-gauge wire, attach one end to the power wire from the power converter, or hot lead, on the 7-Way.
- Route it down and under the vehicle.
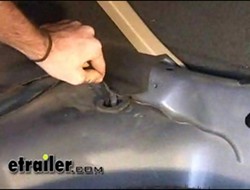
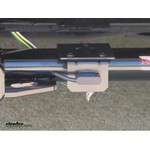
- For a power converter you may need to route it through a grommet like the one shown in the picture. If no grommet is present, you can drill through the trunk/cargo area. Be careful not to drill through anything on the other side. After routing the wire, seal the hole with silicone sealant to keep out moisture and exhaust fumes.
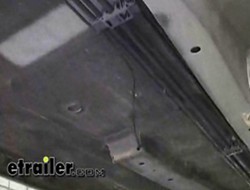
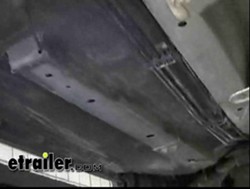
- Once the wire is under the vehicle you will simply follow along an existing factory wiring harness or the frame rail toward the front of the vehicle or to where the battery is located.
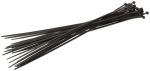

- Use wire ties like those pictured, and included with some kits, to hold the wire up.
- Always avoid areas that may pinch or burn the wire, such as suspension components and exhaust.
- After you have routed the wire to the front of the vehicle, you will route it up through the engine compartment and to the vehicle battery.
- Again, you need to avoid areas that are hot or that have moving parts.
- Once you have reached the battery, you need to connect the wire first to the
inline fuse holder for a power converter or to the AUX post of a
40-amp circuit breaker for a 7-Way connector.
- If you find routing the wire up through the engine compartment too difficult, you can start at the battery and work the wire down through the engine compartment.
- Connect the fuse holder to the positive battery terminal before installing the fuse. For a 7-Way connector, route a separate wire from the BAT post of the circuit breaker to the positive battery terminal.
The benefits of this method are that it is fast and easy. A drawback is that the wire is not as protected from the elements as it could be.
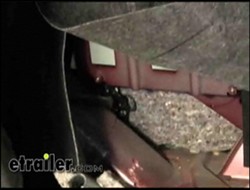
Method 2: Through the Frame
The second method will help protect the wire better than leaving it exposed under the vehicle. This method requires that you route the power wire through the frame of the vehicle toward the front where the battery is located.
Routing the wire through the frame can be tricky. Every frame is different, so this method may or may not be an option.
- Start at the front of the vehicle and use a long, straight, rigid item, such as a bolt leader or fish wire, and push it through the frame from the front to the back.
- Once the other end of the bolt leader is exposed at the back of the vehicle, tie off or tape the power wire to it and carefully pull it through.
- Some frames are not completely open and you may have to find an alternate route at some points.
- Once you have reached the front of the vehicle you will route the wire up through the engine compartment, as described in Method 1, before making the final connection to the battery or circuit breaker.
The benefit of this method is that the wire will be more protected from the elements. The drawbacks are that installation is not as easy, takes longer, and makes it more difficult to troubleshoot the wire should something malfunction. Also, some frames are only partially open, so you would need to weave the wire in and out of them.
Method 3: Through the Vehicle
The third method of routing the power wire involves running the wire through the vehicle interior. This is usually a must if the battery is located in the trunk or cargo area or under the backseat. Every vehicle interior is different, so the path you choose to take is up to you.
Usually, this method requires that you route the power wire first through the trunk or cargo area. For a 7-Way installation, unless the battery is located in the interior of the vehicle, Method 1 or 2 is recommended.
You can then loosen or remove some interior trim panels or carpeting to hide the wire before entering through the trunk to the backseat area of the vehicle.
From this point there are several options:
- You can route the wire behind trim panels by loosening or removing the panels with a trim panel tool.
- Or you may be able to tuck the wire underneath the trim panels.
- The most common ways are (a) to run the wire on the driver's side above the doors or under the doors and (b) possibly even routing the wire under the door jambs.
Once you have reached the front of the vehicle, you can route the wire through the firewall and into the engine compartment. When you go through the firewall, you may find an existing wire bundle going through a grommet that you can use.
You may find that you will need to drill through the firewall. If you do have to drill, use caution and do not drill through any components on the other side. Once the wire is in the engine bay, connect the power wire to the battery or circuit breaker as described in Method 1.
The benefit of this method is that the wire is the most protected from the elements. The drawbacks are that it is the most time-consuming method of installation, it can be difficult to troubleshoot the wire, and you may need extra wire to reach the battery.
Tools Needed for Routing the Power Wire of a Trailer Wiring Harness
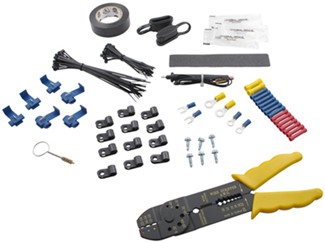
Most of the wiring harnesses that require a direct connection to the battery, such as #119176KIT, come in a kit that includes wire ties for the Method 1 installation. If you choose Method 2 or 3, you may need some additional tools:
- Trim panel remover
- Wire splicing tool
- Wire clips
- Looms
- Screwdrivers
- Wiring kit
- Bolt leader or fish wire
- Some items can be found at home improvement stores
Updated by: Raymond P.
Last updated: 9/17/18

Danny B.
5/26/2022
Like many here, I am a bit confused as to how a 7 pin ties into a 4 pin flat connector. Tow vehicle is 2018 Rogue. Here are my 2 or 3 dilemmas: 1. I found a 12v constant power source on drivers side, behind rear panel in trunk (actually, a black and blue bundle).. It does produce a constant 12 volts, it seems (some called in factory Tow ready package?). Anyway, we used that wire to connect the 4 pin flat connector and the black module; connected black wire from module to the wire we found by tire jack on drivers side). Trailer lights / turn signals / brake lights work fine. Seems to work, so why would running the power wire to the battery be necessary? 2 . how do you now connect the 7 pin conversion kit? Specifically, WHERE would the black wire from the 7 pin connect to? (remember, I already used the power wire to connect to the the black wire on the 4 pin module; do i simply splice INTO it? Or do I remove it?

Niels D.
9/1/2021
Thank you for the instructions. I currently have the 12V line protected with a 10A fuse at the battery, and a 15A BUSS self-resetting circuit breaker after the wiring harness. Would you recommend I replace this with the 40A breaker? If so, where would you recommend I put said breaker?


Matt
8/29/2021
Am I able to connect a 4 plug trailer connector to the led taillights of my vehicle if I have led trailer lights for power? (As opposed to running a wire from the battery to the back of the vehicle?

Joe S.
3/18/2021
I'll be replacing my AGM battery with a lithium battery in my travel trailer very soon. I don't necessarily want the power wire to charge my battery. I just want to make sure my lithium won't draw a huge amperage across the small 12V wire trailer plug. Is this something I need to be concerned about?


Explore Expert Info
![Our Expert]()
on Wiring

on Wiring


Departments
Towing
- Trailer Hitch
- Fifth Wheel
- Gooseneck
- Towing a Vehicle
- Front Hitch
- RV Hitch
- ATV Hitch
- HD Truck Hitch
- Vehicle Wiring
- Brake Controller
- Ball Mounts
- Weight Distribution
Sports and Recreation
Trailer Parts
- Utility Trailer
- Boat Trailer
- Landscape Trailer
- Enclosed Trailer
- 5th/Camper Trailer
- Car Hauler
- Horse Trailer
Vehicle
Contact & Help

What our customers are saying:
"Very helpful/friendly Customer Service. Competitive Pricing. Shipping was Fast."
John
Mankato, MN
Popular Vehicles
- Subaru Forester
- Ford F-350 Super Duty
- Ford F-250 Super Duty
- Chevrolet Silverado 1500
- Jeep Wrangler Unlimited
- Jeep Wrangler
- Ram 3500
- Toyota Highlander
- Ram 2500
- Chevrolet Silverado 2500
- Subaru Outback Wagon
- Chevrolet Silverado
- Dodge Ram Pickup
- GMC Sierra 2500
- Ram 1500
- Ford F-250 and F-350 Super Duty
- Jeep Grand Cherokee
- Toyota Tacoma
- GMC Sierra 3500
- Toyota Tundra
- Ford Escape
- More >>
Roy H.
7/31/2022
i have a 2011 tocoma prerunner the lights on truck work fine but the trailor hitch has no power at all for the lights the hitch part is all factory but when you plug in the trailor you have no power to anything etc no brake, taillights or siginal