
Brake Controller Installation: Starting from Scratch
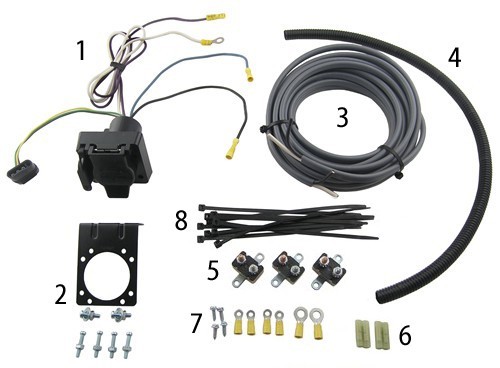
Four of these wires need to be connected individually, and three lead to the 4-pole adapter. The 4-pole adapter will plug into the vehicle's own 4-pole trailer connector, allowing for basic wiring functions without the hassle of splicing or cutting into your vehicle system. The three basic wiring functions are for tail lights, stop lights and turn signals. NOTE: This 4-pole installation is vehicle specific. If your vehicle does not already have its own 4-pole trailer connector, use the Wiring Fitguide to find the harness recommended for your vehicle.
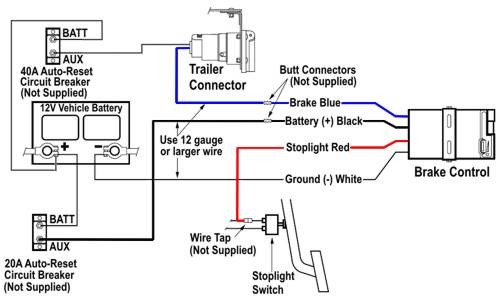
The first wire (black) runs to the vehicle's battery to supply power to the trailer connector. This wire is called the "12 volt hot lead."
The second wire (blue) runs to the brake controller to supply power to the trailer brakes. This wire is called the "brake wire."
The third wire (white) gets grounded to the vehicle's frame. This wire is called the "ground wire."
The fourth wire (yellow) hardwires to the vehicle's reverse lights. This wire is included with 7-way connectors but not 6-way connectors and can be tied off if it is not going to be used.
7-way trailer connector, which includes a 4-pole adapter The mounting bracket secures to the vehicle's bumper or other appropriate mounting location and harbors the trailer connector. Mounting hardware, such as self-tapping screws, is included to mount the bracket to the vehicle and the trailer connector to the bracket.
The gray duplex cable houses two wires that will become the 12 volt hot lead and brake wire. The duplex cable runs from the trailer connector to the front of the vehicle.
The black loom is a hard plastic tube that covers the 12 volt hot lead and brake wire connections at the trailer connector, protecting the connections and giving your installation a professional appearance. Circuit breakers act as midway connections for the 12 volt hot lead and the brake controller power supply (introduced later) before they reach the vehicle's battery. Butt connectors help to make connections between wires. Ring terminals attach to the end of wires and hook around battery posts and circuit breakers. Zip ties help to bind loose wires together and prevent them from interfering with vehicle components such as brake and gas pedals.
Find a suitable location to mount the 7-way connector. A typical location is on the bottom of the bumper. Using the self-tapping screws, secure the mounting bracket into the bumper and the trailer connector into the bracket.
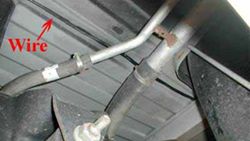
Plug the 4-pole adapter coming out of the 7-way connector into the vehicle's 4-pole trailer connector. Ground the 7-way connector by screwing the white wire into the frame of the vehicle. Make a small cut in the rubber sheath of the duplex cable and slightly separate the two wires inside. Use a butt connector to connect the black wire in the duplex cable to the 12 volt hot lead (black wire on the 7-way connector). Then do the same for the white wire in the duplex cable and the brake wire (blue wire on the 7-way connector). Next, route the duplex cable under the vehicle all the way up to the engine compartment under the hood, being careful to avoid hot areas or those that may pinch the cable. Before you proceed further, the brake controller needs to be mounted. We will return to the duplex cable shortly.
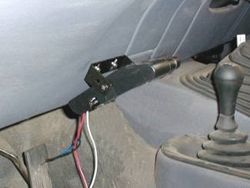
Choose an appropriate mounting location for the brake controller mounting bracket. A typical location is the lower right side of the dash, which allows easy access to the brake controller in the event of an emergency braking situation.
Using the screws provided, install the mounting bracket into the dash. Make sure you avoid drilling through components on the other side of the dash.
Secure the brake controller into the mounting bracket. The four wires on the brake controller will be connected shortly.
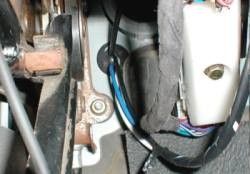
Return to the duplex cable under the hood, where the brake wire (now white) needs to be separated from the 12 volt hot lead (black). The 12 volt hot lead will stay under the hood, where it will be connected to the positive post of the battery via a 40-amp circuit breaker. The brake wire will be routed through the firewall into the vehicle, where it will later be connected to the brake controller. It is best to run the brake wire through an existing grommet or knockout in the firewall. If none is found, a hole can be drilled. Make sure both sides of the firewall are clear of obstruction before drilling.
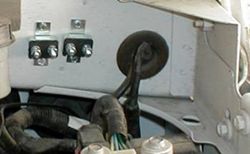
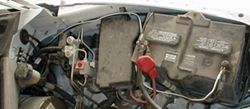
Using a butt connector, connect the blue wire coming out of the brake controller to the brake wire (white wire of the duplex cable) that was routed through the firewall. Find a safe location under the hood or on the firewall to mount two circuit breakers: one 20-amp (or 30-amp; see brake controller instructions) and one 40-amp. After those are secured, route the 12 volt hot lead to the 40-amp breaker via ring terminals and then to the positive post on the battery.
The black wire coming out of the brake controller is the brake controller power supply. Route this wire to a 20-amp (or 30-amp) breaker under the hood and then to the positive post on the battery. There are now two wires connected to the positive post: the 12 volt hot lead and the brake controller power supply. NOTE: There will be excess wire after the 12 volt hot lead or brake wire connections have been made. If any brake controller wires are too short, use the excess wire from the 12 volt hot lead or brake wire to lengthen them as needed.
The white wire coming out of the brake controller is the ground wire. Route this wire to the negative post on the battery. It will be too short to reach the battery, so you will have to use excess wire from the 12 volt hot lead or brake wire to complete this connection.
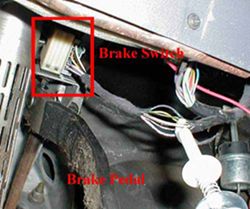
Inside the cab, we only have one connection remaining. Find the wires connected to the brake switch at the top of the brake pedal. Using a circuit tester, find the wire carrying a signal when the brake pedal is engaged. Use a quick splice to connect this wire to the red wire coming out of the brake controller.
With the brake controller mounted and connected, zip tie any loose, excess wires underneath the dash and under the vehicle. DO NOT allow the wires to interfere with the brake and gas pedals, and keep them away from areas of excessive heat.
Marcel F.
10/31/2023
I have the Curt echo wireless brake controller. How would the wiring be different when I use this kit?


Mike L.
11/15/2023

Dave D.
9/14/2023
Installing Tekonsha P3 controller in a 2008 Tahoe with factory wiring. Have searched the videos and articles/reviews for details on where to wire in the 20 amp circuit breaker. Can it be mounted under dash between the black controller wire and the red w/ black stripe Tahoe wire?? Or, should it be mounted to the fender under the hood, and wired into the brake control power wire going to the larger post?? Thanks for any help!


Mike L.
9/14/2023
Carl
8/29/2023
I’ve got a 2007 Gmc 2500. The original control box was sending 12.49V to the 7 blade connection Blue wire at the back of the truck. I bought a new control box and upon installation delivered that the white wire ground feeding the original control box had come loose. Thinking that was the problem with the first box, I reconnected the white wire feeding box and checked voltage again. Now the blue wire at the back of the truck (in the 7 way truck connector) has 6.30 v all the time. I’m I correct in saying if the brake pedal is not pressed nor the “emergency” or manual switch on control box is not pressed, there shouldn’t be any voltage to the truck rear plug??

Carl
8/29/2023


Mike L.
8/30/2023


Mike L.
8/30/2023
Helpful Links

Larry
8/27/2023
Where can I tap into the white wire ( cold side) to add a brake trailer controller?


Mike L.
8/30/2023

Glenn
8/25/2023
i need to know what color wire is on the cold side of the brake switch on a 2023 outback and if there is an easier place to access that wire? I aint no spring chicken.


Mike L.
8/28/2023

Glenn
8/29/2023

Kenn
7/25/2023
So... do I need to connect the 12v Aux wire on the 7-pin to my battery? From what it looks like, if my trailer doesn't use this 12v feed then I don't need it. Is this thinking correct?


Mike L.
8/3/2023


Adam B.
5/1/2023
does the trailer controller red stop switch wire require a 12 volt stop signal or will a 5 volt work as well to activate the brakes?

John H.
5/4/2023

Dave M.
11/14/2022
installing a 7pin trailer connector and brake controller on my 1998 Tahoe. There is a orange and blue (#10 size) wire folded back and taped off in the factory trailer harness cable (ORN -PWR and BLU DRK - AUX) Is either of these the wires that go to the brake controller connection thats under the dash. I have not started the controller install yet, was hooking up the 7 pin plug first.

David B.
11/15/2022
Helpful Links
Tractor D.
1/24/2023


Mike L.
1/25/2023

Ed B.
2/21/2023

Mick O.
9/7/2022
Hi, I have a 2011 F150 with factory brake controller. When I connect a braked trailer and apply the brakes the stop lamps are dim when applied and it has blown the fuse before. when using the manual override the turn signals light up and not the stop lamps? any help would be hugely appreciated Cheers Mick

David B.
9/7/2022
Helpful Links

Warren Z.
7/24/2022
I installed your ETBC7 kit using your 5535 draw-tite brake controller and 20127 plug in harness on my 1994 chev silverado K-1500. The lights on my truck and car trailer work O.K. until I put my foot on the brake petal, my 15 amp turnsignal / stop light fuse blows. I tried disconnecting the red stoplight wire from the stoplight switch. still have same problem. Can you help me solve this problem?

David B.
7/26/2022
Helpful Links

Danny
2/27/2022
I have a 2013 Ford Expedition XLT and hooking up a Hopkins Towing Solutions Multi-Tow 4 Flat to 7 Blade and 4 Flat Adapter, 47185. I also will be using a CURT 51180 Echo Mobile Electric Trailer Brake Controller with Bluetooth-Enabled Smartphone Connection, Proportional for my brake controller. I will be using for my camper. On the 7 pin connector hookup. Following the instructions with the installation I connect the 4 pin pre-wire to the one on my truck and also installed the white wire ground form the 7 pin to my vehicle frame. 1. Do I need to hook up the purple to the reverse since I will be using for my camper 2. Should I hook up the Auxiliary black wire to the battery? If so I will need to run a wire back to the battery and use an auto circuit breaker? 3. On my wire harness on the vehicle has the separate Electric Brake wire is cap off. Should I hook it up to the blue wire even if I will not be using a Brake controller inside the vehicle but using the Echo Mobile Electric Trailer? I do hook the wires up can I just leave it connected?

Les D.
2/28/2022

Danny
2/28/2022


Kim
3/15/2023


Mike L.
3/17/2023

David M.
1/31/2022
I am installing a class lV hitch on my 2022 Subaru Outback and need to install 7 way trailer plug. Would like the plug to have screw wire connectors on the back of the plug. The car has a pre wired connector for this prepose. I would like to get the correct wire harness to install. The trailer has tandom axles and brakes. I would like to install a proportional brake controller with a dash mounted controll knob. Could you help guide me to the correct parts? THANK YOU Dave M

Les D.
2/1/2022
Sean
7/14/2022

David B.
7/26/2022

Sean
7/26/2022
John A.
11/7/2021
I have a 2005 Dodge Dakota 6 wires on my brake light switch witch one do i use ?

Tom T.
9/19/2021
What size wire do I need to use to run from the front of my motorhome to the rear it is a 40 foot motorhome? Thank you

Les D.
10/14/2021

Michael M.
9/17/2021
@JonG I have a 2020 Dodge durango. I have to hard wire my brake controller in. On my wiring harness for the brake it has 2 12 gauge wires black and blue and 16 gauge red and white. On your wiring diagram it says to use 12 gauge or higher. Should I match the wires according to my wiring harness or use 12 gauge on all? Also is a 20 amp circuit breaker adequate?

Les D.
10/14/2021
Helpful Links

John
8/31/2021
I have a 09 GMC Sierra 1500 on the brake controls wires on the truck side we have blue, red/black. ,green , yellow on the controller it Blue, black , white and red help

Victoria B.
9/9/2021
Bob R.
8/19/2021
Wouldn’t the controller be on all the time wired up this way? Shouldn’t there be relay to supply key on 12v?

Victoria B.
8/26/2021

Jeff W.
7/18/2021
Is there a difference if i use the bolt on circuit breakers as opposed to the in line blade stlye? I have an in line and i feel it may be tripping after initial brake application. Touareg towing a 23.5 foot travel trailer. Thoughts?


Jon G.
7/19/2021

Jeff W.
7/19/2021


Jon G.
7/14/2021

Todd
7/14/2021


Jon G.
7/14/2021

Marty W.
6/27/2021
I have a 2016 Nissan Frontier with tow package. I have a Tekonsha POD #39523 when plugged into trailer, no green LED, when brakes applied goes red. there is 12 volts on the red wire when the brakes are applied but only getting max 3 volts on the blue wire no matter what the sensitivity knob is set at. when activating the manual lever does nt show any change of voltage at all. Does this mean the controller is bad.


Jon G.
6/28/2021


Jon G.
6/28/2021

Marty W.
6/28/2021

Kenneth T.
5/25/2021
I have a 2018 chevy colorado with the trailering package but no brake controller. Bought one and decided to wire it in myself. Under the panel on the driverside kick plate are the four lose wires used to connect the brake controller to. Red, Black, white/blue, blue. When I connected it all up according to my truck manual, the papers that came with the controller and via [online] videos my trailer when connected is constantly receiving the Ebrake signal cause the brakes to be locked up. I believe the white/blue wire is the one that should only send power when applying the breaks. Checking it with a multimeter it reads at .50v at rest and pops up to 12v when the break pedal is applied. How would I go about fixing this wire or connecting to the appropriate wire to make this thing work correctly?


Jon G.
5/26/2021


Jon G.
5/19/2021

Larry
5/17/2021
2020 Durango R/T having problems locating the cold side of brake switch, have 3 wires going to switch found the hot wire but unable to figure out which wire is the cold side, using a test light to check but neither wire turn hot while pressing the brake pedal


Jon G.
5/18/2021

Christian T.
5/12/2021
j'ai un GMC terrain 2017 et j'aimerais savoir quel est le fil sous mon tableau de bord qui me donnerais le signal pour activer mon controlleur de frein. Merci


Jon G.
5/12/2021

Rick H.
4/2/2021
Simular question as most others. My RV has the 7 blade and only four wires. Under the dash has the trailer connection. 4 prong. Can I run a new blue wire to the controler by cutting the blue wire from the controler and connecting the new blue at that point. That makes the blue all the way to the trailer connector?


Jon G.
4/3/2021

Bruce B.
3/27/2021
I have a 2008 dodge 1500 ram my trailer brake started popping circuit breaker when brakes were hit I got to checking with a test light at the 7 pin connector and the one that go's to the trailer is hot all the time I cant figure out what is causing this I have used it for about 5 years the truck has the factory connector under dash and the break controller came with the harness to plug into it any help would I could use it will also pop breaker if you ground it to pin in 7 pin connector


Kef G.
3/30/2021

Sharon
3/24/2021
I have a 2005 Toyota Sequoia that has no wires for towing. I have already put a hitch on it but now have to figure out how to hook it up when there is no wires. Please help

Dtf
3/22/2021
Followed this exact diagram and got my 2005 BMW X5 wired up with a Prodigy P3 controller. Only difference is I picked off the brake signal from next to the battery off the X393S plug, PIN 10. Can't believe I got this thing wired up for about 200 bucks by myself, thanks guys.


Ron J.
3/21/2021
I have a '98 Tahoe. I'm having trouble reaching the wiring at the break pedal switch to patch in the red wire from the brake controller. Is there an alternative area where I can tap into the cold wire besides under the dash?


Kef G.
3/24/2021

Joe F.
3/17/2021
According to diagram blk lead is power for unit then sends signal to trailer wat is 40 amp cb for? Blk lead has a 20 cb


Jon G.
3/18/2021


Bob J.
3/1/2021
1) I have a Prodigy P3 controller that I want to wire into a 2020 Pacifica Limited. The wires at the brake pedal switch are a very small gauge. should I pick up the brake light power for the controller there or somewhere else where there may be a larger gauge wire? 2) There are three wires at the brake light switch. Are the left and right stop lights powered separately from the brake light switch?


Jon G.
3/4/2021

Brian B.
2/22/2021
I have a 2013 Town & Country Touring L that already has the 7 pin connector installed. Would there be a spot under the driver side panel that would already have the brake controller wires? Thanks!

Jack T.
2/15/2021
I have an RV on a Mercedes Benz Sprinter Chassis 2021. i would like to connect a Tekonsha controller. Controller has a 4 pin connector . Thanks


Jon G.
2/16/2021

Dave O.
1/18/2021
I have a 2017 GMC Acadia Limited. Before I bought it there was a receiver hitch and a GM 7-pin connector installed. The fuses and relays for the trailer are also installed in the engine fuse block. However, there are no leads, and no socket for a brake controller. Is kit ETBC7 what I need to install a controller? Thanks.


Jon G.
1/20/2021

Dave O.
2/1/2021

Steve G.
12/26/2020
I have a Tekonsha Prodigy (purchased in 2007) that I used in my old 2006 Dodge truck, I now have a 2019 Ram 1500 (new body style), can I use my “old” Prodigy with my new 2019 truck ? if so, which wiring harness would I need to purchase ? thanks for your response.


Jon G.
12/28/2020
Zach B.
11/19/2020
I bought a 2016 Chevy Duramax Diesel shuttle/passenger bus 3500. I purchased a wireless trailer brake system that I mounted inside my trailer. There is a 7 pin connector attached at the back of the bus, but once I hooked up my trailer and didn’t receive power to my brakes I noticed it was only a flat 4 pin setup. There’s a 12 gauge blue and red/white wire taped underneath the steering column. I checked the red/white wire and it does in fact have 12v power. Is safe to say I can use these to wire back to the 7 pin?


Jon G.
11/20/2020

Adrian P.
10/26/2020
I have a Tekonsha primus IQ2 and my vehicle does not have a fancy adapter thing to plug into. My question is the 4 wires coming out of the controller can you tell me where they are supposed to connect to red blue black white Thank you in advance


Jon G.
10/27/2020

Randy
10/10/2020
good morning one of our service trucks is a 1997 f350 dump the wiring harness for the brake is under the dash near the ashtray. the brake controller was not engaging so I bought a new hopkins controller. when I plugged it in I got the e1 error long story short I could not find the ground or short so I rewired the entire controller wiring by passing the old harness. and rewired the plug in I still get the e1 error but the brakes engage I can't put the truck in service until the digital read out shows engagement thoughts? oh the traile is a brand new superior oversize covered trailer thanks for the help


Jon G.
10/12/2020

Randy
10/12/2020


Mirek
10/4/2020
I have a 2013 Hyundai Sonata I am towing pop up RV with (Starcraft about 1400 lbs). This is an upgrade trailer for me as I started with a little coleman (900 lbs) that did not have electric breaks. My question is what does it take to have the electric break wired on this trailer. I have the 7 way to 4 way connection and trailer lights and blinkers work. I have several extra wires (blue, black, white i believe) with the connector. If i purchase a break controller can I use the current wiring or does a cable need to be run again all the way to the battery. I have a 4 way plug coming out of my trunk. I purchased 7 way to 4 way plug set up because the trailer has 7 way plug. Can I do this myself or should i take it to a car electrician or a shop ? I have no clue about any of this but if it is very simple I could probably get the job done :)


Jon G.
10/5/2020

Roy ..
9/8/2020
Have a new 2020 Silverado 1500 truck did not come with factory installed trailer brake switch . So I ordered the original switch that fits in dash and installed it but it will not connect to the wiring harness the dealer provides with new truck so my question is how does it wire up . Or how do I find where to wire it in.


Jon G.
9/11/2020

Jp
9/3/2020
I have a 2005 Ford E450 RV. I have installed a brake controller under the dash using the existing vehicle plug dedicated to the controller. I have an existing 7 blade connector at the rear of the RV with four wires for stop, turn and running lights. issue I have is finding the connectors that are set up for the tow package namely the blue and orange wires that come out of the wiring harness. Did Ford put in a brake controller and rear 7 pin connection but didn't route wires for brake and voltage?


Jon G.
9/4/2020
Helpful Links


Chris H.
8/17/2020
I'm installing a brake controller and a 7 way plug on a 1995 Ford F Super Duty, single cab flat bed dually. I have a 3035 wiring harness adapter to connect the brake controller to the trucks wiring under the dash/radio. I believe i found the harness it plugs into. My question is- if i use the 3035 adapter, do i still need to install the circuit breakers and run two wires back to the 7 way plug? I've already wired the 7way to the truck 4 way, minus the blue/electric brake and black / power wires. I am not seeing any other wires run to the rear of the truck, except the 5 factory wires for rear lights. No brake or power wires.


Jon G.
8/21/2020
Helpful Links

Jp
9/4/2020

Sorin N.
8/8/2020
The instructions say to connect the hot lead and the e-brake controller directly on the battery. This would add a constant drain to the battery when engine (alternator) is not running. What's the purpose of providing a "hot lead" to the trailer that can potentially discharge the vehicle battery? Isn't better to run those trough a relay that provides power only when ignition is "ON/Aux"?


Jon G.
8/10/2020


Jim C.
8/6/2020
I have a 2008 tundra that doesn’t have the factory tow option. It was wired for a 4 pin blade receptacle. Now I’m trying to wire it for a 7 pin connector with trailer brakes. I installed the 7 pin receptacle on the bumper and plugged it into the plug that I disconnected from the 4 pin. I already installed the brake control unit in the cab. My problem now is I don’t have the last 2 wires ( the electric brake wire and the power wire ) running from the front back to the plug in the back. All my blinkers and lights are hooked up and work. I just don’t have the last 2 wires. Is there a harness or do I have to tap the lines from the back of the control unit. Thanks


Greg V.
7/30/2020
All my my trailer connections are hardwired. So, if I run the Red wire from the brake controller to the back of the vehicle and hardwire splice it into the same line as the brake lights (connecting the vehicle and trailer plug), is this effectively the same as connecting it to the wire right behind the brake pedal? I'm getting blinking in my trailer lights when all brakes, running lights, and indicators are all enabled simultaneously. Can't figure out the problem!


Jon G.
8/10/2020

Jim R.
6/3/2021


Jon G.
6/4/2021

Trent
7/22/2020
With a constant 12v going from the positive terminal to the 7 pin connector, and the brake controller going to the positive terminal as well (via circuit breakers) my brake controller on my ram 2500 is lit up as it's registering a trailer connected. With those wires going straight to the positive shouldn't they be spliced in to a keyed-on positive wire?


Chris R.
7/23/2020

Glenn W.
7/18/2020
I have a 16 ft jayco starcraft caravan with electric brakes.I have fitted a tekonsha primus iq brake controller to my tow vehicle.The controller is showing that there is a short in the wiring.On unplugging brake magnets the wiring is clear.Each magnet is measuring 3.4 ohms and testing from the tow plug the measurement is 1.7 ohm.The brakes are operating as they should be but I am getting the 5H flashing on the screen.How do I rectify this problem.


Chris R.
7/23/2020

Dan
7/16/2020
I have a 2000 chevy signal cab short bed. I have the Tekonsha Voyager brake control. Cannot get to work. With plug supplied by gm when truck was new.


Chris R.
7/17/2020

John H.
8/11/2020

Ace
7/8/2020
One question: WHY do you have a live wire (from B+) going directly to the trailer brakes, while the brake controller is supplying the brakes with current, and the lights have a separate system? We have a simple resistance-based brake controller and old-fashioned hydroelectric brakes on the trailer. The only way to make the whole system work in our case is to ground that wire to the firewall/frame! The ONLY power supply to the trailer brakes is via BLUE wire from the controller! Now everything works!


Chris R.
7/13/2020

Ace
7/13/2020


John H.
8/11/2020

Cody M.
6/29/2020
Working on a 2013 Ford F550 with a Utility bed and hoist. Im trying to install a new 7 way plug and it was all going well except I can't seem to find my brake wire. All of my wires tested negative so I have to run wires from the LED lights to the pickup end itself. I found my brake wire I believe but still no power from the original harness. How do I run a new brake wire from the brake switch? Thanks


Chris R.
7/2/2020

Miguel
6/20/2020
Hi, I'm installing a Reese towpower 8508211 brake controller on a 2019 VW Jetta everything is pretty much done but the only problem I had when trying to connect the red wire to the brake switch there were no wires on the brake pedal so what I did, I tap in to one of the wires that runs to the brake tail lights that runs from front to back on the side of the door this wire only gets power when you press the brake pedal. On the brake co troller screen I get 2 dots and when I activated manually I get an N.C. on the screen I wounder if my installation is correct? Thank you


Chris R.
6/21/2020

Miguel
6/23/2020


Chris R.
6/25/2020

Don J.
6/17/2020
Brake sense color and location for 2004 mercury mountaineer premier 4.6l v8 awd


Chris R.
6/21/2020

Charles B.
6/11/2020
I have a 2019 canyon, I bought a hopkins impulse controller. Can you help with the wiring please. I have to use it in 2 days, please advise


Chris R.
6/15/2020


Chris R.
6/5/2020

Darby L.
6/5/2020


Chris R.
6/9/2020

Chade
5/16/2020
We have a 2019 Durango that does not have the towing package so I will need to wire directly, however I am unable to find the wire for the break sense (stoplight) switch. Do you happen to have the color and location of the wire? I have to assume it's in the wire panel just behind the ebrake pedal but I can't find any wire that is only hot when the break is depressed.


Chris R.
5/19/2020

Bill
5/14/2020
Does the connection from the brake light switch carry a ground or a positive 12volt to the controller. Would connection to the center mounted brake light on a ford transit work. How much currant does this connection draw as these are very light guage wires.


Chris R.
5/16/2020

Trent
1/30/2020
Which color wire on my break pedal wires is the power to the brake. 2003 gmc Sonoma ext 3 door no tow package.

Jason S.
2/3/2020
Helpful Links

Dave L.
1/28/2020
Thanks for the helpful article. Questions:1. The brake controller is wired directly to the battery in the diagram. I could postulate safety reasons for this i.e. not to lose brakes if the engine quits or needed to apply brakes with the truck off but Is it acceptable to wire to an accessory with appropriate relay switch position. Seems like you would have a good potential to drain the battery if you left the controller on with the vehicle off.2. You used circuit breakers in this application. Is there a reason that circuit breakers were used in lieu of cheaper / simpler fuses. Again I could postulate that maybe you would hope that the breaker would reset if the fault cleared and still retain brakes.....? But you would still lose the brakes for some period of time whether the breaker tripped or the fuse blew...….


Jacob H.
2/4/2020

Sorin N.
8/8/2020


Jon G.
8/17/2020
Show All (62) Replies
Hide Replies

on Trailer Brake Controller
Videos
for Trailer Brake Controller
Help Articles
for Trailer Brake Controller
Expert Answers
for Trailer Brake Controller
The Prodigy P3 trailer brake controller uses a 4-wire hookup. The white wire is to be grounded to the battery negative terminal; the black power wire connects to the battery hot terminal through a circuit breaker; the red wire takes in the brake…
view full answer...A 4-Way trailer connector has the basic lighting functions only; running lights, left turn signal and brake lights, right turn signal and brake lights, and ground. A 7-Way has these functions and a 12 volt circuit, a circuit for electric trailer…
view full answer...For trailer wiring that fits your 2024 Hyundai Palisade you'd want the Curt kit part #C43FV for a 4-way or the part #TK64CR for a 7-way. Both of these kits are custom fit so they do not require hardwiring and they have reliable…
view full answer...On this page (typically below the product links) there is a helpful link section that will have the install instructions fo the Hopkins Breakaway kit part #20400 that you referenced. I also attached an install video that shows the kit installed as…
view full answer...That's a good question, and in order to use the Curt Echo Mobile Trailer Brake Controller #C51180, it requires simply the 12 volt, ground, and turn signals be connected to the 7-way on your truck. So you will need the 12 volt connected…
view full answer...If you have a vehicle specific wiring harness for a brake controller then that would indicate that you have a factory tow package and subsequently would already have a 7-way at the back of your vehicle. The universal 7-way connector #ETBC7 is meant…
view full answer...I have attached a basic brake controller wiring diagram for you. You will want to make sure that you ground the white wire to the negative post on the battery. The black wire will attach to the positive battery post. The red wire will tap into the…
view full answer...The trailer brakes work on a separate circuit than the lights. You have a couple of options to control the electric brakes on the trailer. One option is to use an air over electric brake control, #HA100400C. This unit connects to the air brakes on…
view full answer...When you are hardwiring a trailer brake controller like the Prodigy P2 #90885 the red wire connection that provides the triggering signal to the controller should be made to the wire on the COLD SIDE of the brake light switch circuit. This is the…
view full answer...All the brake controller needs to sense a trailer connection so that you can test it is a slight amperage draw on the output circuit. For that you can use a circuit tester like the part #PTW2993 with one pin grounded and the other on the output…
view full answer...Actually, the P3 now has the upgraded axis accelerometer like the P2. The Tekonsha P3 Trailer Brake Controller #90195, will work with both electric over hydraulic brakes on the trailer as well as electric brakes. It has a menu option on the display…
view full answer...Departments
Towing
- Trailer Hitch
- Fifth Wheel
- Gooseneck
- Towing a Vehicle
- Front Hitch
- RV Hitch
- ATV Hitch
- HD Truck Hitch
- Vehicle Wiring
- Brake Controller
- Ball Mounts
- Weight Distribution
Sports and Recreation
Trailer Parts
- Utility Trailer
- Boat Trailer
- Landscape Trailer
- Enclosed Trailer
- 5th/Camper Trailer
- Car Hauler
- Horse Trailer
Vehicle
Contact & Help

Popular Vehicles
- Subaru Forester
- Ford F-350 Super Duty
- Ford F-250 Super Duty
- Chevrolet Silverado 1500
- Jeep Wrangler Unlimited
- Jeep Wrangler
- Ram 3500
- Toyota Highlander
- Ram 2500
- Chevrolet Silverado 2500
- Subaru Outback Wagon
- Chevrolet Silverado
- Dodge Ram Pickup
- GMC Sierra 2500
- Ram 1500
- Ford F-250 and F-350 Super Duty
- Jeep Grand Cherokee
- Toyota Tacoma
- GMC Sierra 3500
- Toyota Tundra
- Ford Escape
- More >>
- Jeep Cherokee
- GMC Sierra
- Toyota RAV4
- Nissan Rogue
- Dodge Grand Caravan
- Toyota Sienna
- GMC Sierra 1500
- Honda Odyssey
- Chevrolet Equinox
- Chevrolet Silverado 3500
- Ford Explorer
- Chrysler Town and Country
- Ford F-150
- Jeep Liberty
- Nissan Murano
- Ford Edge
- Subaru XV Crosstrek
- Hyundai Santa Fe
- Chevrolet Silverado New Body
- Ford F-250 and F-350 Heavy Duty
- Kia Sorento
- Chevrolet Traverse
- Dodge Journey
- Acura MDX
- Honda CR-V
- Chevrolet Silverado Classic
- Jeep Patriot
- Ford Focus
- Acura RDX
- Honda Fit
- Ford Fusion
- Ford Flex
- Honda Pilot
- GMC Acadia
- Toyota Prius
- Dodge Durango
- Nissan Frontier
- Nissan Pathfinder
- GMC Terrain
- Honda Accord
- Volkswagen Jetta
- Kia Soul
- Dodge Dakota
- Chevrolet Cruze
- Chevrolet Sonic
- Mazda 3
- Toyota FJ Cruiser
- << Less






Evan
3/10/2024
I have an 88 gmt400. I also have a tekonsha brake controller from an 04 truck. How do I wire that controller to a truck that doesn’t have a factory plug?