
Summer Starts Here - Save up to 70%

California residents: click here
Videos are provided as a guide only. Refer to manufacturer installation instructions and specs for complete information.
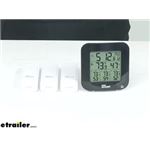
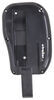
Adam: Hi, everyone, Adam, with etrailer.com. Today, we're going to be taking a look at the TempMinder Humidity and Temperature Control Station. So this can be used in a lot of different ways. We're in an RV today, just to show you guys, it can be used in an RV, in your house, or even your garage, literally anything. It's got 165 foot of range for these two. So you can spread them out, put them in multiple locations just to monitor their humidity and temperature to your liking.So if you're monitoring your sleeping spaces humidity, or temperature, there's a bunch of different ways we can do it.
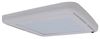
We can actually just hard mount it to a screw, right here, screws aren't included, so just either find one that's already here, or just screw in somewhere that's appropriate.You could also use double-sided tape. That's probably what I would do, so I can remove it, and not have a hole in my RV. Or you can just lay it next to your sleeping kiddo by their bed or whatever. One thing to note, heat does rise, obviously. So don't put it in a compartment.
So it'll get an inaccurate reading, or put it way up high, because it will say it's going to be a little bit more hotter than the actual level of which your kiddo may be sleeping.So we can put it in our refrigerator just to make sure that it is accurate. If it does read the temperature and humidity, we just want to make sure it's accurate because our food here, it's got to feed us while we're on the trip. So a lot of you guys are using this to monitor the outdoor temperatures as well. A lot of these RVs are going to have outdoor temperatures, but they are going to have to be either an auxiliary mode, or started to be able to get that reading.This is all battery powered, so you can get it all the time. Only thing I do suggest is just finding a safe spot away from the elements.
So I would suggest putting it on the other side of your exhaust. The exhaust is going to run down usually on your passenger side. So find a good place away from the elements on your driver's side, probably like above of your frame rail, and probably before your back tires. So you don't get a whole lot of water splashing up and hitting this. It might make it inaudible 00:02:11 or something.
I'm probably going to pick a good spot next to my batteries, just to see what weather conditions that they're dealing with.So we can also put it in those extra storage compartments that you might have on your RV. If you have some sensitive items that you're carrying with you, put this in there and you'll be able to monitor the conditions that it's dealing with.So we're back inside. Let's see what we got, Inside temp, we have 73 degrees, nice and toasty, and 34% of humidity. Back in the bedroom, which is channel number one, 64 degrees, pretty, pretty comfortable, I would say. And then we have our refrigerator about 40% humidity, 57 degrees, pretty nice. And then our storage compartment is also going to be about 57 degrees and 34% humidity.You can switch these up, and they are adjusting quite often actually, I was pretty impressed, and I think they're fairly accurate actually. It's a pretty nice day. And my phone reads about 57 outside as well. So I would definitely say they're accurate, and we're not losing connection. And they're pretty far away. It's a pretty decently large RV.So our TempMinder here is going to have a couple of buttons on the back. And all they're really going to do is set, is going to be probably the first button that you're going to press. You press that. And it's going to set your time, your date and your year as well. So we'll keep track of that. We're going to have the alarm, and by holding that down, it's going to activate the alarm and you can set that as well, using the up and down arrows here. These are going to be a double function button. Basically, if you're going through and you need to go up and down, you're going to use these, but the memory is what you're going to press to cycle through the high and low temperature readings, like the max and minimum.So by clicking the memory button, we're going to be able to sort through the max temp and humidity, read and the minimum temp and humidity. And then we're going to go back to just the current temperature and humidity readings.So by clicking channel, as you can see, channel one is blinking, channel two is blinking, and channel three is blinking. So if we wanted to reset that, we can just kind of, while it's blinking, hold down the CH button, and it's going to wipe that clear and it will reconnect. And then it's going to reset it. So basically your minimum and maximum readings are going to be starting from after it connects again, till whenever you want to take and look at that minimum and maximum reading.So you can either do them all individually, or just completely clear everything. Let's just say, if you are leaving your RV for about a day, going on a day hike or something like that, and you're wondering if your refrigerator was running properly the whole entire time, put one in there, we can reset that TempMinder, that's in our refrigerator. And then whenever we leave and then come back, we can check the max and minimums and make sure that they didn't go way up. And our food sat in 60 to 70 degree heat for a little bit. That's something that I thought about, or if you keep your dogs in, and you're just curious if it's going to be unsuitable for them while you're gone, this is going to take care of that for you, give you peace of mind whenever you're on the road.In the last two buttons here, we're going to have the CF, and that's going to just change it from Celsius to Fahrenheit. So, whatever preference you have, go ahead and just click that to change it. And then we're going to have the snooze button, if we have an alarm set, or we're going to have a light. So whenever we click this, it is going to eliminate blue. That definitely makes it visible at night as well.So it also has the function of an alarm. All you got to do is hold down the alarm button, the numbers start blinking. You set them with the up and down arrows, and then click alarm again. One thing you have to do, is make sure that you have this little alarm icon on. So whenever it hits, it's going to start beeping, and the screen will also light up.So it's not necessarily the loudest alarm, but it's definitely, probably going to get me up in the morning. The longer it goes, the more it's going to start beeping. If that's something that interests you, it's a feature that this thing has. It's pretty easy to set up. It'll come in a package like this, pretty easy to get open, and they are going to be ran off of AAA batteries. We're going to have two here, and two AA's for each. They do not come with it, but the batteries will last decently long time. We don't have to charge it or anything like that. And it's really easy to set up. So let's go ahead and do that. Grabbed all my batteries here. So first things first, we have this little door here, pinch that out, make sure you put it in positive and negatives correctly, and it should light up. And then we can go ahead and take this film off and hear a little audible beep. Everything seems to be working.So now we're going to put some batteries into the actual sensors. And then as we put the second one in, we're going to get a light, and it's going to pop up here. We're going to have for adjustments wise, we have this little switch here. We're going to have one, two and three, and that's basically going to put it in either slot one, two or three on our screen here. We're going to have three. So we want to make sure that we have each one on a different channel. So I'm going to go ahead and set up the other two, and put them on channel two, and channel three.Well, everyone, everything's set up, we got all of our sensors out and doing their thing. To get an accurate reading on all this stuff that I want to keep an eye on. I got one in my refrigerator, storage compartment, and one in the bedroom. Whether you're just hanging outside your RV in the campsite, just having a fire, and you want to just check on that, make sure if you have a baby sleeping in the bedroom, whatever, it's just going to give you peace of mind, make sure everything's working properly. And everybody's nice and comfortable. Again, this was the TempMinder temperature and humidity control. And I'm Adam with etrailer.com..
Average Customer Rating: 4.8 out of 5 stars (4 Customer Reviews)
We purchased a new travel trailer and as "newbees" we learned dampness due to humidity was not good so I picked out this unit from etrailer.com,
I strategically placed 3 sensors [including the monitor] inside the trailer and one in the lower storage bay out front.
So with my monitoring system in place along with my bucket of damp rid, I'm good to go.
After going on line to see why the receiver was not working, I found that the low cost batters I had put in the receiver would not work. This was something that was not in the instructions.
Other than that it seems to be working.
Info for this part was:
At etrailer.com we provide the best information available about the products we sell. We take the quality of our information seriously so that you can get the right part the first time. Let us know if anything is missing or if you have any questions.


Thank you! Your comment has been submitted successfully. You should be able to view your question/comment here within a few days.
Error submitting comment. Please try again momentarily.