
Summer Starts Here - Save up to 70%
To see if this custom-fit item will work for you please tell us what vehicle you'll use it with.


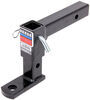
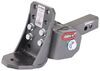
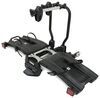
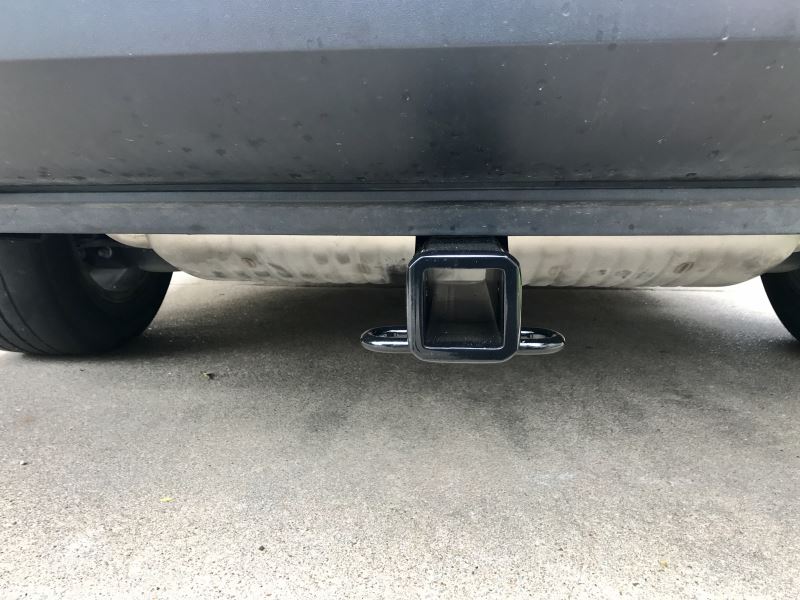
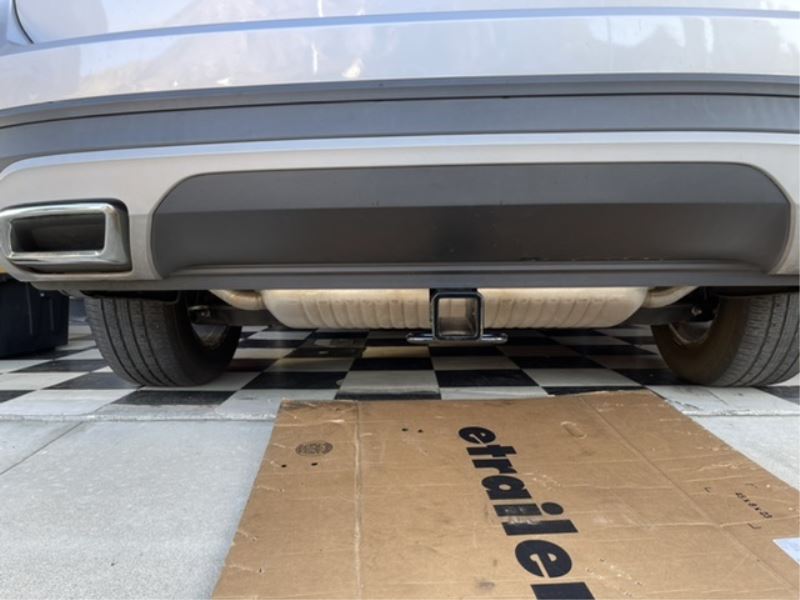
This fully welded trailer hitch receiver bolts onto your vehicle's frame with no welding required. Matte black, powder coated steel is durable and corrosion resistant and creates a rugged look.
Features:
Specs:
The sturdy steel construction is protected with a matte black finish for added durability. This unique powder coating gives etrailer hitches a carbide-like appearance and a rugged look that sets them apart from traditional glossy hitches. In addition to being rust and corrosion resistant, the tough matte coating hides dirt, scuffs, and dings better than a glossy finish.
At etrailer we're committed to the products we sell, and to our customers. Our experienced and knowledgeable staff are available via both phone and email to address your questions and concerns for the lifetime of your hitch. The technicians at etrailer perform hitch installations on a daily basis, making them a valuable resource for do-it-yourselfers. The one-on-one, personal service you'll receive comes straight from an expert in the towing and automotive field. We've installed it, we've wired it and we've towed with it, so whatever your question, we can answer it.

Videos are provided as a guide only. Refer to manufacturer installation instructions and specs for complete information.
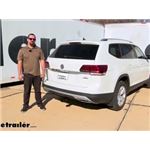
Hello neighbors, it's Brad here at etrailer and today we're taking a look and installing the etrailer Class III trailer hitch receiver on a 2018 Volkswagen Atlas. Now if you plan on towing a trailer you have some nice rolled style safety chain loops here which are gonna be great for your standard S hooks. Even a larger clevis style no problem to hook that up. And if you do plan on towing, you're gonna want to adhere to the weight capacity of the hitch as well as the vehicle. And these are pretty solid numbers. Your gross trailer weight rating which is gonna be the weight of the trailer plus the accessories loaded up.
Basically what's pulling on the receiver it's gonna be 6,000 pounds and that's pretty solid. You also have a tongue weight rating which is gonna be for your suspended accessories basically how much weight's being put on here and that's gonna be 900 pounds. So overall really, really good numbers. But you're gonna want to actually check your vehicles owner's manual check to see what the vehicle's capable of and that way you're not overloading them. So compare that with the hitch numbers and take the lower of those two.
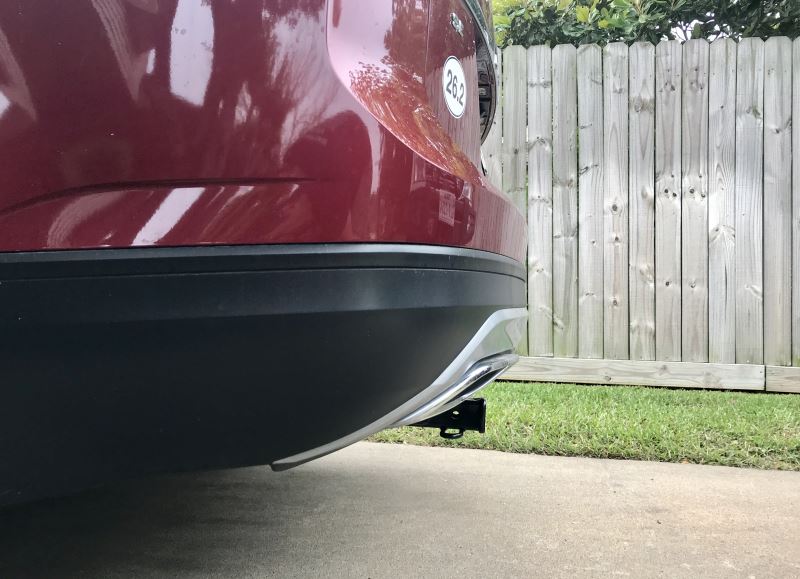
And we're gonna take a few quick measurements. This does sit a little bit recessed past the rear fascia here. So something to keep in mind when choosing accessories to make sure that they fit. We have five inches from the center of the hitch pin hole to the furthest point. So when you have some of those folding accessories you're gonna wanna make sure it doesn't make contact with your rear fascia.
And also just choosing your ball mount as well making sure you have that extension to stick out far enough for your trailer. Now another quick measurement here from the top the receiver tube to the ground, we're looking at about 13 inches and that's also helpful as far as picking a ball mount for your trailer. But also when choosing your accessories you do have a slightly lower ground clearance and they can extend past your vehicle. So as you go up an incline you don't want those making contact with the ground. So just something to keep in mind while driving with accessories loaded.
Now the installation's super easy on this. The hardest part is going to be scraping off the undercoating that's on the frame so that our hitch sits nice and flush against the metal. But other than that, this can definitely be done in your garage or on your driveway and it's simply just putting four bolts in. I'm gonna walk you through all those steps. So let's take this into the bay and I'll show you how to get it done. To begin our installation, we're gonna need to scrape off some undercoating that they have on the frame. You can see that this is all coated on there and we can scrape this off. A putty knife works pretty well. I have a scraper here. Our hitch kind of extends right at this kind of seam. So I'm gonna go, I'm gonna start here and work my way all the way to the front that way our hitch has clearance and it's gonna sit nice and flat. And if we can get a nice opening here we can kind of work away at the rest of it. This is gonna be a little bit tedious so make sure you have a nice putty knife or something that's gonna be strong enough to get this all off. If you're using a razor blade or something along those lines, just be extra careful. Now if this is gonna be tedious, which it is putting up a pretty good fight here, if you have an oscillating tool or a multi-tool as they call 'em sometimes this is really nice just if you have a blade that's not, you know just don't go at a straight angle against the metal but you can really dig under this. So now at this point we're gonna be using a fish wire technique to get our carriage bolts and our spacer blocks here in place and that's gonna create the stud for our hitch to mount up to. And if you've never done this it can look a little bit tricky, but it's pretty simple. So we're gonna take our fish wire here and take the coiled end and if you need to, you can put a little bend here and we're gonna have to be feeding this back all the way to this access hole, this oval. So just kind of keep your finger here and just kind of jostle this around until you find that coiled end. You're gonna wanna pull this out here, now don't pull too far 'cause you're gonna need this tail end that we fed it in. Just gonna put a bend here on our wire and that way it's gonna kind of help prevent it from pulling through. Now on our coiled end what we can do is take our carriage bolt and spacer block and we'll just get this fed on our coiled end pretty easy here. So then we can feed each of them in one by one. So spacer block, we'll just kind of push this up in the frame rail. And same with the carriage bolt. Now it might get a little tight here so you kind of put it in at an angle and some of that undercoating here might kind of make it a little tricky but sometimes it's easier to put the head in first. So just kind of find the sweet spot there. It's pretty close here but should be able to get this in. There we go. And you can just feed that carriage bolt up and then from here we're just gonna pull on our end where we fed it in, jostle around a little bit and we should have our stud pop through. Now keep your fish wire attached. It's gonna make it a lot easier to keep this in place when we push the hitch up. That way it doesn't push back in the frame. So now we're just gonna repeat the same process for this hole and also on the other side of the vehicle. Now at this point you might wanna grab an extra set of hands and we're gonna get our hitch in place. Now you're also gonna want to have at least one of these flange nuts ready. That way we can get it started on each side and the hitch will support itself. And those bends we've put in the fish wire kind of work twofold. We're gonna feed these into our hitch and those are gonna kind of keep those in place. So as we raise this up, just kind of pull the pull wires along as you go and you may have to kind of raise this up over the exhaust to kind of get that to fit. And then what we'll do is kinda get our stud to feed through here. And then I'm gonna just use the hitch to kind of hold this in place. So you can pull your pull wire off and then just make sure this doesn't push up. So as I push on the hitch, it's gonna keep that in place and I can just hand tighten this on here. Once you get it on both sides then you'll be able to support it. Now we're just gonna repeat the same process for the rest of our hardware, getting our flange nuts on. And if you can't use the hitch to hold it in place it might help to just kind of use your finger or a flat head screwdriver just to kind of hold tension on it just to kind of get those first threads started. Now at this point we're gonna tighten these down but you have a little bit of wiggle room here on the hitch so just make sure you have it perfectly aligned in the center or exactly where you want it. And then we're gonna be using a three quarter inch socket to just get these tightened down, make it nice and snug. Now we're gonna come back with a torque wrench and torque 'em properly so you don't have to get too crazy here. So now we're gonna be using the torque setting that's found in the instruction manual and we have torque wrenches available here at etrailer. You can generally rent them at an auto parts store as well. This is just gonna make sure that we have 'em tighten enough to where they're not gonna loosen up over time. But also you can over tighten hardware as well causing stress on the threads. So we'll just go through and torque these all down. With all of our hardware properly torqued down our hitch is completely installed and all that's left to do is load up our accessories and hit the road. And that was a look and installation of the etrailer Class III trailer hitch receiver on a 2018 Volkswagen Atlas..
Average Customer Rating: 5.0 out of 5 stars (5 Customer Reviews)
This fully welded trailer hitch receiver bolts onto your vehicle's frame with no welding required. Matte black, powder coated steel is durable and corrosion resistant and creates a rugged look.
Great Product. I am not a professional but the hitch installed super easy. I did not need to make holes or nothing!
Super fast shipping , great product
Fast delivery! Good price!! Accurate information and specifically!!!
Great product, great shipping/packaging, great instructions/videos. This is a job that can totally be done DIY no problem if you own the right tools. Car jacks were not necessary. Parked car backwards in garage with front-end going downhill to lift the rear.
The ordering process was really smooth and I received top notch customer service.
The hitch has worked perfectly for what I needed it for, without any issues at all.
I have a 2018 VW Atlas SE AWD. The part came way ahead of schedule. And I installed it without even lifting the car. (I did struggle a bit trying to hold it in place, but then again I was doing the job alone with some 2×4 to help me hold it in place). It fit perfectly. Just below the bumper. So NO BUMPER CUTTING. Looks awesome and pulls the trailer we need. I did have to drill out the insert holes (not the holding holes) just a bit to make the head of the crew fit. But that only took 2 min. Very good product and i highly recommend it!! Installed it alone in 45 min
I watched a YouTube video first, so it was very easy to install with two people. This hitch is pretty beefy so I needed my son's muscle to help!
Great Product. Great service. The shipping was fast, the price on etrailers was better than other online retailers for the same product. It fit my 2018 VW Atlas (4cil) perfectly. Had to google for an installation video to understand where to thread the fishing wires through. You will need to enlarge a couple of holes on the frame with a file so the bolt heads fit through (I suggest a dremel or file bit for your power drill) but it's not much, it can be done with a manual file if you are patient. All in all, installation took about 45 minutes without any problems. You do NOT have to cut the lower end of the bumper with this hitch as opposed to other brands, the downside is the hitch will hang lower so your departure angle will be decreased considerably.
Had it for one year now. Works as expected. Would recommend.
This hitch has been great, my family and I like to go biking hiking and I am always using my hitch for cargo carrying and my bike rack and it works like a dream.... installation was easy also me and my brother put in on in about 20 minutes.
One year later and I couldn’t be happier. My towing needs are a 5x8 trailer loads supporting house improvement projects. This receiver flawlessly met this need.
Installation does require a fairly capable person to do it. If you are a “handyman”, then this is in your ability. Patience is another good thing to have. Although the installation isn’t the simplest thing, it is doable with basic tools and average skills.
Give it a try. Even if you can’t, surely a friend of yours can. May take an hour tops.
What a great product and company! The trailer hitch arrived as promised. I watched the install video before buying the hitch, and installed it from remembering the great easy video. It took me about 30 minutes to install by myself having to lay on the ground and lifting the hitch in place with the help of my leg - lol.
I highly recommend etrailer.com and I’m anticipating my first adventure using my new trailer hitch.
Wow! I was absolutely impressed with this company. They had my orders packed and ready for shipment in a couple hours. They don’t mess around. Their tracking also works great. When my order arrived the box was damaged but that could have been transport company’s fault. It’s hard to hold 70 pounds of steel in a cardboard box. Fortunately the parts where all there. Installation was a breeze with the included bolt pulls that are genius in themselves. Thanks etrailer, already placed a second order. Took me about 40 minutes by myself which was quite a balancing act laying under the car and supporting one end with my legs while attaching the other end. Second helper or jack stands maybe would have been helpful.
Fit perfectly.
Glad I purchased from etrailer. Hitch was delivered on time and their website is a good source 9f knowledge.
They have earned my business.
Install is straight forward and easy just like in the video. You just need a second person to help hold in place while securing nuts.
This will allow us to use bike rack hitch for weekend getaways in 2019 vw atlas.
I bought this hitch for my wife's 2018 VW Atlas. Super fast (and free) shipping was great. The hitch fits like a glove and is clearly made to fit the Atlas. I installed it myself, and the process was straight-forward, taking an hour. Widening the holes with a hand file was the longest part - took about 10 - 15' for each hole - I would recommend a Dremel or file attachment for a drill instead. Threading the bolts and plates was simple - my 10 and 6 year old even helped with that part. I got a bit nervous that I was going to push the bolt back through the frame when I removed the wire, but ultimately it all worked out fine. I definitely needed my wife's help to hold it my place while I screwed on the nuts. Finally - I did my best to torque the nuts to the recommended specs, but it's a tight space near the nuts closest to the fender.
I love how easy the installation was perfect fit didn't had to modify or cut anything
You do have to file a hole to make the bolts fit
But otherwise very easy and very practical
I will say that the packaging of the tow hitch was not that great UPS delivered the box and the hitch was sticking out of the box they could do a better job on the packaging...
That is why i didn't give them 5 stars
Thank you! Very helpful and caring service! After U-hal failed to get a hitch that I needed for a move... (Ordered 1 month ahead of when I needed it and they did not tell me until 5 days before my travel) I ordered a trailer hitch on Friday from etrailer.com and with rush service I received it on Monday! Car is a VW Atlas 2020
The only difficulty I encountered was getting the carriage bolts to go through the access holes. After several unsuccessful attempts (despite removing some of the protective underbody coating in one of the access holes as recommended in the instructions), I used a grinding center to remove less than 1 mm from the heads of the carriage bolts - worked like a charm.
This is a great product that matched the sellers claims for quality and ease of installation. I am a young 83 year old that had more difficulty getting up and down from the garage floor that I did fishing the hardware in place!
The invisible hitch, except for the receiver, is a real winner from Curt products.
Fit my 2018 VW Atlas perfect. No modification to the frame to fit bolts through. The bolts will fit, a little tricky/tight. I coated my hitch in undercoating due to rusting on my old hitch/car (picture).
Quick easy install. All the hardware is included with instructions and pictures. I watched the video on the website to make it even easier. I did the install by myself.

Do you have a question about this Trailer Hitch?
Info for this part was:
At etrailer.com we provide the best information available about the products we sell. We take the quality of our information seriously so that you can get the right part the first time. Let us know if anything is missing or if you have any questions.


Thank you! Your comment has been submitted successfully. You should be able to view your question/comment here within a few days.
Error submitting comment. Please try again momentarily.