
Summer Starts Here - Save up to 70%
To see if this custom-fit item will work for you please tell us what vehicle you'll use it with.
Thank you! Your comment has been submitted successfully. You should be able to view your question/comment here within a few days.
Error submitting comment. Please try again momentarily.


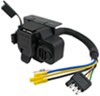
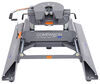
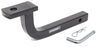
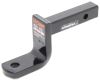
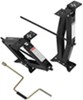
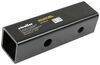
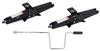
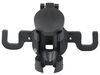
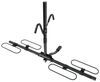
Perfect for light-duty towing, this custom, vehicle trailer hitch receiver features fully welded, gloss powder coated steel construction. Drawbar sold separately.
Features:
Specs:
At etrailer.com we're committed to the products we sell, and to our customers. Our experienced and knowledgeable staff are available via both phone and email to address your questions and concerns for the lifetime of your hitch. The technicians at etrailer perform hitch installations on a daily basis, making them a valuable resource for do-it-yourselfers. The one-on-one, personal service you'll receive comes straight from an expert in the towing and automotive field. We've installed it, we've wired it and we've towed with it, so whatever your question, we can answer it.

Videos are provided as a guide only. Refer to manufacturer installation instructions and specs for complete information.
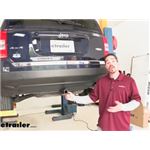
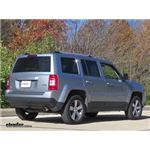
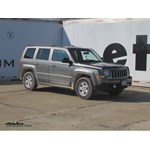
Rob: Hey everybody. Rob here at etrailer.com and today, we'll be taking a look at the Curt Class 2 Custom Fit Trailer Hitch Receiver on our 2017 Jeep Patriot. Now here's what our hitch is going to look like. I think it looks pretty good, it has almost a factory type look to it. And that's because the cross tube is going to be completely hidden behind the bumper and the only thing we're going to see is the receiver tube sticking out. Now, again, it is a class two, which means it's going to give us that inch and a quarter by inch and a quarter receiver tube opening, and it's going to be great for some light duty towing.
Maybe you have a small jet ski trailer or a small utility trailer you need to move around. But at the same time, it's going to be really good for bike racks and cargo carriers, that way we can hit the trails with some friends or family, or possibly just make some room on the inside with a cargo carrier, moving all that gear to the outside.Now, regardless of how you're going to be using your hitch, all of the accessories are going to mount to the hitch pin hole here on the side. And the hitch is going to accept a standard half inch pin and clip. Now, these aren't going to come with the hitch, but you can find them here at etrailer.com along with some locking devices and anti-rail devices to keep everything nice and secure and to cut down on that noise coming from the back of the receiver tube. But also we're going to have a spot to hook up our safety chains.
Here we have a loop style, it's welded to the bottom of the receiver tube. You can see it, it's just almost like a rolled steel stock. And if you have most normal sized hooks like this, you can see there is plenty of room to get them hooked and take them off. You don't have to really worry about hitting the Jeep on the bottom of the fascia or interfering with the pin and clip.Now, obviously, if you're looking for a hitch, weight capacity and what it's going to be able to do is pretty important. So the weight ratings on our hitch are going to be a 300-pound ton weight.
That's the maximum downward force at the end of the receiver tube. To put that in perspective, we'll be able to carry a decent amount of bikes with this, maybe two, three bikes with us. Now the hitch is also going to have a 3,500 pound gross trailer weight rating, that's how much the hitch can pull, but that does include the trailer and a load we have on it. So with all those numbers in mind, you do want to double-check your Patriots owner's manual, because again, those are the ratings for our hitch, and we don't want to exceed the manufacturer's rating for our vehicle.I'd like to give you a few measurements, these are going to help you whenever you're looking for accessories for your new hitch, like a bike rack or a cargo carrier. From the center of the hitch pin hole to the outermost edge of the bumper, it's right about five and a half inches.
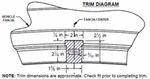
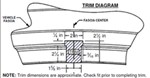
Now that measurement's going to help you out when you're looking at folding accessories, to make sure you have enough room to put them in the upright storage position and not make contact with the rear bumper. From the ground to the inside top edge of the receiver tube opening, it's right about 14 and a half inches. Now at that height, I would recommend a bike rack or a cargo carrier of the raised shank, that way we can get just a little bit more ground clearance out of it. Now that we've seen what our hitch looks like and gone over some of the features, let's bring it into the shop and go through the installation process together so you can have the confidence to do it at home.To begin the installation, we want to come to the back of our Jeep and at the very bottom of the fascia here, we're going to have several push pin fasteners that we need to remove. So we're going to grab a flat blade screwdriver or a trim panel tool. Now you'll notice there's a little notch on each one of the push pins. We're going to take your tool, go underneath that notch, you want to pry out the center section first, that's going to take all the tension off and if it comes out, that's perfectly fine. But then once that's out or loosened, we want to come underneath the base and pull the rest of the push pin out. Now the rest of these are going to work that way so we're just going to work our way across the bottom edge, pulling out all the push pins.Now we've moved to the rear wheel. We're right behind the rear tire, right at the edge. We're going to have a couple of bolts that are holding that liner in place, so we're going to grab a seven millimeter socket and we'll pull both of these out. We're going to have these two screws on the other side as well, so we'll finish taking this one out and move to the other side and remove those too. So our next step is going to be lowering our exhaust, but we don't want to just lower it down without having some kind of support device underneath it. At home, you use a jack stand. Whatever you have available, but you just don't want it to hang down too far. So I'm going to take a strap and I'm going to hook it to a secure spot on the frame.I'm actually just going to centre it down, so it's nice and taut, that way when we lower it down, we can control it by this strap. So one side of the muffler here for the back corner on the driver's side, we're going to have the hanger and that's actually connected to a rubber isolator. So we would take a little bit of spray lubricant, spray it on the hanger and the isolator. Just makes it a little bit easier to slide off. Then I can take a pryer bar, and I'm going to pry against the hanger itself. And the main goal is just to get that isolator to slide off of there.Spray lubricant just makes it a little bit easier for it to move. Now that we had this one removed, we'll move over to the other side of the muffler, where we're going to have another hanger, an isolator, that we need to remove. Now you can see that once we have these lowered, we can lower that strap down a bit, but we may not have as much room as we need, so we can move further up the exhaust and remove another isolator. We just want to follow the exhaust pipe forward to the next one down the line. Now the next one is going to be pretty far forward, it's going to be about halfway of the vehicle, but really easy to access. There's not a whole lot around it. Just again, make sure you have that strap in place, so the exhaust doesn't come down too far.So we can lower the exhaust down to where we have plenty of room to work right above it right here. Right above the exhaust, we're going to have our heat shield. That's going to be held in place by four studs with nuts on them. So we're going to grab a 10 millimeter socket and we're going to pull all those nuts out. Once you have all the hardware removed, gently pull down on the heat shield and we'll set it aside for right now. Now, if we come to the frame rail, we're on the passenger side over here, you're going to notice that we have two holes on the inside of the frame. Well, those are actually all the way through the frame. So we have them on the outside as well. And those are going to be our two mounting locations on the passenger side.So what we want to do is we want to grab one of the long hex bolts out of our kit, we're going to follow it up with a flat washer and we'll come from the outside of the frame and we're going to pass them through. But instead of having the bolt go all the way through, we want to leave room for our hitch to be put in place. So you just want it to be nice and even, or pretty close to poking through. Again, that way we have room for our hitch to fit through and fit into the inside of the frame rail. And we're going to do that for the other hole and we're going to have the same two mounting locations on the driver's side frame rail, so we're going to put that hardware in place as well.Now, with an extra set of hands we're going to lift our hitch up. I do want to mention that we're only going to get one piece of hardware in place right now, that's going to be the forward mounting holes. So we're going to lift it up, rotate it so we can get those forward bolts lined up. You want to push them through the frame, and that'll allow the hitch to hang by itself. And we want to loosely apply one of the flange nuts, just hand tight for now, they don't need to be very tight, but just enough so that our hitch isn't going to fall down.So now that we have our hitch loosely in place, obviously it's not going to be pointing down like this, but it allows us to hang our hitch. What I'm going to do is I'm going to rotate it up to where it just touches the fascia here. We're not going to be pushing on it or anything, but we'll rotate it up. Then I'm going to take a marker and I'm going to mark where the outside edges of my hitch are. And that'll give me a reference point of how wide I need to trim my fascia.And then if we look at our instructions, they are going to give you a diagram that gives you a rough idea of how you need a trim. So I'm going to follow those measurements and measure up and then connect on my lines and we can trim out that section. Now, whenever you go to trim out your fascia, you can use just about whatever you have. You can use your utility knife. You want to make several scores, not pressing too hard. And then eventually just make small passes that keep going a little bit deeper. You can use a pair of tin snips, or a rotary tool like this.I do suggest that you trim a small amount, probably less than you think you need to because we can always come back and take a little bit more material off, but we can't put it back. So I always like to trim as small as humanly possible. We can always come back with a file or a razor knife, clean up any of this excess plastic and possibly trim out a little bit more if we need to. But now we can just take our hitch and we can rotate it up. We're going to push those bolts through the frame and then loosely get a flange nut in place. Again, they don't have to be real tight, we just want to make sure that hitch stays in the position that we put it. We'll do the same thing on the other side. But now that the hitch is loosely in place, we're going to grab a 19 millimeter socket and wrench, or a three quarter inch socket and wrench, and we're going to tighten up all of our hardware.You want to make sure you come back with a torque wrench and torque all your hardware down to the specified amount in the instructions. You may or may not have to hold the nut with a wrench, maybe on there, tight enough to where the bolt will tighten up, but it's a good idea to have that wrench on hand in case it does start spinning. We're going to go through and continue tightening down all of our hardware until it's all torqued to specifications. We're going to line up our heat shield and replace the factory hardware that we removed earlier. Then we can get ready to put our exhaust back in place.Always like to spray a little more lubricant on each one of the hangers, then I'll actually lift up, tighten that strap so I don't have to hold it while I'm getting each one of the hangers back in. Then we can put all these fast screws back at the bottom of the fascia. With these push pins, you want to make sure that center section is either completely out or sticking out and push the base in and then push the center section in to lock it down. Once you have all your fasteners back in place, that'll finish up your installation and your look at the Curt Class 2 Custom Fit Trailer Hitch Receiver on our 2017 Jeep Patriot.
Average Customer Rating: 4.8 out of 5 stars (27 Customer Reviews)
Perfect for light-duty towing, this custom, vehicle trailer hitch receiver features fully welded, gloss powder coated steel construction. Drawbar sold separately.Ordered a trailer hitch and wire harness for my Jeep Compass. Shipping was handled professionally right to my door. Products fit like a glove. Couldn't be happier
Fit perfect. Directions were helpful. No drilling required.

I have bought a variety of products besides this hitch from etrailer over the years and have never been disappointed. The detailed descriptions allow you to review the product prior to purchase and know exactly what you are getting. The knowledgeable technical support is second to none and always available for any questions. Prices are better than anywhere and delivery is incredibly quick and well packaged. I have recommended etrailer to many friends. THANKS!!
The trailer hitch and installation were exactly as advertised. However, the trailer hitch when installed is very low to the ground and requires a long and high drawbar in order to keep the trailer a safe distance from the vehicle bumper and high enough to track safely behind the vehicle. The hitch designer should think about some modification in order to bring the hitch higher.
Product installed just as instructions said. I will say it takes a little more time and you must have good tools to complete the job, which I had. This is the 2nd hitch I bought from etrailer.com. Both were delivered quickly. Great company!
My second order with strainer, best price, excellent follow-up and order tracking, I will order from them again.
Online order was efficient and delivery was very timely. Hitch appears to be of high quality. Instructions for mounting were excellent!
Knowing that trailer hitches are exposed to the elements and traditionally rust easily, why don't the manufacturer's spray them with a quality automotive under coating?
Just like all the other reviews on this product, It is great, with the purchase, shipment, quality and installation. Not knowing anything about hitches I was able to install this in about an hour or less. One surprise for me on the installation was that the EGR Canister was somewhat in the path for installation which slow me down a little. Otherwise a BIG Thank you to etrailer on all the videos!
Came as described. Perfectly! Instructions for install needed a little more to them though. Luckily I had my mechanic friend do the install so his lift, big wrenches, jack for holding the manifold/muffler in order to make space to insert the hitch and, saw to cut out a piece of my bumper so the hitch end could sit right; were all extremely handy. Stuff I would have not been able to do myself. Great quality!! Awesome customer service. Would definitely buy from again.
outstanding product..with no lift and no help it was a struggle but not impossible.due in part it was a perfect fit.and the wiring harness couldnt be any easier. The videos were awesome and a huge help. Awesome job. I definatly recommend this product to anyone..........2012 jeep patriot
Received my hitch promptly and it appears to be of good quality. Installation instructions were a bit hard to read but this installation was fairly straight forward. A small amount of shimming was required but was no big deal.
Over all I am pleased with my purchase.
Hi there. Wanted to let you know the shipment got here right on schedule, and I thank you for that. We have a slight 'warming trend' coming over the next day or two and I will install it then. The box got a bit 'beat up', but given the nature of what the product is intended to do, I doubt the contents of the box could be damaged by 'rough handling'. I took some pics of the box, but at this point I am not alarmed at all. So, thanks folks, and should I have need to get into this stuff again, I will give you another shout... but at 75 y/o I am hoping to 'stand down' from laying beneath cars soon.
Ordering & delivery were great and met my expectations. I have not yet installed the hitch but don't foresee any problem with that task. Thanks for your promptness and the price was just right.
Good looking hitch,have not installed it yet,it was delivered only a few days after I ordered.
Good instructions and product looks and fits good.
Excellent fit with an exceptional finish and great instructions.
This product has endured 20k of pulling a kayak since its purchase. No issues what so ever. Thanks

Donald

10/1/2022
Fine no probs
Easy to install. Well built
Easy to install with No experience. Took about 45min only because did not have professional proper tools. Should have spent the cost to rent them.
Very satisfied with the transaction, price, free delivery, and the product less than half of a dealer installed hitch
Ordering was very easy. The product shipped the same day. Quality product’s.
Perfect and fast shipment!
Do you have a question about this Trailer Hitch?
Info for this part was:
At etrailer.com we provide the best information available about the products we sell. We take the quality of our information seriously so that you can get the right part the first time. Let us know if anything is missing or if you have any questions.


Tim
5/8/2017
I have purchased several Curt hitches from etrailer for a variety of different vehicles over the years and all have been excellent. They fit well, are simple to install myself and look great. No issues with my latest purchase and functions as good or better than expected. Thanks etrailer for all your support!!