
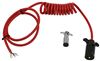
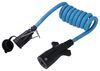
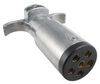
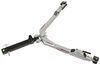
Replacement 7-Way to 6-Way Coiled-to-Straight Cord for Roadmaster Nighthawk Tow Bar - 8' Long
(14 reviews)
Price: $128.70
In Stock
Replacement 7-Way to 6-Way Coiled-to-Straight Cord for Roadmaster Nighthawk Tow Bar - 8' Long
Item # RM-1676-7R
Our Price: $128.70
In Stock
Thank you! Your comment has been submitted successfully. You should be able to view your question/comment here within a few days.
Error submitting comment. Please try again momentarily.


- All Info
- Reviews (14)
- Q & A (0)
- Videos (2)
- Photos
Roadmaster Accessories and Parts - RM-1676-7R
- Tow Bar
- Power Cords
- Roadmaster
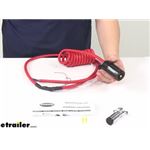
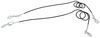
Replace the power cord from your Roadmaster Nighthawk tow bar so that you can run power from your RV to your towed vehicle. Coiled end prevents dragging and straight end runs through tow bar channel guides. Wires into tow bar to power LED lights.
Features:
- Adapter cord runs power from your RV to your towed vehicle or trailer
- 7-Way plug connects to RV and uninstalled 6-way plug connects to the towed vehicle
- Coiled end avoids dragging and tangling
- Straight end installs into channel guides on the tow bar arms
- 2 Wires connect directly to tow bar to power LED lights
- Silicone-injected plugs prevent corrosion and vinyl coating resists water, oil, and chemicals
- Made in the USA
Specs:
- Extended length: 8'
- Wire gauge: 16
Fits:
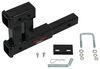
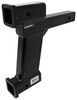
- Roadmaster Nighthawk tow bar with LED lights
1676-7R Replacement Road Master Night Hawk Towbar with Running Lights 7 Wire RV to 6 Wire Round Coiled-to-Straight Curly Power Cord for Channel Guides - 8' Long


Video of Replacement 7-Way to 6-Way Coiled-to-Straight Cord for Roadmaster Nighthawk Tow Bar - 8' Long


Videos are provided as a guide only. Refer to manufacturer installation instructions and specs for complete information.


Video Transcript for Replacement 7-Wire to 6-Wire Cord for Roadmaster Nighthawk Tow Bar Review
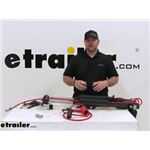
Shane: Hi, I'm Shane with etrailer.com. Today, we're gonna be taking a look at, and you're gonna help me install the power cord or replacement power cord for our Nighthawk All Terrain Tow Bar. Now, the replacement cord is gonna replace our damaged or worn out power cord that comes install on our Nighthawk. As you can see here, it's gonna be coiled to a straight cord, so it runs through the channels on the Nighthawk. We're gonna have two wires that come off of it. They're gonna allow you to hook to your LED lights, so you can get your Nighthawk working properly.
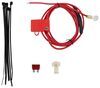
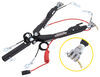
Couple of additional things that are gonna come with your new cord, gonna be your six-pole plug for the end, and a couple of heat shrink butt connectors for your two wires going to your LED lights.To start, we need to remove our old wire. We're gonna start with our six-pole plug on the end. What we're gonna do is we're gonna take our smaller screwdriver, Phillips screwdriver. We're gonna loosen this screw here. And then we're gonna loosen this real small screw right up here in the front.
Actually, we're not gonna loosen that one, we're just gonna take it all the way out. Then we're gonna take our cord, should slide it right out of the end. Some of these could have some sealer in here, so that's why it could be a little bit difficult to get out. So, you can see all the sealer there. So now what we're gonna do, is we're gonna disconnect all the wires off the end of that.
You can just use a flathead or Phillips screwdriver. These screws are kinda small, so a Phillips tends to wear those out a little bit, if you're gonna reuse it.I like to use a flathead myself, on it. You see, we have little screws. Our wires just go down inside and that screw tightens against it. So once you remove this, go ahead and slide this off.
And then right up here, we're gonna have a large Phillips screwdriver, or a large Phillips screw on this clamp here. Go ahead and remove that. And then hold onto that, 'cause we'll be reinstalling it. And then we're gonna slowly work this out from that channel. So, we wanna get to this heat shrink part. This is gonna look the same as our replacement, but what I don't wanna do, is I don't wanna cut my cords off right there. I'm gonna go ahead and peel back some of this heat shrink here and see if I can get closer to where it connects up inside. Looks like I got it right there. So, I'm gonna cut them right here. You can see they're connected to the brown and white wire.The one thing we're not gonna have to do is we're not gonna have to connect them inside on our new cord, because they're already pre-installed. So, I'm gonna cut them here. Gonna go ahead and get rid of our old wire. Now, what I'm gonna do, is I'm gonna inspect the end of these wires. The wires that come on the new one are pretty long, so I cam make adjustments. I can cut this down a little bit more if I need to. What I wanna try to do, is I want the heat shrink butt connectors to be up inside of here, if possible. Just to give it a little bit more protection. They are heat shrinked, so they're gonna protect your connection from corrosion anyway. But, cit doesn't hurt to have a little bit of extra protection, anyway. So, it looks like this black wire is kinda pinched right here, a little bit.So, just to save time in the long run, in case for some reason this wire won't work, I'm gonna cut it off behind that and then just re-strip it. These wires are pretty thin, so when you're stripping them, just make sure you don't squeeze so hard that you start breaking off wires in there when you're pulling off that outside coating. Now, take your heat shrink butt connector, we're gonna slide one on each, our black wire and a red wire. And then crimp it down. Give it a little tug when you get them on, make sure they're not loose, 'cause you don't want them to slide off. Now, we'll take our new cord. I'm gonna take this end, it's gonna slide through the channel towards the arms. Like that. You may have to kinda rotate the cable a little bit to get it to slide in there. Before I go too far, go ahead and get these connected.And then, we're just gonna red to red and black to black. Then, we'll take our heat source and shrink up our butt connectors. If you don't have a heat gun, you can find them here at etrailer.com. Hopefully I can get it in there. I'm gonna take a little bit of electrical tape, and I'm gonna go around these butt connectors, maybe from here to there. Hopefully I can get that inside with this. And again, electrical tape is not necessary. I just like to have as much protection on my wiring as possible. Because that's a channel and there could potentially be water that gets in there and sits. I wanna keep it off of this stuff as much as possible. We're doing all right. And then, we just reinstall our clamp. Reinstall our six-pole plug, comes with our kit. Gonna do the same thing here.We're gonna take off this small screw. Make sure this back one's loose. And what this does, and I'll show you here in a second. When you loosen that screw, there's actually . you can see that little, it almost looks like a little door. What it does, is it squeezes down against your cord so that your cord doesn't move. 'Cause you don't want it pulling on you six-pole end up here. So that helps your cord stay inside the plug. And then we'll just slide this out, and we're gonna slide this end right through . or our wires right through that end, like that. Basically, we're doing the opposite of the way we took it off, took off the old one. The back of your plug is actually gonna be marked for your wires. It's gonna be marked with your right turn signal, left turn signal, running lights, your ground. It's also gonna have two extra ones.Your gonna have an auxiliary. And then you're gonna have a spot for a brake light monitor system in the RV. So, we're gonna start with those two. We'll start with our black wire first, which is gonna be a power. This is a charge line. This is gonna be for if you hook up a charge line in your car to charge the battery. This is what it's gonna tie to. So, we're gonna start right there in the middle with the black wire. And then, cinch that screw down. Now, we're gonna go to our blue wire. And to hook our blue wire up, we're looking for the S, which is gonna be this one here. This is for our brake light monitoring system in our RV. And then we're just gonna work our way around and hook the correct wires up to the correct spots. Your instructions are actually going to have an explanation on that tells you which wires go in which spots.So, you can see where my gree wire here, when I put it in, I wanna go to the edge of this coating. You wanna make sure that coating does not go down inside there, because you don't want your screw holding onto the coating, you want it holding onto the wire. Now that I've got my wires hooked up, there's a couple extra steps that I'm gonna do. But before doing that, I wanna go ahead and test out my tow bar to make sure my LED lights are coming on. So, this is gonna be just like hooking up to your RV. See our LED lights are working there. Working on this side. So, we know we're functioning. It's a good idea to take some dielectric grease and put it on your connections there, just in case any water or anything gets in there. It helps keep those connections from corroding. And again, make sure you test it first, otherwise, if something's not working right, you're gonna have to wipe all this stuff off. It could be a pain.Something like that. And then, the screw hole in the top, screw hole or the hole in the top of our casing, we're just gonna line those two up. Just like that. Go ahead and install this screw. And then we'll tighten this one down. That's gonna complete our installation. Now you can feel confident knowing you can hook your car back up to your RV and you can safely flat tow your vehicle, knowing that your tow bar's gonna work correctly.
Customer Satisfaction Score:
99% were satisfied with this product
1% of customers were not satisfied
- Did not arrive in time
Customer Reviews
Replacement 7-Way to 6-Way Coiled-to-Straight Cord for Roadmaster Nighthawk Tow Bar - 8' Long - RM-1676-7R
Average Customer Rating: 4.8 out of 5 stars (14 Customer Reviews)
Replace the power cord from your Roadmaster Nighthawk tow bar so that you can run power from your RV to your towed vehicle. Coiled end prevents dragging and straight end runs through tow bar channel guides. Wires into tow bar to power LED lights.by: Charles10/25/2023
Jaime, you did one hell of a job helping me with my Roadmaster tow bar wiring issue. I did receive the power cable today. Expedited shipping was a great help. It was packaged nicely and I have already installed the cable. You people at Etrailer.com are fantastic. Keep up the good work.
by: Gannon08/03/2022
Great product, easy to switch with original damaged part, worked great first time. Came with easy to understand instructions just like everything I have purchased through etrailer.
by: jtortho11/11/2023
Worked well. Good instructions.
by: Tim 02/09/2024
Well made product.
by: Dennis 02/10/2024
Exactly as ordered. Quick shipping
by: Delton01/11/2024
Worked perfect.
by: William08/30/2019
6way plug small end screw so tight could not get it out. Roadmaster cord work great order a new plug 6 wire
by: Steve 12/15/2022
Arrived with in just a day or two.
by: Steve04/16/2023

Katrina B.
4/17/2023
I see that you gave your experience with etrailer 1 star. If you give me more information about why you are disappointed in us, I will be happy to assist you.
by: Robert 02/12/2024
by: John L02/12/2024
by: Michael 05/26/2021
Easy to order, everything was in stock, delivery was quick
by: Alex 08/20/2021
by: Guy 04/26/2021
14
14
See what our Experts say about this Roadmaster Accessories and Parts
- How Much Can You Cut Off of the LED Wires for the Roadmaster 7-wire to 6-wire Replacement CordThere is not necessarily a pre set number of how much wire you should cut off when using the Replacement 7-Wire to 6-Wire Coiled-to-Straight Cord for Roadmaster Nighthawk Tow Bar # RM-1676-7R. You can cut the wire as short as needed so long as you leave enough wire on each end to fully seat in the butt connectors for a good strong attachment (you will want to give a pull at each side after crimping to ensure they are in the connector tightly). I went out to our warehouse to take a look...
view full answer...
Info for this part was:

Edited by:
Lindsey S

Video Edited:
Jacob T

Installed by:
Cole B

Installed by:
Shane H

Written by:
Mike S

Video by:
Michael B

Updated by:
Amanda K
At etrailer.com we provide the best information available about the products we sell. We take the quality of our information seriously so that you can get the right part the first time. Let us know if anything is missing or if you have any questions.
Product Experts Available Now!
Call 1-800-940-8924
Gannon
8/4/2023
Still working great!