
Thank you! Your comment has been submitted successfully. You should be able to view your question/comment here within a few days.
Error submitting comment. Please try again momentarily.
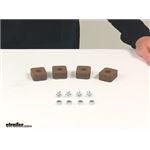
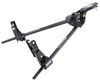
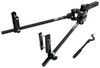
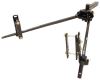
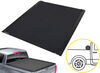
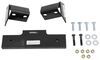
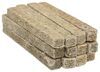
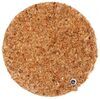
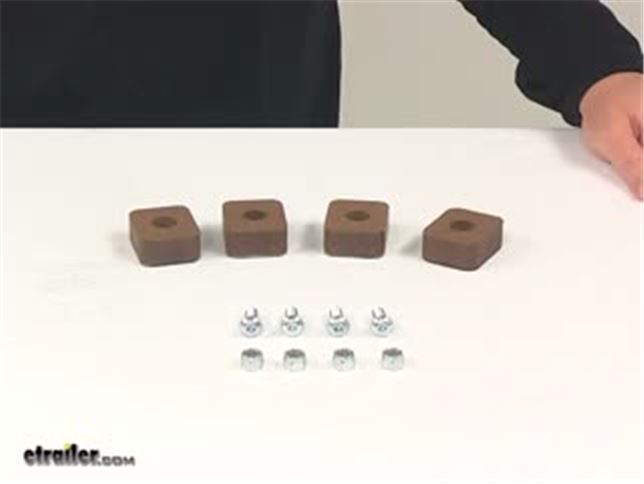
Replaces a friction pad kit for your Reese Steadi-Flex weight distribution system (RP66559, RP66560, or RP66561).
Features:
California residents: click here
Videos are provided as a guide only. Refer to manufacturer installation instructions and specs for complete information.
Today, we're going to be taking a look at the replacement friction pad kit for Reese Steady-Flex weight distribution systems. This kit's going to replace the friction pads on your Reese Steady-Flex weight distribution system. Part numbers RP 66559, 66560 and 66561. These are made from a durable steel construction. They're going to feature the nice automotive grade friction material. These pads line the brackets to help correct any sway that may occur due to winds, curvy roads, or sudden maneuvers.
It's going to come with one kit. Each kit is going to come with four pads. That's two per bracket. It's going to come with the necessary installation hardware. That's going to do it for today's look at the replacement friction pad kit for the Reese Steady-Flex weight distribution systems.
Average Customer Rating: 4.6 out of 5 stars (17 Customer Reviews)
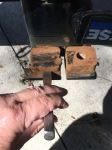
Replaces a friction pad kit for your Reese Steadi-Flex weight distribution system (RP66559, RP66560, or RP66561).Deducted 1 star for no installation instructions. Note this is a medium difficulty job only due to the de-installation of old pads - the abraded brake pad material filled in the screw hole and packed in tight under temperature (friction caused by the WD bars) forming a solid brake pad. You will need a 3/16 hex socket, ratchet, 12" extension (length dependent on your trailer setup), cold chisel, hammer, small flat bladed screwdriver and angle grinder (if unlucky).
The first pad I tried digging the hole out with a screwdriver and pick. Even after cleaning out the hex head and around the head very well I still stripped the hex head (the male hex bit spun inside the female bolt head). Apparently some of the residual pad material had "glued" the bolt head down and I couldn't dig it all out. Next I used a cold chisel and a hammer, hitting the pad between the friction pad material and metal backing plate to pop the pad off. Success! The head was now exposed and I used an angle grinder to grind the head off and drove the remaining bolt out with a hammer & drift.
Now for the other side front pad. Here is what I did and it was easier. First separate / pop the pad off the backing plate with a cold chisel & hammer like the first pad. Now you have full access to the bolt head and can thoroughly remove all residual pad material from on/in/around bolt head with a small flat bladed screwdriver and pick. Clean the female hex recess of the bolt head extremely well. Helpful hint: Next assemble the 3/16" hex socket and extension but don't attach it to socket wrench yet. Put this into the bolt head and hit the end of the extension with a hammer. This will drive the hex bit into the bolt head, even if there is residual pad material still in the hole, giving it better bite. Attach socket wrench to extension, keep your weight on ratchet driving the hex bit into the bolt head and now try to loosen the bolt. It should break free. If not and the bolt head strips out cut the @%^ bolt head off with the angle grinder lol. YMMV
Side note: the dealer apparently skipped step 31 in the installation instructions so just my front pads wore down. This has been corrected.
Quick, prompt professional service. Thank you,
I just received these and have not yet used them. They do appear to match original hence the five stars. These were back ordered but etrailer did a good job of keeping me informed of delivery. I have been happy with the performance of the Reese Stedi-flex system for one and a half seasons of light use. I am disappointed that 2 of the pads separated from the metal backing even though the pads were still in good shape. Had I considered the high price of replacement pads I would have considered a different system.

David

8/17/2022
I was able to glue the original pads in place with gorilla glue and have kept the replacement kit as a backup. The system has worked well.

My first trip after replacing the pads, one of them crumbled on the ends. I rotated the pad around to get what I could out of it. They seem to be wearing a little quicker than the original pads. Otherwise they’re doing the job.

Steven L.
6/16/2023
OK! One pad partial crumbled on the first use, otherwise they’re holding up.
While it was disappointing to have the friction pad on my fairly new Reese Stedi-Flex WDH break off as I removed the system etrailer did an excellent job of reviewing the problem, speaking with the manufacturer, and overnighting the parts to me for the repair. For anyone with this system I recommend carrying a good quality 3/16 hex socket in your took kit. The factory install on the bolt would not give using a cheap allen wrench. With a good hex socket the parts are simple to replace. Thank you Emily for excellent service.

Bruce D.
7/30/2018
The Reese WD Hitch performed well half way into a long trip. After about 3,000 miles one of the ablative pads broke off and it took several hours of trying to call Reese to figure out a solution. Finally etrailer stepped in to solve this by sending me the replacement parts. I still am getting uneven wear on the pads but no adjustment seems to remedy that. If I were starting over I would buy a hitch system with a different system for sway control. The installation of the sway control brackets resulted in an uneven fit on the trailer A frame. The bottom bolt had to be ed into a hole about an inch below the trailer frame and when tightened to specifications it bowed out somewhat resulting in uneven force against the A frame. I reported this to Reese and got no reply. If you have any suggestions I would appreciate it. We are about to take some more trips so it will be interesting to see how the system performs.

Right parts, delivered on time. Thanks Kimberly for the help!
GD Imagine 2970RL (8,995# GVWR) w/ Ford F250: I swapped out my Fastway Equalizer e2 for this hitch, not because I didn't like the e2, but the dealer undersized the hitch (10K w/1K tongue weight rating), and it didn't offer the tongue weight rating I needed. With modest cargo and a full fresh water tank, I was closer to a 1200# tongue weight, which is right at 12%-13% of the total trailer weight, and really ideal for WD/sway control towing. I've towed about 500 miles so far on this hitch, and it does what it's intended to do. If any sway is introduced by a passing truck or whatever, this hitch knocks it right out quickly, and it is very minimal to begin with. I will say there was a bit of a 'wear in' period the first 50-75 miles. The reason for that is the WD bars come painted at the point where the bar meets the friction pad (Fastway left this part bare metal), and the paint makes the bars slick, which does not help with sway initially. However, once the paint wears off and you have metal-to-friction-pad contact (like the breaks on your car), it works perfectly. Reese should consider not painting this part like Fastway; I mean you wouldn't paint the break rotors on your car for that reason. Step #31 is also very important. Your clamping bar mount will not sit perpendicular to your frame if you've done this correctly. The bottom will be kicked forward toward the tow vehicle slightly. It look's a little weird to us OCD types, but it's critical to make sure the WD bars sit flush on both friction pads equally. The only reason I'm taking a star off is the friction pads are a wearable item, and $100 for a set of four, that's an additional ongoing expense that other typical WD hitches do not require. Additionally, I'm not a big fan of the spring bar cover design and the tiny little cotter pin that holds it closed. Everything else seems super industrial strength, then there's this teeny tiny little hole and cotter pin (that I might lose) holding the cover shut, and your WD bars in place. Reese could have done a better job on the design there IMHO. Otherwise, it's a great hitch and is working fantastic on my set up.
The pads on my Reese Steadi-Flex hitch take a beating due to the high tongue weight (1200 lbs) of my trailer. One of the original pads disappeared after only 4 trips but the replacement pad is holding up well along with the other three originals after 13 trips.
The delivery of the product was very fast, and was glad that they had them in stock nobody else had them.
Thanks so much !
The brake pads came as requested and were easy to replace. Though they seem to be a quality product they are expensive for what you get. Not e-Trailer's fault.
Even though the order was backed ordered you constantly kept me updated as to target ship dates.
Got the ordered on time and it was exactly what I ordered. Thanks

Do you have a question about this Accessories and Part?
Info for this part was:
At etrailer.com we provide the best information available about the products we sell. We take the quality of our information seriously so that you can get the right part the first time. Let us know if anything is missing or if you have any questions.


Ron M.
2/5/2020
Work as advertised