
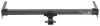
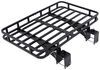
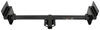
Mount-n-Lock Heavy-Haul'r Replacement RV Bumper - 4.0" Wide - 500 lbs - Mill Finish
(15 reviews)
Price: $379.95
Mount-n-Lock Heavy-Haul'r Replacement RV Bumper - 4.0" Wide - 500 lbs - Mill Finish
Item # MNT78VR
Retail:$435.04
Our Price: $379.95
You Save: $55.09


- All Info
- Reviews (15)
- Q & A (0)
- Videos (3)
- Photos
Mount-n-Lock Accessories and Parts - MNT78VR
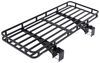
- RV Cargo Carrier
- RV Bumpers
- Bumper Parts
- Mount-n-Lock
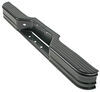
This heavy-duty, aluminum bumper gives you a higher weight rating so you can safely haul your bikes or generator to the campsite. You can store your smelly sewer hoses inside the bumper using the vented endcap to free up space in your compartment.
Features:
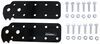
- Bumper kit replaces your stock RV bumper for extra durability and a higher weight rating
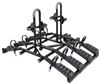
- Great for supporting cargo carriers, bike racks, and other bumper-mounted accessories
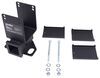
- 10 Heavy-duty brackets reinforce the bumper to prevent heavy loads from damaging it
- Less likely to lead to bumper detachment than a stock bumper with the same weight
- Hollow compartment with vented end plates stores your wet, smelly sewer hoses and fittings
- Circulates fresh air to prevent moisture and mold build-up
- Slide the plates up and down to easily access your hoses
- Rustproof, lightweight aluminum construction with bare mill finish that can be painted
- Bolt-on installation onto your RV's frame with included hardware - some drilling required
- Need extension plates (MO24VR - sold separately) if frame is shorter than your RV's body
- Need drop plates (MO84VR - sold separately) if your RV's body extends to the bottom of the frame
- Made in the USA
Specs:
- Application: I-beam, S-beam, tube, and channel frames
- Flanged frames: must be at least 4" tall x 3" long
- Non-flanged frames: must be at least 3" tall x 3" long
- Overall bumper dimensions: 92" long x 4" wide x 4" tall
- Maximum capacity: 500 lbs when evenly distributed
- Weight: 22 lbs
- Limited lifetime warranty
Planning on getting a brand new 4-bike rack and want to make sure your RV's bumper will be able to support the weight? Or perhaps you just need to replace the old, dented bumper that's currently on your rig? This durable, hefty bumper lets you upgrade the existing bumper on your RV so you can haul a cargo carrier, bike rack, or a spare tire carrier with confidence. And because the bumper is made out of aluminum, it won't rust in the rain or snow. The bumper has a bare, raw mill finish so you can paint it a color of your choosing.
Ventilated Storage Compartment

If you don't want to muck up the inside of your RV's cargo compartment, you can use the ventilated storage area inside the bumper to hide your smelly sewer hoses and fittings. When it's time to dump your back and gray tanks, slide the end plate up on either side of the bumper so you can easily grab your hoses. These end plates have small, built-in holes that help circulate fresh air to help prevent moisture and mold from building up on your wet hoses. And by keeping your sewer gear in the bumper, you'll free up space in your RV storage compartment for additional camping gear.
Bolt-On Installation

Once the old bumper has been removed, use the included hardware to directly mount this bumper onto your RV's frame. You may need to do some drilling. The bumper attaches with the included 10 heavy-duty brackets to provide additional reinforcement.
You may also need some Mount-n-Lock Addabumper plates. If your frame is shorter than your RV's body, some extension plates (MO24VR - sold separately) are required. And if your RV's body extends to the bottom of your frame, some drop plates (MO84VR - sold separately) are needed.
10VBK92MF Mount n Lock Heavy Hauler Replacement RV Bumper - 4" Wide - 500 lbs - Aluminum - Mill Finish


Video of Mount-n-Lock Heavy-Haul'r Replacement RV Bumper - 4.0" Wide - 500 lbs - Mill Finish

Videos are provided as a guide only. Refer to manufacturer installation instructions and specs for complete information.


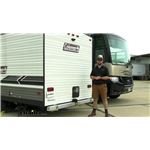
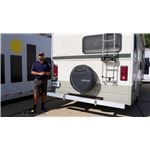
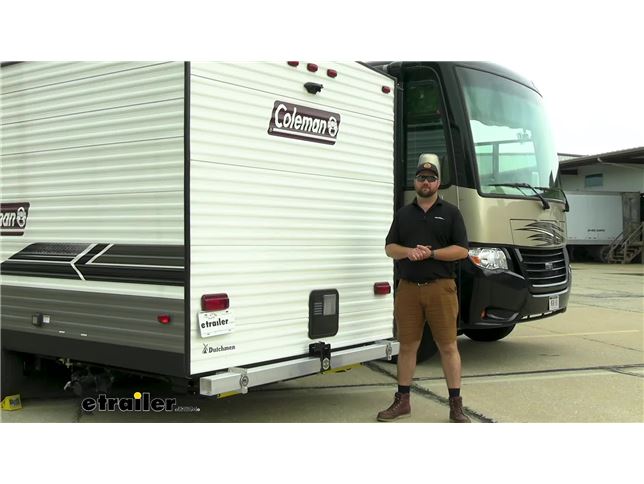
Video Transcript for Mount-n-Lock Heavy-Haulr Replacement RV Bumper Installation - 2020 Dutchmen Coleman Lantern Travel T
Hey guys, it's Jake here with etrailer. Today, we're taking a look at and we're gonna show you how to install the Mount-n-Lock HEAVY-HAUL'R Four-Inch RV Bumper on our 2020 Dutchmen Coleman travel trailer. Upgrading your RV's bumper to this bumper is gonna allow you to safely haul accessories on the back of your RV. This bumper actually is gonna have a weight capacity of 500 pounds. Standard RV bumpers, most of them don't even have a weight capacity because they're not tested to have accessories mounted to them. You may not have seen it, but we've seen it many a times, an accessory like a hitch like we have here or a bike rack or something is inserted in a hitch, and the bumper has either ripped off or twisted because the wall of the bumper, so the thickness of the tube itself, is too thin and it's not rated to tow.
And people use it like that. Because they make accessories for it, they think it's okay. And most of them are not. If you do not have an extra support behind your standard RV bumper, the one that comes with your factory, then your bumper is not designed to use for towing. Some of them will have a cross beam.
I know on my fifth wheel, I have a cross beam that's welded to an I-beam that is welded underneath my RV bumper, and I have a hitch on mine and I can tow with it. This bumper is gonna be rated for 500 pounds and it's designed to replace that factory bumper that you otherwise shouldn't be doing much with. Now, if you're not looking to upgrade your entire RV bumper because it is quite an extensive installation, we do have brackets that are designed to mount underneath also made by Mount-n-Lock. They mount underneath and then they bolt to either side of your frame rail. And that's the whole point is that we want to get this secured to the frame rail, rather than having a small bead weld of the frame just welded to the backside of our bumper.
Those welds pull off all the time because they're welded really quick just essentially to get the bumper to hold on and for you to slide one of your sewer hoses in the end of it. If you want to be able to get a higher capacity out of it, I would definitely recommend upgrading the entire bumper assembly. Now, you might be thinking, and it's the same as me, you don't like the look of a natural aluminum-colored bumper on the back of your RV that has no other brush aluminum accessories on it. We do have some black powder-coated bumpers from Mount-n-Lock on our website if you want it to match your old one and other accessories on your RV. Well, another thing I really like about this kit is that I see on forums all the time and on different social media sites that somebody saw another sewer hose laying on the side of the road.
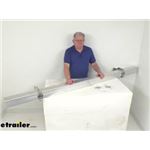
The RV, this RV, when it came in, was missing the end caps to its rear bumper. Whether they we're there or not, we don't know. But there's a lot of people that what happens is you have a sewer hose stored in there, which is perfectly fine. That's what it's intended for. And the sewer hose will slide from side to side when you're traveling down the road because it fits loosely inside that bumper. What'll happen is you go make a turn, your tail swing gets a little fast, and then that hose will slide, pop that cap out, and then there goes your sewer hose. What Mount-n-Lock did is they made it so that it's kinda like a trap-door design. You'll have a little bolt here that keeps this from coming out. And then when this is down, you don't ever have to worry about your sewer hose sliding out. It also will have some vent holes, so that your sewer hose can naturally dry. Now, as far as the installation goes on this bumper it will come with all of the hardware included to get it installed, but it will require quite a bit of work to get the old bumper off. If you are fortunate enough to where your bumper is bolted on, that's great. Hopefully, you can reuse some of the holes drilled in the frame, but you will have to drill four holes on each side of the frame rail, and you'll have to cut off the old bumper. But other than that, I would just say definitely have patience when installing this kit because what'll happen is you might get some of your brackets installed and they do not like to move, which is really nice because they'll bite into the top of the bumper, but you cannot adjust it once you get it installed. What had kind of fooled us a little bit, and we just had assumed, but I recommend to not assume, that the frame was square with the bumper itself. So you can see here, there's a little bit of space between the edge of our bumper and the side of our RV, but on that side there's little to no space. You want to be sure that this bumper is square with the frame rails and not square with the actual box sitting on top of it. Our RV has actually shifted a whole inch this way. That's why we have that extra space. So just make all your measurements based off of your frame rails and don't pay any attention to the actual box itself. But with that being said, let's go ahead and pull it in the shop and show you how we did it. Now, from the factory, these bumpers are not load-bearing bumpers. You can get brackets from Mount-n-Lock that mount on either side of the bumper, but even so, with those, they're not gonna add any additional support to the center of our rear bumper. So if you plan on towing a trailer behind your travel trailer, then what you'll need to do is you'll need to get a full replacement like we're doing today. There's a couple different issues with this factory bumper. The tubing is too thin to be able to be weight bearing, and you may see going down the road the actual tube itself will twist. Ours has started to twist a little bit and it looks like there used to be a hitch receiver on here or at least a spare tire mounted down towards the end there. Just that spare tire bouncing on the back or a generator carrier, what have you. They obviously had something here, and it added a twisting action to the top of this bumper. In addition, this bumper doesn't have the end caps anymore, so the owner of this motor home just wanted to. or RV wanted to just replace the whole thing, so that he knows if he wants to tow a trailer, he can do that, as long as you're in within legal limits of towing a trailer behind your RV. To begin our installation, we need to remove our bumper, but it might be different on different models of campers or even from camper to camper. I've seen that. What we need to do on our specific camper, we have two plates that are welded to the backside of our bumper, and we don't have much of our frame rail to sacrifice here, so we're gonna have to keep as much as it as we can. So we're gonna cut through the bumper through those brackets, then take the bumper off, take the brackets off, and the frame rail will stay the same length. Some bumpers are bolted on, which are really nice 'cause you just take it off, and then bolt the new one on. But yeah, you can see here a little bit better angle. These are the brackets. This bracket is essentially what we need to take off. So we'll cut straight through this one, and the one on the other side of the frame rail, and then take the bumper off, and then take this bracket off. We're just using a hacksaw here to be able to do this. We just wanna be careful when doing this. (hacksaw whirring) (hacksaw whirring continues) (bumper clanging) (hacksaw whirring) (bumper clanging) (hacksaw whirring) (bumper clanging) Now, what we need to do is we need to try to pry this last section of bumper off, and then we'll slide a flathead screwdriver or something back here and try to pry these tabs back and forth to get the end of the frame rail cleaned up. (hacksaw whirring) (bumper clanging) And we're just taking a pry bar and hammering behind this bracket. (bracket clanging) We're gonna pry it out, try to bend it back and forth, and break it off. (bracket thudding) Now, if you have any weld left on the inside, you wanna grind that off. (welding tool whirring) Now, with us having all this exposed metal, we're just gonna take some black spray paint and give it a nice even coating (spray paint hissing) to prevent any rust in the future from flooring. (spray paint hissing) Now, with our paint all dried up, we'll take one of our brackets, hold it up, we'll make sure the end of it here is level. I'm gonna be lining it up. We do have a bolt that sticks out on the other side. It was on this side but I moved it to the other side. You just wanna make sure you're not going to be hitting that when you put your bracket on. Line this up. We're gonna take a punch and punch out the center of each of these holes. Now, we're gonna take a pilot drill bit and drill out our four holes. (drill whirring) We're gonna eventually want to step this up to a 25/64 drill bit. (drill whirring) Now, we'll take five of the brackets that come in our kit. We're gonna take the second one from the top, flip it over, and the fourth one from the top, flip it over, (brackets clattering) and then essentially we're going to have. That's the easiest way to get them like this. You'll have three on the bottom and two on the top. And this is what's going to hold our bumper. And the reason why you wanted the two on the top and three on the bottom is that they're staggered, so that you have one flat pack, but they're gonna be staggered for when you put this ending bracket on. They'll line up perfectly with the slots in this bracket. We're gonna start with this pack. Take a bolt. You'll have a couple of different packs of hardware in your kit. This pack of hardware is just gonna have two bolts and two nuts in it, and this is what it's for. And then, when you can open it up like this to slide your your beam in, but we'll hold it up to our circles, make sure they're all lining up, which it looks like they're all lining up pretty good. Now, what we did here, to get our brackets in place, we marked out where the innermost bracket is going to have to sit on our cross beam. What we did was we measured from the outside to the outside of our frame rails, and we're gonna put this bracket here right on that line or as close to it as we can get because we found out once you get these in place, they're kind of hard to move. (bracket clattering) Just like that. Now, we've marked out our location of our inner bracket. That's gonna go up against our frame rail here. We'll take the outer securing bracket, slide that on, and then we may end up having to take this. (bracket clattering) We're gonna take these, take this nut off, slide it out, lift these two pieces up, slide the end of our bracket on, and slide it back down, making sure our bracket's in the right place. And then, put our nut back in. (bolt clattering) Okay Put our bolt back in and put the nut on that. Now, we'll take a clamp, and this is not absolutely necessary. We just like to keep this patch and a little bit more control, clamp that on. Then, we're going to loosen up this other clamp, and we have to push down on this in order to get all four of our bolt holes to line up again. Essentially, you just wanna try to get one bolt started and that should hold the rest of them in line with one another. Once we've got our bolts pre-threaded through our brackets on our bumper brackets, we threaded them the rest of the way through through the holes that we drilled through our frame rail, and now we're taking our nuts and putting them on the other side and we can tighten them down. (drill whirring) With our bumper installed, before we torque everything down, we'll have to take the little Allen head bolts and the smaller nuts that come in your kit, and we'll insert them in the smaller hole. This is going to help this little door from coming all the way out. So we'll tighten that down, and you can see, it stops the door from coming all the way out. So if you're driving down the road, it's not gonna bounce out of the slot. (bumper clanging) Now, once you have everything tightened and torqued to the specifications in the instructions, that's gonna do it for the installation. One note why we'll make that we discovered when installing this on this camper is that you'll measure your bracket distances from each other based off of the frame rail, and you want your bumper to be square and even on both sides to your frame rail on your RV, not the box. Our box, we discovered, is just about an inch off-square. So we've got 13 inches over here and 14 inches over there. So we do have a little bit extra space from our box hanging over, but it is more important for the structural integrity of this bumper for it to be square with the frame rails than to be square with the box.
Customer Reviews
Mount-n-Lock Heavy-Haul'r Replacement RV Bumper - 4.0" Wide - 500 lbs - Mill Finish - MNT78VR
Average Customer Rating: 4.2 out of 5 stars (15 Customer Reviews)
This heavy-duty, aluminum bumper gives you a higher weight rating so you can safely haul your bikes or generator to the campsite. You can store your smelly sewer hoses inside the bumper using the vented endcap to free up space in your compartment.by: Lee04/04/2024
Satisfied & would by again. The original bumper on my 27-foot Freedom Express travel trailer failed when I mounted a lightweight bicycle rack on it. I replaced it with this Heavy-Haul'r bumper. This has worked well. No problem at all now carrying my bicycles. I also use it to carry a equipment rack with an auxiliary generator and gas can. I usually run the generator from the carry rack attached to the Heavy-Haul'r bumper. A bit slow installing with some frame drilling on my camper required but works great once installed.
by: Joseph08/07/2023
Product quality is very good and powder coating was well done. My issue is with the shipment packaging. Although there was an attempt to protect the product in transit it did in fact fail. I recommend the shipper place reinforced cardboard on all four corners from top to bottom and also add reinforced cardboard at each end of the bumper. The shrink wrap was an attempt but didn’t prevent the scratches and dents. After spending nearly $[XX] for the bumper I would say an additional $[XX] spent in proper packaging would eliminate any returns. See pictures.


by: Brenda V02/14/2024
This is an impressive bumper. We ordered this to be delivered to a RV park in FL after our original 4” bumper twisted & broke the welds on our trip down from the weight of our mountain bikes (~ 200 lb total).
We went with a 5.3” replacement to make it easier to insert our sewer hoses & adapters. My husband & neighbor put the new bumper on in 2 h; it did require drilling new holes in the frame but that was easy enough & well worth it. This bumper is exceptionally strong, has a great finish and has a much better solution for closing the ends than your typical end caps. We also bought the 2” Shake-Stopper Hitch Receiver and it mounted in about 20 min. It is super strong and as advertised - it makes a very solid connection with the bumper. Highly recommend both
by: Jesse08/10/2023
Love the product and the ability to safely handle more cargo such as our 4 bike carrier. My only qualm is if you have a Camco Rhino waste hose you will have to use your old end cover instead of the stock ends that come with the unit. The little screws that hold the metal pieces in place are in the way and the hose will not go in.


by: Sam09/18/2023
The products I bought came a little earlier than originally stated, and that was great. Unpacking the products was a big pain in the a. However, every thing was in good shape. My main complaint that gives the 4 stars is I ordered a 4 inch bumper to replace my old 4 inch bumper, but with the slide gates on the ends (which looked like a great idea) my 4 inch dump hose won't slide in past the slide gates. Customer service says I'd have to have a 3 inch hose or buy a bigger bumper. That was not an issue I saw while shopping for the bumper. In fact, the little video showed tipping the slide gate to the side and easily sliding the hose inside. Nope! It never said anything about a smaller hose. I'm going to have to take off the screw in the slide gate on one end of the bumper and remove the gate every time I want my hose. I hope it won't bounce out while I am traveling. If it does I'll go back to a rubber cap, rats!
by: Edward08/31/2023
Both products failed with a 4-bike rack rated for RV use the first time I used it.
by: David09/19/2023
It was easy to install with the adapter. Looks great
by: Kevin 10/25/2023
Always fast and easy.
by: Thomas 07/17/2023
Product arrived quickly, and was packaged extremely well! Installed and SOLID!
by: Scott 07/20/2023
I received the new bumper right on time.
by: Andrew 05/24/2023
Fast shipping and great packaging.
by: Jeff 04/07/2023
by: Samuel07/02/2023
by: Michael 05/02/2023
by: Rick 04/26/2023
15
15
See what our Experts say about this Mount-n-Lock Accessories and Parts
- Are Additional Parts Needed to Install the Mount-n-Lock Heavy-Haul'r Replacement RV BumperThe Mount-n-Lock Heavy-Haul'r Replacement RV Bumper # MNT78VR comes with mounting brackets but you might need the Extension Plates # MO24VR if your frame is shorter than your RV body. All of the hardware parts needed to install the bumper are included though so nothing additional is required.
view full answer...
Info for this part was:

Installed by:
Jeff D

Video Edited:
Joshua S

Written by:
Mary K

Updated by:
Wilson B

Edited by:
Amanda M

Test Fit:
Jacob H

Video by:
Thomas T

Video by:
Rick G
At etrailer.com we provide the best information available about the products we sell. We take the quality of our information seriously so that you can get the right part the first time. Let us know if anything is missing or if you have any questions.
Product Experts Available Now!
Call 1-800-940-8924
Thank you! Your comment has been submitted successfully. You should be able to view your question/comment here within a few days.
Error submitting comment. Please try again momentarily.