


California residents: click here
Videos are provided as a guide only. Refer to manufacturer installation instructions and specs for complete information.
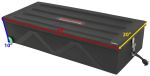
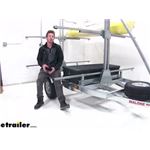
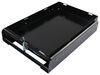
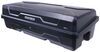
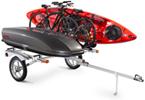
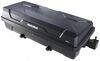
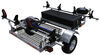
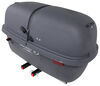
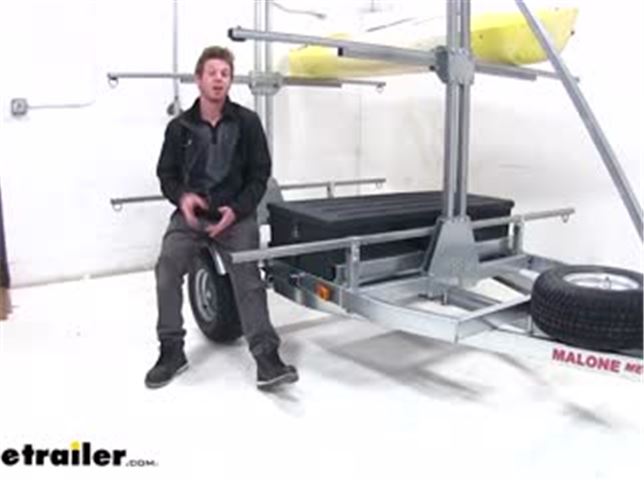
Hi, everyone, Adam, with etrailer.com. Today, we're going to be taking a look at the Malone sliding storage drawer. This is going to get you about 5.5 cubic feet of storage on your Mega Sport trailer. Super, super cool about this one is that it actually just slides on out. We can have it secured for traveling, but when we're loading stuff up, we can slide that out to make it a little bit easier on ourselves. So as you can see here, I have a lot in my container.
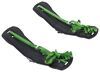
I have a bag full of a bunch of pool toys just in case. I got a life jacket of course. Was for my kayak. Got some fishing gear and I got a smaller tackle box to fit inside my kayak when I'm fishing on my kayak.So what's nice about the sliding feature is if I am kayaking with a buddy, I'm going to have two here. So it goes all the way in like that.
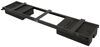
If we had a kayak here, I would have to kind of maneuver around to grab all my stuff. This way, if I am kayaking with a friend, which I like to do, I can just slide it on out and I will have a little bit more room to kind of work and grab my stuff or load it up for the trip.So what helps us get that cool rolling feature is going to be these two rollers here. It's going to sit underneath the majority of our container and also our roller blade wheel here. It actually has a pretty decent bearing. So even after tightening it down a decent amount, we're going to have a decent amount of roll, and it just fits into that channel really nicely, making it really, really easy to slide it to and fro.So we are going to get about 46 and a half inches of length.
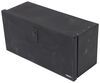
We're going to have about 18 and a half inches of width and about nine and a half inches of height here and that's all going to be usable space to gain that 5.5 cubic feet of storage space, and if you're hauling some sensitive items, we do have a weatherstrip on the inside and that's going to help keep out some of that moisture and rain whenever you're driving in the elements. So whenever we're ready to pack up, roll it out, get all your stuff, load it up in there.One of the nicest things about this is, I do have my pool toys in there and I keep my tackle box in my kayak sometimes, it might accumulate a little bit of water. If it does, don't worry. We have a little drain here, twist that off and all of that will drain out pretty nicely. So if there is any water that gets in there, which I doubt it will because of the seal, but if some of your gears' wet, you can drain that out pretty easily.
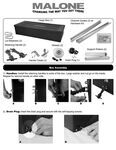
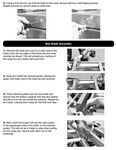
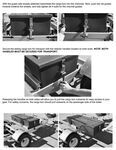
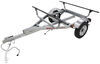
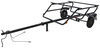
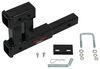
Then whenever we put it back in, ready to go, we have something that's going to prevent it from sliding, and also it does come with a little latch like so, but if you have a locked keypad, you can do that as well to give you that added comfort to make sure your belongings don't go anywhere.So, one thing that we ran into on the Outfitter 3 and the Low Bed 2, this bottom bar is not going to clear the top of our container here. So we probably won't be able to utilize this bottom bar to hold some of our kayaks, but there are a lot of other Malone trailers that won't have that issue. Those just have a little bit longer far as here to kind of elevate this up a little bit more. So we do have a couple other options when it comes to storage for our mega sport trailer. The other day, we we're working with a wired basket, which holds a little bit more, a little bit easier to install, but it's a wire basket.Nothing is getting protected from the elements, but if you do have wet gear, it will dry down the road. That is something that you kind of like, we have that here at etrailer.com. There's another one as well that's going to have a little bit more storage space and it's going to be more similar to the one you see here. It's going to be made of plastic, but you're not going to get the sliding capabilities that this one has. I would recommend the sliding just because it's really cool, but it is a little bit more intense to install, but don't worry. We got it all recorded. So let's go ahead and do that now. So the first thing we want to do is take our beams that come with our kit and note that we do have one side that has four holes and one side that has just two, we're going to use the side that has the four holes.We're going to use the ones on the very end and that's going to be facing down towards our trailer and the holes that we're going to mount on our trailer, it's going to be not the round ones, but the more oval shaped ones. So we can have that adjustability for when we put our basket into place and the hardware is included with our kit. So we're going to take a washer or a bolt, and then our nylon lock nut and go on the underneath, but we're not going to tighten these down right now because we will have to adjust the width of these two beams to meet the wheels on our basket, but when we do, I will be using a 13 millimeter socket and wrench to tighten that down. So with our kit, we're going to get two basically just rollerblade wheels. What we're going to do is they're going to sit on the outside of our box. We're going to grab the bolt that has not all the threads throughout the whole entire shaft of the bolt and we're going to put a washer on there, put it through the wheel, into the pre-existing hole. So we're going to slide our washer on there, followed by our nylon lock nut.And with these washers into place, we will be able to torque down on these, not too much, but definitely get it nice and tight, just so we don't have any rattling with our wheels. Cause that bearing will keep it spinning. We're can do the same exact process on the other side. So since we do have a nylon lock nut on the inside, it is going to be possible for us to leave a little bit of slack, not a whole lot, but we just want to make sure that this wheel is going to spin freely. Now we can go ahead and put our box into place, putting our wheels into those channels and they aren't all the way faceted down yet. Once we get it in there, what we're going to do is kind of move it in towards it, making sure that the wheels are inside of the track, but we want to make sure we're not rubbing too much on the outer shell of this box.But once we have all that done and aligned and set into place, then we can go ahead and tighten everything down. So probably the hardest thing about tightening these down with just hand tools is making sure that bar isn't going to move when we're tightening stuff down. As you can see there, it just did it on me again, but just be mindful of that whenever you're tying everything down, just so you don't have to go back and readjust everything. So when we're ready to install our rollers here, one thing that we do need to make sure is the beams that are a part of the actual trailer, not the kit right here. We want to make sure that the flat surface is facing inward. We actually had to take it out and flip it around just because now we can utilize these holes here and here to put our roller on, and also here and here.One thing to note, obviously I have this disconnected, but the nice thing is if your trailers already faced the right way, you can actually push this in. So we don't have to undo these bolts to get it into place. So we ended up having to remove this beam here and we actually flipped it around just so we had that flat face. And we did want to make sure that we have the little two holes lining up right across from each other as well, to get those rollers into place, and if you do need to do this, you just need a 14 millimeter socket and a 14 millimeter wrench. So we're going to start by putting our rollers on these two holes on our passenger side. One thing that I found the easiest is just to kind of push this in, get it kind of started into that hole, keep pushing it in and then you can find the hole. You can do the second one. Same exact way.Another thing to note, we are going to have two different holes to choose from. I would suggest doing the one closest to your passenger side. So you can roll your tode out a little bit farther. If you put it here, we aren't really going to have much of that rolling action. We're not going to be able to use it as well. So now we can go ahead and install some of our last bolts. It's going to be the one's pretty big, decent amount of threads on it and what this is going to act as, as your stopper. So as your wheels are coming in, it's going to stop it just so it doesn't overhang too much. And if you have a lot of weight, it's not going to bend that tote of yours. So we will have a nylon lock nut as well, and I'm going to be using a 14 millimeter socket, and we want to make sure we don't tighten it down too much, just so we don't bend this bar.We can do the same exact thing on the other side. So now we can go ahead and put our box into place as it's going to stay there now. With those rollers, helps it go on and off pretty easily, doesn't catch on these bolts here. Now we can go ahead and grab our bracket here. We'll see it has a pretty unique shape to it. So grab that one and all we have to do is make sure it's facing like this. We're going to use these two holes here and the tapping screws that come with our kit. I am going to use a power tool on this and we are going to be using a five sixteenths insurer to get this into place.Not tightening it down too much just to make sure it's nice and even. Something that I'm fond of is we didn't have to drill into this. We are using pre-existing holes that came with our Mega Sport trailer so that we can take our other bracket and we're going to utilize this hole that's already pre-drilled for us. Take our hardware, put it through like so, and we are just going to put a nylon lock nut on the back.So now we'll take our rubber retaining handle. One thing I noticed it's pretty thick. So I think it's going to be able to hold up over time and take a decent amount of abuse. So we're going to take our unique bolt here. It's the only one in our kit has super long bolt, but then a little bit of threads. We're going to put that into place and shimmy our way through the bracket. Take our nylon lock nut and then go ahead and tighten it down again with a 14 millimeter. Now you're going to repeat that same exact process for the other side. Now we can go ahead and just secure it down, making sure everything's nice and tight. We will get these little clips here after we put on our lid, just to make sure the lid's not going anywhere and now our box isn't going anywhere either.Now we're going to install our drain if you haven't already. So we are going to have a pre drilled hole in the actual box here. What we're going to get is a little cap here that you can take the little tabs and push them in to get that cap out but so we are going to get the hardware included. The holes are drilled for the hardware, but you can kind of just drill them right through. It'll go through this plastic pretty easily. And one other thing you need to make sure of is there is a little gasket that goes around here in between your actual box and the plastic black plate here. Once you do that, just fold in those tabs and screw this cap in.So now that all that's done, you're pretty much ready to go. All you really need to do is use it, and that's just about all there is to know about the Malone plastic sliding storage container for your Mega Sport trailer..
Average Customer Rating: 4.7 out of 5 stars (3 Customer Reviews)

Decent value! This product fits under my kayaks and I can store my life vests and outriggers into it, making room in the vehicle. I can access the storage with the kayaks on the trialer. Works well! 4-Stars due to high price.

Do you have a question about this Accessories and Part?
Info for this part was:
At etrailer.com we provide the best information available about the products we sell. We take the quality of our information seriously so that you can get the right part the first time. Let us know if anything is missing or if you have any questions.


Thank you! Your comment has been submitted successfully. You should be able to view your question/comment here within a few days.
Error submitting comment. Please try again momentarily.