


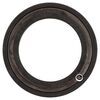
The most durable, highest-performing type of brake pads available, ceramic pads are able to withstand high temperatures, thereby maintaining their strength and integrity for longer than either NAO or semi-metallic models.
Features:
Specs:
Videos are provided as a guide only. Refer to manufacturer installation instructions and specs for complete information.
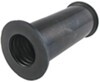
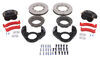
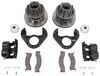
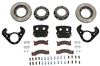
Hi there, trailer owners. Today, we're going to be taking a look at Kodiak's line of ceramic brake pads. These are available with either the standard back plate you see here or with a stainless steel. They do fit a variety of different size axles depending on their weight rating. If you have 3,500 to 6,000 pounds, we have sets available, as well as 7,000 to 8,000 pounds, 9,000 to 10,000 pounds, and 8,000 to 14,000 pounds.These ceramic brake pads are going to be a direct replacement for your Kodiak disc brake pads. Being ceramic, they're going to be made of a harder, higher temperature resistant material than what a semi-metallic pad would be.
Which means they're going to not only last longer, but they are going to provide better performance because we can put them under higher pressures than what we could with the other pads.Just like on your car, you can replace just the brake pads. You don't have to replace this whole assembly. And if you've put this whole assembly on yourself, you know how much work that would be. We can avoid all of that. The caliper just comes off, and you can replace the pads.
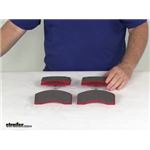
What also is cool about that is we don't have to disconnect any lines or anything, so we don't have to bleed the brakes. We can simply just push our piston back in, and then install our pads, and then we're good to go.And since these are a direct replacement for your existing Kodiak brakes, they're going to look and fit exactly like the originals and have the same corrosion resistive material on both the backing plate and on the outer perimeter of our pad. If you've got the stainless steel, the stainless steel ones are obviously going to be resistant due to the stainless steel.We'll begin our installation by removing the wheels. To do this, you are going to want to lift your trailer up. I recommend using your floor jack and lifting up by the frame.
You need to have it high enough up that your wheels are going to be off the ground. It's easiest to do this by having four jack stands placed around the vehicle to get the whole thing above the ground. Now, due to the tight clearances between the lug nut and the rim here, you may not be able to fit a impact socket. We weren't able to fit one in there, so we're using a chrome socket.Before I lifted it up, I did use a breaker bar to break each one of these loose. That way, we're not going to be putting any stress on the chrome socket when we take it off here.
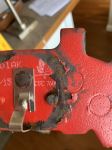
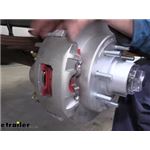
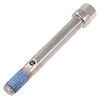
We're just going to zip them the rest of the way off. Once they're all loose, sometimes you got to give it a little tap.Once you've got your wheel off, this is a perfect time to inspect your brakes to see if you need to replace them. Because we can see whether or not we need to replace them before we even remove them. One of the things you want to look for is check the face of your rotor on each side. You're looking for any kind of grooves that may be worn into it and rough surfaces, because it should be a pretty smooth glassy surface, especially after it's been run for a while. This one here's fairly new, so it still has some of the coding on it from being so new. But if you had it on there for awhile, it'd be very glassy. Very shiny.You can almost see your reflection, and that's kind of what you would expect. But if you see any deep grooves or gouges, then you want to inspect your pads even further because you likely have worn them down to where it's causing some issues. You could also potentially have a rock or something else stuck up in there that you might need to address.To see your pads though, there's an inspection opening right here. What we're looking for is how much meat is left on the pads. This part of the pad here is the backing plate, which is made of metal. If this touches our rotor, it is going to dig into the rotor and cause damage to it. The material that you see here where this little groove is . and this is kind of a wear indicator, this little groove here in the middle. If you no longer have a groove in the middle, you should definitely consider replacing your pads, because you're down to pretty much what's the minimum safety thickness for your pad. It really needs to be replaced at that point.That's usually around 2 to 3/32 of an inch. Maybe slightly different on this particular one. That's pretty close to the average. But yeah. The indicator right there is just that in the middle. If you no longer have that gap, you have worn down pretty much the life of this pad. You'll want to check both of them. The one on this side is a little bit harder to see. You can usually see that on the outside here. You can't unfortunately really see the wear gap too well. You can kind of look down in here, and you can kind of see it from a certain angle. You're really just looking to see the distance between the backing plate and the rotor face.If it is that 2 to 3/32 distance, then you should replace them. If you've got plenty of meat here, then you can probably extend it longer. And there is another reason why you may want to replace your pads even though you might have plenty of meat left on the pads, and that's contamination. If you have a wheel seal here on the back that goes out and grease gets all over your rotor, that grease is going to contaminate the pad material, and you're not going to have the same grab properties that you did before. It's going to cause excessive heat, which usually leads to warpage on the rotors. Pretty much once you get grease on your pads here, everything needs to be cleaned up and the pads need to be replaced in order to prevent any further damage occurring to the rotor and other components.Now, we're going to go ahead and just show you how to replace the pads. You'll have two bolts that hold the caliper on. Now, we're going to go ahead and remove the bolts on our caliper, and then this will let us get it off of there. You can usually get a socket and ratchet in there to remove them, but sometimes your clearances are a little tighter just depending on your trailer. You might need a wrench to do it. I highly recommend a ratcheting wrench is you've got to set up those laying around.Once we get these loose, you don't even really need to take these bolts all the way out. You can just leave them in there like that to where they're just loosely sliding in and out. I actually usually do leave them in just so that way I don't lose them. Next, you'll take a screwdriver and we're just going to hook it on the rotor. All we're doing is just kind of putting a little bit of pressure on it that's going to push that piston in, which is going to free it up. Because normally it does have just a little bit of kind of pressure on there that makes it hard to get off. It's really not a lot of pressure, but it just kind of makes it in a bind when you're trying to slide the thing off of there. Freeing it up like that makes it a whole lot easier.Now, with these particular brakes, I've noticed that the coating on them for the corrosion is extremely thick. Most of the time, your caliper . once you've got it to the point where it is loose like that, you can just pull it off of there. But due to how thick the anti-corrosion coating is on here, usually it kind of gets stuck when you're about halfway off. That's just because that coating is so thick. We're just going to take our rubber mallet here, and we're just going to tap it the rest of the way.Now that we've got that out of there, we can replace our pads. Now, you don't want to let your caliper hang by the brake hose. You could potentially damage the brake hose. A lot of times, I'll set it up something like this and then you can get them off. I do highly recommend maybe running a bungee cord through the opening hole or something and attach it up. That way in case it falls off of this spot, it's not putting all that tension on your brake hose.Then we can take the pads out. We're going to start with the inner pad, which just pulls out of there. We'll set this one aside. And then the outer pad, and this one you're going to probably need a screwdriver for. That's just because of these little ears here where they pop into these holes, it makes a little tight. You can either kind of gently pry up like that to move it out, but I just find it easier if you just go right here in the center of the pad and then just pry upward. Then it'll pop off of there. We can then set this one aside and get our new pads.Now, you got your old pads out of there. Now, our piston is pretty far in just because . this is just for demonstration purposes. But normally when your pads have worn down, the piston here extends out. And it's going to stay extended out to make up for the amount of pad that has worn off from your old pads. We need that piston to be fully retracted all the way back in, or when we put the new pads in we might struggle even getting the pads on. And if we do get the pads on with the pistons not in, we're never going to be able to slide it back over our rotor.To get the piston back in, we're just going to use a C-clamp. You just run your C-clamp down here in the center, and then just tighten it down until the piston is fully retracted. You just loosen this back off, and then we can install our new pads. So, now we've got our new pads. We're going to go ahead and install those. What I've got here is just a little bit of wheel bearing grease. I find it makes it easier to assemble the pads if you just have a little tiny, thin coating on the back. I just put just a little bit on my finger . not a lot there, and we're just putting a thin layer on the back. That'll help them slide together a little bit easier, and it can also cut down on any rattles, chatters, and squeaks that you could potentially get from two pieces of metal contacting each other.Now, we're put it on just the backside. We don't want to get it on the surface of our pad. We don't want to contaminate with that, but this does help out quite a bit. And then we can just go back and install it. Just going to clamp it right down on there until those snap back into place, and then we're going to do the same thing with our other pad. We're going to put a little bit of grease on the backside of this just wherever we know the piston is going to be potentially touching it. And you can even put a little bit on here just to make it slide in a little bit easier as well. See, it's very thin. We're not using a lot at all. Just a tiny bit.Then this guy's just going to pop back in there, and we're now ready to re-install it. Now, when I did find this on some of these, your leaf spring can potentially get in the way of getting your bolt installed. Usually it's just on the upper one. We're just going to slide that guy right in there first, and we can slide our caliper bracket back into place. Then we're just going to reinstall it in reverse order again. It's going to be a little tight if these are fairly new because of all the thick coating that's all over it.Now that we've got our caliper back on, we just re-install the bolts. Tighten them and torque them to Kodiak specifications. Now that we've got this side replaced, we're just going to perform the exact same procedures over on the other side of the axle to get that side installed. If you have more than one axle, you can purchase kits for each of those axles and replace all of them. That completes our look at Kodiak's ceramic brake pads.
Average Customer Rating: 4.6 out of 5 stars (14 Customer Reviews)
The most durable, highest-performing type of brake pads available, ceramic pads are able to withstand high temperatures, thereby maintaining their strength and integrity for longer than either NAO or semi-metallic models.Satisfied with the product and service. Ordered the Kodiak disc brake system, works far better then the e brakes did. Just put pads on my trailer and new caliber on it. Keep up the good work. I will order more trailer parts from you
Excellent looking brake pads with a good price and free shipping, best price on internet, arrived on time and in great shape from UPS.

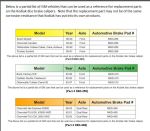
These are the exact some pads that go on a 1999 Dodge Ram 3500. Save your self some money next time. Your welcome everyone.
Just what we ordered.
GREAT RESPONSE ON LETTING ME KNOW ABOUT WHEN MY PARTS WERE BEING SHIPPED. MY PART WERE ON BACKORDER, BUT NOT LONG. A LOT OF PLACES WILL NOT TELL YOU ANYTHING, JUST LEAVE YOU WAITING.
Delivered fast, even to Alaska !! Great customer service.
Exactly like the originals. Free shipping and tracking was timely.
Alex did a great job serving my needs.
Do you have a question about this Accessories and Part?
Info for this part was:
At etrailer.com we provide the best information available about the products we sell. We take the quality of our information seriously so that you can get the right part the first time. Let us know if anything is missing or if you have any questions.


Thank you! Your comment has been submitted successfully. You should be able to view your question/comment here within a few days.
Error submitting comment. Please try again momentarily.