How to Install Pop & Lock Tailgate Lock on a 2012 Ford F-150 with Backup Camera
Question:
Hi, Was wondering if 2013 F150 with back up camera has factory wiring for pop and lock power tailgate lock. any information is helpful.
asked by: Lamme
Helpful Expert Reply:
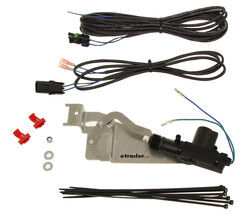
For your 2013 Ford F-150 installation of Pop & Lock tailgate lock # PAL8250 will be the same as in the video I have linked on a 2013 F-150. And for the written instructions they are as follows:
1. Lower the tailgate and remove the access panel.
2. Release the passenger side rod end from the scissor link, remove the passenger side 10 MM nut holding the scissor link bracket. Install the 2 flat washers included in the kit onto the stud and install the lock bracket. Reinstall the nut and tighten. Make sure the two arms of the lock crank straddle the toggle link before you tighten the nut. Connect the rod end onto the scissor link.
3. Locate the wires to connect to. If the truck has 2 doors or access cab then the wire will be in either side kick panel. If the truck is a true 4 door (crew cab) then the wires can be located in the step plate.
2009 and Up Ford F-150: locate the Grey/with a Brown(tan) stripe wire and the Light Blue/with Green stripe wire on the drivers side. For the passenger side locate the Grey/with a Brown(tan) stripe wire and the Purple/with Grey stripe wire.
4. Feed the round bullet connectors on the end of the short wiring cable into a drain hole at the bottom of the tailgate and up to the power tailgate lock. Connect them to the wires of the power tailgate lock.
5. Route the other end of the short cable to be located between the bumper and the truck bed.
6. Connect the short wire harness to the long wire harness. Locate the connector so that you can unplug the two if you need to remove the tailgate. Coil and tie the extra length of the short wiring harness inside the tailgate. Don’t attach it to the truck.
7. Route the long wire harness along the frame rail and the existing wiring on the driver’s side of the truck. Use cable ties to attach the harness to the existing wiring underneath the truck. Follow the existing wiring under the cab and up the firewall to the grommet at the hood-release cable.
8. Pull the wires through the grommet and lead them to the of the location of the wire found in Step 3.
9. Connect the long wiring harness wires to the factory wires using the tap connectors and test the system. Lock and unlock the doors using the power door lock switch. The two crank arms should flip the toggle link up and down to lock and unlock the scissor link. If the lock operates the opposite of the doors, switch the two leads at the bullet connectors off the actuator.
10. The system is now fully installed. Perform a final check and make sure lock functions properly. If everything works, reinstall the access panel.

Product Page this Question was Asked From
Pop & Lock Custom Tailgate Lock - Power - Black
- Vehicle Locks
- Tailgate Lock
- Keyed Alike
- Vehicle Specific
- Power
- Black
- Pop and Lock
more information >
Featured Help Information
Instructions
Miscellaneous Media

Continue Researching
- Shop: Truck Tailgate Lock
- Shop: Pop & Lock Custom Tailgate Lock - Power - Black
- Q&A: Wire Colors Used to Install the Pop and Lock Tailgate Lock part # PAL8250 in a 2012 Ford F-150
- Search Results: pl8250
- Q&A: Troubleshooting Pop and Lock Tailgate Lock Installed on 2013 Ford F150
- Q&A: How Do I install The Pop & Lock Custom Tailgate Lock On My 2014 Ford Raptor
- Q&A: Troubleshooting the Pop & Lock Custom Tailgate Lock on a 2013 Ford F-250
- Q&A: Power Tailgate Lock for 2014 Ford F-150 Lariat
- Q&A: Custom Tailgate Lock That fits 2012 Ford F-150 Raptor
- Q&A: Accessing Wiring To Install Pop and Lock # PAL8250 Tailgate Lock on 2013 Ford F150 Regular Cab
- Video: Pop and Lock Tailgate Lock Installation - 2012 Ford F-150
- Video: Pop and Lock Tailgate Lock Installation - 2006 Ford F-150
- Search Results: testers
- Search Results: circuit tester 3808
- Shop: Hook Probe Circuit Tester
- Video: Choosing the Right Trailer Wiring
- Search Results: trailer brake controller
- Shop: RoadActive Suspension Custom Leaf Spring Enhancement Kit - Heavy Duty
- Shop: Suspension Enhancement
- Article: Trailer Wiring Diagrams
- Video: Roadmaster Active Suspension Custom Leaf Spring Enhancement Kit Installation - 2018 Ford F-150
- Shop: Tekonsha Prodigy P3 Trailer Brake Controller - 1 to 4 Axles - Proportional
- Shop: Trailer Hitch
- Article: How to Choose the Right Trailer Hitch Class
- Search Results: brake controller
- Video: RoadActive Suspension Leaf Spring Enhancement Kits Standard Vs Heavy Duty
- Shop: Universal Installation Kit for Trailer Brake Controller - 7-Way RV and 4-Way Flat - 10 Gauge Wires
- Shop: Trailer Wiring
- Article: Wiring Trailer Lights with a 7-Way Plug (It's Easier Than You Think)
- Search Results: hitch


