
Summer Starts Here - Save up to 70%
To see if this custom-fit item will work for you please tell us what vehicle you'll use it with.
Thank you! Your comment has been submitted successfully. You should be able to view your question/comment here within a few days.
Error submitting comment. Please try again momentarily.
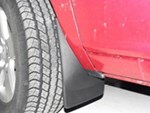
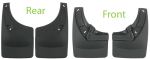
These premium mud flaps are easy to install and digitally designed for a perfect fit. Protect your vehicle and your trailer from road debris. Flaps are constructed of durable thermoplastic resin.
Features:
Precision fit, durable components and ease of installation make WeatherTech NoDrills your first choice in mud flaps. Installing mud flaps has never been this painless. Quick and easy installation with OEM hardware - no drilling required.

Videos are provided as a guide only. Refer to manufacturer installation instructions and specs for complete information.
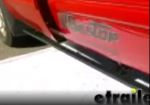
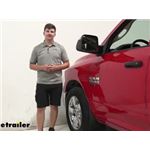
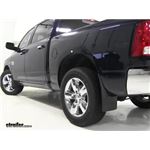
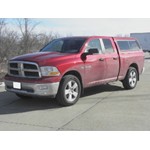
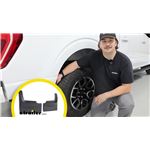
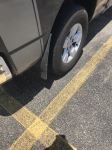
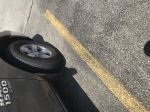
Hi there Ram owners. Today on your 2019 Ram 1500 Classic, we're going to be taking a look at and showing you how to install WeatherTech's mud flaps for both the front and the rear. These are a custom designed and molded plastic mud flap that's designed to contour with your truck's existing body curves. So it gives it a nice finish, but it's also going to ensure that we keep all that mud off the vehicle, and it's not going to get down in the cracks here. And if it does get a little bit of dirt, we've got a film here that ensures that no damage is going to occur with our paint. And you'll see when we install it, when we go to remove our factory components, there's no film on your factory components and there's likely already abrasions there.
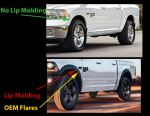
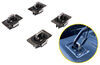
So I like that WeatherTech has taken the extra step to ensure that their product is not going to cause any abrasions onto the paint.And if we come up to the front here, you can see that they're also custom molded to the contours of our Ram, and it gives it a nice look that's also going to help protect the finish from the rest of our vehicle, because we're not going to be throwing that rocks, dirt and debris up on the side of our body when we're going down the road. These are a no-drill installation. Now that being said, there are optional holes in your mud flap to increase the stability where it's attached. With those you will have to drill out those extra holes, but it's not necessary. There's enough holes provided that uses factory hardware and the hardware provided to have it secure where it is.
We went ahead and did drill out and attach the extra mounting holes just to ensure that it's going to be as solid as possible, and so you can see at home how to do so.Mud flaps not only make your truck look like you use it as a working truck and gives it a more aggressive look, but it's also going to help protect the paint on your truck, mainly from the front mud flaps, keeping it off your vehicle, but also on any of your expensive cargo that you're going to be hauling. Whether it be a big boat you're hauling behind you or a fifth wheel or toy hauler, you don't want to be flinging up dirt, rocks and stuff, messing up the paint on those surfaces. So you can protect your investment and make your vehicle look cooler all at the same time.We'll begin our installation on the passenger side, you can start on the driver's side if you want. We need to remove the plastic trim piece that's located here, because our mud flap is going to go in that position. There are two bolts we're going to need to take out on the inside of the fender liner here with an 8mm socket.
Now we are on a lift just to get it up higher, but you could easily do this on the ground. You don't need to jack the vehicle up or anything like that, there's plenty of room to work. This is just for camera purposes. We're just going to get both of these removed here. You can, if you want to use power tools, a lot of times you can turn the wheel left or right to give you a little more room, but these usually come out pretty easy.
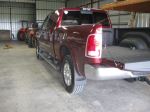
Once you break them loose, you can usually just take them out by hand.On bottom, we're going to have one screw we're going to take out with a Phillips head screwdriver. And sometimes with these screws, they want to be a pain. So if we give a little bit of downward pressure while we're unscrewing it, it'll pop out of there. As you can see, it's a little clip there. And the way these are supposed to work is the center is supposed to unscrew, and then you can pull the pin out. But it's pretty common that dirt builds up in there and it just makes the whole thing start to spin. So that's why if you just give a little downward pressure, you can just get the whole thing out like that. Next, we'll take a cloth with some alcohol on it. We're just using some isopropyl alcohol. And we're going to clean off all this area because we do have a protective film we're going to be putting on to ensure our new mud flap isn't going to vibrate and cause any scratches or abrasions to the paint.Now that we've got the area all cleaned up, you can see there's some markings where the old plastic piece was, and these are actually damaged to the paint, so it's never going to clean off. That's why we're putting this protective film on there before we put our mud flap on, so that way we don't leave any marks behind from this one. But we do first want to just hold this mud flap up here. You want to make sure you got the one for the right side. And we're just wanting to get an idea of how high this mud flap is going to sit so we know where we want to position our protective film. It's going to be in about this position. So it looks like it's pretty close to where our old plastic piece was that we took off. It does stick out a little further down here towards the bottom. So we can use this little bolt here as a mark to know where we want to line up our protective film.So now we know where we want to put our film, we're going to just going to spray some soapy water on here. And this is going to allow the film to slide around so we can get it into position. Your film is going to be labeled right and left side. So we want to make sure we take the right side, since we're on the passenger side here. We're going to peel that off, and the sticky side is going to go right over top of our soapy water there. And this is going to make it so we can slide this around easily so we can get it into position. And we want to try to work out any bubbles you get under it, so just push those out as you're working it into position.Next, we can hold up our mud flap and reinstall the screws that we removed. There are some spacers that come included with your kit. So as you see fit, you can put those behind here just to make it line up. If it seems like it's flexed out or anything like that, you can just add a little shim to the backside of it to make sure that it's flush. You're going to get varying thicknesses of these, because it's going to vary due to manufacturer variances, on which size you're going to need, if you need any at all. We're going to start with none to see how the fit goes, and if it doesn't look like it's sitting on there properly then we will add some spacers.So we're just going to thread our hardware in and then we can just snug it back down. So our mud flap has good fit and form without the spacers. But if you did want to add some, this is what they would look like. You just peel them off and you can see they've got the thickness of them written on it. Now that we've got these attached, there's another attachment that's optional, but will help increase its stability. If we go a little bit further in, there's a hole here. And all we need to do is just drill out through that hole. So we're just going to line this up and we're just going to drill into the plastic panel right behind it. We're just using a 1/4" drill bit to do this. We can then take the small bolt that comes in our kit, place the washer onto it, and then we're just going to thread the nut on the other side. We can then go back and tighten these down.Now that we've got this mud flap installed, we're going to repeat the same procedure over on the other side for the front, and then we're going to show you how to get the rears installed. Now, here in the rear, we're going to start getting these on. We're going to start on the passenger side, you can start on either side. We're going to remove the trim piece, just like we did in the front. We're going to remove the two bolts here with an 8mm socket. And these aren't very tight, so usually you can just get it started with your tool. And since it's so close to the tire, you often can't get a power tool in there. If you had a swivel, you might, but once you get them cracked loose, you can usually just take your socket off and then just spin them out by hand. On the bottom side of our plastic trim piece, we're going to remove the Torx bolts that are located down here using the included T20 Torx bit.And these are a plastic pin. So once you take the center of the head out, it just pulls right out of there. If you're having a difficult time getting it to start, you can reach around the backside and just pinch the plastic piece, and then you can get it to come out and you can pop it out. We'll then just take this piece aside, we're not going to be reinstalling it, and then we can clean up the area with some isopropyl alcohol to get all that dirt off of there. Just get all the dirt off of there, so we're not pinching it behind, because we are going to be also be putting on a protective film back here. And this is going to ensure that our new mud flap doesn't cause any scratches or abrasions due to little vibrations over time.And you can see here that the factory trim piece that we removed has left some abrasions behind. You can really see almost an outline of where it was. And that's the main purpose of this film that we're going to put on is to ensure that we don't have that happen with our new mud flap. So now we're going to take our mud flap and we're just going to hold it up there so we can see how it's going to fit. And we're going to be putting this film on but we need to know how high up and where to put the film. So it looks like it pretty much does go up as high as where our old trim piece was, and it starts to come further down here at the bottom. And I always just have a look in, there's a couple of . There's a bolt here, there's a little alignment peg right here, and that's about how far our mud flap came out, was this alignment peg. So just use some details on the vehicle as a mental note where the things are.We'll then take some soapy water and we're just going to spray it on the area where we're going to be putting our film. This is going to allow us to slide it around and get it in the proper position. And you'll just peel your film off, it is labeled right hand and left hand side, so make sure you get the appropriate side. We're on the passenger side here, so we're going to be using the right hand side. And we're going to put the sticky side of the film right onto the vehicle. And I like to just roll it on and slide it up. And we're more concerned down here with the bottom. It's not going to go up quite as high as our mud flap, but really it was more towards the front here, it didn't really wrap around the side. And we're just going to work the bubbles out of it with our fingers until we get it into position.Once you've got it in position, we can take our mud flap. We're just going to hold it up there, lining up the holes with the factory holes. And then we're going to use the factory hardware that we removed to secure it. It's best to get both of your bolts started first before tightening them down. Because as we tighten it down, we want to keep pressure on our mud flap, holding it into place. Also, included with your kit you will receive some spacers, and these are optional, and they may or may not be necessary. If your mud flap seems to be slightly deformed and it doesn't want to fit quite properly, the spacers are designed to help take up some space where our old classic piece used to be, so that way it will fit more appropriately around the curves of our vehicle. Now we've got in position, we're going to make sure they're fully snugged up. You don't need to go crazy with them. And then we can repeat the exact same process over on the other side.And that completes our installation of WeatherTech's mud flaps for both the front and the rear on our 2019 Ram 1500 Classic.
Average Customer Rating: 4.8 out of 5 stars (1380 Customer Reviews)
These premium mud flaps are easy to install and digitally designed for a perfect fit. Protect your vehicle and your trailer from road debris. Flaps are constructed of durable thermoplastic resin.Seems like a solid product. Made in the USA. The instructions were a bit off. So I jumped on the etrailer YouTube account, found the install video. Issue solved. I will say I'm more impressed with etrailer than weathertech. However, nice fit and finish. I would recommend this product.
The front ones fit perfectly the back one I had to drill a hole and add a bolt so the stayed with the inner fender liner. Looks good.
The front mudflaps actually required drilling one hole in the plastic inner fender well (which was not mentioned in the advertisement, nor in the installation instructions...it was supposed to be "drill free") to mount, and the mudflap kit came with the fasteners needed to fasten the mudflap through this drilled hole. I would not have drilled through metal, but I was good with drilling through the inner fender well. The fit for the front was very good, the fit for the rear was OK.

Dave Y.

1/30/2018
Yes...I bought them for a trip we were making to Alaska. They worked great and wouldnt hesitate to buy them again.
The fit and finish of these Weather Tech mud flaps is very good. They install in just a few minutes and I especially like that no drilling is required. Pricing from etrailer.com was very competitive and shipping was very fast.

Terry O.
7/29/2018
To resolve a vibration I removed the screws, adding black RTV liberally to the threads. This solved the problem and my flaps still look and perform as good as new.
Fit like advertised, appears to be sturdy, but i put an extra screw for a little added strength. As usual e-trailer was quick on shipping and love the personal touch they give.

Bushy
3/28/2016
Held up well and performed like it should. Spent a month in Idaho Wilderness and 3 weeks in Montana both in Winter held up well
The instructions that came with the mud flaps were very generic... I called the manufacture and they walked me through it NO issues now !!!

Chip
7/15/2017
As far as mud flaps go, they havent fallen off and keep the mud off the truck!
Holy smokes!!! These are the nicest and easiest mud flaps I have ever installed! Had all 4 installed in under an hour, at a slow pace.
Daniel H.
2/13/2021
Love my mud flaps a year later! Easy to install and very durable!
Good quality, packed well, but not exactly screwless in my case. As it turned out I did have to drill an extra hole both front and back. In the case of the front, the flaps actually had 3 screw holes, but my 2016 Ram 1500 crew cab didn't have a hole in the well well shield for the inner-most screw hole in the flap. So I drilled a hole in the plastic truck wheel well shield and used one of the bolts that came with the kit. In the back, the truck had 3 screws holding the wheel well shield to the fender, but the flap only had 2 screw holes. If I hadn't drilled a hole in the flap for that 3rd screw, the flap wouldn't have fit the contour correctly. None of that was a big deal.
However, I was expecting the flaps to do a better job covering the tire. They leave 3-4" of tire exposed on the outside. I guess it's a matter of whether you're looking for appearance or function. They do look nice, but for me, I would have looked for a wider flap.
I'd like to give this product a 5, but the top bolt on the front set is a little odd how you have to use a nut behind the metal instead of using the factory bolt and metal nut on the inner fender well. Both sets, front and back, are no drill and mount very easily. I have a 2015 that had the little rock guards that had to be removed, the factory plastic rivets are a pain, but there are included plastic washers to allow you to put the rivet back in. These should help to keep the road grit off my truck and hopefully prevent some rock chips on the rockers.
Very good mud flaps. Fit well and easy to install. The only thing is that the instructions do not tell you that you have to remove the factory fender guards, if they are mounted on the vehicle.
Excellent product. Took about 20 minutes to install all 4 mud flaps. I really liked the 'no drill' installation and they fit like a glove. A little more than I would have liked to have paid but as always, you get what you pay for. Timely delivery too.
Product was spot on as advertised. Installed in minutes, no tire removal required. I would recommend this item to anyone. I would also like to commend e-trailer on their super fast shipping....A+, received product within 3 days.
Ordered these mud flaps Monday night at 10pm, they arrived that Wednesday, and I had them on the truck (2012 Ram) by Thursday. The installation was simple, fit was good, and they look great.
No issues installing the Mudflaps.
Outstanding service. Ordered on Thursday and received on Sunday,3 days later. They keep you well informed on the status of the order and the install videos are first class. I highly recommend etrailer.
Perfect fit for my Ram 1500. As soon as I installed them I took the truck out to play and bent one of the rear flaps backwards on a rock. It snapped right back into place.
Easy installation and they look like factory equiptment.
Mud flaps fit as stated from etrailer. Good job
perfect fit

They fit as advertised but are way to small and do not stop mud as advertised.
Great Product and awesome turn around. I even ordered the wrong pair and they were super helpful on getting the situation resolved.
The look great and function well!
Great product easy to install.
perfect fitment... quick n easy.
Product arrived quickly. Have not had a change to install them buy they look good.
Do you have a question about this Mud Flap?
Info for this part was:
At etrailer.com we provide the best information available about the products we sell. We take the quality of our information seriously so that you can get the right part the first time. Let us know if anything is missing or if you have any questions.


Mike
2/22/2019
After a year my mud flaps still look and fit like new. Zero issues. Just wish they were a bit wider.