
Summer Starts Here - Save up to 70%
To see if this custom-fit item will work for you please tell us what vehicle you'll use it with.


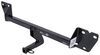
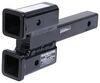
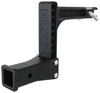
Designed for use with motor-home-mounted tow bars, the direct-connect brackets are virtually invisible, easy to mount and remove, and they eliminate the need for a quick-disconnect crossbar on your tow bar. Installs on your vehicle's frame.
Features:
Note: Roadmaster direct-connect base plates will only work with Roadmaster tow bars that slide into a trailer hitch, such as the Nighthawk, Sterling, Blackhawk, Blackhawk 2, Falcon, or Falcon 2. These base plates will not work with tow bars that require a hitch ball.
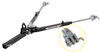
The drawbars, or front arms, on this base plate kit are supremely easy to mount and remove. Just insert them into the brackets and twist to lock them in place. To remove each arm, simply tug the built-in pull pin to disengage the lock, twist the arm back and pull it out of the bracket. Once the drawbars have been removed, the remaining brackets are virtually invisible. On most automobiles, the brackets are mounted within the grille, where they remain not only unseen, but protected from scrapes and scuffs as well.

Videos are provided as a guide only. Refer to manufacturer installation instructions and specs for complete information.
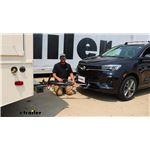
Hey everybody, Ryan here at Etrailer, and today on our 2020 Buick Encore GX ST, we're gonna be showing you how to install the Roadmaster Direct Connect base plate kit with removable arms. Before we get into that, though, let's just take a couple minutes, check this out, and make sure it's gonna work for you. Before we jump right in, I figured it'd be useful just to kinda refresh ourselves on the main parts we're gonna need to flat tow our Buick down the road in the first place. First part will be the base plate, and that's gonna provide us with a solid and reliable connection point. That way we can hook our tow bar up to it. Tow bar'll be the second component.
This is gonna be the actual physical link that connects the front of our Buick to the back of our motor home. Third main part will be safety cables, and these are just there in the event of an unlikely disconnect. We're gonna keep everything paired together. The fourth main part will be tow bar wiring, and what this is gonna do is transfer the lighting functions from the back of your coach to the back of your Buick, keeping you safe and legal. And last but not least, the fifth main part will be a supplemental braking system, and what this is gonna do is apply the brakes in your Buick whenever you hit the brakes in your coach, helping to bring you to a more complete and predictable stop.
Something else that I do recommend picking up is the Roadmaster automatic battery disconnect switch. And I say that because the Buick does require the battery to be disconnected whenever you're flat towing. So as opposed to having to pop the hood every time, disconnect the battery manually, and go through all that trouble, with this setup, all you're gonna have to do is push a button that'll disconnect the power for you. You can flat tow. Whenever you're ready to unhook, you simply push that button, everything'll get powered up, and you'll be ready to go.
So it just saves a lot of time. And then there's something else. It's called a stoplight switch kit. I recommend that if you're gonna be using either one of these supplemental braking systems, the Demco Stay-IN-Play DUO, which we used here today, or the Roadmaster InvisiBrake. And I say that because with that stoplight switch, it's gonna give you an accurate reading in terms of what the brake pedal's actually doing and if the braking system is operating as it should.
This is what the front of your vehicle can look like whenever you're not flat towing it. And I feel like that's pretty important, especially on a vehicle like the Buick. You know, really clean SUV, and if possible you don't want a ton of noticeable parts up here in the front. I don't really think could get much better than this setup, to be honest with you. Everything's kinda tucked in back there, not super noticeable. You don't have to cut a bunch of stuff out of the front of your car to get this all to fit. So I think they did a good job in terms of that. I do like, too, the base plate's gonna have some bracketry on it that'll allow you to mount up your electrical connector and your breakaway switch for your braking system, which just kinda streamlines the whole process and makes everything a little bit easier on you. Whenever you are ready to hook up, everything's gonna be pretty streamlined, to be honest with you. The kit uses these removable arms. So these are a direct connect style. And what happens, you put these in, rotate 'em about a quarter turn. They'll lock into place. Same deal for the one on the other side. And now that's gonna give us the attachment point to be able to hook our tow bar up. As far as getting the tow bar attached, really simple. All the other components are easy to see and get to, but with this being that direct connect style, just lines up, put your pin through, and lock it down. So this base plate is gonna work with those Roadmaster type tow bars as well as some of the other manufacturers. What a lot of 'em are doing now is making adapter ends. So let's say, for example, you have a, already have a Blue Ox tow bar, you really like one of theirs, but you wanna use this base plate kit. Chances are pretty good you can get the adapter in, swap the ends out on the tow bar, and allow you to pair it up with this base plate. This is how the vehicle'll look when you are ready to flat tow. And I like it. Everything's easy to get to, easy to see, looks organized, and so you can't really ask for too much more. Now, with that said, this base plate is gonna work with the ST models of the Encore. If you don't happen to have that trim package, there are other ones available that you can look into. I do wanna mention the use of what's called a high low adapter, which is this piece right here. And some of you may need it, some of you might not. And the reason you could potentially need it is to make sure that your tow bar is gonna ride nice and level. That way everything pulls correctly and works as it should. So it's really easy to figure that out. You can pull your vehicle up to your motor home, something like this on preferably flat ground, and measure from the center of the pin hole down to the ground. In our case that measurement was 16 and a half inches. And then measure from your motor home's hitch pin hole down to the ground, and you want that measurement to be within three inches. That's kinda the safe zone there. If it exceeds that, usually the motorhome's up higher. If it exceeds it that's where the high low comes into place. So on ours we have a two inch drop, drops it down a couple inches and allows us to make sure our tow bar is level. Other than that, you know, if I had an Encore and I was flat towing it, I definitely wouldn't hesitate to use a setup like this. You know, it looks good and it's easy to see and get to, so you really can't ask for too much more. In terms of the installation, not as bad as you might think. We've done quite a bit of vehicles, and this one probably falls somewhere in the middle in terms of difficulty. You know, so just take your time and stay focused. Really shouldn't run into too many issues. But with that said, if you'd like to hang around, we'll go ahead, pull into the garage, and get started on it now. To begin our installation, we're gonna be here at the front of our Buick, and you can pop the hood. We're gonna need to remove the front fascia, and so we can start by removing three fasteners on each side of our vehicle. The fasteners are gonna have a T15 Torx bit head. We'll pull that one out. This one we can skip. We can get this one and this one. And I wanna mention from this point on, anything we do to one side of the vehicle, we'll also do to the other side because it'll be set up the same way. Just over here on the passenger side we have our washer fluid bottle. There's a push pin fastener. We're gonna remove that fastener. So you can take a trim tool or flathead screwdriver, pry underneath the head of it, and then work that whole base out. With the fastener out, now you wanna just grab this and kinda rotate it side to side, pulling up on it, as well. And we can set our filler neck off to the side. Underneath the front of our vehicle now, we're gonna have this underbody panel. We're gonna remove it. So essentially just kinda all around the edges of it, there's gonna be seven millimeter head screws. So we just work our way around and get 'em all pulled out. (tool whirring) And in our case back here, there's a pushpin fastener in there. Yours may or may not be set up like that. But either way, all the fasteners are gonna have to get removed. (tool whirring) This looks to be the last one, and if it is, I missed one here in the corner. Once you get 'em all out, it should drop down and we can set it off to the side. On each side of the vehicle, there will be another pushpin located in this area. So we'll get that removed. And if you kinda work over to the side there, there's gonna be three T15 screws. (tool whirring and clunking) If you pull this down, you'll see two 13 millimeter head bolts here, and on each side of your vehicle. We'll pull those out. (tool whirring) Moving to your front wheel wells now. If you turn your tire one way or the other, gives you a lot more room to work. There's gonna be some Torx bit fasteners, and up towards the top a little bit, there's a pushpin. So we're gonna get that removed. I believe there is five. We have five of these T15s. So we'll just work our way all the way around. (tool whirring) So what I've done, put some tape around the seams here, 'cause eventually we're gonna be popping some of this plastic off. I don't wanna scratch anything. But if you take your liner that, now that we undid it, and kinda push it in, we're gonna have the side marker light that we need to pop out. So you can unplug it from back here. It's kinda hard to get to. What I like to do is just push the light out of position. And I'll show you here once I get it. there's some tabs on the back that you push in. So that's why I was taking my finger and just kinda pushing in on that and pulling the light out, and a little bit easier to disconnect now. So there's a red tab. Pull back on it. Then if you push down on the center, you can get it off. Sometimes they're tight, so helps to have a screwdriver or something to give you a little more leverage. This is how pretty much all the tabs are gonna work here in terms of getting 'em unplugged. If it's super tight and it's not working when you're pushing down like that, if you're really careful you can come in, kinda pry up on that to get it to release, as well. So with the light out of the way, in our case we have this sensor here, too, and eventually we'll unplug it. This one's a little harder to get to, so I think we might release this plastic trim first and then make it easier to get behind there. So with the plastic trim, kinda like the light, there's some keepers on the backside of it, and if you squeeze the sides in, you should be able to get this to kinda pop free. So you can start to get this popped out, which I've done, and it's really tight, so be careful. You can squeeze down on these things while you're pulling out. So if you need to come in from the back, you know, and with a pair of pliers or something, kinda squeeze that, pull it out. Using a trim tool like this, too, to get a little leverage on it definitely makes things easier. And that's actually what's kinda holding this whole thing in place here. So we're just gonna work our way up till we get to about this point here. With our blind spot sensor, if you kinda pull on the tabs a little bit, you can actually push that sensor through, and with this one you can unplug it if you want, but since we have it released now, I'll probably just leave it plugged in and kinda push it through the opening there. If you kinda hold this trim piece out in the corner here, there's gonna be a seven millimeter head screw. And since that is gonna be one of the fasteners holding our fascia on, we're gonna need to remove it. Now with an extra set of hands, we should be able to remove our fascia. So if you start in the corner, here's this clips, you know, that this is pushed into. I have to lift kinda up on the front here to clear some of the components and carefully remove it back. There may be some electrical wiring looks like in our case maybe on each side we'll have to disconnect. Here's one of the connectors. It works the same as the others. You have a red tab, push on it. Push down on the center or in the back like I showed you earlier to get it unplugged here. One here on the passenger side, same deal. Red tab back and separate it. And then with the fascia free, we can set this off to the side. On our air dam on each side of it, up at the, towards the top of it here, you can trim it. I put a mark about in the area where we're gonna cut. So I'm just gonna use a pair of snips and separate it like that. To get the actual air dam removed, on each end of it, you come in from the bottom. Gonna take a secure driver, push up on the tab. You can get this out of the way. On each side of our vehicle, we're gonna need to trim a small portion off of our, the front of our intercooler. So this is just these fins here. When you're doing this, be real careful. You don't wanna actually hit the intercooler, you know, because then you'll have some issues there. So be real careful when you're doing this just to trim off the small portion. I like to use a multi-tool 'cause it kinda gives you some more control. But Dremel tool, maybe some snips, kinda whatever you got will work. So come in and get that done. (tool whirring) Just over here on our driver's side you'll see this small PCM. If you push up on them tabs, you can kinda pull this out. Just let it hang for now. And then we're gonna have this big harness here, too, but you can just kinda pull out on that and it'll release. Moving over here to the passenger side, we're gonna have this air sensor here, and you'll need to disconnect it, which I've done same exact way that we've been doing the others. You know, that retainer clip pops out. You can squeeze down on it or carefully come in and pry up on the top to remove it. And then focusing over here by our washer fluid reservoir, there's some connectors, as well. We'll disconnect this one. Same, red tab, push down. These are a little different. Could take a, I just happen to have a pick. You can take a small flathead. With these, there's really no retainer. You're just kinda coming from the back. Push up and they will release. So what you can do now is just kinda pull all the wiring and tubing off of our fluid reservoir. There's a couple pushpin deals up here. You can pop them out. And we are gonna need to disconnect this. And so what I think I'm gonna do, I got a piece of tubing here. I think when I pull these off I'm gonna try to loop 'em together. Hopefully this is long enough so I don't make a big mess. But we'll see here. With this, just carefully, you know, work one of the ends of the rubber fittings off. I'll leave that almost ready. I get this one almost ready. That way I can pull 'em both off and they don't spill everything here. We're gonna remove the hardware now that's holding this in. It looks like there's three. (tool whirring) And it looks like they're all gonna be a 10 millimeter. (tool whirring) Here. (tool whirring) We can lift this up and get it out of our way. Just over here on the driver's side, this big plastic piece which, you don't have to do this, but it'll help make things a little bit easier, give you more room. You can unbolt that. There's two 10 millimeter head nuts you can pull off and this kinda just pops out. That way we can kinda push it further off to the side. And when we're ready to drill our openings into the frame there, we'll just have a little more space to work with. You can grab the side specific bracket. So check the diagram and instructions, give you some guidance. And this is gonna line up with our pinch wall up here like this. So you might be tempted to push this all the way back like that. But you don't wanna do that on this end here where it kinda starts to ramp up a little bit. You're gonna want that corner to line up with the corner on our pinch weld. So like that. And holding this into position where it needs to be, and then take a pen and use the holes in this bracket here to draw onto the frame. That way we can get these drilled out. I'll come in with the proper size drill bit and get these opened out. (tool whirring) Once both of those are drilled out, you take the plate, you take the three eights by inch and a quarter bolts and you push the bolts through. Where the bolts come through, you can take a split lock washer, put that on, and then on the nut, or you can do this on the thread of the bolt, whatever works, take some red Loctite, put it on the threads, and all the hardware that we're gonna use to secure the base plate will receive some of this red Loctite. Doesn't come with it, but you can pick a tube up here at Etrailer. And the same deal for this one back here. Already got the Loctite on that nut. So we'll just get these started hand tight. We can grab these lower brackets again, side specific. It's gonna kinda sit like that. You take the three eighths by inch and a half bolts, put them through, have a flat washer, split lock washer, and a nut and get these hand tight. And same hardware combo for that hole there. Go ahead and grab the longer three eighths bolt. Put your Loctite on, flat washer, then I'll run from the bottom up like that, and another flat washer, split lock washer, and hex nut. We're also gonna have these brackets again, side specific, but that hole there is gonna line up the hole in the frame and so it's gonna sit something like this. So what I'm gonna do, take the half inch bolt and flat washer and some Loctite. Helps if you have a magnet or something, too, to hold it, 'cause you do have to kinda push it through a little opening there. But that's gonna go through like that. And then you can put on another flat washer, split lock washer, and a hex nut. At this point we can snug down all of our three eighths bolts. So 9/16ths socket and wrench. And we wanna work from the top down. (tool whirring) And in that same order from the top down you can come back with a torque wrench and make sure all the hardware is tightened down to the specs in the instructions. Now with an extra set of hands, you can get the center section into position. So the three holes of it are gonna line up with these three holes and those two on that other bracket. So you'll put it in between 'em And you might have to kinda work things around or get it started kinda closer to the same time. Probably be a tight fit. If you kinda angle each side, at least get the top one to get started. You're gonna take the little bit shorter half inch bolt, put on your Loctite, and push that through. Where the bolt comes through, put on a flat washer, a split lock washer, and a hex nut. Get it started hand tight. With this being kinda tight, you can take a prybar screwdriver, whatever you got, and kinda pull it into position like that and then get the other bolt started. So these ones are just a little bit longer. Push that through. and we'll kinda just do this one at a time on each side and hopefully everything will kinda pull right into place. So by kinda doing that one at a time, the base plate stayed in place lined up. This hole here, same longer bolt. And again on these two, the back is just flat washer, split, and hex nut. But with them all started, we can then come back with a three quarter inch socket and wrench and snug 'em down. (tool whirring) This bolt that we put back here, at this point grab your three quarter inch tools and snug it down, as well. (tool whirring) With all that snug, don't forget to come back and completely torque down all of our half inch hardware. With the base plate completely torqued down now, you can reinstall your washer fluid reservoir and get everything hooked back up opposite way that you removed it. As far as this wire that was going to the air sensor on our intercooler, some side plates might have a large hole here. If it does, you can push your connector in through it to plug it back in. Ours didn't, but thankfully there's enough wire to kinda run it around and plug it back into our air sensor. On the driver's side, you can resecure the computer and all this stuff, too, same or opposite way that that we removed it. And now at this point, it would be a fantastic time to install some of your other flat towing components like wiring, braking system, things like that. And I say that because if the fascia off, we're gonna have a lot more room to work. So that's exactly what I'm gonna do. And once I have that wrapped up, then we can work on potentially trimming out the fascia and getting all that reinstalled. So I got the rest of our components installed on the front of our car, our braking system stuff and our wiring and things like that. And so now we can go ahead and get our fascia back on. So what you can do is reference the instructions. That usually gives you some guidance. But I'm gonna just hold our fascia on here, kinda see where we need to trim, and go from there. After holding this up, it looks like we might only have to trim out one little area, which is outermost part here. This opening definitely needs to come out. So I'm just gonna use a pair of snips like this (tool snipping) Cut out another one on the other side of our fascia, too, and see if it goes on. So this ended up working. I was able to get our fascia on. It was tight, you know, so just take your time working stuff around, get everything to pass through. One thing you might have to do is if you have a connector plug like this, if you can't get it to slide through, you might just have to take, you know, disconnect it, push the wires through, hook it back up out here. It was really close. You could probably do it if you pried up on it, get the whole thing through. But other than that, I think it turned out pretty good. So with this in place now, we'll go ahead and re-secure everything the opposite way that we removed it. And that'll finish up our look at and our installation of the Roadmaster Direct Connect base plate kit on our 2020 Buick Encore GX ST.
Average Customer Rating: 5.0 out of 5 stars (2 Customer Reviews)
Designed for use with motor-home-mounted tow bars, the direct-connect brackets are virtually invisible, easy to mount and remove, and they eliminate the need for a quick-disconnect crossbar on your tow bar. Installs on your vehicle's frame.
It took forever to get it done but was worth the wait. The car tows great!
I have thrown out the etrailer name a lot.
Do you have a question about this Base Plate?
Info for this part was:
At etrailer.com we provide the best information available about the products we sell. We take the quality of our information seriously so that you can get the right part the first time. Let us know if anything is missing or if you have any questions.


Thank you! Your comment has been submitted successfully. You should be able to view your question/comment here within a few days.
Error submitting comment. Please try again momentarily.