
Thank you! Your comment has been submitted successfully. You should be able to view your question/comment here within a few days.
Error submitting comment. Please try again momentarily.
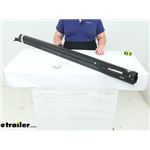
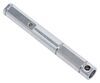
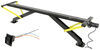
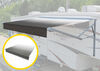
Replaces (1) 69" long arm assembly used to support your flat Solera RV awning.
Features:
Fits:

Videos are provided as a guide only. Refer to manufacturer installation instructions and specs for complete information.
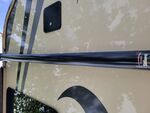
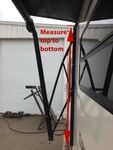
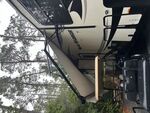
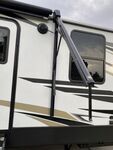
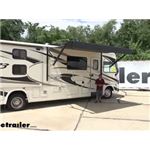
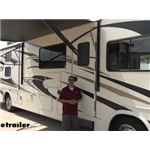
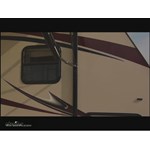
Rob: Hey everybody. It's Rob here at etrailer.com. And today we'll be taking a look at the Solera flat arm replacement support arm on our 2017 Forest River FR3 motorhome. Now you want to make sure you get the correct replacement part for your awning. So the way you're going to measure to make sure you have the correct arm is you're going to measure from the very top of the extrusion where the fabric goes into the motorhome. You're going to measure from that point all the way down to the bottom mounting point, where they are mounts into the wall.
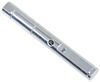
Now that measurement comes out to be 69 inches. Then this is the arm that you need to use to replace it. Now, the other thing to pay attention to is that our arms do come into different colors. We'll have the black, like we have here, but if you have white arms in a white awning, you might want to go ahead and pick up a matching one in white.And the support arm is going to be a direct replacement for the factory arm that came on your awning. And this is going to be a replacement for a flat awning and it is going to work for powered and manual awnings as well.
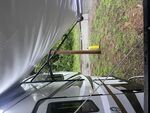
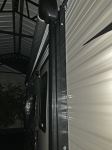
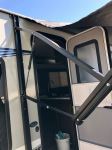
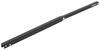
And here we have the original one that we took off. You can see up top here close to where it mounts, it's actually bent and it starting to crack. Well, that's obviously not good because if this breaks, then our entire mount will come off, not to mention where it was mounted, definitely took some abuse there to where it was actually starting to pull away from the motorhome. Now, the really nice thing about the replacement arm is that it does come as an entire unit. You can see if we open up our old one here, we can see that it has a shock inside.That's a nice thing.
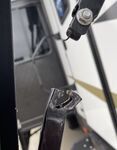
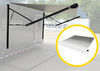
We don't have to take apart the entire arm to try to replace just this piece. It's going to be all one assembly which makes it really easy to get installed rather than having to replace a small component or the entire system. And slur makes really nice awnings. One thing I really like is the joint they have right here on the arm. It's actually a friction joint so we can change the pitch of our awning.
In case we have a lot of water up there, we can pull down on the arm and you can see it'll change the pitch just enough that we can get all that water to come off and drain off the edge. But the other nice thing is, is we're not going to have to adjust that arm to match the other side. We can roll our awning in and it'll automatically go back to the way it needs to.Now, as far as the installation, it's a pretty straightforward process. It's a replacement part. So we're simply just removing this one and replacing it with the new one. One thing I do definitely recommend is having a few extra people with you so they can help you hold things up and kind of hold things while you're getting things in place. Another thing you will need is either some butyl tape or some kind of silicone so we can seal up all the holes either from the mounting locations, or if you have a powered one where all the wires are coming through. Now, we're going to go and show you how to get everything on, so you can have the confidence to do it at home. The starter installation, we need to remove the arm that's damaged or that you're going to be replacing. On ours, this front one at the very top, that brackets bent pretty bad, but we need to get access to the bolts that are holding it to the motorhome.So we're going to extend it out far enough that we can access these lower bolts. So if you have a power arm like we do, you're going to extend them out. If we have this cover that's covering up the wires, typically you just grab behind it, pop it out of that channel at least far enough that we can see the bolts that are holding everything in. So you want to grab a 3/8 snap driver or a 3/8 socket. And we're going to pull all these out, two at the bottom and then the two in the center. Are the arms still being held on by the top bolts So we don't have to worry about it coming down, but you do want to be careful case it starts moving on it.Now, If you have a power awning as well, we're going to need to disconnect the wiring before we can pull the entire arm off. So any of these covers that are covering up the wiring, you want to go ahead and pull them out so we can get access to them. Now, the first ones we're going to have on ours is we're going to have these wires going to the lights. they're right above our awning. So we want to go ahead and disconnect those.Now those already have butt connectors on them, so I'm just going to cut them right before the butt connector. That'll also give me a good indication of which wire goes where. just leave a little bit out of the connector and have an easier time hooking them up later. So cut those wires and pull all the Slack down through and then if we follow the arm where our black cable is, it's going to come down this channel and actually come back up till it goes to the head. Now on the very back of the arm here, we pull down on that connector, we can get it disconnected and again, start filling that wire through so we can get all the Slack out of the arm.At this point, we want to make sure that we have something to rest the awning on. Because we're going to be disconnecting the head from the arm right here. Now the arm still attached to the motorhome, so we want to worry about it dropping, but again, you want something or someone to support the roller in this side of the awning. We'll grab a Phillips screwdriver or a Phillips bit and we're going to remove that large screw right there at the end of the arm.So now that we have our arm extended, the awning is supported. You want to double check your wires and make sure that you can actually pull the awning away and it's not stuck to the wires. Because we're going to move up top, remove the bolts and then remove the entire arm assembly. Just want to make sure that you have someone below supporting it because it is a little difficult to hold on to all of this while you're on a ladder. But there should be four bolts, we'll go ahead and pull all four of those out.And then gently lower down the ladder, lower down the arm and make sure the wires come through and they don't get stuck. So we're going to grab our new arm. Now at this point, you'll notice there's a big zip tie holding the arm together, leave that attached until we're ready to because the arm is going to open up just like the other one did. But for right now, we just want to attach it to the motorhome just the way we took it off. So we're going to attach the top first.But before we do that, I always suggest using some butyl tape. Now this is not going to come with the arm, but it's definitely a good idea to put some in. So seal up the holes that we have and we don't have to worry about any kind of water intrusion. The butyl tape in place and make sure you put any wires through that opening, line up our brackets, make sure the holes line up in the other locations. I'm going to take the new screws that come in our kit and we're going to drive them right into the side of the motorhome.At this point, very carefully we want to cut that zip tie and allow the arm to come out so that we can get access behind it, route our wires and connect the head. But again, remember there's that spring in there or that at least that shock, so it is going to come up pretty quick. So you want to make sure you have a firm grip on it. So we want to go ahead and make sure we start routing our wires through the opening at the bottom, just kind of pull the arm away, very gently until all that Slack to come through for all the wires.You put a little bit of butyl tape behind the mounting holes, then we can take a couple more of the included screws and secure them down in those same locations, the two at the bottom and then the two in the middle. So now we want to start routing our wires the same way that we took them off. The black wire will go up and eventually go to the head. And then for our power wires or red wires here, those are going to go up top to the light. So we're going to go ahead and route those and get everything connected up.So this point we want to bring the head over to the end of the arm. Now we did end up getting the head screwed in and back on the arm, but I will let you know it was a little bit of a battle trying to get everything lined up. Partially because we had the arm on the other side fully extended. So there is a lot of tension on that arm. So what you can do is, is if you come to the pivot point and actually grab the arm and pull it down, that will change the angle of the awning, and it'll give you a little bit of Slack, you kind of have to play with it. So you get one side a little bit loose, move to the other side, pull down and kind of go back and forth until you can have enough Slack to get the head connected back electrically and to put that screw back in place.And then the final step is going to be rolling the awning in and out a couple times, make sure that the fabric is nice and centered and that the arms are working properly. And if everything is in adjustment, the fabric should be straight on the roller and the arms should go into place all the way locking in on both sides. Now that we know that our awning moves in and out perfectly fine, that'll finish up your installation and you look at the Lippert replacement arms for Onyx. But again, I'm Rob here at etrailer.com and that'll finish up your look at the Solera standard flat awning support arm on our 2017 Forest River FR3 motorhome..
Average Customer Rating: 4.6 out of 5 stars (92 Customer Reviews)
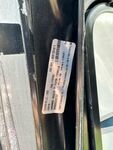
Replaces (1) 69" long arm assembly used to support your flat Solera RV awning.69 inch awning shipped in a 69 inch labeled box. Fairly easy installation. My Cougar has pop rivets in the lower and middle position which I drilled out and replaced with the supplied screws. E-trailers pricing was better than any one I found. Received on the 3rd day after ordering. Worked perfectly.
Havent tried to install it yet so I’m not sure about fitment. Etrailer staff was very helpful on the phone helping me get the correct part.
The Awing was easy to install after viewing the video. I Have run it in and out a few times, and it has worked perfectly. Another great product from etrailer.

Fast delivery. Part ha worked perfectly since installation
Everything was as described .
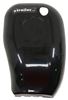
But also need a cap
Had no idea that it was required.
Lost a week in installation.
Still pleased.
Philip
Tail swing on 30' trlr thru a 11' gate with a turn required to get thru sorta messed up one support arm of the Solera power awning. I did some looking and found that etrailer had exactly what I needed, a speaker head cover for the arm and a 69" support arm assy. I ordered the parts I needed and when they arrived I was relieved to know that they were genuine Lippert parts. I had to grind the heads off of the old pop rivets to get the old assy. off of the trailer. Then I pushed the flaired rivet end into the wall. The new arm lined up perfectly with the old holes, so with some black silicone as sealer and new flairing pop rivits, we were up and running in about 3 hours. Thanks all at etrailer for your help.
.
I ordered 4 arms for replacement. Of the 4 arms that arrived in boxes, two arrived damaged and unusable out of the box. The two was returned and two was shipped to be replaced.
The two replacements arrived and one was damaged out of the box. packing was terrible. this is a nightmare. Now i have to send one back again. these are expensive parts that they put in very thin boxes and get damaged during shipping. I give it to them they tried there best but it has became a very confusing situation for etrailer and i get diffrent employees handling the same situation and no one returns my calls.. the wharehouse does not take great care of packing items to the customer even when asked to please ship in a better box.
I'm pleased with the produce and the speedy delivery.
Perfect replacement for support arm! I had read reviews and most said that it didn’t come with the mounting screws but mine did. Took about 30 minutes to replace. I would order some butyl sealant tape to go along with it. It just makes a better deal over the mounting screws.
Shipping was exceptionally fast. Ordered it Monday and it got here Thursday! Will definitely buy from them again!
Easy to install and received part in a timely manner.
2 relatively handy guys about an hour to replace. Watched a [online video] video and had at it.
Just FYI lipperts rain release. Doesn’t work. First use. Had to replace complete arm assy. Thanks ETRAILER for the quick response. Got in time to get back camping for the holiday.
Arrived in time promised and was in as expected, no shipping damage or issues. Replaced a damage support arm and it was an exact match.
Finding necessary part and ordering easy. Standard delivery very fast. Find etrailer easy to deal with.

Bj

7/11/2023
Not well. Ever since I attached it the piston does not hold the awning in any position but up. I have found with an RV complaining only gets you on the merry go round. When I get tired of tieing it down Ill order another.
tHE ETRAILER SERVICE WAS EXCELLENT AND WOULD GIVE 5 STARS BUT NOT INSTALLED OR OUT OF PACKAGE YET. VERY PROMPT DELIVERY
The part was exactly what I needed. Perfect size, perfect fit. Would not hesitate to order more parts in the future.
This is a direct bolt up replacement for my awning arm. Really easy to replace given you have the proper tools for the job.
Etrailer is very knowledgeable about the products they sell and would order from them again fast delivery and very curious
I ordered this part to replace the one I damaged while camping. I’ve always had good luck with etrailer for other items I have ordered. Part arrived after I returned from our trip and when I went to install it I then noticed this arm was shorter than the one on my rv. I verified I had ordered the right part, box was labeled correctly. Called etrailer and let them know. They sent out another one, unfortunately did not arrive in time for my next camping trip. Measured the replacement and again it was the shorter arm but box had correct part number. I called again to let them know and they were now out of stock. I sent my parts back and now I’m awaiting my refund. I ordered from a different vendor and same issue so I’m thinking it was an issue over at Lippert. I called Lippert to let them know they might have a problem but they weren’t very helpful since I didn’t order from them. I had to order my replacement from my local rv dealer and luckily they had the correct one. I don’t believe this is etrailers fault, more the manufacturer but was hoping for a little more help from etrailer. Took me 4 tries and 2+ weeks to get the correct part for my awning to be operational again. If I had gotten the correct part I would have given the item and etrailer 5 stars.
Part was as described. Easy install. Was done in less than 30 minutes.

Chris
7/7/2023
Still working well. No defects noted.
Tesm was helpful and the delivery pretty quick. Will do business anytime.
This was not a 1 to 1 replacement of a broken assembly on my 2017 Jayco Greyhawk, but it worked beautifully.
Great selection and customer service! Replacement arm was a perfect match and easy to install.
Perfect fit
Just like the original. I did have to drill out the pop rivets at the top of the support arm to match the original holes. That only took a couple of minutes. The arm came in a heavy duty cardboard tube. It arrived with one end completely open. But, the arm was not damaged. The packaging needs some attention to prevent damage in the future. A great product at the best price I could find. It took me about three hours to install.

Mark Z.
7/22/2018
Still working great. Just like the original. Easy to install. Saved lots by doing it myself.
Do you have a question about this Accessories and Part?
Info for this part was:
At etrailer.com we provide the best information available about the products we sell. We take the quality of our information seriously so that you can get the right part the first time. Let us know if anything is missing or if you have any questions.


Ray
4/10/2024
After 1 year the awning is still working fine. I wasted a lot of time and $ trying to repair the old one. Should have gotten a new one sooner.