
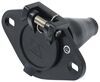
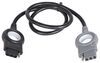
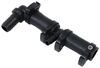
Replacement Dash Mount Connector for Brake Buddy Systems - Classic II and 3 - Select II and 3
(48 reviews)
Price: $46.99
In Stock
Replacement Dash Mount Connector for Brake Buddy Systems - Classic II and 3 - Select II and 3
Item # HM39342
Our Price: $46.99
Will this fit?
To see if this custom-fit item will work for you please tell us what vehicle you'll use it with.
In Stock
Thank you! Your comment has been submitted successfully. You should be able to view your question/comment here within a few days.
Error submitting comment. Please try again momentarily.


- All Info
- Reviews (48)
- Q & A (0)
- Videos (2)
- Photos
Brake Buddy Accessories and Parts - HM39342
- Tow Bar Braking Systems
- Wiring
- Connectors
- Brake Buddy
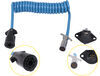
Replace the connector that mounts beneath your dash for plugging in your Brake Buddy Classic 2 or 3, or Select 2 or 3 flat tow brake system.
Features:
- Replaces the dash-mount connector for your portable Brake Buddy system
- Connects to your Easy-Pull cord to run 12V power to your braking system
- Fits:
- Brake Buddy Classic II and 3 supplemental braking systems
- Select II and 3 supplemental braking systems
39342 Replacement Dash Mount Connector for Brake Buddy Classic 2, Classic 3, Select 2, and Select 3 Flat Tow Brake Systems
California residents: click here


Video of Replacement Dash Mount Connector for Brake Buddy Systems - Classic II and 3 - Select II and 3


Videos are provided as a guide only. Refer to manufacturer installation instructions and specs for complete information.


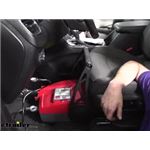
Video Transcript for Brake Buddy Supplemental Braking Systems Dash Mount Connector Install - 2019 Chevrolet Equinox
Hi there, Chevy owners. Today, on your 2019 Chevrolet Equinox, we're gonna be taking a look at and showing you how to install Brake Buddy's dash mounted connector and wiring harness. The Brake Buddy in dash harness is used to get a connector here on the inside so you can quickly and easily plug in your portable breaking system. This way you can have your breakaway switch outside. You can run all your wires connected to this harness. So that way we've got a nice, easy plug here.
The harness replacement is nice if you've got your brake buddy here, and maybe you just switched to a new vehicle and you're gonna plan on reusing your brake buddy and your new vehicle. But when you go to pull your wiring out you've probably cut all the wiring to length for your previous vehicle and stuff. So when you go to try to reuse that stuff a lot of times, it just doesn't quite line up like you wanted to. Maybe when you got rid of the vehicle you didn't pull all the components out of there, so you're missing that in dash harness. So you can purchase that component here and get that moved over to your new vehicle.
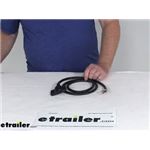
Or maybe you just gotta Brake Buddy from a buddy or something and you're looking for all the components to get it set up. We've got each piece that you would need here at Etrailer to piece together and get this up and going. We'll begin our installation here on the driver's side. you can see there's your brake pedal. We have a grommet located here inside of our vehicle.
We're gonna move to the left of our brake pedal and then straight back towards the firewall. You will have to peel back some of the carpet here to access a grommet. We need this grommet here to be able to feed our wiring through. And I went ahead and just took my razor knife, and I put a plus, we went to the left of where the main wire harness is in this kind of flat spot area. And then I just poked my screwdriver through it.
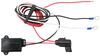
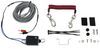
And then I double checked on the other side, make sure everything looked good, we weren't damage any wiring. Once we verified that with our screwdriver I then took some airline hose and I just poked that through there, 'cause we're gonna use this as a fish wire to pull our wiring through. Now, if you're doing this at home, there's a good chance you don't have airline tubing but what you probably do have is a metal coat hanger and those work really well for feeding wires through. So go ahead and get that set up just like this. Once you've got it set up we'll pull it through using electrical tape. and we'll tape our wiring here, this is the harness that we're gonna be installing, to our tubing there. So we're just gonna use the tape here. When you're taping your wiring to it I highly recommend all the wires are covered, 'cause if you don't cover the ends, they can fold over and make it really difficult if you get it to pass through. So straighten them all out, get 'em kind of close together. Get it up here on your wiring. And I usually start kind of lower down here. That way we get plenty of grab on it since we're pretty far down but then we're gonna work our way up, making sure that we cover all these all the way up. 'Cause what'll happen is they'll fold over and then you'll never get this to pass through that grommet. But if you cover 'em up and it's kind of tapered like, it'll pass through a whole lot easier. So once we get that all the way wrapped up, there, that looks pretty good. We can now pull 'em, pull it on through. And I wanna put just, this is such a thick piece of wire. We're gonna double it up, back here in the back. 'Cause I feel like it may want to pull off of our airline tube, cause this is really thick. All right, so we've got that pretty well taped there. So now we'll go ahead and pull it through. Now, one of the things I did find that helps get this to pull through easier, is a little bit of silicone spray. We're actually gonna put a little bit right here where it starts to taper. And that way, when we hit this point, that lubricant will help that just kind of slide through our grommet. So I'm gonna head to the other side now, we're gonna pull that on through. All right, so now we've got our wiring through, we just need to get the kind of depth set for how deep we want it. I am gonna pass it up above. This is the vent duct where it blows out on your feet. We're gonna pass it on top of that, that'll keep the wiring up so it isn't gonna fall down near our feet. And then I'm just gonna keep on feeding some of this through here. Until we get it to a point where we want it. We're gonna probably just mount it right here to the bottom of this lip. Be careful, there is an airbag component potentially up a little higher in a bracket. So just make sure you feel behind it to make sure you've got clearance. We do have a pretty big amount of clearance there, almost, not quite two fingers worth, but pretty good amount. All right, so that's pretty close to being fed to where we want it there. Maybe a little bit more fed through. All right, that looks pretty good. From there we should be able to mount it to the bottom of our paneling right here. You can see there are two places to slide fasteners through. You don't get me included with the kit. So we're just gonna be using some self tapping screws to run 'em into the bottom there. We'll use an eight millimeter screw, I mean, an eight millimeter socket for the fasteners that we're using here. Slide it up through the hole in your connector and then run this right up into the paneling. So we're not going crazy tight with it yet 'cause we wanna be able to kind of slide it around so we can make it look nice. We can then take our other fastener, slide it on through. Make sure you get it where you want it. Screw that on up. So then we can kind of, just loosen them a smidge, make it till it's roughly even and snug them down. And It is just plastic, so we don't want to go too crazy tight with it. It's just gotta be secure on there so we can make our connection. And that feels plenty secure right there. So now, for your wiring, if you need to you can feed a little bit less or more through as necessary but this all looks pretty good right there. It's gonna stay plenty out of our way and pass through. Everything looks good there. So we can now head out on the outside and start making our connections. Our grommet is located just behind your coolant reservoir, this little bubble right here. So just behind that and down is where you're gonna find that grommet. So go ahead and reach back here and grab your wiring and go ahead and pull it forward. We kind of fed it up this way first and then I fed it around the side of the battery after grabbing it from back here. And we got four wires we'll need to make connections to on our circuits here. The brown and the red we will be hooking to our breakaway switch. It doesn't matter which breakaway switch wire goes where, any breakaway, because you are gonna have two breakaway switch wires. choose one and put it there, choose the other and put it there ,it doesn't matter. Our white wire is our ground wire and our black wire is our positive wire. So first thing we're gonna do is just get that breakaway switch hooked up. Our breakaway switch is mounted at the front. Here's the leads that are coming from our breakaway switch. I'm gonna route the breakaway switch wire probably down like this, to where we meet our harness and then I'll run it back up. Something like this, probably. And then I'll trim it off. I'll trim off my excess about right there. So we'll cut off the excess and then we'll start hooking it in to our connector. After trimming off your excess you'll want to separate your wires if they are together. Some breakaway switch wires are in a duplex like this, where they're kind of molded together. So you just snip in between 'em and peel 'em off. If they're not together, then you don't have to do that. But then strip back each end of these. And then we'll crimp 'em on to our brown and our red here. So we are gonna use heat shrink butt connectors for these. Since they, these wires are outside of our vehicle here, the heat shrink butt connectors will protect it from the elements. So we're just gonna take one here, slide it onto our wire. Crimp it down And then we'll hook this to the brown wire. Just because brown and black are a little closer. But again, it doesn't really matter. Either breakaway switch wire works. And then we'll hook our red wire to the other red wire over there. Just 'cause I just will keep color continuity if we can. Just double check our circuits, make sure they're not gonna pull off of there. Everything looks good there. Okay so, now we've got power and ground left. For our power wire we're gonna hook that to our battery positive, but you don't wanna hook it directly to battery positive. That'll leave you with an unprotected circuit going inside. That's a potentially dangerous situation. So we're gonna install a few harness in line. It doesn't come with your harness here. This is something you have to purchase separately, but I highly recommended for protection purposes to make sure that you're electrically safe. So we're gonna add this to the black wire, since this is gonna connect to our battery, that'll put a fuse in line for us, to keep us safe there. So I've already got my butt connector on there, so we're just gonna crimp this onto the other side here. Now, typically your fuse harnesses don't come with the butt connectors and ring terminals on 'em. I went ahead and put those on there myself. So you will need to probably provide those as well. All right, so we got that connected on there. This guy's gonna go back to our battery roughly over there and make a connection underneath this compartment here. We can go ahead and make that connection now. So we'll just lift up on our compartment, got a couple of clips you gotta release, So that way that flips open. After that flips open, we're gonna use this fastener there, looks like it's probably a 13 millimeter, and we will slide our ring terminal on it and reinstall that screw. So we'll just zip it off of there. And that is the 13 millimeter. Remove your nut, slide your ring terminal on, reinstall your nut. And we can zip that back down. And our wires Should be able to kind of just poke down there on the side and our cover should still reinstall. So now for our ground. Our ground wire here is just in kind of a poor spot. It's a little bit too far away from any grounding spot inside of our harness. So you could cut the harness open to pull that wire out but, we've got some extra wire left over that we trimmed off of our breakaway switch. So we might as well use that to make a small jumper here. So we're gonna put a ring terminal on the end of our jumper. If you did want to cut the harness open and pull that wire out of there, you could put your ring terminal directly onto the white wire and just hook that to ground. But we're extending it a little bit. We're gonna attach it to the ground post located right here. So we'll remove that. That will also be our 13 millimeter socket. Slide that off of there, slide your ground wire on. And then just reinstall it. Then we can take our ground wire and bring it over towards our other wiring. I think we're probably gonna maybe slide it down underneath this guy. That way it can go forward kind of sit in between these two boxes and then it can come up and make our connection right there. That's pretty good. We'll probably trim a little bit of this off, something like that. And then we can strip that back and make our butt connection there. All right, so we've got our connection made there. Now all we need to do is, each of these butt connectors that we put on, we're gonna grab our heat gun and shrink 'em down to seal it up. You do wanna kind of pull it up away from your plastic components, like those lids. The heat gun can deform the covers. If you need a heat gun, you can get one here at Etrailer, from performance tools. I'm using one of their smaller models. I actually like this for automotive applications. It fits down into areas a little bit better. It's not quite as high powered, but I kind of like that because again, some of these plastic components on these vehicles, they melt very quickly and easily and deform. So having a slightly lower power heat gun helps you distribute the heat exactly where you want it. Once you've got all of your connections made, we can just take our wiring here and we're gonna use a cable tie and just secure it to this factory harness. We are trying to make sure that we don't obstruct any of our covers from opening. So make sure you pull yourself enough slack and stuff like that, to where you can still open all your covers. And when our cable ties around there and secure it in place. Now cable ties do not come included with your harness but you can get those here at Etrailer if you need some. So now at this point, just drop your Brake Buddy in here and plug in your cable. It should power up, just like you see here. We just got done doing the setup feature to make sure everything comes up green, and it did. So the only other thing that I'm gonna do just to verify that everything's working here, our connector harness that we installed we incorporated the breakaway switch into it. So I'm gonna pull the breakaway switch pin and the unit here should activate. And if it does our harness installation's complete and everything's working the way it should. And looks like our unit did activate, so we are good to go. And that completes our installation of Brake Buddy's dash mounted wiring connector and harness on our 2019 Chevrolet Equinox..
Customer Satisfaction Score:
99% were satisfied with this product
1% of customers were not satisfied
- Alternate product found
- Wrong item was ordered
Customer Reviews
Replacement Dash Mount Connector for Brake Buddy Systems - Classic II and 3 - Select II and 3 - HM39342
Average Customer Rating: 4.8 out of 5 stars (48 Customer Reviews)
Replace the connector that mounts beneath your dash for plugging in your Brake Buddy Classic 2 or 3, or Select 2 or 3 flat tow brake system.by: Fred12/11/2023
Bought this for my second flat tow vehicle. The Brake Buddy works great
by: Richard02/27/2024
Part works as expected and was installed by my RV dealer.
by: Dan05/21/2023
Had to retighten mounting screw under the dash otherwise works fine
by: Scott 08/22/2023
I needed to connect a second towed vehicle. This was perfect.
by: Ron 05/06/2021
The brake buddy has been a super addition to towing my 2008 Jeep jk. It works great and trouble free providing additional stopping power.
People who are towing need to be aware of the rules of having brake assist both for safety and law enforcement and insurance.
by: Charles10/01/2020
They had the parts I needed at an affordable price. Carol was fantastic when I call to check the status of my order and offered to follow-up on the order if it wasn't going to be filled timely. While she didn't have to follow-up, her attention to customer needs and focus on my satisfaction was refreshing to say the least. Great job Carol!
by: Craig02/24/2022
etrailer replaced our electrical cord while we were on the road quickly and accurately
by: George 06/02/2021
This item was installed to use the Brake Buddy in a second car and was easy to install and is currently working well
by: Vernon04/19/2023
Prompt delivery- thank you
by: Mark02/06/2020
Have not yet installed these replacement parts, however, I do have these items on another vehicle, and they work great. I’ve used etrailer for all of my towing equipment purchases, and couldn’t be more pleased. Thank you Allison K for your assistance with my orders!
by: Julie 02/14/2023
Thank you for the availability of the item and the quick turnaround time!
by: Monroe03/21/2023
Waiting to install
by: Francis 08/12/2021
Have used this on our other vehicle and it works fine. Little tough to find a passage way thru the firewall tho'.
by: Clarence 01/17/2023
Exceptional delivery time . Customer service excellent
by: Doug 10/25/2022
wish every order I did online was just half as pleasant as this. THANKS!
by: Linda04/23/2022
Totally happy with our recent purchases- Quality parts instock, Quality Customer Service.
by: John 09/12/2022
works as it should
by: Tim09/04/2021
Easy to install and use!
by: Timothy 09/28/2020
Very involved customer service.
by: James 10/16/2020
Thanks for the prompt service an proper part
by: Austin 02/25/2023
by: Kenneth 09/05/2023
by: Tom 09/09/2023
by: Richard 09/08/2021
by: Jeff12/07/2023
25
48
Show More Reviews
See what our Experts say about this Brake Buddy Accessories and Parts
- How To Transfer Brake Buddy Classic 2 Portable Supplemental Braking System To Another VehicleIn order to transfer the Brake Buddy Classic 2 Portable Supplemental Braking System part 39495 or Brake Buddy Classic 3 Portable Supplemental Braking System part # HM39494 to another vehicle you will likely only need the Replacement Breakaway System for Brake Buddy Classic and Select Supplemental Braking Systems part # HM39340 and the Replacement Dash Mount Connector part # HM39342.
view full answer... - How To Use The Brake Buddy 2 Supplemental Braking System On A 2008 Jeep WranglerIn order to use your Brake Buddy 2 on your 2008 Jeep Wrangler, you will likely just need the replacement breakaway system, replacement dash mount connector, and wiring kit for the 7 pin plug. For the breakaway kit, use Replacement Breakaway System # HM39340. This will ensure that the Jeep's brakes will activate if it ever becomes disconnected from the motorhome. For the dash mount connector, use Replacement Dash Mount Connector # HM39342. This will give you the connection inside the jeep...
view full answer... - Parts Needed To Install Brake Buddy Classic II In a 2nd VehicleYou will need the Dash Mount # HM39342, Breakaway System # HM39340 and Charge Line # BB54FR to reinstall the Brake Buddy Classic II supplemental braking system.
view full answer... - Recommended Portable Braking System For a 2024 Jeep Wrangler Being Flat TowedI recommend using the Brake Buddy Select 3 Portable Supplemental Braking System # HM39524 on your 2024 Jeep Wrangler. I prefer this unit as it provides proportional braking and folds up into an easy to store package. If you plan on using this with multiple vehicles you will need a Breakaway # HM39340, Charge Line # BB54FR and Dash Mount # HM39342. This will allow you to easily move the braking system from vehicle to vehicle.
view full answer... - Recommended Replacement For A Brake Buddy Classic 3 Supplemental Braking SystemWhen it comes to cost prices do fluctuate but at this time the lower end of the spectrum is going to be the Brake Buddy Classic 3 # HM39494 and then the Select 3 # HM39524. From there is the Roadmaster Even Brake # RM-9400 and then the Blue Ox Patriot # BLU37TR. Out of these options I personally prefer the Select 3 # HM39524 because you get a remote that allows you to adjust your brake settings on the go without having to leave the cab of the motorhome. With the Brake Buddy systems each...
view full answer... - Required Wiring To Flat Tow 2009 Jeep Wrangler Unlimited With Brake Buddy 2 Braking SystemThere is two different sets of wiring used to hook your 2009 Jeep Wrangler Unlimited to your Motorhome. This will be the wiring for your braking system and wiring for your lights and turn signals. The Brake Buddy 2 or the newer Brake Buddy Classic 3 Portable Supplemental Braking System # HM39494 will include all necessary wiring for the install and using, but if you need the replacement wiring you can use Replacement Breakaway System # HM39340, Replacement Dash Mount Connector # HM39342...
view full answer... - Can Blue Ox Base Plate And Brake Buddy Select Transfer from 2018 Wrangler to 2023 Jeep Wrangler 4xe?Your 2023 Jeep Wrangler 4xe will require the Blue Ox Base Plate Kit # BX1139. This is different than the Base Plate # BX1126 you have on your 2018. You will be able to remove the Brake Buddy Select 3 Portable Supplemental Braking System # HM39524 and reinstall it on your 4xe. We do have the Charge Line # BB54FR, Breakaway System # HM39340, and Dash Connector # HM39342 if you prefer to leave those parts on your old Jeep since you will not be able to reuse the baseplate. We do have the Tow...
view full answer... - Parts Needed to Flat Tow a 1998 Toyota Rav4 with Roadmaster Nighthawk Tow Bar and Brake Buddy 3From what I could find on your 1998 Toyota Rav4 it looks like it can be flat towed if you have the manual transmission. In order to use your Roadmaster Nighthawk All Terrain, Non-Binding Tow Bar # RM-676 you would need the Roadmaster Crossbar-Style Base Plate Kit # 1142-3 and the Replacement Quick Disconnect Crossbar Assembly # 910021-00. For your Brake Buddy Select 3 # HM39524 you would want to add the Replacement Dash Mount Connector # HM39342, Replacement Breakaway System # HM39340...
view full answer... - Can Blue Ox Tow Bars Be Connected To a Roadmaster Base Plate On 2021 Jeep Grand Cherokee L Overland?To attach your Blue Ox tow bars to the Roadmaster Direct-Connect Base Plate Kit # RM77ZR on your 2021 Jeep Grand Cherokee L Overland trim you will need the Adapter Kit # RO64FR to replace the ends on your Blue Ox tow bars. The Roadmaster base plate will require you to trim a hole in the fascia honeycomb grill insert just below the front motion sensors. You can keep your tow hooks with this kit and I have attached a copy of the installation instructions below that have very detailed pictures...
view full answer... - Complete Flat Tow Setup For A 2018 Ford F-150 King Ranch 4x4To complete a flat towing setup for your 2018 Ford F-150: You can use the Blue Ox Base Plate Kit # BO74FR, which is compatible with the Blue Ox Alpha 2 Non-Binding Tow Bar # BX7380 that you mention. To adapt the Brake Buddy Classic 3 Portable Supplemental Braking System # HM39494 to your Ford F-150, you're going to also need: -The Replacement Breakaway System for Brake Buddy Classic and Select Supplemental Braking Systems # HM39340. & -The Replacement Dash Mount Connector for Brake...
view full answer... - Parts Needed For Flat Towing a 2017 Jeep Wrangler With Roadmaster BlackHawk Tow BarsFirst you will need the Roadmaster Direct-Connect Base Plate Kit # RM-521448-5 that fits your 2017 Jeep Wrangler with the factory bumper. If you have a aftermarket bumper or special edition Jeep please let me know so I can confirm that the you do not need a different base plate. This base plate will direct connect to your Roadmaster BlackHawk 2 All Terrain, Non-Binding Tow Bar # RM-422. The Roadmaster Universal Hy-Power Diode Wiring Kit # RM-152 and 6-Way Connector # PK12720 will allow...
view full answer... - Recommended Parts for Flat Towing a 2023 Ford MaverickWelcome back! It looks like you have the Brake Buddy Select 3 Portable Supplemental Braking System item # HM39524. To replace all of the wiring you will want the following parts: Replacement Dash Mount Connector for Brake Buddy Classic and Select item # HM39342 Replacement Breakaway System for Brake Buddy Classic and Select item # HM39340 BrakeBuddy Towed Vehicle Battery Charge Kit item # BB54FR I see you already have the etrailer SD Non-Binding Tow Bar item # e74ZR. For a compatible...
view full answer... - Recommended Parts For Flat Towing a 2013 Honda CR-V With a Motorhome That Has Sterling Tow BarsTo attach your 2013 Honda CR-V to your Roadmaster Sterling All Terrain, Non-Binding Tow Bar # RM-576 you will need the Roadmaster Crossbar-Style Base Plate Kit # RM-521567-4. The Quick Disconnect Crossbar Assembly # 910021-00 is needed to connect to the crossbar base plate. If you are missing the 7-Way Cable # RM-98146-7 or Safety Cables # RM-645 they are available. Also available is the RoadMaster Nighthawk All Terrain and Sterling All Terrain Towing Combo Kit # RM-9284-2 to get all...
view full answer... - Parts Needed To Flat Tow a 2015 Chevrolet Silverado 1500 and 2003 Dodge Durango as a 2nd VehicleThe Roadmaster Nighthawk All Terrain, Non-Binding Tow Bar # RM-676 will work with both your 2015 Chevrolet Silverado 1500 and your 2003 Dodge Durango. You may need to have a High-Low Adapter like # RM-048-4 to level the tow bars. A different adapter may be needed for each vehicle as the bars want to be within 3" of level from your motorhome to the vehicle. The Roadmaster Direct-Connect Base Plate Kit # 266-3 is correct for your Durango. The Roadmaster Direct-Connect Base Plate Kit #...
view full answer... - Parts Needed To Flat Tow a 2014 Ford F-250 or 2017 Ford Explorer Sport With a Tiffin Allegro RVFirst you will need to start with the baseplates. For that I recommend the Roadmaster Direct-Connect Base Plate Kit # 4428-3 for your 2014 Ford F-250. Your 2017 Ford Explorer Sport will need either the Roadmaster Direct-Connect Base Plate Kit # RM-524446-5 (Okay for Adaptive Cruise Control, No Active Grill Shutters) or Roadmaster Direct-Connect Base Plate Kit # RM-524445-5 (Okay Active Grill Shutters, No Adaptive Cruise Control). With the weight of your F-250 I recommend using the Roadmaster...
view full answer...
Do you have a question about this Accessories and Part?
Info for this part was:

Edited by:
Lindsey S

Installed by:
Jeff D

Video Edited:
Chris R

Written by:
Alexander C

Test Fit:
David F

Video by:
Schuyler H

Updated by:
Amanda K
At etrailer.com we provide the best information available about the products we sell. We take the quality of our information seriously so that you can get the right part the first time. Let us know if anything is missing or if you have any questions.
Ron
5/7/2022
Working great as it should. Would recommend to anyone towing a vehicle.