
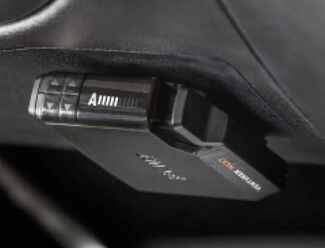
A simple LED display and a pinch-trigger manual override make this time-delayed brake controller easy to read and easy to use. Installation is quick and simple with no mounting restrictions. Activates brakes with a preset intensity.
Features:
Specs:
Gain control lets you set the maximum amount of power that will be applied to your trailer's brakes, adjusting in increments of 1. How much braking output you need is determined by the weight of your trailer; a heavier trailer will need more power to bring it to a stop. You want to go as high as you can without the trailer brakes locking up. Typically, the gain is only readjusted when you experience changing road conditions or if the weight of your trailer changes. To get more power to your brakes, press the left-hand upper rocker switch. To decrease the gain, press the lower switch. When you make your adjustment, the gain setting will show on the LED screen for 5 seconds as a series of bars and then go into sleep mode to reduce drain on the battery.
Once you have the gain set, you can fine-tune your braking by adjusting the load control on a scale of 1 to 9. This controls the aggressiveness of your trailer's braking, meaning how quickly the brakes reach the maximum braking level. Load control can get the braking power to your trailer faster and with more intensity so that it doesn't push your tow vehicle forward. If your vehicle takes too long to come to a stop, increase the setting by pressing the right-hand upper rocker switch. If it stops too abruptly, decrease the setting by pressing the lower switch. You can alter the setting to suit your driving preferences or to improve handling based on changing road conditions or varied trailer loads.
The Venturer comes with a easy-to-reach, pinch-trigger manual override, great for stopping sway or controlling your trailer's momentum in emergencies. To engage the manual override, just push in the trigger. This will activate the trailer's brakes and brake lights without you having to apply the brakes on your tow vehicle, perfect for limiting trailer movement while you're cruising.
The LED display on the Venturer is large and easy to read at a glance. It will show you what setting the brake controller is on as well as give you information for troubleshooting. You can adjust the screen brightness or trigger night mode so it won't glare obnoxiously on your dash. Press the control button to cycle through the different modes, shown as a bar - keeping it simple.
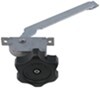
Because inertia plays no role in the functioning of this controller, you do not have to mount the unit at any particular angle. Your mounting options are limitless, so long as you can still easily access the controller and the manual override. The included bracket is designed to mount the brake controller flush to the dash so it takes up almost no space at all.
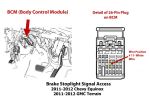
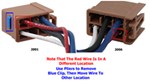
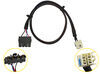
If your vehicle already has a plug-in brake controller wiring harness, just connect the unit to it. Otherwise, you will need to purchase a vehicle-specific wiring harness (sold separately) to plug into. If a harness is unavailable for your vehicle, hardwiring will be necessary.
Note: If a custom brake control wiring adapter is not available for your vehicle, one of the following will be required:
20-Amp circuit breaker (9506P - sold separately) for 2- to 4-brake applications
30-Amp circuit breaker (38630 - sold separately) for 6- to 8-brake applications
See also etrailer.com's exclusive 7- and 4-way brake control installation kit (ETBC7 - sold separately) if you don't already have a 7-way plug at the back of your vehicle.
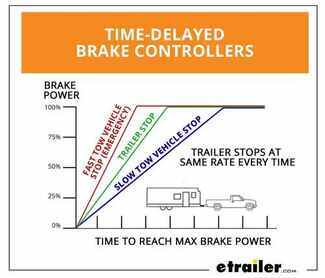
The Curt Venturer NEXT comes equipped with time-delayed braking. Every time you apply the brakes in your vehicle, a signal is sent - via the brake switch - to the Venturer. The controller then sends power out to your trailer brakes to activate them with an intensity set by you, at a rate determined by you. Both the amount of braking power (gain) and rate of application (load) can be adjusted to suit your preference, the road conditions, the type of trailer, and the weight of your load. To determine which levels are best for your application, test your towing setup and choose what feels right.

Average Customer Rating: 4.9 out of 5 stars (12 Customer Reviews)
A simple LED display and a pinch-trigger manual override make this time-delayed brake controller easy to read and easy to use. Installation is quick and simple with no mounting restrictions. Activates brakes with a preset intensity.Installed but not used with a trailer yet, easy instruction and appreciate the extra hardware for the installation.
Compact and not intrusive. Decided to use the adhesive tape included and taped under the dashboard L of the steering wheel.
Slimmer than most of the others. Easy install with the additional pigtail.
Delivered early. Was just what I wanted.
Almost plug-n-go.The hardest part was where to put the controller !
Do you have a question about this Trailer Brake Controller?
Info for this part was:
At etrailer.com we provide the best information available about the products we sell. We take the quality of our information seriously so that you can get the right part the first time. Let us know if anything is missing or if you have any questions.


Thank you! Your comment has been submitted successfully. You should be able to view your question/comment here within a few days.
Error submitting comment. Please try again momentarily.