
Summer Starts Here - Save up to 70%
To see if this custom-fit item will work for you please tell us what vehicle you'll use it with.
Thank you! Your comment has been submitted successfully. You should be able to view your question/comment here within a few days.
Error submitting comment. Please try again momentarily.


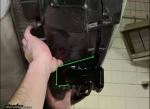
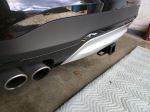
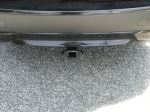
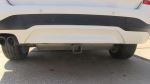
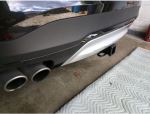
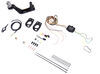
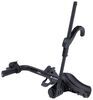
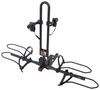
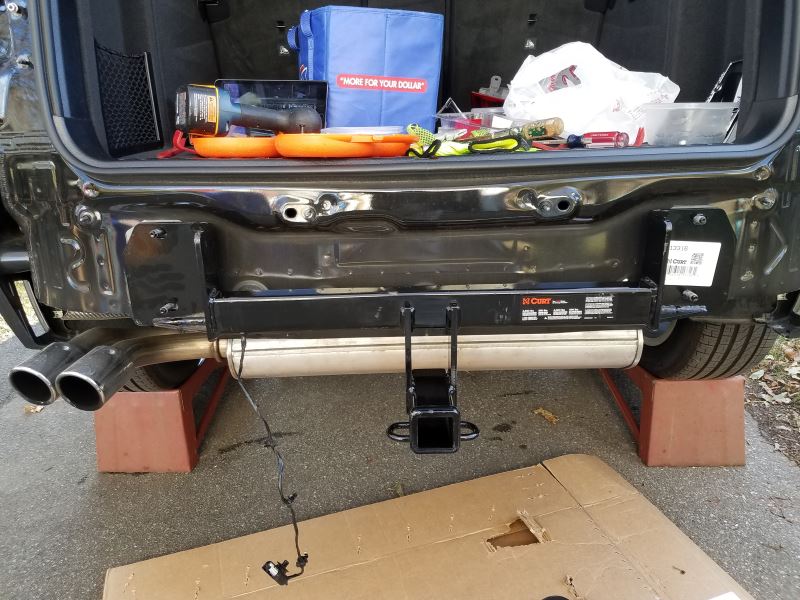
This fully welded trailer hitch receiver bolts onto your vehicle's frame with no welding required. Powder coated steel is sturdy and corrosion resistant.
Features:
Specs:
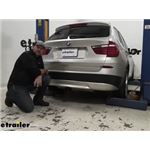
At etrailer.com we're committed to the products we sell, and to our customers. Our experienced and knowledgeable staff are available via both phone and email to address your questions and concerns for the lifetime of your hitch. The technicians at etrailer perform hitch installations on a daily basis, making them a valuable resource for do-it-yourselfers. The one-on-one, personal service you'll receive comes straight from an expert in the towing and automotive field. We've installed it, we've wired it and we've towed with it, so whatever your question, we can answer it.

Average Customer Rating: 4.9 out of 5 stars (111 Customer Reviews)
This fully welded trailer hitch receiver bolts onto your vehicle's frame with no welding required. Powder coated steel is sturdy and corrosion resistant.
This hitch has a rugged quality build and fit my 2014 X3 to a tee. I have hauled my bike rack a number of times as well as an open 7' U-Haul trailer. If you are handy and can follow the installation video, you will save a lot of money and be pleased. I watched the video a few times before and during the procedure.
Couple tips for you. It took me a while to find a plastic rivet gun in the local hardware stores, but finally found the perfect one from Harbor Freight. Most stores just sell rivet guns for metal rivets, not plastic rivets. Also as another reviewer noted, be very careful removing the plastic trim and the rear fascia.. it is very easy to break off tabs if done too forcefully.
Very pleased with the product and experience. Build quality on the hitch seems great, very sturdy with a nice gloss black powder coat finish. Don’t let the 10/10 difficultly scare you, the install took about 2 hours with a friend helping out. Trimming the plastic pieces was a breeze using a Dremel tool, just measure/mark and trim. 18mm deep dish socket is critical to reach over the studs for the bumper beam, otherwise some basic sockets and extensions for the 8mm and 10mm will do the trick. Etrailer’s YouTube tutorial was very helpful for figuring out tools needed ahead of time and bolt/clip locations. Very pleased with the end result, came out cleaner than the professional install I had done on my GTI a few years back.
The videos always make everything look easy. I actually took the bumper off and installed the hitch in about 3 1/2 hours. Buttoned everything up and pushed the rear hatch to go down it went down locked but then wouldn’t open again as it was catching on the bumper cover. My old eyes did not see the clips on the under side of the bumper top edge that needed to fit in to the track above the plastic bumper brace. Had to drill out the rivets and remove the bumper cover to diagnose. Had my wife help me this time and checked hatch operation before proceeding. Glad for the extra rivets that were supplied. Some video details on reinstall with hints would be helpful. Overall, easier than a self vasectomy and the hitch looks great. Waiting for my new ebike rack.
High quality as mentioned. I chose this hitch because the shape was closer to the 2017 OEM BMW hitch. Install took me about 3.5 hours but that included running out to buy socket extensions for re-assembly. As mentioned deep socket for the 18mm but the standard depth was fine for the rest. The installation video is excellent and I had a tablet with it running in the back of the car during the install. I used metal snips for trimming and feel that they give better control than cutting with a rotary tool. The one problem I had was that I snapped a white plastic connector at the top of the of the wheel well. I only removed the 3 back rivets if I was to do it again I would probably remove the back 5. Also, make sure you get all the screws at the bottom of the bumper before removing the trim.
I’m really excited about my new trailer hitch I reluctantly joined this camp when I bought a new SUV and could no longer use my roof rack and I’m really excited about this new accessory.
I got it for a great price from the trailer it came in a couple days and although my mechanic said it was kind of a pain in the butt to install he was very familiar with them and it looks like it came out of the factory with the new hitch.
I have a 2013 BMW X.3
Installed this on a 2017 BMW X3.
First the quality on this hitch is awesome. It is a very solid, and very well constructed. The price paid was an excellent value!
I highly recommend watching the install video, it made the installation very easy. Taking the bumper off (releasing the clips) was the most challenging part, but having my laptop in the back of the car made it very easy to see what to do. There is some slight trimming of the plastic panels and trim piece under the car. All in all the install took me two hours. The estimated time listed in the instructions was 90 minutes. I am happy with the time, and did not rush things. If I installed another, I am sure it would be much quicker.
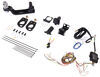
I also installed the Tekonsha 119190KIT wiring harness (again there is a great walk through video on this site. Was for a 2015 X3, but the wire colors were the same).
Deducted one star because of missing rivets in package. Inspect package contents before removing all your rivets. Only 8 rivets came in the already torn open parts package. Box was not damaged or tampered with. There's not much to go wrong with a hunk of steel. My challenges was with getting the X3 facia off without breaking the tabs and never could unplug the proximity sensor so just lifted the bumper/fender facia with proximity connector still connected and hung it from tailgate pistons. Everything went together fine and looks good when finished. Pro-Tip: If you don't have a low profile plastic pop rivet gun (and why would you?) then use the car jack or a floor jack to lift the car off the wheel then it's easy to get a cheap plastic pop rivet tool square with the rivets. Amateur-Tip: If you don't have or want to spend $xx.xx on a rivet tool.
The hitch is phenomenally engineered, went on without a hitch, no pun intended! Great Product, Excellent Price!

Raul G.

3/8/2022
Phenomenal product!
Awesome! Exactly as advertised, both to look at install. The video of installation was perfect, making the installation a 3.5 hour breeze. I did have one snafu, the plastic rivets kept "snapping" before they would expand. I assumed at 35 degrees they were just too cold, so I soaked them in warm water for a few minutes and then they too installed perfectly. Now with a 1 man loader, I will be able to move my scanoe from lake to lake all by myself
The product is what i have expected. It arrived a day late, but that's ok. The instructions on how to remove the bumper was not detailed enough on how to pry on the rear bumper reflector, Chipped the edge of the reflector towards the end. I think the instructions was for Bmw x3 and not for x4. Aside from this small incident, Product looks and feels solid. Plus, they provide you with the replacement plastic fasteners.
Very easy to install, had detailed instructions and videos...
The hitch worked like a champ. With the help of the instructional video, I was able to install the hitch. It is not an easy task for someone that may not be good at working on cars. Make sure you have the plastic rivets to install back in. I believe they were supplied with the kit, but can't remember. I used pliers and a flat metal piece to install the rivets. Very good fit to the car.
This trailer hitch is very well made and a reasonable price. I had it mounted by professionals who said that it was straight forward process and fit perfectly. I haven't actually used it yet, (hence only 4 stars..) but I'm very pleased with its quality. However, Etrailer deserves 5 stars for their professional, courteous service and speed of delivery. I'll continue to do business with them.
Robert
10/14/2021
Very good product. Well designed, looked great and performed well for the entire time I owned the car I had it mounted to. Have a new car now, but will be looking to put another hitch from Curt on my newer vehicle.
Found the right product for my car and was quickly delivered…awesome!
Hitch was as advertised. The printed instructions made it a breeze. Took about an hour with me and an experienced mechanic. The light kit took a little longer than expected but was installed inside the car vice behind the lights like the video showed. Towing a camper this weekend, not expecting any issues.

B K.
8/10/2018
All is well. Don’t use it that often but when I needed it they’ve been there. I’ll use etrailer from now on.
Easy to install with clear directions. Worth every penny. Used so many times for our biking & hiking trips.

Paul M.
3/17/2023
Perfect after 1 year. No issues. I brought a rubber end stop. Looks really nice.
Perfect directions. It took me 3 hours minus setup and cleanup. The fit looks like it came from the factory. Thanks for the tutorial and great product.
Etrailer customer service helped me pick out the perfect hitch receiver for my BMW X3 for my bike rack. Local auto shop installed it with no problem with the instructions included and in the time estimate given. One year later and it has worked great and I saved a lot of money with etrailer help.
I installed this hitch in about 2 hours with the help of your videos and enclosed instructions. It involved taking off the bumper and fascia. I purchased the tail light converter connector kit. The videos are concise and to the point, with all steps in succession (beginning to completion) and is not confusing. I had zero hangups and a great product that other companies in town charging two to three times more than I paid with Etrailer.com. I use this hitch occasionally and hitch and lights works flawlessly every time. The hitch is installed on a BMW x3 and looks great on it. It doesn't take away from the vehicles appearance. Great product and company......
The hitch and the instructions to install were very simple to follow. The videos were most helpful. The quality of the product is very good.
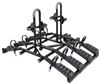
I use this hitch for a bike rack for my mountain bikes on my BMW X3. Good Quality and looks good. Installation was straight forward and easy with the instructions and replacement fasteners provided in the kit, even though I had to remove the rear bumper and bumper cover. Excellent experience all around.
After a year of use I don't see any issues with this hitch. Never used it for heavy lifting though, only using it for a bike rack, very often with 4 adult bikes. While I started to see some minor issues (like rust) with the bike rack, there is nothing with the hitch. I installed it by myself onto BMW X3 without any problems. Fully satisfied with the product
First off, the unit is very sturdy and appears to be well made.
I watched the video twice, and didn't open the box or look at the directions until it was time to put the unit on the car. Took me 2.5 hours, referring to the video a few times.
Tools I used: 10mm DEEP socket; 18mm DEEP socket, 8mm socket, a battery powered impact drill, a ratchet (to remove the 4 18mm nuts), a torque wrench to tighten the 18mm nuts (these nuts weren't very tight, but since the unit is heavy and will do heavy work, one should definitely torque them per instructions -- ), a set of plastic trim tools, 1/8" drill bit, rivet gun.
Couldn't find a solo 18mm socket, so bought the set below.
couple of tips:
I drilled out 4 rivets, not 3. However, 1 of the white BMW connectors that helps hold the wheel trim on did break, but didn't affect my completion. You may want to get a couple from BMW just in case.
Snapping the rear fascia off was the most tedious for me, as I was cautious about breaking tabs off. Be patient. I used my trim tools to help pry and unhitch things.
The 2 pieces of hard black plastic: I used sheet metal shears to trim notches for the bumper which worked OK. Perhaps a Dremel might work better. The shears worked just fine for the softer panel that goes under the bumper.
Little bolts stick out after taking off taillights; I leaned forward and hit my forehead on one and poked a small hole, but bleeding was minimal. :-)
I’ve use the etrailer.com for a few vehicles that I had to install trailer hitches on. Also the wiring. They’re very easy to work with and the systems that I received were well-built and went on very easily as described. I would always turn to them first with any of my trailer needs.
High quality and perfect fit! The supporting install video made what would have been a challenging job very straightforward - thanks etrailer support team!
Do you have a question about this Trailer Hitch?
Info for this part was:
At etrailer.com we provide the best information available about the products we sell. We take the quality of our information seriously so that you can get the right part the first time. Let us know if anything is missing or if you have any questions.


Z
12/25/2023
Still great after a year of hauling bikes and u-haul trailers!