
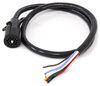
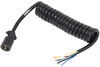
Trailer Wiring Junction Box
(787 reviews)
Price: $29.01
In Stock
Thank you! Your comment has been submitted successfully. You should be able to view your question/comment here within a few days.
Error submitting comment. Please try again momentarily.


- All Info
- Reviews (787)
- Q & A (0)
- Videos (3)
- Photos
Spectro Accessories and Parts - 38656
- Trailer Wiring
- Junction Box
- Spectro
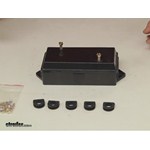
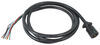
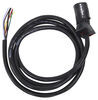
This Spectro trailer wiring junction box provides a fast, easy way to connect the wires from the trailer connector to the wiring for either a 6-way or 7-way connector. Makes replacing your trailer's connector simple.
Features:
- 7-Terminal junction box lets you easily connect your trailer wiring to a 6-way or 7-way trailer connector (sold separately)
- Weatherproof, heavy-duty plastic protects wires and terminals from the elements
- Mounting hardware included
- Ring terminals (44-5310A) sold separately
Specs:
- Box dimensions with lid: 7" long x 3-1/4" wide x 2-3/4" tall
- Overall length (with mounting flanges): 8"
- Distance between mounting holes (on center): 7-3/8"
- Mounting flange dimensions: 3/4" wide x 1/4" thick
- Outer diameter of terminals: 3/16"
9709 Spectro Trailer Wiring Junction Box


Video of Trailer Wiring Junction Box

Videos are provided as a guide only. Refer to manufacturer installation instructions and specs for complete information.


Video Transcript for Spectro Trailer Wiring Junction Box Installation
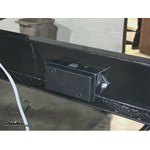
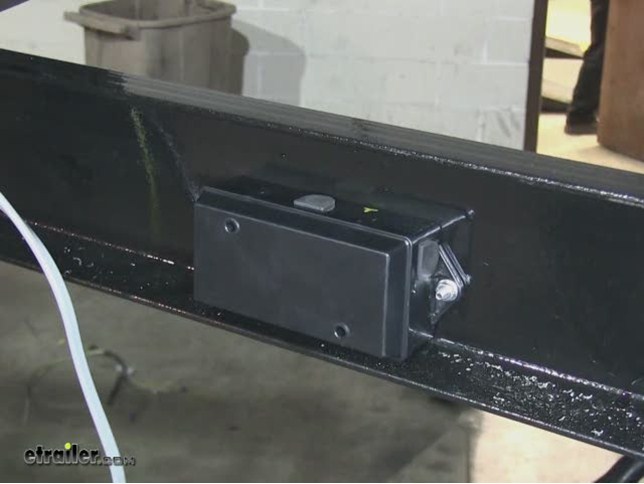
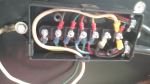
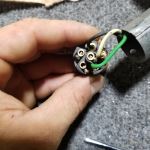
Today were going to install part number 38656. This is a trailer wiring junction box. First thing were going to do is find the location for our junction box. Were going to go ahead and install on the inside edge of the tongue. Well go ahead and hold it up to the tongue and then well go ahead and use a drill to mark it for our holes. We have our holes marked, well go ahead and remove the box, and then go ahead and drill out our hole.
Now well go ahead install our hardware and install our box. Now were going to use a quarter inch hardware to install the box to the frame. This hardware does not come with the box. With our box installed, we can go ahead and start getting our wiring ready. Well go ahead and cut our wires to the length of what we need and then well take our excessive length from our gray cable and use the white wire for our ground lead.
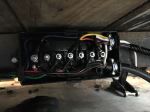
Were going to take the white wire, well add a couple of ring terminals, and well go ahead and connect it to the post labeled white and ground. Well also change out one of solid grommets for a hollow ground. With our new grommet installed, well go ahead and fish our wire through, and attach it to the box, and then were going to use a self-tapping screw to attach it to the frame. Now well go ahead and get the rest of our break cable ready, the gray cable will be for our electric brakes. Well cut back the gray sheath to expose our two wires.
Our white wire will go to ground, our black wire well go ahead and post to label blue, blue is only the function for brakes. Well go ahead add some ring terminals to it, then temporally put them into position. Now well go ahead and hook up our wires for our trailer lighting, well also go ahead and run it through the grommet and then go ahead and install our ring terminals. Now the brown wire on our trailer will be even running light circuit that will go to the post labeled brown, it will also say taillights on there. The green wire will be our right turn signal, well go ahead and connect that wire to a post labeled green, and it will say right turn.
The yellow wire well be our left turn signal and that will be connected to post labeled yellow and left turn. Now these wires have been loosely installed. Next well go ahead and wire our trailer connector, this is going to be a seven molded trailer wire connector, eight foot long, part number h20046. You see the seven pole and we have our wires. Once thing to know about this is that the functions do not match the colors better on the trailer. Now on the other side of the box well go ahead and replace them with solid grommets with a hollow grommet and well go ahead and run that over our wire that we can go ahead and push the wire back into the box. Then well go ahead and add our ring terminals to our wires. Now well go ahead and start attaching our wires, well start off with the green wire from the seven-pole which will be our running lights; this will be connected to the post with the brown wire from the trailer lights. The brown wire will be our right turn so that it will be connected to the post with the green wire from the trailer lights. The red wire will be the left turn function on the seven-pole, so well connect that to the post with the yellow wire from the trailer lights. Our blue wire will be our brake control power, so well hook that up to the post labeled blue. Now our yellow wire is usually reserved for reverse light or whatever function youd like. However, this application is not being used, so well just ignore that wire. Our black wire will be our 12 volt power supply, however this trailer is not using it right now, but well keep it to the junction box for our upgrade in the future. Well now go ahead and take our white wire push it to the ground from our towing vehicle that will be transferred to the trailer and well connect that back up to the white post, well get two white wires. With all of the wires in place well go ahead and tighten down the nuts. Next well go ahead and install the clamp from the wires that come in from the trailer side. Looking at the box on the left hand side there is provision for a clamp. Well make sure everything is pushed together properly and wont get pinched, well go ahead and install the cover. Well fasten and replace of these two bolts. Thats what it takes to install our junction box. All right with that it will finish it for our install of part number 38656, a trailer line junction box on this new trailer.
Customer Satisfaction Score:
100% were satisfied with this product
0% of customers were not satisfied
- Wrong item was ordered
- Product did not meet expectations
Customer Reviews
Trailer Wiring Junction Box - 38656
Average Customer Rating: 4.8 out of 5 stars (787 Customer Reviews)
This Spectro trailer wiring junction box provides a fast, easy way to connect the wires from the trailer connector to the wiring for either a 6-way or 7-way connector. Makes replacing your trailer's connector simple.by: Michael12/26/2023
I mounted mine onto a piece of aluminum flat stock on the trailer “A” frame to reduce rock impact from Nevada’s gravel back roads. There really wasn’t good location on inside of trailer frame rails, was adding electric brakes and converting from 4 pin to seven. . I’m pretty darn happy with this junction box as it made rewiring rather straight forward. Our local 12 volt guru at the auto electric shop was duly impressed-wanted to know where I found it.

by: Harvey 03/30/2024
One of the best set-ups. This is definitely the way to go with your trailer wiring. The built in labeling inside aids in installation and troubleshooting. Make sure to provide some impact protection if mounting this in and exposed area.
by: TomD07/23/2019
This box was used as part of an electric brake conversion on my trailer. This box was an excellent means of connecting the existing wiring and the new brake wiring into the new 7 way trailer connector. It has the required breakouts and grommets needed to make the wiring task the easiest part of the conversion.


Tomd

7/24/2020
Im very satisfied with this connection box. It keeps all of the connections well insulated and out of the weather.
by: Richard04/05/2024
The box is a bit too tight to bend #8 wires which is needed for the power and ground conductors. Also, after a few months, the rubber plugs for the unused cable entries cracked and leaked water.
by: Paul 04/01/2024
etrailer has always been so helpful with all my projects. This box and the install video is just what I needed. I needed to put together a 7way, 4way and a 7way with 6 wires. This was a nice and clean way to do it.
by: Juan 02/03/2024
I like the junction box it makes it easy to wire up your trailer hook up wires in a dry secure place!
by: David 04/11/2024
Best Trailer parts dealer ever. Extremely happy. Thank you.
by: Deitrich03/10/2024
The junction box was ok but I used my owne method terminal use.
by: Dale Peterson07/13/2021
I needed a way to reorganize wiring for my very old utility trailer. This wiring junction box from etrailer met my needs exactly and made my re-wiring project easy


Dale P.
7/14/2022
It works well to organize wiring.
by: Richard P.10/14/2017
Installed in about 30 minutes, made install a breeze and took the mess out of a rats nest of wiring spliced under the trailer. Comes with plenty of grommets and all hardware to put together. You need to supply the bolts or screws to mount this to your trailer. Each terminal is labeled for what connects to it taking the guess work out of matching wires up.


Richard P.
10/14/2018
Still works great, no issues at all.
by: David09/22/2023
I just opened up my new Class 5 Curt XD hitch and have not yet installed it so my comments are based on first impressions only. It is very heavy duty - and heavy at 40 lbs. - made of extremely thick metal and outfitted with quality Grade 8 bolts with square necks so they won’t turn when torquing on the nuts to attach the main tube to the side mounting plates. My bolts are plated yellow (which I like) rather than silver as you may have seen in some online photographs. It is substantially beefier than my existing Grade 4 hitch and superior in every way. It’s an impressive piece of hardware. I cannot imagine anyone being disappointed with it on specifications, quality, strength, and general appearance. It’s a beast. What I AM disappointed in is Curt’s packaging and the condition in which the hitch arrived. (This is NOT a reflection on etrailer.com as the hitch arrived in Curt’s original packaging.) The unassembled main tube and the two side mounting plates come bundled together with nothing separating them but shrink wrap. No cardboard, plastic, even paper coming between the metal surfaces - just shrinkwrap probably not even a couple of mils thick. With basically metal-to-metal contact in an oversized-box with the bundle jostling around, it would be a miracle if there were no scratches, gouges, or some type of damage to at least one piece, which is exactly what happened to my hitch. The main hitch tube, on the exterior facing plane, on the driver side where I’ll see it every day, has some gouges on it that go through the powder-coating to bare metal. I can - and will - paint them to prevent rust (and, therefore, have to paint the whole hitch to match). But the gouges will still be noticeable as they go through the thicker, pebbly, powder-coat finish and will undoubtedly still appear as depressions in the surface even once painted. I fully realize this kind of surface damage will almost certainly happen with regular usage of the hitch anyway and that it’s certifiable to demand absolute perfection in anything. But if you are someone who cares about the aesthetics of your equipment and keeping it looking new for as long as possible, it is very disappointing to receive such an expensive and prominent piece of hardware damaged right out of the box and requiring immediate repainting. The plastic parts bag had also ripped open in transit, with nuts, bolts, shims, etc. rattling around in the box. I am dumbfounded that Curt packages such a high-quality piece of equipment so shoddily where such damage is virtually unavoidable. I bought from Curt solely due to their being an American manufacturer and to support American workers so this is doubly discouraging. It’s a trivial complaint in the big scheme of things and not worth demanding a replacement over. Just be aware that unless Curt changes their packaging practices it is very possible you will have the wind taken out of your towing project sails just as I have. Again, this in no way reflects on etrailer. My experience to date with etrailer (website, educational resources, staff reviews, ordering, tracking, email contact, etc.) has been beyond exemplary in every way. They rank as a Top Five online retailer in my opinion, maybe even the best.
by: Chris B11/07/2016
Rewired my trailer and used this junction box to go from my main cable to all the individual lights and brakes. It worked great, the only thing I didn't like about it was that it only had two cable clamps on the inside


Chris B.
11/11/2017
I still have all the electric supplies from etrailer on my cargo trailer. I have had no issues with any of your products whatsoever. I hope this helps
by: Geary12/01/2022
perfect to make a universal trailer hook-up, Hi quality parts, see adjacent review for completed assy


by: Michael C.11/17/2012
I purchased this product after researching current trailer rewiring methods. I recently had my entire 18' trailer wired and upgraded. The trailer is 8 years old and I wanted to replace the original 4 way trailer harness which the trailer manufacture had surrounded in electrical tape which also needed an adapter. After some research, I opted for this 7 way pigtail (50-67-005) which is the connector I needed my trucks and this junction box. (all contacts were current)
The junction box is sturdy and well made, we installed 7 way wire within the box with a snug fit. The trailer now has a clean professional appearance and most test functions can be performed from the junction box location. The junction box was installed behind the trailer tongue frame to minimize the weather elements. This product appears to seal well as the product description indicates. I am very satisfied with this product and Etrailer's customer service.


by: Jonathan04/22/2024
This is a nice junction box for the cost. I would have liked larger studs to use larger eyelets but overall im happy with it and would recommend. No issues.
by: Sherman M.11/04/2013
We wanted both a 7-wire and a 4-wire plug on the same trailer. This junction box made the installation very easy. If your connecting the Hopkins 7-wire harness to this box, you'll probably have to ignore the wire colors names and just use the location (R Turn, etc.). Both are marked on each terminal.
There are 5 different openings to choose from to route the wiring to this box and it comes with both rubber grommets to run wiring through and rubber plugs for the openings not used. A downside is that only the side with 2 openings has wire hold downs on the inside. It would have been nice if at least the opening on the opposite end also had such a feature.
It's fairly water tight and installed easily onto the frame, under the trailer. Because it's lightweight plastic, I'm not so sure how long it'd last in the direct sunlight if it was mounted on the tongue or other exterior location.


by: Steve S.11/25/2013
I love these boxes. I've repaired numerous trailers my sons and I own, including cargos, flat beds and horse trailers. I really like the grommet locations, cable clamping and posts for wire connections. There is plenty of room inside to neatly route wires.


by: Joel j07/03/2015
Junction box was great had it installed and wires hooked up in a little over an hour. Service and shipment was better than expected. Will definitely use etrailer for more of my needs, very good company. The only thing that took a while was the molded seven connector wire colors don't all follow standards, but a test light and a few minutes and it was figured out.


by: Michelle 06/01/2023
I had to swap the trailer wire connecter with a new one and didn't realize the junction box terminals were corroded and half of them twisted the stud off while removing the old wires. Found this junction box and it turns out it's an exact match. This will make mounting so much easier since the mount holes are perfectly aligned.
by: Bob H.08/20/2012
Had some real issues with this one. Should have noticed when purchasing this harnes is not wired using standard truck/trailer color format. Other than that it went together fairly nice. If the connector would come apart I was thinking of fixing the wiring my self.


by: Wayne M08/07/2014
This trailer was built from scratch using only the metal frame. I purchased some items from etrailer an was very satisfied with the products.


Mike D.
3/26/2015
Great job! Looks like a high quality build.

Wayne M.
8/7/2015
Its still working great.
by: Seth07/22/2012
It was nice for organizing the wires and install. The rubber wire hole plugs are not the best. One month outside in the sun and the top one dried out and cracked. I guess install it some where it is protected from the weather.


by: RJ07/15/2013
Installed as I had planned and it went well. Wired the supply line to the box to all of the correct wiring terminals as it is labeled in the box. I was prepared by other reviews, things may not match up, which they didn't, but no biggie. Once I flipped a few wires around things worked nicely.


by: Mark05/21/2021
Now I have a chuckwagon that is all tricked out for side marker lights and more. This box really did the trick for keeping wires organized.


by: Robert S12/31/2016
Thanks for your help with parts for my trailer build. My wife and I are still making custom cabinets out of curly maple. We hope to finish this winter. We have taken it out 7 times this season. Thanks again.


25
786
Show More Reviews
See what our Experts say about this Spectro Accessories and Parts
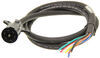
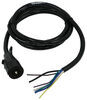
- Recommended Replacement Molded 7-way Trailer Plug and Cord The Epicord # 277-000143 7-way plug you'd looked at would indeed make a better connection than something like the # H20044 that just has the single contact. Keep in mind, the wire color coding on this plug/harness might be different than what you already have, so be sure to look at the chart on the # 277-000143 product page that lists the wire colors and their purpose. Are you having issues with the plug not staying fully seated? Because the spring loaded lid for the trailer connector...
view full answer... - How to Add a Battery to an Enclosed 6x12 Cargo Trailer for Powering Interior Lights.So the right way for you to do this will depend on how often you're going to use the lights and how many of them there are. If a trailer isn't equipped with a battery, the interior lighting is frequently tied into the running lamp circuit. Turn on the vehicle's running lights and boom, on come the lights. This is the simple way to go. You'd obviously need the truck there and plugged in to make that happen. You'd also want to run the truck from time to time so the alternator keeps the vehicle...
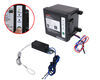
view full answer... - Troubleshooting Trailer Brakes That Show Intermittent Overload Error Message on Prodigy ControllerIt sounds like your Prodigy brake controller in your 2004 Dodge Ram Pickup is sensing an intermitting short in the trailer wiring. Since you have checked the brake magnets and have found them to be okay, I suggest tracing the entire brake circuit for signs of damage or corrosion. Follow the brake circuit wiring from each brake all the way to the trailer plug. Look for cracked insulation and spots where it is worn off, especially near points where the wire bends and where it comes into...
view full answer... - Troubleshooting Trailer Wiring Issues on Gooseneck with Functions Not Matching TruckIt definitely sounds like someone has done some alternate wiring. I've attached an article on trailer wiring to help, but you will have to go off of the functions listed instead of the colors as the colors may have been changed around. It sounds like your running lights are connected to your trailer brake wire on the trailer. I recommend using a circuit tester with an incandescent light like # PTW2993, to work through each function of your connection with your trailer. I've attached...
view full answer...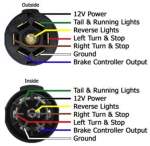
- Curt Trailer Wiring Harness part # 56146KIT Recommendation to Convert Separate Signal to CombinedYes there is, you would need to install the Curt Trailer Wiring harness part # C59496 on your ambulance and it will convert the separate trailer wiring to a combined signal that would work well on your trailer. I attached installation instructions and an install video that shows a typical installation to show you how to test the circuits and install this harness.
view full answer... - Determining The Correct Replacement Axle For 2012 Aliner Classic CamperIt is possible that the Dexter Trailer Axle w/ Idler Hubs - EZ-Lube - 5 on 4-1/2 Bolt Pattern - 72" Long - 2,000 lbs # 20545I-EZ-72-15 you were looking at will fit your 2012 Aliner Classic Camper but the only way to be sure it to measure your current axle, and find the axle rating of your current axle. Starting with the measurements you will need to know the hub face to hub face and spring center to spring center measurements. For example the # 20545I-EZ-72-15 has a hub face to hub face...
view full answer...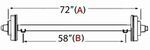
- Wiring New 7-Way Trailer Plug on Trailer That Used Wishbone Harness on 4-PoleThe easiest way to wire in a 7-way plug on your trailer that currently has a 4-pole wishbone harness is to use a junction box like # 38656 from Spectro. Your trailer that has a wishbone harness has two separate running light wires (dual brown wires) that allow you to connect both sides' running lights without need to run a running light jumper wire between the two sides of the trailer. The junction box will provide a handy and weatherproof connection point to wire together the trailer's...
view full answer... - Why Are My Trailer Brakes Activating/Deactivating When Plugged In/Unplugged to 7-Way Plug?If you are experiencing power at the 1 o'clock position on your 7-way, the issue most likely lies with the trailer's wiring. With this situation, it is important that the trailer wiring is correctly inserted into trailer's side 7-way plug so that the correct pins on the vehicle side can activate the correct corresponding pins. All that being said, I recommend removing your trailer's 7-way and using the Junction Box # 38656 to make sure that the wiring is on the correct pins on the trailer's-side...
view full answer...
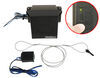
- Upgrading a Trailer From a 4-Way Flat To a 7-Way Connector For Adding an On Board BatteryFor your trailer I recommend the Junction Box # 38656. This will allow you to add the Wiring # HM20048 as needed inside the junction box. I have added an image below showing the wiring terminal positions for the 7-way. Depending on your vehicle your 12 volt power may run all the time or only when the ignition is turned on. You can use a Tester # PK12741 to check all your circuits or a Test Light # PTW2993 to check each circuit individually. The charge line will be able to recharge your...
view full answer...
- Wiring Diagram for Trailer Wiring 6-WayAssuming your 6-way was wired up using industry standard trailer wire colors you should use the chart I attached that shows how to wire up the 6-way. Use the orientation of the screw on the center pin to know which direction is "up" and down on the diagram.
view full answer...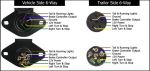
- How to Confirm Trailer Wiring Configuration to Match 2007 Jeep Grand CherokeeTrailer wiring often uses a particular wire color for a particular function, such as a white wire for ground, but there is no absolute rule that this will be the case. For this reason, testing with a circuit tester like # PTW2993 is recommended. In the case of a trailer, you can use a spare battery (or your Grand Cherokee battery) to test each trailer circuit to see what light activates with the 12V input power applied. The linked trailer wiring article illustrates the various connector...
view full answer... - Troubleshooting Trailer Brakes that are Always EngagedFirst of all did this problem just start happening? If the trailer has always worked fine before on the same truck then it's likely a short on the trailer's brake wiring. I would start by cleaning the connector and make sure it's free of any debris or corrosion. Also make sure the breakaway pin is inserted properly. However, it the probem is from the breakaway switch the brakes will only be locked until the breakaway battery dies. If both of these are fine then you need to inspect...
view full answer...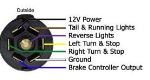
- Troubleshooting SH Error Code On Trailer Brake Controller Connected To a 2011 Keystone 5TH WheelThe wiring for the Trailer Brakes # AKEBRK-35-SA enter through the back of the brake assemblies for the magnet. To get to the magnet you will need to remove the hub but you can perform your tests on the back side where the wiring connects to the brakes. Your wiring should all connect in a Junction Box # 38656. This is also a great point to check the wiring before it heads back to the axle to determine if the issue is with either the trailer connector or connection on your tow vehicle. With...
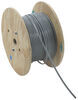
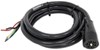
view full answer... - Parts Needed to Wire Electric Brakes on Homemade Trailer From ScratchSince your trailer is being wired from scratch, I recommend a 7-way molded connector like part # H20046, a junction box # 38656, and an appropriate length of duplex cable, # 10-2-1 for the brakes and 4-wire cable # 16-4B-1 for the lights. To complete the installation you will also want ring terminals and butt connectors # DW05702-1, # 44-5310A, # DW05745-10, and # DW05744-10.
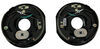
view full answer... - How to Convert a Boat Trailer w/ Surge Brakes to Electric Brakes? To convert your trailer from surge to electric brakes you are going to need a new set of brake assemblies that match the brake flange on your boat trailer. The Dexter Electric Trailer Brake Kit - 12" - Left and Right Hand Assemblies - 6,000 lbs item # 23-105-106 have a 5 bolt mounting flange and fit 12" hubs. These would be a great start but you will want to ensure they are the same size as your current brakes. You will need to look inside your hubs as well. If your hubs have casting holes...
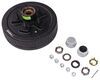
view full answer... - Brake Controller And Brakes Recommendations For 2010 Kia Sedona And TrailerThank you for the spec sheet on the axle you have on your trailer. I spoke with my contact at Dexter and they told me that you do not need to replace your axle, you can just upgrade the one you have. They told me that you have the brake mounting flange mounted on your axle so what you will want to do is add a new hub and drum, the brakes, and wiring for your trailer, and you should be good to go. The hub and drum I recommend is the etrailer.com Trailer Hub Assembly, part # AKHD-545-35-G-K....
view full answer... - Parts Needed to Add Electric Brakes to a Wells Cargo SW-10 Single-Axle Service Wagon TrailerA good starting point for your project to add electric drum brakes to your trailer is a review of the linked article which covers this process in detail. You will need to select brakes based on the weight rating of the axle on your trailer, which should be indicated on a sticker or plate, and you'll need to select new hub/drum assemblies that use the same bearings as the hubs currently on your trailer. This will ensure compatibility of the new hub/drum assemblies with your spindles. If...
view full answer...
- Adding Electric Drum Brakes to a Scamp Camper TrailerSetting up a trailer with electric drum brakes is going to be the easier and most cost effective way of adding brakes to your Scamp trailer. Since the trailer already has the mounting flanges that will limit the amount of parts and work that will need to be done. Starting with the hub and drum assemblies since your bearings are both L44649 and you have an EZ Lube style axle you would need # 8-257-5UC3-EZ with the 5 on 4-1/2 bolt pattern. They are designed for 2,000 pound axles but will...
view full answer... - Wiring Electric Brakes to Trailer Without Access to 7-Pin Wiring on TrailerYes, it doesn't matter which wire is ground and which one is the power wire coming from the brake assemblies. If you have a brake wire on each side of the trailer, you do not have to splice. You can use a brake wire for each side. Since the trailer is aluminum you cannot just ground to the frame because it does not conduct electricity well. The aluminum trailer probably has a hard metal core which is why the manufacturer was able to ground into the frame with screws. You won't be able...
view full answer... - Parts Needed to Add 7-Way and Junction Box to TrailerIf you are wanting to add brakes to your trailer, the correct way to to it would be to remove the 4-pole connector and install a 7-way harness/plug like part # H20046. You would use a junction box like part # 38656, and some 10 gauge wire like part # 10-1-1 to run the brake output circuit from the junction box to the brake assemblies. Each brake magnet will have two wires exiting it. One wire will ground to the trailer frame, the other will attach to the brake output circuit. The junction...
view full answer...
- Parts Needed to Add Electric Drum Brakes to Boat Trailer with 3500-lb AxleThe Axle Tek 10-inch electric trailer drum brake assemblies # AKEBRK-35L-SA and # AKEBRK-35R-SA are the left- and right-hand drum brake mechanisms only and do not include hubs/drums. The pair has sufficient stopping power for a 3500-lb-rated axle. An example of a compatible hub/drum assembly is the Axle Tek # AKHD-545-35-K, which has the popular 5-on-4-1/2 wheel bolt pattern and that uses inner bearing L68149 and outer bearing L44649. Adding electric drum brake to a trailer requires a...
view full answer... - Installing New LED Lights on 2011 Karavan Boat TrailerIt is true that a trailer ground wire will usually be white but there is never a guarantee that every trailer's wiring follows that convention. It is also indeed unusual for a ground wire to be fused; normally that fuse would be on the hot side of the circuit; but in fact having fuses in trailer wiring at all is rather unusual so it may be that the item you found (and thanks for the photo) is simply a connector used to extend the original wiring. If the original trailer lights were the...
view full answer...
- Recommended Ring Terminals for 10 to 14 Gauge Trailer WiringWhen using ring terminals for wire gauges between 10 and 14 I recommend using # 44-5310A. The smaller gauge wire will just be stripped back further and doubled up for a snug fit. These ring terminals work great for a connecting a trailer connector like # H20046 you asked this question from to a junction box like # 38656.
view full answer... - Trailer Brake Lights Do Not Work When Connected have a 96 ranger with seprate turn and brakeWhenever any type of adapter like # PK12716 is used to mate different types of connectors on the vehicle and trailer, connection problems can develop because of all the extra contact points. The best way to go is to install a new connector on the trailer that directly matches that on the tow vehicle so that you can avoid using an adapter. This is easily done by using a junction box like # 38656 and a new 7-way plug like # H20044. All you need to do is verify the function on each trailer...
view full answer...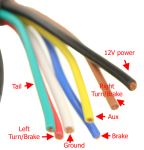
Do you have a question about this Accessories and Part?
Info for this part was:

Expert Research:
Mike L

Expert Research:
Robert G

Expert Research:
Michael H

Expert Research:
Reno H

Expert Research:
Jameson C

Expert Research:
John H

Expert Research:
Adam R

Expert Research:
Jeffrey L

Video Edited:
Zack K

Updated by:
Shelly K

Updated by:
Wilson B
At etrailer.com we provide the best information available about the products we sell. We take the quality of our information seriously so that you can get the right part the first time. Let us know if anything is missing or if you have any questions.
Product Experts Available Now!
Call 1-800-940-8924
Mike L.
7/25/2019
For a neat install and ease of replacement later if necessary, theres no better way to go than a junction box.