
Summer Starts Here - Save up to 70%
To see if this custom-fit item will work for you please tell us what vehicle you'll use it with.
Thank you! Your comment has been submitted successfully. You should be able to view your question/comment here within a few days.
Error submitting comment. Please try again momentarily.


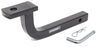
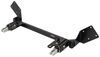
This fully welded, corrosion-resistant vehicle trailer hitch receiver is perfect for your light-duty towing needs. Draw-Tite's Tested Tough guarantee ensures that this hitch exceeds industry standards. Drawbar sold separately.
Features:
Specs:
Draw-Tite's Tested Tough program provides testing standards far superior to those outlined by the Society of Automotive Engineers (SAE), the go-to source for engineering professionals.
Each Draw-Tite trailer hitch receiver undergoes extensive fatigue testing and static testing with the ball mount that is either supplied or recommended for use with that particular hitch, thus ensuring results that are applicable to real life use. Fatigue testing is also conducted on hitches rated for use with weight-distribution systems.
In addition, Draw-Tite performs static testing on a simulated automobile, as opposed to the rigid fixture used for SAE testing, resulting in a more true-to-life scenario.
At etrailer.com we're committed to the products we sell, and to our customers. Our experienced and knowledgeable staff are available via both phone and email to address your questions and concerns for the lifetime of your hitch. The technicians at etrailer perform hitch installations on a daily basis, making them a valuable resource for do-it-yourselfers. The one-on-one, personal service you'll receive comes straight from an expert in the towing and automotive field. We've installed it, we've wired it and we've towed with it, so whatever your question, we can answer it.

California residents: click here
Videos are provided as a guide only. Refer to manufacturer installation instructions and specs for complete information.
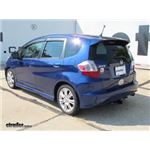
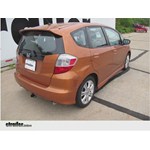
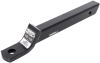
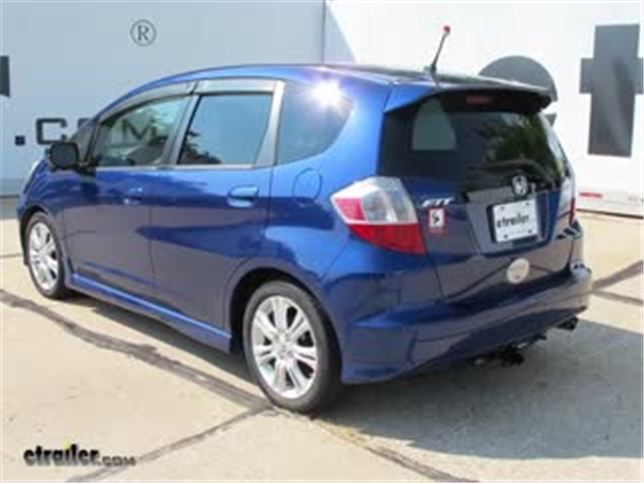
Today, on our 2009 Honda Fit, we're going to take a look at and also show you how to install the Draw-Tite Custom Fit Class II Note, this is a Class I hitch, not Class II 00:00:07 trailer hitch receiver. Its part number is 24826. Okay, this is what our hitch looks like installed. You'll see our cross tube meets here in the middle at our 1-1/4" x 1-1/4" receiver tube opening. This is a Class I rated hitch, so this hitch is going to work out well for us when it comes to your smaller cargo carriers, small bike carriers, or even the light-duty trailers. To secure all of our items in place, we're going to use the 1/2" diameter pinhole here on the side. You want to be sure you use Class I rated accessories, but no matter which one you would pick, whether it would be an anti-rattle bolt, maybe a locking hitch pin, or a regular hitch pin and clip, should be plenty of room to make that work. You can see our safety-chain connection points here, kind of a rounded steel-stock material.
Plenty of room there for getting those chains connected if we need them. When it comes to weight ratings, the hitch is going to offer a 200 pound tongue weight capacity, so that's the maximum downward force that we can put here at the received tube opening. It gives us a 2,000 pound gross trail weight rating. That would be the total weight of our trailer and anything that we we're to load up on it. Of course, we need to check the owner's manual on the Fit. We need to see what it's rated for, then we can go off of whichever of those numbers are the lowest. The hitch does sit a little bit lower.
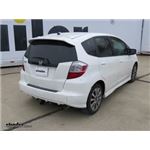
Of course, it's on the Honda Fit, so ground clearance is going to be the biggest issue that you might have if you run into any problems with it. Something you'll want to do if you pick a bike rack or if you pick a cargo carrier, be sure you get one that has the raised shank. That's going to elevate that up a little bit, giving you more room at the back of that carrier or that rack for ground clearance. A few measurements that'll be helpful when if comes to selecting your cargo carrier or bike rack will be from the ground to the inside top edge of the receiver tube opening. We've got about 9-1/2". Then from the center of our hitch-pin hole to the outermost edge of our bumper, it's about 4" To being our installation, we need to take off just a little of this rear wheel-well liner, this rear appearance panel.
It's just going to be where it fits up on our frame here. What we'll do, just going to cut up this inside edge here. That will bring it down a little bit to give our hitch room to go into place like that. We're going to be removing this top section here. Then we can just cut that in a straight line coming off of there.
That should give us plenty of room. You can trim this off with a razor knife if you want or what we're going to use is a high-speed cut wheel. We can use a screw driver or a trim panel tool. We'll pop that pushpin fastener out. You can see that little piece that we trimmed off. Now we need to prepare the rear hole. See our carriage bolt, that's going to fit through there fine. You can see our spacer block, we need to take out just a little bit of material. It's going to make a little U shape on the back side so that it'll slide in there without interference. Now what we're going to do is grab one of our pull wires. We'll start it at our forward-attachment point here, and we want it to come out the rear hole that we just enlarged. Onto that, we're going to slide one of the spacer blocks, thread in our carriage bolt. Now we'll feed these up into the frame rail separately then allow it come right down out of our hole location. For our other one, we want to thread our bolt on first. We'll put our bolt up inside of the frame rail first, slide in that spacer block, and then pull it back down through. Then we'll go do the same thing on the passenger's side, although it is a little tighter. Now with an extra set of hands, we're ready to get our hitch into position. I'm going to be using the fish wires here to kind of guide us up. We need to get it around the exhaust first. Might have to pull down on it a bit. Once we have it in position there, we can guide it up onto the bolts that we have installed. Our heat shield's going to hold down slightly on the hitch, which is okay. It'll be sandwiched between the hitch and the frame once we tighten it down. We need to place on a conical-tooth washer. The teeth of that washer will face up towards our hitch and also a nut. These are all provided with the hitch. Once we have three or four good turns on that, we can just let our hitch rest on this side while we get one started on the other side there. Our hitch will rest there while we get our other two conical-tube washers and nuts installed. We'll continue on by snugging them down. Now we can grab our torque wrench and torque them all down appropriately. Those specifications you'll find listed in your instructions. That'll complete our installation of the Draw-Tite Custom-Fit Class I trailer hitch receiver with the 1-1/4" x 1-1/4" opening, part number 24826, on our 2009 Honda Fit.
Average Customer Rating: 4.7 out of 5 stars (242 Customer Reviews)
This fully welded, corrosion-resistant vehicle trailer hitch receiver is perfect for your light-duty towing needs. Draw-Tite's Tested Tough guarantee ensures that this hitch exceeds industry standards. Drawbar sold separately.Draw-Tite makes good stuff.
Etrailer has a great website. It describes the product very well. Has many references and videos on install combined with reviews made this a very easy product to get and installation was easy and as described. However the product was poorly made. The powder coating had huge bubbles in several places and had chipped off. I decided to install it instead of returning it. The product will rust over time and the flaws wont be visible from the outside. When I was installing the hitch everything went great until I tried to do final adjustments before torqueing down the bolts. The hitch receiver tube was not sticking out straight. When I crawled under the car and looked. The tube is welded on about 5 degrees off of 90 degrees so I had to install the whole product on as much of an angle to compensate. It still sticks out at an angle. Will it effect use. Probably not, but it is on a new car. Have not contacted Etrailer yet.

Patrick B.
12/20/2013
We are sorry to hear about the hitch. We will be in contact with you shortly.
A great product, installed the hitch receiver and the T-One Wiring Harness on my 2011 Honda Fit in just under an hour. Would have been much faster, but had to find some of my tools that the grandkids had been playing with. A very easy install after I found out how to remove the inside fender panel. It just snaps on, go figure.

Jan M.

5/16/2014
Hitch is doing great.
I bought the Fit to replace my truck, so I needed a hitch to haul bulky items in a trailer.
Installing this yourself isn't difficult, in case you're wondering. I installed it by myself. The only part that's difficult is holding one side up while bolting the opposite side on. I rested the one side on the muffler while putting the other side up, and it worked ok for me. It was nice adding this on myself instead of paying double the price for a dealer to do it for me. I've used a bike rack with this, and hauled a lot of items in a trailer, and have had exactly zero issues with this hitch.

Rating is 4.5. Easy to install, works great! Would be perfect 5 if it had a 2” gooseneck rise for raising the bike rack on my Honda Fit. It would help avoid hitting bike tires on pavement when backing out of driveway.
2010 Honda Fit here. Took me about 2 hours to install, I have only basic tools and no garage to work in. The part fit perfectly, installation was straightforward. Would have been a little easier if I'd had a second pair of hands to help when hanging it up after putting the bolts in, but I managed alone. Looks great, should be all set for the move!

Steve M.
3/21/2015
Served admirably for the move! I havent used it since, but its still on the car. The mouth area got a little rusty salted roads... but I cleaned it up with a brush and WD-40. Seems fine since.
Before ordering this hitch, I watched the etrailer.com installation video to see if this was really a DIY project. Looked straight forward so I made the leap. Once the hitch arrived I unpacked it, gathered the recommended tools (all three of them) and watched the video again as a refresher. Then on the driveway in front of all the neighbors, I proceeded to install it with no cussing and no bloody knuckles! Total time including watching the video: 40 mins.
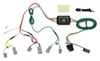
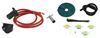
Then I tackled the trailer wiring kit. Talk about easy, 20 minutes later car is back together and ready for my Yakima Rock and Roll trailer that should arrive tomorrow. Had some concern that the remote braking system for towing the Fit behind our RV was going to interfere but not a bit. Great service and great products etrailer!
I’m really happy with my new Draw-Tite hitch and Swagman bike rack! They work really well on my 2010 Honda Fit, and look really sleek and stylish, too. I had my local car service place put them on them for me, and the guys found them very easy to install. I’ll be carrying just one bike, so I put on just one set of tire holders, and they’re on the outer side so I can load and unload the bike without having to lift it around the backside of the mast – so easy! I also got a Swagman adapter bar (thanks for the suggestion, Alexis!) to work with the curvy step-through frame, and it’s very easy to click into place. I’m several miles away from nice safe bike trails, and I’m really enjoying how this new setup helps me go there so I can ride my new bike in a good place.
Great Product. I spent much longer than the estimated time but stopped to take lots of photos. A couple notes on install...
-- Taking off the passenger side wheel give you some space to work and makes your life 100x easier. Also made it possible to do the job without dropping the muffler and I was super glad. Mechanics probably have a trick to get those rubber hangers off in 2 seconds but I fought with it for 20 minutes before giving up.
-- The spacers are only 0.04in larger than the hole in the frame so you don't need to take away much metal at all when you make the keyway. You'll need a small (less than 1" wide) file with a fine tooth. The frame material is only maybe 14-18ga steel.
-- The fish wires are coiled pretty tight in the packaging. Straighten them out a bit before starting to make it easier to get through the frame
-- If you're doing the job yourself and you've got an extra jack stand, use it to prop up the hitch so you don't have to support it's full weight while you're starting the first bolts.
-- The plastic wheel well guard is easy to trim down using a sturdy utility knife with a new blade
-- Didn't need to trim the exhaust heat shield.
-- There's some left-right adjustment room in the mounting holes so check that the hitch receiver is centered before tightening everything down. (last pic taken before I did this.)
Haven't attached the bike rack yet or tried it out but expect no problems. Install is tight and no rattles from exhaust or trim. Very Happy!
I am very happy with my hitch that I bought from etrailer. I had it installed on my 2011 Honda Fit and I use it to haul around two bikes on a bike rack.
No need to do "keyhole" notching of "frame" member IF you remove rear fascia (bumper cover) and steel bumper bar. As shown in photo, removal of these parts reveals round hole through which bolts and bolt backing plates may be fished. No notching means less corrosion. Further, you can spray anti-corrosive wax-type coating through hole into "frame" rail both before and after installation of bolts/backing plates. This is the correct way to do job. Bumper and bumper bar removal takes about 15 minutes and also allows for easier placement of hitch into correct position.
Very easy install! One man install using a just 2 passenger-side wheels on the curb to get some room under the Fit, and some seat cushions to not kill my back. Including the 4 wire bolt leaders was pure genius.
Seeing the video was great - I used some bike chain oil (couldn't find my WD-40) to ease the muffler hangers off. A long screwdriver and gentle pressure is all you need. An old braided belt was to hold the muffler out of the way, and then hold the hitch in position.
Got it on snug - need a deep-well 11/16 socket and torque wrench to finish the job.
Pictures show the Swagman 2-bike rack. I like the way the rack goes from the hitch to give some ground clearance on driveways, ramps, etc.
Great deal - great price - great service on delivery - easy install thanks to the video - will let you know how the Swagman does after a 1500 mile trip!
I got it installed today and know it will do it's job for a few years.
It will also get very rusty. For the money, a better rust resistant finish should be used.
Installation was on a 2012 Honda Fit Sport. The video produced by etrailer.com was VERY HELPFUL. The instructions leave a bit to the imagination.
The video shows exactly where the wheel well plastic trim needs to be cut and the importance of dropping the exhaust before attempting to "keyhole" the right side.
A third pair of hands (or a floor jack as I used) is very helpful to raise the hitch while bolting on the hardware.
My Trailer Hitch was easy to install with the videos provided through etrailer.com. I have used my trailer countless times over the last year and believe it is one of the best purchases I've ever had the privilege to enjoy.
Perfect fit and easy to install. I got it for a bike rack and it works great. Everything necessary for install was included and the video made it a no brainer to get all set up. etrailer was great through the whole transaction as well; fast processing, shipping and great communication.
Hitch arrived promptly and installation was very straightforward. You will need some sort of rotary tool or ginder to cut a 1/16 in groove into two of the frame holes to get the nut plates to fit into the frame. Believe it or not you can actually install the hitch by yourself and without dropping the exhaust although it does take some flexibility. Overall great product and great price.
2013 Honda Fit Sport 5 door
Installing this was the easiest project I've had in years! The Honda Fit installation video on the etrailer site was immensely helpful. I used a metal file to cut the notch in the frame to get the backing plate into the frame. It only took me about 3 minutes of filing on each hole. I was working by myself, and had everything torqued down and cleaned up in just over an hour.
The Draw-Tite hitch came very quickly from etrailer, and they had the best price around. Installation was easy, taking only about 35 minutes, including the time to put the car on/off jack stands. Fit was perfect, and the end result is very solid. Once installed, it is well hidden, which made photographing the finished job difficult.
Works perfectly. I use it for a bike rack for an E-bike that is really too heavy to put on top of the car. .
This trailer hitch was perfect for our 2013 Honda Fit Sport, making it possible to use our Saris Thelma 2 bike rack easily. Thank you
You guys are great!
First, shipping was very expedited, the package arrived a lot earlier than promised and the item is simple great quality. Also you took the time to look for an installer for me in my area but ended up doing it myself, I just followed the instructions of the video you sent to me and that was very easy.
I can only say now, thank you very much for your service, Im very happy with my new toy!!!
Delivery was fast!
Mine is a 2010 fit with the sport package and this fit perfectly. I highly recommend watching the video to master the techniques for using the screw-on wires to pull the bolts through the frame (this technique is a time saver!). Keep these wires attached until you are ready to put on each nut because it's easy to bump them back into the frame.
Also, I did not detach and lower the muffler as shown in the video but you can work around the muffler if you have a bit of dexterity. I worked at a slow pace and the installation time was 2 hours (although 40 minutes is clearly possible).
Installed the mount on a 2013 Fit Sport without assistance in under an hour with no additional help. I just used a couple of jack stands for support.
Looks great and works perfectly. Very solid construction. I will be using this to pull a Class 1 trailer.
Do you have a question about this Trailer Hitch?
Info for this part was:
At etrailer.com we provide the best information available about the products we sell. We take the quality of our information seriously so that you can get the right part the first time. Let us know if anything is missing or if you have any questions.


Steven
12/22/2023
Perfect.