
Hopkins Trailer Wiring Installation Kit
(7 reviews)
Price: $17.87
In Stock
Hopkins Trailer Wiring Installation Kit
Item # HM51010
Retail:$25.66
Our Price: $17.87
You Save: 30%
In Stock


Need help with installation?
Locate installers near me- All Info
- Reviews (7)
- Q & A (0)
- Videos (2)
- Photos
Hopkins Wiring - HM51010
- Tools for Wiring
- Wiring Kits
- Hopkins
- Installation Kit
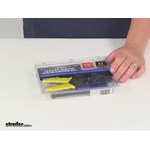
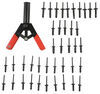
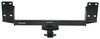
Wiring your trailer has never been easier. This kit contains a multipurpose wire tool; 12-V LED circuit tester; connectors; zip-ties; ground screws; and more. Perfect for Y-harness and 4-conductor wire installation.
Features:
- Great for wishbone-style Y-harness and bonded 4-wire installation, or any other wiring project
- Includes the essentials for rewiring or hardwiring a trailer connector to your trailer
- (1) Multipurpose wire tool for cutting, stripping and crimping
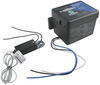
- (1) 12-V LED probe circuit tester
- (1) Roll of electrical tape
- (9) Butt connectors
- (1) Terminal grease packet
- (2) Self-tapping, hex-head ground screws
- (20) 5-1/2" Long zip-ties
- (1) 4-Wire flat dust cover
- (4) Splice connectors
- (3) Ring terminals
- (1) Resealable storage case to keep everything organized
51010 Hopkins Trailer Wiring Installation Kit
California residents: click here


Video of Hopkins Trailer Wiring Installation Kit


Videos are provided as a guide only. Refer to manufacturer installation instructions and specs for complete information.


Video Transcript for Hopkins Trailer Wiring Installation Kit Review
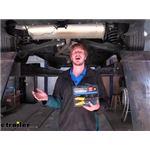
Hi do-it-yourself-ers! Today, we're gonna be taking a look at Hopkins Trailer Wiring Installation Kit. We're gonna be using the deluxe one here today. Comes with a few extra components, but there is also a standard one. So you're installing your wiring. Can you open up the box And this is really what you're going to see. We've got our module on our four-pole.
We're routing our wires now, but I wanted to show you what hardware does come with a typical custom fit wiring kit. You're going to usually get a ring terminal so you can make your connection to the battery. You're going to usually get two bud connectors and they are heat shrink butt connectors, which is nice. And these are usually for running the power wire from the rear of the vehicle up to the front. And then you get a self-tapping screw for connecting your ground.
That's on the module and that's it. So if you're making any repairs, one of these rolls off. If you go to crimp a wire and the wire falls out of there while you're crimping it, you don't have any other hardware. There's nothing else that comes in the kit. You don't get any extra components.
So having these laying around can save you a trip to the store could save. You potentially really need in that job to be done. And you don't have your parts on hand, but having them on hand, you can ensure you can complete that and do everything you need to do. Additionally, if you've had your wiring installed now for maybe a year or so and service, and maybe you ran over something or somebody hit you at the back end or just any little thing might've happened out on the job site, you need to make her a pair to any of your wires. You're going to have all the components on hand to be able to do so, so you can keep on working and keep on enjoying yourself if you're out on vacation.
So here we can see inside of our kits some things you're going to get in there. You get some zip ties. So you get some various butt connectors, ring terminals as well as self tapping screws. So you can get those mounted up. You've got some quick splices here. Replacement ends for four poles for the dust cover to get some terminal grease to protect your connections to four pole ends as well as a terminal brush here. This is great for cleaning out those females terminals on your a four pole connectors and also get some electrical tape and plenty of zip ties to secure everything up. And it wouldn't be complete without a set of wire, strippers, and crimpers. So we can utilize all these parts here and get everything installed. One of the things we're going to be using here on our particular install is these loom clamps here. These only come in the deluxe kit and when you have a location where there's just no place to zip tie your wiring when you're running it front to back something like this can really come in handy to ensure your wire doesn't get into a predicament like touching on your exhaust and Melton through and shorten out or getting tangled up in your steering or suspension components. So we're gonna go ahead and use one of these. Now we're also gonna use one of the self tapping screws to get it installed. Ruined, pull this out. And we're going to go ahead and pull out one of the self-tapping screws. So you can see here this is our power wire that we've connected up in our wiring kit that we're installing here for our Jeep. And this wire has to run all the way to the front and this spot right back here. There's just really no good place to zip tie. This wire and our exhaust is right here. So we really want to keep it away. Try to keep it over on this side. So we're going to be using one of the cable clamps that came in the kit. We're just going to slide it over our wire, just like that. And then we can use the self tapping screw that comes in the kit to secure it right to the side of the frame there. After making our connections at the back we do have to run that power wire all the way to the front. And it was as if title on the wakes we want to keep it nice and safe. We've got those clamps for locations where there's just nothing to tie it to but there's no reason to keep drilling holes in your vehicle. If you've got a place where you can just put a zip tie on to hold your wiring. So we're just going to run this through one of these open holes in our under shield here and our wiring's right there. That's going to keep it secure. That's going to keep it away from our exhaust over here cause our again, our main goal is to get this wire up to the front without getting damaged. By anything down when driving down the road and then, we can take the rest of our excess here and we're going to trim it off using our wire cutters here because we want to have a nice clean looking installed as well. We've got our wire right up here towards the front of the vehicle, but we need to get up to the engine compartment to get this connected to our battery. So one of the things you're not going to get in your kit is any way to really get this up there. You're just going to have to push her up there and try to figure it out. Well, if you're watching and following along with a one of our videos at home trying to get the installation you're being with you're probably going to see us do the fish wire trick where we take a piece of airline tubing or a coat hanger or something. We pushed that down from the top that where we can attach our wire to it, to pull it back up so we can use some of that electrical tape that comes in our trailer, wiring installation kit. And we're just going to tape that wire to the piece of airline tubing. I've run down. And that way, when I go back up top cause it's much easier to push this down. I can just pull this wire right up and that's going to make our life a lot easier. In addition to the fish wire trick here let's go take him to all sorts of scenarios. Maybe when you we're making your connections or cutting your wires you accidentally Nick the wire a little bit and you've got a small exposed section. You can take this up to seal that back up through it and your shorts. If you've got wires that are blood cut and maybe there are some you're not going to use. Cause when you're doing certain vehicles you may have some wires that just don't end up getting used. You just got to ground those, your tape off the ends. We can do that with this to keep and ensure that none of our live connection wires are going to ground out or touch against anything else and causes any problems down the road. So we've gone ahead and pulled that wire up now thanks to that electrical tape and our fish wire. I've gone ahead and routed it around our box. We are here at our battery when you start making some connections over here. So we're going to take our strippers that come in our kit. These are cutters and strippers and they get to here. We can do the entire job with just these. We can cut, We can strip and we can crimp. And I do like that, the crimpers are on the outside. That actually makes a pretty big difference in where you're going to be able to fit these crimpers. Some tight locations are going to have a real hard time crimping wires when they put the crimpers on the inside like this. So I do like that, they've got it out there. How we've got that crimp, we're just going to strip this other side. we've got to put a butt connector over here to connect to that black wire that we ran up. Now this is an outside connection, so rather than using one of the connections that come in the trailer installation kit we're going to be using one that comes with our custom fit wiring harness here since this does live outside the vehicle. And if we take a look at the ends here the crimpers are also designed for insulated wires which is important with these outside heat shrink butt connectors because it's not gonna protrude through the plastic there and it's still going to give us a good crimp. So once we heat this up it's going to seal this completely with no chance for leaks. So now I'm gonna go ahead and make my connection to my black wire. Here. We can use those cutters once again and we can strip this. This wire is a little bit different gauge than the fuse harness there but we've got plenty of options here. We can go between a 10 gauge wire all the way to the tiny little 22 gauge wire. And that's going to be enough for just about everything you would do as far as trailer wiring's concerned. This is a great kid, especially if you're looking at upgrading from this wire from just a custom fit wiring like this to a brake controller as well to some of the parts that come included with our trailer installation kit are really going to come in handy with a brake controller. In addition to our custom fit wiring here. With our wiring, it's all we want to test everything out. I've got an assistant in the vehicle so we can operate the various lighting signals. And then we want to see if we've got them here at the back. Currently, we've got the tail lights on with the left turn signal take your clip and put it on ground. That's going to be the exposed stud our terminal there on your four-pole. And then we go over one. We're going to have our tail lights. And if we see here, we touch it and it lights up which means we've got our taillight signal. Next is going to be our left turn signal here. And we can see we've got a blinking signal there. We'll then get our assistant to switch it over to the right turn signal. And we can see that we've got our right turn signal there. And then if they hit the brakes we should be able to get brake signal on both the turn signals on the scene. We've got brake on the passenger and brake on the driver's side. So our systems working out and this tester can be used not only for testing your four-pole but you can use this really anywhere that you've got a 12 volt connection that you need to check for power at. So this can be even useful on your trailer. If you're making repairs over on that end as well a couple of additional parts you're going to get in your kit for your four-pole here. You're going to get a terminal cleaning brush. This is great for cleaning out those terminals, nice tight fit. That's going to really get in there and get that corrosion out. If you do have any corrosion or maybe it's just dirt and debris, that's in there causing you a bad connection we can ensure that we get that out of there. So when we go to plugin, we've got good metal contact to help combat against corrosion. We do get some terminal grease included in our kit. So we're going to go ahead and put this here. This comes with our trailer installation kit. We're just going to rip that open here. And you do want to be pretty generous with this because this is going to keep out moisture as well as dirt and debris that can get up in there and cause corrosion cause that dirt and debris also holds in moisture, which causes things to corrode even faster. So we want to keep all that stuff out of there. This one that we just installed has a dust boot that's made onto it, but some of them just come with ones that slide on. And this year, this can get easily get ripped off. If something happens to it gets cut. Maybe it hits something or those other ones that you have to slide on. They sometimes you lose them. They fall off of there. You need a couple that come in your kit. So you're going to have some replacement dust caps here. It's nice to ensure that your connection stays a corrosion-free cause once you put that terminal grease in there and seal it up with this cap, that really makes a big difference on how long this connector's going to last living outside the vehicle here. You're also gonna get a couple of other items in your kit. Let's say you gotta hook up to your trailer and you've got all your lights, but one and it kind of comes in and out as you're messing with your wiring, check your ground. In many cases, your ground is what's causing your your components to cut in and out. And a lot of times it's just corrosion that builds up or maybe the surface you had put your ground on has a it's a painted surface and you're not getting a good ground. So you're going to get some angry clause in there. This is an abrasive material that you can use to just clean that up. And you can also use this to clean off corrosion in other areas, maybe you got it on your terminals. We showed you the little brush for cleaning out the inside but maybe that ground on the outside of your connector needs a little bit cleaning up. You can knock those off with this as well unless we get some quick splices in our kit. And when you're installing your regular custom fit wiring and things like that and doing repairs on your trailer, they're not as useful. Cause this is really exclusive for inside the vehicle because corrosion will occur on these if left outside the vehicle. But where they really shine is when you go to install a brake controller in your vehicle you're going to have to tap into your stoplight switch. And this is going to be one of the quickest and easiest ways to get that stoplight switch signal for your trailer brake controller. And when you're all done the packaging works as a storage case. It keeps all of our components nice and separated. So we can just fill this in our toolbox and it's ready for the next time we need it..
Customer Reviews
Hopkins Trailer Wiring Installation Kit - HM51010
Average Customer Rating: 4.6 out of 5 stars (7 Customer Reviews)
Wiring your trailer has never been easier. This kit contains a multipurpose wire tool; 12-V LED circuit tester; connectors; zip-ties; ground screws; and more. Perfect for Y-harness and 4-conductor wire installation.by: Anthony04/04/2024
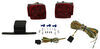
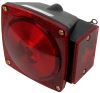
Restoring a 1991 2 horse trailer. etrailer had all the exact lights made by Peterson, 35 years later.
by: Christopher05/18/2018
Just what i need to rewire the whole utility trailer. Great Suggestion from Tammie.
Great Customer Service and Fast Shipping
by: Matt M.03/12/2017
Great kit, with a little bit of everything you would need to wire a trailer.
by: Dennis P.08/01/2015
What can you really say about a tool kit? Good quality, great price. Worked for exactly what I needed it to.
by: Fredy R.04/19/2016
I thing it is a good product just for one use.
by: Patrick03/02/2018
Got your basics covered!
by: Mark 06/09/2021
7
7
See what our Experts say about this Hopkins Wiring
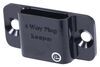
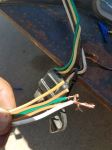
- How To Connect Vehicle 4-Flat Connector To Loose Trailer WiresIt sounds like your truck has a 4-way flat trailer connector with yellow, green, brown and white wires (see picture), which is pretty standard. It also sounds like your trailer has 5 loose wires that you are trying to connect to a trailer side 4-way flat connector similar to part # W787264. If this is the case, then it sounds like your trailer came with a wishbone style wiring harness meaning you have two running light wires (brown wires) for each side of the trailer, the left turn signal...
view full answer...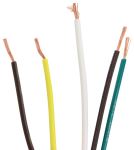
- No Wiring for Electric Trailer Brakes in 2013 Toyota Tundra 7-Way Trailer ConnectorSo on your 2013 Toyota Tundra 7-Way trailer connector there is no wire in the back at the 7 o'clock position? If that is the case all you will need to do is get about 20 feet or so of wire # 10-1-1, sold by the foot, attach it to the back of the 7-Way in the 7 o'clock position, then route it under the truck, into the cab, and attach it to the blue wire coming from the back of the controller. When routing the wire avoid areas that can pinch or burn the wire. You may or may not have to drill...
view full answer... - Can Bargman Trailer Tail Light 30-92-001 Be Grounded At Trailer ConnectorThe Bargman Trailer Tail Light part # 30-92-001 can be grounded right at the light's mounting point on the frame or you can extend this wire and run it up to the main trailer connector ground. If you do this you'd need more wire for each side and a few wire connectors. The Hopkins Trailer Wiring Installation Kit part # HM51010 has most of what you need for the job.
view full answer... - Will the Prodigy RF Brake Controller Work with a 2017 Chrysler Pacifica TouringThe Prodigy RF brake controller # TK94FR can be used with your 2017 Chrysler Pacifica and it will not void the warranty on the vehicle. This controller installs on the trailer so nothing is being hardwired into the vehicle. In order for the RF to work the vehicle just needs to have a functional 7-Way trailer connector. That is one the RF gets its power and how it knows when the brake pedal is being pressed in the vehicle. If your Pacifica Touring does not have a 7-Way trailer connector...
view full answer... - Adding a 7-Way Trailer Connector on a 2012 Ford Escape to Use Prodigy RF Brake ControllerTo install a 7-Way trailer connector on your 2012 Ford Escape you will first need to install a 4-Way using # 118551 (since there isn't a plug and play 7-Way options for your 2012 Ford Escape). Then you can install # 37185. Since you will be using the Prodigy RF, # TK94FR, only the lighting functions and the 12 volt circuit will need to work on the 7-Way. To get the lighting functions to work you just plug the previously installed 4-Way to 37185. Ground the white wire from 37185 to the...
view full answer... - Adding a 7-Way Trailer Connector to a 2003 Ford Expedition with Factory 4-WayOn your 2003 Ford Expedition follow the 4-Way connector wiring forward on the vehicle until it meets another connector. On this forward connector, if you peel back the loom covering the wires you will see there are more wires going into the plug than coming out to go to the 4-Way, There should be an orange wire and a blue wire. You will need these wires if you intend to install a 7-Way and the trailer requires 12 volt power and has electric brakes. You will need 4- to 7-Way adapter #...
view full answer... - Adding a 7-Way Trailer Connector to a 2014 Ford Escape with Factory 4-Way to Use RF Brake ControllerIn order to use the Prodigy RF # TK94FR you will need to install a 7-Way trailer connector on your 2014 Ford Escape. For that you will need # 37185, a 40 amp circuit breaker, # PK54540, and enough 12 gauge wire, # 12-1-1, to reach from the back of the Escape to the front. The wire is sold in increments of 1 foot. Twenty feet is recommended so you would enter 20 in the quantity box. The factory 4-Way will plug into the back of # 37185. Then you will ground the white wire to the vehicle...
view full answer... - Tips for Installing Opti-Brite LED Work Lights on Outside of Enclosed TrailerAs far as physically mounting the Opti-Brite work light # TLL60FB it has a bracket that you can just bolt directly to the mounting surface so that much is easy. Just be sure to use hardware that is appropriate for the mounting surface material. Wiring on the other hand is just slightly more complicated. What I recommend is running the power wires for the lights to a switch, # PK34513. Then the power wire for the which will need to attach to either a trailer mounted 12 volt battery or the...
view full answer... - Need Universal Installation Kit for Trailer Brake Controller # ETBC7 Minus the 7-WayTo duplicate the Universal Installation Kit for Trailer Brake Controller, # ETBC7, minus the 7-way, you will need the Wiring Kit for 2, 4, 6 and 8 Brake Electric Brake Controllers, # 5506, Hopkins Trailer Wiring Installation Kit, # HM51010, 40 amp. In-Line Circuit Breaker, # 9510, and Wire Loom (sold by the foot), # 459075-1.
view full answer... - Wiring Harness Needed to Install Brake Controller on 2018 Chevrolet Equinox with Factory 7-WaySince your 2018 Chevy Equinox has the factory 7-way connector, all you will need is the brake controller and the hardware to tie it into the trailer wiring. Traditionally, GM has not put a brake controller port on the Equinox, so plug-in brake controller adapters aren't currently available, even for the 2018 models. So, instead of a quick connect under the dashboard, you will have to hardwire your brake controller. To complete the installation, you will need the Draw-Tite Wiring Kit, #...
view full answer...
- Replacement Connector for SnowBear Trailer with 5 WiresI do have an option for you but I don't have much information on what type of trailer connectors these trailers used from the factory. It could be an odd style of trailer connector or a standard one that is badly damaged. That said, in either case, it would need to be replaced for a standard style which can attach to modern vehicles. I recommend using the Hopkins Endurance 4-Way Flat Trailer Connector part # HM48110 or the Hopkins Endurance 5-Way Flat Trailer Connector part # HM47910. If...
view full answer...
- Availability of a Replacement Spade Terminal for Thin-Line LED Racing Light Kit # LS-108You are talking about a spade terminal I believe. Those are available at just about any hardware store. If you did need a switch, you could use # D16740. You may also need some electrical tools and tape. We have a kit, # HM51010. No spade terminals in this kit but everything else you might need.
view full answer... - Adding a Brake Controller to a 2017 Ford Explorer XLT with Factory Tow PackageIf your trailer has electric brakes then I highly recommend using a brake controller to decrease stopping distances when towing and to reduce wear and tear on the 2017 Ford Explorer's brakes. Your Explorer with tow package should include a 7-Way trailer connector which is needed for electric brakes. But also check the glove box for a Ford brake controller harness which they may or may not have included. If you do have the factory brake controller harness then the amount of installation...
view full answer... - Ways to Convert Trailer to LED Type LightingYou can convert your RV to separate turn signals and/or LED operation in a couple of ways, depending on how much wiring modification you care to do. Any of your existing lights can be converted to LED operation by swapping out the incandescent bulbs for LED-type replacement elements. We have LED equivalents that are drop-in replacements for many popular standard bulbs. All appear on the linked page and can be selected by bulb number, such as the popular 194 type bulb # A194B that can be...
view full answer... - Does Trailer Wiring Harness C59496 Include Everything for Installation on a 2010 BMW 135iTrailer wiring harness # C59496 comes with everything you will need for installation on your 2010 BMW 135i except for any tools you might need in the process. Extra wire and a circuit tester are included. A trailer wiring installation kit such as # HM51010 will help with crimping wires. But if you have one the only other things you might need are electrical tape and wire ties (to hold the power wire to the bottom of the vehicle). I have included a link to our help article with tips on...
view full answer... - Adding 7-Way Trailer Connector to 2013 Hyundai Santa Fe Sport with 4-Way to Use Prodigy RFTo install a 7-Way on your 2013 Hyundai Santa Fe Sport with the 4-Way trailer connector and to use the Prodigy RF mounted on the trailer, you will need # 37185. You will also need enough 12 gauge wire, # 12-1-1, to reach from the back of the vehicle to the front. The wire is sold in increments of one foot. So for 20 feet you would enter 20 in the quantity box. And last you would need a 40 amp circuit breaker # PK54540. You would plug the 4-Way into the # 37185. Then ground the white wire...
view full answer... - Installation of a Tekonsha P3 Brake Controller on a 2020 Mercedes Metris with Tow PackageThe stop light switch (red wire) on the Tekonsha Prodigy P3 Trailer Brake Controller # 90195 will use 12 volts. The stop light switch is not providing power or sending power, it is merely a switch that when it receives power indicates the controller to activate the brakes. The stop light switch circuit is not going to need a fuse. Because you already have the tow package on your 2020 Mercedes Metris you can use 10 Gauge Primary Wire (sold by the foot) # 10-1-1 which will run from your...
view full answer... - What Bulb Does Peterson Interior and Compartment Light 433600 UseI checked with my contact at Peterson, and the # 433600 interior and compartment light uses a standard number 1141 bulb. We offer a convenient wiring kit, part # HM51010, which includes all the essentials for a wiring project, and I am including some links to additional information on wiring, if needed for reference.
view full answer... - Adding a 4- and 7-Way Connector to Use Prodigy RF Brake Controller with 2005 Pontiac VibeTo add a 4- and 7-Way connector to your 2005 Pontiac Vibe that already has a 4-Way AND to have it work with the Prodigy RF # TK94FR you will need a couple of parts. First you will need # 37185. The 4-Way you have plugs into this, retains the 4-Way and also adds a 7-Way. This adapter has several wires that you will need to hardwire to the vehicle so that it will work with the RF. First, ground the white wire to the frame. Since you are using the Prodigy RF you will not need the blue wire...
view full answer... - Does the Prodigy RF Brake Controller Need Brake Output and Reverse Lights Circuits to WorkSince you are using the Prodigy RF brake controller # TK94FR you will only need to have the 4-Way plugged into the adapter, the white wire grounds to the vehicle frame, and the black wire needs to have power because that is where the RF gets its power. The blue and yellow wires on the adapter, # C57674, will not be used for the RF. But if your trailer has an electric reverse lock out then you would have to attach the yellow wire to a reverse light wire on the vehicle The black wire is...
view full answer... - Mounting Bracket for EZ Connector 7-Way 319-S7-05 and 14-Pin 319-S14-05-6EZ Connector Mounting Bracket # 319-S7-61 is compatible with their 7-way vehicle socket # 319-S7-05 as well as their 14-pin socket # 319-S14-05-6. Both share the same mounting hole spacing that is shown in the linked photo. For a crimping tool I suggest one the like tool included in wiring kits # HM51020 and # HM51010.
view full answer...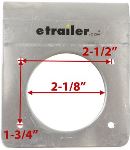
- How Much Should It Cost To Completely Rewire a TrailerI can give you a list of parts below that will be needed to rewire a trailer which you can then use when combined with the labor rate of the shop to give you an estimate but it can be very hard to estimate the price of said job because the labor rates for shops can vary quite drastically. If you think one shop is charging too much, I would shop around and compare prices but I can't really give you a yes or no answer in regards to whether or not they are charging too much. Tekonsha Push-To-Test...
view full answer... - Adding a 7-Way for Lights and Battery Charge to a 1998 Toyota 4RunnerThere are a couple of parts you will need to get the 7-Way connector you have working on your 1998 Toyota 4Runner. First you will need to install a harness for the lights on the trailer. For that use # 118341. The output side of this harness has a 4-Way flat connector. If the 7-Way you have has a mating 4-Way then you would just plug the two in together. If not then you would cut the 4-Way off and hardwire the wires to the 7-Way. White is ground, brown is running lights, green is right...
view full answer... - Adding a 7-Way Connector to a Tow Vehicle to Use the Prodigy RF Brake ControllerIn order for the Prodigy RF brake controller # TK94FR to work the tow vehicle will need to have a 7-Way connector with function light circuits and a functioning 12 volt circuit. Since your truck already has a 4-Way you will just need a couple of parts. First you will need a 4- to 7-Way adapter # 37185. Your 4-Way will plug into this adapter to provide the lighting functions. The white wire on the adapter will need to be grounded to the vehicle frame. Next you will need about 25 feet of...
view full answer...
Do you have a question about this Wiring?
Info for this part was:

Video Edited:
Dustin K

Installed by:
Cole B

Installed by:
David F

Updated by:
Alexander C
At etrailer.com we provide the best information available about the products we sell. We take the quality of our information seriously so that you can get the right part the first time. Let us know if anything is missing or if you have any questions.
Product Experts Available Now!
Call 1-800-940-8924
Thank you! Your comment has been submitted successfully. You should be able to view your question/comment here within a few days.
Error submitting comment. Please try again momentarily.