
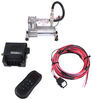
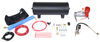
Viair Ultra Duty Onboard Air Compressor with 2.5 Gallon Tank - 200 psi - 1.86 cfm
(3 reviews)
Price: $588.95
In Stock
Viair Ultra Duty Onboard Air Compressor with 2.5 Gallon Tank - 200 psi - 1.86 cfm
Item # VA69WR
Our Price: $588.95
In Stock


- All Info
- Reviews (3)
- Q & A (0)
- Videos (3)
- Photos
Viair Tire Inflator - VA69WR
- Tire Inflator
- On-Board
- Viair
- 12V
- 200 psi
- Analog Pressure Gauge
- Manual Shut Off
Onboard portable compressor mounts on your Jeep, truck, or RV so you can pressurize air and quickly fill your tank. Perfect for inflating tires 37", air tools, air lockers, and air horns. Hardware, plumbing, and electrical components included.
Features:
- Onboard air system allows you to compress and store air on your vehicle
- Capable of filling virtually any vehicle tire up to 37"
- Lets you operate air lockers, air horns, as well as other standard air tools
- 2.5 Gallon tank fills from 0 psi to 200 psi in 5 minutes
- Automatic thermal overload protector shuts compressor down if overheated, preventing damage to the system
- 30' Heat resistant stainless steel braided coil hose with quick connect for easy attachment of accessories
- Inflator gun makes it easy to fill tires and other inflatables with air
- Analog gauge measures psi up to 200
- Bleeder valve lets you release air
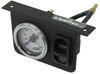
- Dash panel gauge allows you to turn the system on or off from the front seat of your vehicle
- Mositure resistant compressor is equipped with a permanently lubricated, maintence-free motor
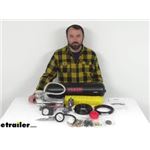
- Includes all hardware, plumbing parts, and electrical components
Specs:
- Tank capacity: 2.5 gallons
- Maximum air pressure: 200 psi
- Maximum airflow: 1.86 cfm
- Duty cycle: 100% at 100 psi
- Inflation ports: (6) 1/4" NPT
- Voltage: 12V
- Maximum amp draw: 23 amps
- IP rating: IP67
- Air hose length: 30'
- 1-Year warranty
Note: Bleed pressure from tank before servicing or adding attachments. Also, only use attachments or tools rated for 200 PSI working pressure or less.
20001 Viair 200 PSI Ultra Duty On board Air System for RV, Jeep, or Truck


Video of Viair Ultra Duty Onboard Air Compressor with 2.5 Gallon Tank - 200 psi - 1.86 cfm


Videos are provided as a guide only. Refer to manufacturer installation instructions and specs for complete information.


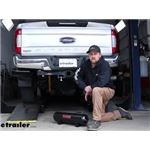
Video Transcript for Viair Ultra Duty Onboard Air Compressor Installation - 2018 Ford F-350 Super Duty
Hey everybody, Ryan here at etrailer. Today, on 2018 Ford F-350 Super Duty, we're gonna be showing you how to install the Viair Onboard Air Compressor System. Before we get into that though, why don't we just take a minute, check this system out and make sure it's gonna work for you. Having an onboard air compressor system on your truck is definitely a cool feature to have. You know, essentially, it's gonna be like having a compressor you would, more or less, at your house and your garage, that stays with your truck all the time. You can fire it up and do a lot of different things with it, especially one of this caliber.
You know, this makes a lot of pressure. It can move a lot of volume and can actually do a few different things with it. So, in our case, our customer here today has airbags, air springs, for the rear axle. He can inflate those with the compressor kit. You can air up tires, you can, you know, blow your bed out of your truck, you know, blow out the dirt and everything.
So, really, you know, it opens up your opportunities and how you're gonna be able to use your truck as another tool. This kit's also gonna allow you to use air horns or train horns as some people call them. It seems to be pretty popular. And here in a minute, we'll kinda put everything through its paces and see how it works. Maybe air up a tire, air up our bags and figure a couple of things out there, but I wanted to show you what's kinda going on.
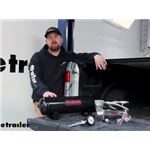
So, I'm not gonna lie, the kit is pretty stout. 2 1/2-gallon tank and the setup has a 200 psi maximum working air pressure, which is really good. The compressor's no joke. This thing will move quite a bit of air. I believe it's 1.86 CFM, but more importantly, it has 100% duty cycle at 100 psi.
So, more or less, what that means, at 100 psi, this thing will run for an hour straight before it needs to cool off. So, you know, that gives you a lot of run time on this thing at a pretty high pressure to be able to do what you're trying to do with it, you know, whatever the case may be. So, pretty cool to see there. Tank seems like it's well-made. A bunch of different prongs located on it so you can put all your different types of fittings and whatnot there. And they give you a hose and actually, a pretty nice gauge too, to inflate your tires or inflate you know, whatever it is you're trying to do. So, with that said, why don't we go ahead and check it out and kinda put the system to the test. So, here's a good situation that never seems to fail. You get a flat tire, you get the spare down, just to realize that the spare is flat too. So, I'm gonna hook up our gauge to it here. (air hissing) Lock that down on there. And it looks like you only got about 20 psi in the tires. A spare on this truck supposed to be 80. I got our compressor tank filled all the way to 200 psi so we'll see how long this takes to pump this up here and if the compressor, there it goes, the compressor kicks on. (compressor running) So, I'm assuming it'll take a little bit. I mean, that's a lot of pressure that this tire's gonna take. It seems to be doing okay. You know, so, this is a good example of how it can get you out of a pinch if something like this were to happen to you. So, there we are, we're able to get it to 80 psi. I'm not gonna lie, from that, I'd say, about 20 to 50 psi, it did that on the first swing. You know, it ripped through that like it wasn't nothing really. From there, you know, about after that 50 psi mark, at least in our tire, you'd get five, seven psi out of it. You know, you'd have to wait a minute for the compressor to get another five pounds of air, wait a few minutes. So, it really started to slow down at the higher range, which is expected. I mean, 80 psi and a tire this large, this one is a 275/70/18. Don't know what that comes out to, but a big truck tire and we we're able to get it, you know, get 80 pounds air in a thing and it would go more too if we wanted, I'm sure. But pretty impressive for a little onboard air compressor kit. Underneath the truck, this is what your kit is go to look like if you install it like we did ours. This is possible to actually get everything underneath here and still get your spare tire back up. It does fit back up, obviously, we left it outta the way so we can see everything and so that's really nice. You're not going to have to, if you don't want to, take up space in the bed of your truck or things like that. And this is really about the only option that we found because there is a particular way you wanna mount up your compressor and some of the other parts to the system, so you can't just slap the thing any which way, you know, on the side of your frame or something. So be conscious of that, cuz if you do that, chances are really good you're gonna end up burning up your compressor cuz it's not designed to run in a particular way there. So, it is doable. It could take you a little bit of time and just a little bit of creativity to to kind of make some things to get set up. But it's pretty nice. All this is tucked away up in here, you know, and even though it's underneath the truck, this stuff's gonna be under the spare tire up high and protected from all the elements. Something I'm sure a lot of people are gonna be wondering, I know I did when I thought about putting this in the truck, is if, you know, you can use one of your auxiliary upfitter switches here that are from the factory already installed and the answer is yes, you know, if you have these and I'll show you how to hook it all up later. But you are able to set it up in a way to where you can use this to kick the compressor on, you know, turn it off, whatever you want to do, if that's what you choose to do, which is what I'd recommend. It turns out to be a really nice setup. And with that said, you know, you can manually turn the compressor on and off and it's also going to turn itself off automatically once it reaches that maximum pressure level. The kit is gonna come with a gauge too that you can mount up and you know, it's just a good indicator to have, always kind of keep an eye on things to see how much pressure's actually in the system and you know, what working pressure you're gonna be using. I'm sure some people are gonna wonder if you could run air tools off of this and just by judging how it inflated that tire, you know, if you we're to ask me would it take off a lug nut or something with an impact. Would probably say if it was full you could probably get one off, maybe two and then wait for it to fill up, pull another one off. I mean that's just, if I had to guess. I wouldn't rely on this thing to be at a job site, you know, cranking tools all day or something like that, but might be able to get you out of a pinch in terms of using a a heavier duty air tool like that. So you know, as a blow gun or something, absolutely, you know, no issues at all with that one. But other than that, at the end of the day, nice little system to have on your truck, you know, in regards to what you're trying to accomplish. And in terms of the installation, it was a lot of work. You know, it's not really confusing by any means, it's just trying to get all that stuff to fit and work properly underneath the truck. Definitely have to make some brackets and and do quite a few things there to get that all to work. So hopefully what I did can help you out and get you going in the right direction and speed it up a little bit. But if you like to see how that's done, feel free to hang around, we'll go ahead and do that now. To begin our insulation, we're gonna be underneath the back of our truck and first thing you wanna do is temporarily remove your spare tire. That way we have a lot more room to work. And then what you're gonna wanna do is find a spot to mount up your tank, which I have done already and where we're gonna be putting it is right here in this location. The tank, what I ended up doing is using our hat channel, we're gonna use that as a mounting point for brackets. they're gonna have some holes in them and so this will sit up there like this eventually. And what I've done, just held this up, lined up where I want it to go, drilled two half inch holes and then I used a carriage bolt and a spacer block behind there and some fish wires got the bolts up through here. That way we can run these through and then put a nut on our bracket to actually bolt this up. But before we do that you want to kinda eyeball everything, make sure we have clearance and find the best spot for our fittings and get those in place first. To get all our fittings in we wanna position 'em in a way that makes sense like how we're gonna have our tank mounted and so that's what I've done. So just kind of give you a reference, this side will be facing our driver's side and the other end will be facing towards the passenger side. But down here I put our pressure relief valve and here our compressor, the airline coming outta the compressor will eventually thread into it. And then right here, I put our drain valve. When you put your drain valve in you want to get it in a spot that, you know, try to get it at lowest point. Right here is our pressure relief valve. This fitting, this will either end up going to our air chuck where you can actually plug your air hose into and get your onboard air or our air pressure gauge that comes with the kit. Haven't decided, you know, what one's gonna end up working best but that one will work for either of those two. And then there's one more back here. This one will work for either of those two that we talked about, as well. Once we get this up, we'll kind of see where the lines lay and what what makes the most sense. So we have two options as far as that goes. When you put these in, you want to use some type of thread sealer on the threads and run 'em down. You know, I try not to crank super hard on these brass fittings, your nine sixteens wrench, because I don't wanna crack 'em. My thought is, if you end up getting a little leak, you'd come in here and snug it up a little bit more, it's a lot easier than trying to replace the whole fitting and and go through all that. With that said too, since these trucks have aluminum beds and we're gonna be mounting this too a part of that aluminum, I did have some, this is almost like clear vinyl, sticky vinyl I guess, you can put a layer on that. And since this is metal or or steel and the bed's aluminum, not a bad idea to have a layer of protection on that just to help prevent galvanic corrosion. I believe that's what they call it. You know, anything will work probably if you don't have this fancy stuff you know, packing tape, just some layer in between there and that holds true for the hardware, any metal hardware that's actually gonna touch aluminum as well. It's not a bad idea to to do something like that. So I got our tank mounted up, just slid it over our bolts and use some flange nuts to secure it. Real solid, ain't gonna go anywhere. The hardware that I used, you're gonna have to grab this separately. I had two half inch carriage bolts that are an inch and a quarter long, the spacer block. And so this is what actually, you know, was inside there coming through. We used the pull wire and then just the flange nut to get it secure. Now, at this point you need to figure out a way to mount up your compressor. And on this truck there's probably only one ideal spot. Because you want this to be mounted up a little bit higher than the tank. You want it out of the elements as much as possible. It has to be pretty close to the tank because this has to thread into it. And you also wanted it mounted on a flat surface and upright. So kind of sitting like this. So you're really limited. So on top of our spare tire carrier, which we'll see in a minute, this is gonna kind of bolt up there. And so what I've done to be able to do that is I made this, this bracket here. So all this is is one inch by one inch angle iron, one eighth of an inch thick. I think this was, I think each one I cut about 19 and a half inches long. And then well we'll see here, about two inches at the end on one side, I cut off that one piece angle, you know on all four ends there and then pre-drilled two holes on each side. You wanna stagger 'em, that way this won't wanna rotate on you. Pre-drill them like that. Mount the compressor about in the middle of it because you want this to reach, you need this to clear the bottom of the bed and you want your air filter tubing to have room as well. Cause if you get this too close to one side, the fitting will hit. And so that's where I kind of came up with that. I did, on all of our mounting locations and where the compressor's gonna sit against the angle, I took some, it's almost just like rubber sticky tape just to help reduce vibration. And then I used the hardware that came in the kit and drilled holes and actually mounted up the compressor to the bracket. So got this thing mounted up, all prepped our holes pre-drilled. Now we can get this up under or above the spare tire carrier, I guess you could say. And actually get it secured to it. Underneath the truck, I got our compressor mounted up here and this is how it looks. So, you know, those pieces that we cut out, it's gonna set up flush against our spare tire carrier. And then I just used two self-tapping screws on each part of our bracket to hold it in place. Now granted, our spare tire's gonna touch this stuff a little bit. Not really a huge deal by any means, you know, it's really don't have any other option, honestly. So yeah, this is how it turned out. Make sure to run your hose on top of everything, your wires and everything else. And with us all mounted up and done up like that we can start to focus on some of our other components. From there I went ahead, took our airline coming out of the compressor, so that'll just thread into an adapter that comes in the kit. So put your pipe sealer on there, throw those in and then just screw it right into the tank, just like you did the other fittings. And then from here we can get a couple of our wires hooked up. The wires that we're gonna hook up, since we're right here, we're gonna have a black wire labeled: "connect to grounding point or control switch" coming out of our relay. And then the black wire from the compressor, just use a self tapping screw and run in through, they already have ring terminals and everything on it so it's pretty convenient. Red wire coming outta the compressor, that just plugs into the white wire and that is the white wire from our regulator there. And that one's labeled: "connect to load or compressor power wire." So those just plug right in. So now I went ahead and mounted up our air filter, which we're on the driver's side, kind behind our back tire and up here along our bedside there's a support I drilled, I believe it was three eights hole in it and that filter just snaps into place. Then you could take your line, push it over, then you can cut it to length and just push it right over the barb fitting. You usually, you know, you wanna mount this in a spot where it's gonna stay dry and out of the elements and you want it to be higher than the air compressor as well. That way, you know, moisture, things like that won't accumulate and everything else. But when you're doing this you don't want it to be kinked or pinched at all. And so one of the things I find, if you have a heat gone or a hair dryer, you can put a little heat on this and it'll make it a little more malleable that way you can bend it and kind of form it how you want it to route. At this point we can get our air coupler set up. So what I did is just made this bracket, it's actually just a piece of angle that I cut short and left a tab hanging, I bent that tab down and then just kind of sanded it out nice, painted it up and drilled the hole in there. Took one of these fittings, put on your pipe tape or your pipe spread there, thread this on and I drill a couple of alignment holes in it and I think I'm gonna use this one. And I drilled a hole there in our little flange that comes down from our hitch. And what I'm gonna do is mount this up, something like that. So I'm gonna get some hardware and get that bolted up. Now, we can focus on hooking up our quick connect coupler. So this is where you're actually plug your air hose into to air up the tire. So I just made a that bracket, like I said. And then you're gonna take your airline tube, take this brass fitting and then again if you put a little bit of, warm this up a little bit, makes it a lot easier. And you're just going to, I'll slide that onto that fitting there, run this nut down and we'll get it snugged up. And then from there we can route this back to our tank, which I have done that. And get this done. (wrench cranking) I'm using a half inch wrench here for this. Just like the other fittings, you know, don't get too carried away here. If you have to come back and tighten it up a little more if it's leaking, so be it. So, we'll just give that a little bit more. And this line, that's gonna run kind of up through this opening and kind of loops around and comes towards the back of our truck and here it is there, just routed it along and up through here. And I ended up using this fitting right here on this side of our tank. You know, cut it to length and hooked it up the same way that we did at the back of her truck. Now we can move inside of the truck and we're over here on our driver's side underneath the dash and we can get our gauge sorted. So you can mount this up however you want. We're gonna get ours kind of tucked up there in the corner where you can see it but it's out of the way. A few things you need to do. I took our bracket and I bent it how I want it positioned. Originally this bracket came out over here and there's an on off switch in it. Since we're gonna be using our upfitter switches, I just cut that off to free up more space. But on the back of it you're gonna have a few things to hook up. We're gonna have a black wire, and these two wires are for your light if you want it to illuminate. The black wire's a ground so I just extended it and grounded it right there. Up that little area, there's a piece of steel. Be careful when you drill into it though cuz there is a component on the backside, but there's a couple little spots that are open. So, just keep that in mind. The red wire, I took another length of red wire, which you will have to get separately, just maybe four or five foot of it, butt connect to that, that'll eventually run into the engine compartment. This fitting here, this is just like the ones on the air tank that we hooked up. Take some of your line air tube, slide it over, tighten it down and this airline tube will run into the engine compartment as well. And so, I already have this mocked up, I just wanted to, you know, lower it down so we can see what's going on. I'll screw this up into place and then we can route our wires. So how I got our nylon air tube and our red wire into the engine compartment, I decided to just drill a small hole in the firewall and use a snap bushing to run those components through. There is a factory grommet you can use. It's just kind of dicey, it's real close to the main wire harness and getting in there and trying to cut it open and everything, it just as accident waiting to happen, at least in my opinion. So I opted to do this. If you do this, make sure to use some type of grommet. We carry these snap bushings to push through there. That way your airline hose and your wire don't rub against any bare metal. Now here in the engine bay, in the corner, so on the driver's side, our red wire comes up and this is gonna get connected to the solid ground wire from our factory outfitter switch wiring. So in this corner there will be a little bundle of wires, you can undo 'em, those are for our upfitter switches. They're on the roof of our truck on the inside. And that solid brown wire, that's gonna be key-on engine and key-on engine on power. And so as soon as you key the truck on that's going to illuminate the bulb on our gauge. Should I just use a butt connector to hook up to that. And our airline tubing is gonna drop down under the truck. But when we're doing that, it's also a good idea to run our other two wires to the back as well. That way we can do it all at the same time. There's gonna be two wires that we're gonna have to run down with our airline tube towards the back of the truck. One of 'em will be the included power wire. So they give you a big bundle of this power wire, crimp on a ring terminal and install it on the positive battery post. When you do this though, make sure the fuse is not installed in it. You wanna put that in at the very end, that way we're not gonna have a hot wire, we're gonna run it back and everything. So that'll drop down. And then you're also going to need a length of additional wire. So I just have some black wire here, pretty long, you know, it depends on the length of your truck. We've got a long bed super crew cab, so pretty good distance, let's say at least 20 feet of wire. And I hook this up to the upfitter switch wire for auxiliary six, it's relay six, it's this gray wire with an orange stripe that has a 40 amp rating for it. Our compressor will probably pull 25, I think mid twenties at its highest peak. So, I just connected our B wire to that. So that wire, our red power wire and our nylon air tube will drop down to the underside of our truck. Underneath the truck, here's where our airline tube and wires come down and I just taped them all together to make it easier to route. And when you're doing this, avoid any hot or moving parts to the best of your ability. Luckily for us there's some factory wiring loom on the frame that I just followed 'em. So you know, every couple foot or so I, you know, secured this with a zip tie. And pretty much runs, for the most part, all the way to the back of our truck. So it just continues along through here and then it'll kind of, we'll lose sight of it for a second, but you'll have to kind of just feed all that through there. It'll kind of go, you know, above our gas tank and we can get underneath our truck now and and grab it and get it hooked up. So right up over this area here is where our two wires and our nylon air tube come out. We'll deal with the tube first. So this runs over through here and gets hooked up to our tank using that last fitting. So the one that came with, it'll work fine but it points straight and I wanted to keep our tubing away from the exhaust as much as possible. So I opted to pick up a different one. This one is just a, it has a 90 in it, so it comes out. So you can always grab those. And then I also put a thermal heat sleeve over our airline tube as well, just to try to keep it protected. Pretty far away, so we should be in pretty good shape there. Our two wires, the red one that came in our kit, the thick one that's hooked up to the battery, you're gonna hook that up to the thick red wire coming out of the regulator that's labeled: "connect two fused positive power source." There's a spade terminal, clicks in. The new wire that we ran, which is this black one that's coming off of our upfitter switch, that gets connected to the little bit thinner red wire coming out of the regulator that's labeled: "connect to trigger/switch positive." And I just used a regular heat shrink butt connector to pair them two together. And with that said, that should wrap up our wiring portion of the whole kit here. With everything hooked up, we can test our system out to make sure that it's working properly and also check for any leaks. So keyed on our ignition, I'll turn on my auxiliary switch that we hooked up our compressor to. (compressor running) I hear the compressor firing up so we'll let it do its thing and and build full pressure inside of the tank. Let our compressor run until it's cycled off. And with the system pressurized, do you now wanna check it for leaks. So, you can listen for 'em and sometimes you can't always hear 'em if they're small. So you can take some soapy water, spray down all your fittings and all your connection points. Let it sit for a minute. And what you're looking for is bubbles to rapidly and continuously form. If you see that, you know you have a leak. And if that's the case, you know, you can adjust your fitting accordingly. Tighten it down if it's a nylon air tube fitting, you know, butt the pressure outta the system, recut that line, redo that, until you verify that you don't have any leaks. Once that is complete, you know, you can clean up all your wiring, zip tie it up nice how you want, and then you can reinstall the spare tire. And that'll finish up our look at and our insulation of our Viair Onboard Air Compressor System on our 2018 Ford F-350 Super Duty.
Customer Reviews
Viair Ultra Duty Onboard Air Compressor with 2.5 Gallon Tank - 200 psi - 1.86 cfm - VA69WR
Average Customer Rating: 5.0 out of 5 stars (3 Customer Reviews)
Onboard portable compressor mounts on your Jeep, truck, or RV so you can pressurize air and quickly fill your tank. Perfect for inflating tires 37", air tools, air lockers, and air horns. Hardware, plumbing, and electrical components included.by: Dave 10/27/2023
This was a great addition to the truck. I use it more than I originally thought I would. Easily fills truck tires up to the 85psi and I can add air to my trailer tires super easy now.
by: Michael 03/09/2023
everything was just as advertised! especially the detailed installation video for my 2019 F350 Super duty. working on installing it now
by: Ladon05/05/2023
3
3
See what our Experts say about this Viair Tire Inflator
- Can Viair Ultra Duty Onboard Air Compressor with 2.5 Gallon Tank Be Used to Fill Air Bags on TruckYes, the Viair Ultra Duty Onboard Air Compressor with 2.5 Gallon Tank # VA69WR can definitely be used to monitor and adjust an air bag kit on your truck. This is a pretty robust system and can go up to 200 psi which is more than any air bag kits I've seen. We actually had an opportunity to do this on a 2018 Ford F-350 which I'm linking the installation video for you to check out!
view full answer...
Info for this part was:

Video by:
Joshua S

Video Edited:
Jacob T

Edited by:
Daron K

Test Fit:
Ryan G

Installed by:
Andy C

Written by:
Bethann B
At etrailer.com we provide the best information available about the products we sell. We take the quality of our information seriously so that you can get the right part the first time. Let us know if anything is missing or if you have any questions.
Product Experts Available Now!
Call 1-800-940-8924
Thank you! Your comment has been submitted successfully. You should be able to view your question/comment here within a few days.
Error submitting comment. Please try again momentarily.