
To see if this custom-fit item will work for you please tell us what vehicle you'll use it with.
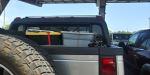
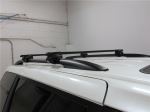
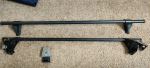
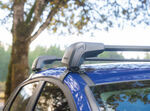
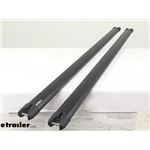
Heavy-duty crossbars mount to Yakima towers to create an aftermarket roof rack. Top and bottom channels let you add channel-mount accessories. Tie-down points in endcaps let you easily secure cargo.
Features:
Yakima HD Crossbars - 55" Long - Black - Qty 2:Videos are provided as a guide only. Refer to manufacturer installation instructions and specs for complete information.
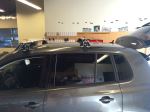
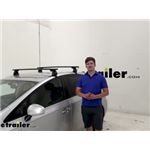
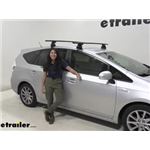
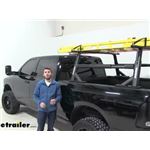
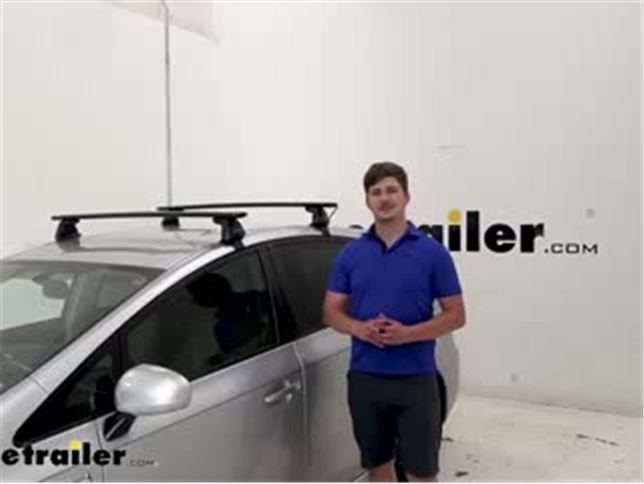
Hi, everyone. It's Aiden here with etrailer.com, and today we're gonna be taking a look at the Yakima JetStream Roof Rack System here on our 2014 Toyota Prius v. Now, this roof rack is gonna be great for getting that extra cargo up and out of your vehicle and onto your roof. Whether you're making more leg room for your passengers on a long road trip with a rooftop basket or a box, putting luggage in there, or maybe you're carrying a kayak, a bike rack, or some skis that are larger, more awkward, that you wouldn't really be able to fit in your vehicle otherwise. It's gonna give you a lot of options, and really expand the possibilities of what you can carry with your vehicle. Let's check it out.
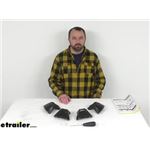
Taking a look at the components here, let's start with the crossbars. These are gonna be 50 inch long aero bars and these are gonna be great for a number of things. The aero shape design is gonna kinda cut down on that wind noise that we hear going down the road, and taper off towards the end here. The other thing that's gonna help with wind noise is the weather strip up here in the T-track system. Now, the nice thing about this T-track system is you don't have to cut it to length when you're putting your accessories in.
You can see here at the end, that we just kinda push it down and slide our accessory into place, and we don't have to worry about cutting anything to length. On my roof rack on my personal vehicle, I have to cut the weather strip if I wanna add an accessory there. While that system works, it's not the best, because if I ever change accessories, or want to take that accessory out, I'm then left with gaps and cut pieces of weather strip. You don't have to worry about that with this system. The other nice thing about the crossbars is that they're gonna give you a 165 pound weight capacity which is on par with most roof rack system, just make sure you check your own risk manual for your vehicle's roof, and go with the lowest rated component.
Next part of our system is the towers here. Now these have the option to be locked with Yakima's same key system. You can purchase lock core separately, and if you have other Yakima accessories like a bike rack, a kayak carrier, or ski carrier, you can lock that and use the same key for your roof rack here. I would definitely pick that up, 'cause then it keeps people away from your system, keeps them from taking your crossbars, and prevent them from just coming up here and taking that cover off. Taking the cover off gives us access to all the parts here to uninstall or reinstall them, so I definitely like having that security.
All I got to do to put it back on is just pop it into place though. As far as construction and build quality goes, this whole system's built really well. You got a nice black powder coated aluminum crossbar, so the nice thing about aluminum is you don't have to worry about rusting or corroding over time. You can also get them in silver if that matches your taste better, but it's all up to you there. Then coming down here to the feet and the clamps, these are gonna be the point that make contact with our vehicle, and the nice thing here is that we got a whole rubber pad here on the foot, and the whole inside of the clamp here is also rubber coated, so we're not gonna have any damaging parts on our vehicle, it's gonna keep everything looking nice and neat. Really, the only thing left is how to install. The process is pretty simple. Let's go to how we did that now. We've already got our front crossbar installed, and the first thing we're gonna do is start getting our back one set up here on the table. We got one of our feet and towers here on the bar already, so all we're gonna do is come to this end cap here kinda lift up on this tab here to release it, and we can pull out like that, and that'll give us access to the track system here. We'll take our tower and our foot, and we're gonna attach those together. The tower's gonna sit on the bar like this, and we want our foot with this arrow facing outward. What I'm gonna do is just set that down there, kinda line up this bar with this slot. I can do this first, and you kinda just push down on the table there, it makes it really easy. Then, take our key track bolt right here, slide that into the track, and we've got this markings here, they're really hard to see, you kinda got to catch the light right to see them, but these are gonna be for our measurements. For our back crossbar here, I know hat I need to set it at 37 3/4, so let's get that edge of the foot lined up with that hash right there, and then we can go ahead and tighten down. You got two points of adjustment here. You got this inner one here, which will kind of set our tower offset one direction to the other. We're gonna tighten that down right there on the center. This is gonna lock our foot and our tower into position on the crossbar. Using our included tool we'll hear a click, pretty soon here, letting us know that's tourqued down. The second point of adjustment we have right here is our pitch. Let me loosen this up real quick, so you can kinda see what I'm talking about. This little bar here will kinda move around the slot as the foot pivots. Again, this can be found in you instructions, but for our back crossbar, we're gonna stay right in the middle. Do the same thing we did before, tighten that down with the tool, and hear a click. With those in place, we're ready to set our bar on top of our roof. We're just gonna set it loosely in place right now, reaching across either side. Now, these feet right here, we got a little bit of a lip on our Prius today. We want these feet sitting basically on top of that lip. Some feet will kinda reach over and conform to that lip, this one's gonna sit right on top. Now, to get the exact spacing and position of this back bar, we're gonna use our front crossbar as reference. For that front one, we just measured from the wind shield up to the front, and for this back one, we're just gonna measure from the center to the center of this one. Right here, we're gonna scoot this in a little bit here. A little bit more from there, and that's gonna be about right there. Now, we can go ahead and grab our clamps, and get that secured. To get our clamps secured, we're gonna come over to the tower here, and take note of a couple things. We've got this gray cover here that we're just kinda pop out of place, and we got our bolt here. There's this rectangular block on the bolt, and I'll try to kinda pop it up there. It's really hard to see, but there's a hook shape tab there, and that hook is gonna basically go in this hole of the clamp, and kinda pull it tight. Underneath here, there's a small slot where the foot or the clamp can kinda slide up into place. We'll push that into place, and as I pul it back, you see that that hook is latched on, it's good to go. You can see here, it's a little bit tight. We want this clamp to go around the door jam there. We'll just take that same tool like we did before, and kinda loosen this bolt up. What that's gonna do is allow it to slide into place there, and we'll start tightening it up. Now, don't go all the way yet. I've got the clamp loosely installed on the other side as well. The reason why I wanna do that, is because if I just start tightening this down without the clamp over there, it's just gonna pull the whole roof bar towards me and not the edge of the car, wanna come and tighten it evenly back and forth. That should be good for this side. Now, I'll hop over the other side, and kinda continue that process. Coming back over to this side, we'll do our final tightening. We hear those clicks form our tool letting us know that we're all tightened down properly. I'll close that cover back down, take our cover for the tower here, kinda hook that in the bottom, and push that in at the top. If you got lock cores that you've already added, you can lock those now, and if you haven't put your end caps back on your crossbars yet, you can do that as well. Now, you can see it's nice and secure. Go ahead and close our door, and your good to go. That's about all there is for the install. The whole process was pretty straightforward, and you can see, it's really secure on the vehicle. We can shake the whole thing back and forth by either one of the bars, to let us know that it's really secure and it's gonna serve you really well. Really, that hardest part about the install, is just differentiating between which parts go to the front crossbar or the rear, and just getting all those measurements, but with the instructions, it's not that bad. In the end though, I think it's gonna be a really great roof rack for your Prius. Again, my name is Aiden here at etrailer. Thanks for watching..
Average Customer Rating: 4.8 out of 5 stars (214 Customer Reviews)
Heavy-duty crossbars mount to Yakima towers to create an aftermarket roof rack. Top and bottom channels let you add channel-mount accessories. Tie-down points in endcaps let you easily secure cargo.
Works perfect for our SUP with the tie down loops. Great for building materials as well. Looks great as well.
Excellent solution for my 2023 Chevy Silverado. In the past, I have had rails installed on the roof of my pickup trucks, but I find the BaseLine towers to be a better solution, since they don't permanently change the truck. Plus, they are much more solid than SkyLine system on the rails.
Love my Yakima roof rack!! It exceeds my expectations.great product. Also thank etrailer for the tec support! great staff always there to help thanks again!!
I ordered the Yakima roof rack for a 2019 Hyundai Ioniq. I went with the heavy duty one for extra strength but it is quite a bit thicker, likely increasing wind noise. So I might have chosen the aerodynamic lighter weight one if I was to do it again. Also, I needed to get larger bolts for my kayak holder to get around the crossbar. The instructions and video on website were very helpful but they did not explain well how to adjust the toe and pitch. For the toe adjustment, you have to push the metal post with the tool before tightening. That was not obvious. For the pitch, it helped to do that once the towers are attached to crossbar. Then you can tilt tower while cross bar is laying flat (upside down). I ended up having to add tilt on both front and back crossbars for them to be flat when installed. Website said only front one would need to be pitched. I am very pleased with the look and sturdiness of the product. My Hyundai Dealer had zero options for this car.
etrailer was a great place to order, quick and easy. Yakima products however are over priced and overly complicated.
Follow the instructions, and you can't go wrong on the self installation
You sold me used equipment at new prices. What a rip off. Your company is a joke! No worries, you’ll not have to worry about screwing up another order for me in the future. I’ve learned my lesson not to deal with your customer service.
These adapters were easy to install and made my system fit together nicely.
Really easy to install & work as specified. So happy with the customer support/service at etrailer.
Your notice of schemes was a lot better than the yakima site provided. They did not suggest the scheme you did.
But when the products arrived, the instructions were by yakima. Generally worked as instructed except the tower to tower transverse mounting dimensions needed to be tweaked for a perfect fit.
The customer service in ordering theses par tea was amazing!! I spoke with a wonderful specialist named Kate F, and she was super helpful and patient answering all my questions and helping me make sure I had the correct parts I needed for my type of car. The bars are very sturdy and have proven very worth the money!!
Ackage came 2 days early the install was somewhat easy (did it by myself)
Did not get to mount anything to it but seems really sturdy. One thing I can say is mark out your mounting points with provided stickers then put up and make adjustments to the roof rack.
I had a difficult time identifying whether these were the correct adapters for the rack towers that I was purchasing to fit my tracks but that has more to do with yakima doing everything a-la-cart instead of having kits that include everything you need if I hadn't already had the HD bars on my other rack and wanted to be able to transfer them to this rack I probably wouldn't have went to this expense because I think they are overpriced.AS far as etrailer is concerned I always receive great service and products and they are always well packaged and never damaged by poor delivery care and always fast delivery speed.
Customer service was excellent, they called me to tell me one item was backordered and how long it would be. Package was shipped with enough packing material. Install was pretty easy, some of the Yakima measurements in the manual are a couple inches off but no big deal. This will be used to carry a box for when the family takes trips. Can pile all the luggage up top and have more room in the car. I would recommend the Yakima corebar roof rack and etrailer! Their price was lower than 2 other sites I checked.
Your service is nothing short of excellent! Thank you
Great product and even better was the service with etrailer! These guys make it happen and delivery was super fast. Thanks for a fantastic experience, will be a return customer.
Yakima HD bars 60”
2018 Ford Expedition
Solid build quality and easy installation on my '21 Mazda CX-5.
So far so good. Purchased these towers to use on a 2022 GMC Canyon with HD bars that I already had, primarily to carry my canoe. Yakima's fitting instructions worked perfectly and the whole system seems really solid.
Love it! We've made several long trips with full luggage loads.
Well packaged and on time
Easily supports the RoofNest! The Customer Service with Roger was Excellent!
The Yakima products are doing great. Just got home yesterday from a 18 day trip using them in Michigan's upper peninsula. Love them. Great products. Thanks again.
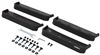
Required for Yakima HD crossbars using timberland tower system.
Great company. Fast delivery.
They fit perfectlly and solidly on my 2021 Toyota Highlander. The instructions are clear and entirely accurate.


Do you have a question about this Roof Rack?
Info for this part was:
At etrailer.com we provide the best information available about the products we sell. We take the quality of our information seriously so that you can get the right part the first time. Let us know if anything is missing or if you have any questions.


Thank you! Your comment has been submitted successfully. You should be able to view your question/comment here within a few days.
Error submitting comment. Please try again momentarily.