
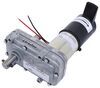
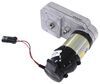
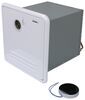
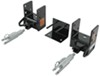
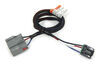
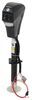
Replacement PowerGear RV Above Floor Slide-Out Motor - Double Shaft - Mid Torque
(11 reviews)
Price: $1,051.70
In Stock
Replacement PowerGear RV Above Floor Slide-Out Motor - Double Shaft - Mid Torque
Item # LC368417
Our Price: $1,051.70
In Stock
Thank you! Your comment has been submitted successfully. You should be able to view your question/comment here within a few days.
Error submitting comment. Please try again momentarily.


- All Info
- Reviews (11)
- Q & A (0)
- Videos (3)
- Photos
Lippert RV Slide Out Parts - LC368417
- Motor
- Motor Parts
- Lippert Power Gear Slide-Out Systems
- Lippert
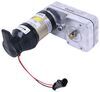
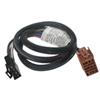
Replaces the above floor slide-out gear motor for your PowerGear RV slide-out. Double shaft is actuated with bi-directional electric motor. Mid-torque. Automatic braking. Pin not included.
Features:
- Replaces the above floor slide-out gear motor for your PowerGear RV slide-out
- Double shaft is actuated with bi-directional electric motor
- Automatic braking feature
- Pin not included
Specs:
- Motor power rating: mid-torque
- Power draw: 12 volts
368417 Replacement PowerGear RV Above Floor SlideOut Motor - Double Shaft - Mid Torque


Video of Replacement PowerGear RV Above Floor Slide-Out Motor - Double Shaft - Mid Torque


Videos are provided as a guide only. Refer to manufacturer installation instructions and specs for complete information.


Video Transcript for Lippert PowerGear RV Above Floor Slide-Out Motor Installation - 2007 Fleetwood Bounder Motorhome
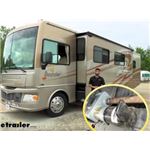
Hey guys, coming here with etrailer and today I'll be showing you how to replace your worn out slide out motor, here on your 2007 Fleetwood Bounder motor home. So over the years, your slide out motor can start to lose power or just have some shoot up gears on the internal portion of the housing here, and because of that, your slide-out's not gonna want to actually come in or out. And the solution to that is to find the correct replacement motor, based on the serial numbers that are on your actual motor for the motor side and for the gear housing side and then cross referencing that to find the correct replacement. So when we look at our slide out motor, there are a few different variations. This one, as you can see, is a double shaft. There are some types where it only will have a single shaft.
There's different variations in what kind of connection. There are a lot of hard wire versions. This specific one comes with a connector, and there's a few different types of connectors. So you're gonna wanna make sure, when you're verifying with all of the information that's on your slide out motor, that your new one's actually gonna match up the same way. So a slide out motor is a fairly simple design.
It is just a motor and then some gears, and what those gears do is spin and spin our double shafts up on the outside of our motor here. And what those shafts do is they connect to your room bar and your room bar goes over to your gear packs. And that's what it actually slides, on a track, to move your slide out in and out. So one other thing is, depending on the type of room bar you have, that's also gonna gonna determine the type of motor. So with ours, we don't have a shear pin.
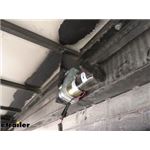
A shear pin is just the small piece of metal that has been rolled and push through your shaft. And what that does is it sticks inside of the raw room bar and then that actually turns it. So on our specific model, our room bar slides over and then we have a pin that goes through and secures with a nut. On other models, you may see that sheer pin, which would stick inside and then connect with some nearing that's inside of the room bar, and that's what actually would spin the room bar as needed. As far as installation goes, it is just gonna bolt right up to your factory bracket on your frame and then you're just gonna have to connect your shafts to your room bars.
So all in all, it is fairly simple. You can easily do this yourself but you may need someone else to kind of sit there and work the controls when you're trying to line up the hole in your shaft to your room bar. So the first step is gonna be determining what is the correct replacement motor, whenever you're dealing with your slide outs. So the motor itself is gonna have some item numbers, part numbers, BO numbers on them, depending on what kind of motor you have and then also the housing itself is gonna have some item numbers on it already. So I had already taken out most of these bolts. I'm gonna take this other one off. So our mounting bolts removed will allow us to see what our item number is on our actual gear housing. So then I can go and cross reference that and find the correct fit. Now that we have the correct fit, we can fully take this off the rest of the way. And before we do anything else, we wanna make sure that we remove the power. So we are going to unhook this from our setup, just so that we don't have any kind of issues. There we go. So next we're gonna have to disconnect our motor from our room bars. So to do that, we're just gonna take off this nut right here. Mine was only hand tight, but you may end up needing a wrench just to take it off on yours. We'll go ahead and we'll just kind of work this up and push our bolt out. That slides out of place, you can see that you can kind of the slide motor out. And we're gonna do that same thing over on this other side, so we can fully remove it. With the motor removed, now you can fully see the part numbers and serial numbers that are on the actual gear housing and then also on the motor itself. As you can see, this is pretty dirty, starting to kind of fall apart. So it is really important to kind of keep these nice and protected. If you can just stick over some clear tape over that, whenever you're replacing it, that way if you ever had to replace it again, or for the next person that owns the trailer, motor home, whatever it is, that they can easily see those and know exactly what to get. So as you can see, we have multiple mounting holes here and you can kind of tell that these holes right here where the factory ones and then these ones that are kind of crooked and has the motor kind of turned are clearly done by somebody else afterwards, whenever they originally replaced the motor, I guess they had to kind of move it a little bit and I'm noticing why now, because, if I put our mounting holes up to the factory side, it kind of pushes our room bar up. And it's not really level going across from the motor over to the ends of our slide out. But if I kind of go off of those new holes, that we're already made, that our last motor was in, it kinda levels it back out. So we're gonna go ahead and use those holes again, just to kinda keep this level, make sure that we don't have any binding. So we'll go ahead and pull that back off. And here's where you can start taking off your little wrappers that they have on there 'cause they kinda lube these up at the factory. So we'll take that off and we will get our mounting bolts and get this back up into place. So your motor isn't gonna come with any kind of hardware. So you're gonna want to just reuse what we already had on there But I'm just gonna get these started. If I can. This is where, kind of, just having that room bar up on there kind of helps just kind of hold in place just a bit. So we don't have to hold the whole weight of it but. All right, so I got my four bolts hand tight. I'm gonna come back with my wrench and tighten these down fully. So for the next step on our installation, we're gonna want to get our holes on our pins lined up with the holes on our room bar. That way we can slide the pins back through it and connect it all together. So what I had to do to get these lined up was plug our motor back in and then use the controls inside to spin the actual shafts right here. It's just a little bit too loud 'cause our engine is right next to us here. So I already went ahead and did this but now we can go ahead and slide a room bar back over, put our bolts back through it. There we go. And then we can put our nuts back in place and tighten them down. And we'll repeat this on the other side as well. Now that we have our new motor in place, we're gonna get out and test our slide out, make sure that it can fully come out and then pull it back in. Well, I think that about does it for today's installation of the Lipper slide out replacement motor, here on our 2007 Fleetwood Bounder. My name's Kevin. Thanks for watching..
Customer Satisfaction Score:
91% were satisfied with this product
9% of customers were not satisfied
- Wrong item was ordered
- Did not arrive in time
- Product did not meet expectations
Customer Reviews
Replacement PowerGear RV Above Floor Slide-Out Motor - Double Shaft - Mid Torque - LC368417
Average Customer Rating: 4.9 out of 5 stars (11 Customer Reviews)
Replaces the above floor slide-out gear motor for your PowerGear RV slide-out. Double shaft is actuated with bi-directional electric motor. Mid-torque. Automatic braking. Pin not included.by: Steve 10/19/2022
I received the item and it worked perfectly thank you very much.
by: Rob M09/20/2021
Pricey but An exact replacement for the Power Gear motor. Bolt holes lined up and it plugged into the power pigtail. Slide came in smoothly without hesitation,
by: Paul01/11/2023
It's the part I needed and it shipped the same day as it was ordered, thank you! But $[XX]???
by: Denise 06/03/2020
My assembly came in fast. Part was exactly as described on the website.
by: Nick 06/17/2021
Easy install and works great!
by: Darin08/22/2023
by: Allen 08/07/2021
by: Sabrina 12/06/2021
by: Joe 01/24/2023
by: John 10/29/2021
by: Hal 08/27/2021
11
11
See what our Experts say about this Lippert RV Slide Out Parts
- Replacement PowerGear Slide-Out MotorThe correct replacement gear motor for the Power Gear 1510000006 is the Replacement PowerGear Slide-Out Motor # LC368417.
view full answer... - Power Gear Slide Motor Replacement for Fleetwood 500790/523900I was able to determine that your Fleetwood part number of 500790 is same as 523900 which we know our replacement # LC368417 is correct for.
view full answer... - Recommended Replacement For A PowerGear 524235 Slide Out Motor Per Lippert, the correct replacement for a PowerGear 524235 slide out motor would be the Replacement PowerGear RV Above Floor Slide-Out Motor - Double Shaft - Mid Torque # LC368417.
view full answer... - Replacement for Power Gear 523900 Slideout MotorYou are correct that the replacement motor for your Power Gear 523900 is the 1010000010 you referenced, and we do carry this part. It is listed on our site under a different part number, but is the exact same thing, the Replacement PowerGear RV Above Floor Slide-Out Motor # LC368417. I have added a link to a video review for you to check out as well.
view full answer... - Replacement Motor for 523983 Power Gear Slide-Out Motor AssemblyThe 523983 and the 522176 have the same gear ratio. The 523900 is a different motor which would be replaced by the # LC368417. The Replacement Slide-Out Motor Assembly # LC383745 you looked at is the same as the 522176 which is the direct replacement for your 523983. The 383745 is the Lippert part number and 522176 is the Power Gear part number.
view full answer... - Replacement Slide Out Motor for Power Gear Motor 523900The Replacement PowerGear RV Above Floor Slide-Out Motor part # LC368417 is the correct replacement for a Power Gear 523900. There isn't a similar alternate part number that would work.
view full answer... - Replacement for RV Power Gear Slide-Out Motor 523900The Replacement PowerGear RV Above Floor Slide-Out Motor part # LC368417 is the correct replacement for a Power Gear 523900.
view full answer... - Direct Replacement Slide Out Motor for 1510000006Hey Larry, thanks for reaching out! The correct part to replace your 1510000006 motor is the Replacement PowerGear RV Above Floor Slide-Out Moto # LC368417. The Replacement Motor # LC386322 you were looking at does look similar, but it isn't the correct part you need.
view full answer... - Correct Replacement Slide Out Motor for a 130-1204G MotorYes, we have a replacement motor that will work for your 2006 National Tradewinds. I contacted the manufacturer to verify that the Replacement PowerGear RV Above Floor Slide-Out Motor # LC368417 is the correct motor to replace the 130-1204G you currently have.
view full answer... - Correct Replacement For A PowerGear Slide Motor Part Number 1010000010I spoke with Lippert and the only correct replacement for a PowerGear Motor #1010000010 is the PowerGear RV Above Floor Slide-Out Motor Item # LC368417.
view full answer... - Correct Replacement for RV Power Gear Slide-Out Motor 523900The Replacement PowerGear RV Above Floor Slide-Out Motor part # LC368417 is the correct replacement for a Power Gear 523900.
view full answer... - Recommended Replacement For A PowerGear 523900 Slide Out Motor The correct replacement for your PowerGear 523900 slide out motor is the Replacement PowerGear RV Above Floor Slide-Out Motor # LC368417. I've attached a short video below where I'll walk you through the replacement process so you can get your slide out back in working order.
view full answer... - Correct Replacement for Powergear 524235 Slide Out MotorThe correct replacement for the Powergear 524235 Slide Out Motor is the Replacement PowerGear RV Above Floor Slide-Out Motor part # LC368417.
view full answer... - Replacement Power Gear Motor Solution for Part Number 521976The Replacement PowerGear RV Above Floor Slide-Out Motor part # LC368417 is the correct replacement for a Power Gear 521976 .
view full answer... - Slide Out Motor Replacement for Dexter VT00310RIt took a little digging but I found the replacement slide out motor for your Dexter VT00310R and it is the part # LC368417.
view full answer... - Replacement Motor For Power Gear Part 1510000006 On 2006 Fleetwood FistaThe correct replacement gear motor that replaces the Power Gear 1510000006 on your 2006 Fleetwood Fista is the Replacement PowerGear RV Above Floor Slide-Out Motor # LC368417. The Replacement Gear Motor # LC368193 you were looking at will not work since it is designed to replace the Power Gear 524276. I included a video of the # LC368417 for you to take a look at.
view full answer... - Slide out Motor Replacement for Slide Out Motor 130-1204GThe Replacement PowerGear RV Above Floor Slide-Out Motor # LC368417 is the correct motor to replace the 130-1204G you currently have.
view full answer... - Replacement Slide Out Motor for Power Gear Slide Out 523900Using your rail number as a reference I was able to determine that the Power Gear setup you have is the 523900 so for a replacement motor you'd need the part # LC368417.
view full answer... - Determining The Correct Replacement Slide Out Motor For A 2006 Fleetwood Expedition Motorhome Manufacturers do not have a list available for the public to see exactly what motor was used on your 2006 Fleetwood Expedition so I would need to parts number listed on the motor to determine the correct replacement. I've attached a picture below of what the tags will look like as well as my installation video of the Replacement PowerGear RV Above Floor Slide-Out Motor # LC368417 so you can get a few tips on getting to the motor and checking it for the info. Once we have the part numbers...
view full answer...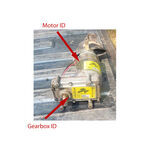
- Replacement Slide Out Motors for Slide Out Power Gear Part Number 523900Based on the part number you listed the correct replacement Power Gear motor for your slide outs is the part # LC368417.
view full answer... - Slide Out Motor Replacement for Fleetwood Southwide 2006 with Part Number 954925Yes the part # LC368417 that you referenced is the correct replacement motor for you based on the part number you listed of 95425.
view full answer... - What Replacement Gear Motor do I Need for My Kwikee Slide-Out Base Motor According to my available research, the NTP-95-4925 is the exact same part as the Replacement PowerGear RV Above Floor Slide-Out Motor - Double Shaft - Mid Torque # LC368417. This is a direct replacement if you have the Kwikee Slide-Out Base Motor 1510000006 on your system. In order to make sure this is the part you need, I recommend confirming the base motor number in your slide-out assembly. I went ahead and included instructions on how to identify your base motor for your convenience.
view full answer...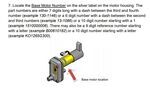
- Correct Replacement for a Power Gear Slide Out Motor 520491The correct replacement for a Power Gear Slide Out Motor 520491 is the Replacement PowerGear RV Above Floor Slide-Out Motor part # LC368417.
view full answer... - Replacement for Power Gear 523432 Slide Out MotorThe correct replacement for your discontinued Power Gear 523432 slide out motor is the Replacement PowerGear RV Above Floor Slide-Out Motor # LC368417.
view full answer...
Do you have a question about this RV Slide Out Part?
Info for this part was:

Edited by:
Lindsey S

Expert Research:
Jameson C

Video Edited:
Jacob T

Video by:
Jonathan Y

Written by:
Kristina F

Updated by:
Mike S

Installed by:
Michael B

Test Fit:
Kevin C
At etrailer.com we provide the best information available about the products we sell. We take the quality of our information seriously so that you can get the right part the first time. Let us know if anything is missing or if you have any questions.
Product Experts Available Now!
Call 1-800-940-8924
Steve
10/20/2023
Its been a year since I replaced the slide-out motor and it works flawlessly every time. Thank you e-trailer for all of your help.