
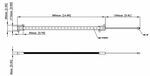
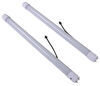
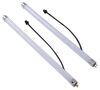
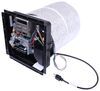
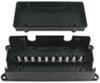
LED light strips with 27 diodes replace T-8 fluorescent light bulbs to provide cool white light from 18" to 24" lighting fixtures. Compatible with dimmable fixtures. Built-in surge protection. Easy wiring with quick connect plugs.
Features:
Specs:
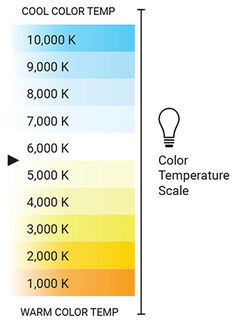
Color temperature refers to the color of the light emitted by a bulb or lamp. This light is ranked on a scale of 1,000 to 10,000 Kelvins (K), which gives you an idea of what color the light will be. These ratings are generally grouped into warm white and cool white classifications. This bulb is rated at 5,500 K, providing a cool white light.
Videos are provided as a guide only. Refer to manufacturer installation instructions and specs for complete information.
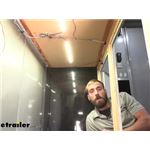
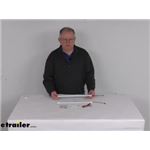
Hey guys, Kevin here with etrailer. And today I'm gonna be showing you how to install the Diamond LED T8 light strip here in our enclosed trailer. So our neighbor is out at the track usually between 10:00 PM and 1:00 AM which means he has zero visibility, 'cause there's no sun out. And usually he's in a parking lot where there isn't really any lights to help him especially inside of his trailer. So when he needs to get down here and operate his wench or maybe his compressor, or if he has to mess with his generator at all, he needs to be able to see. So that's where these lights are gonna really come in handy 'cause they're gonna offer him a whole lot more visibility than any of your standard little LED rope lights like we have here, 'cause we tested a few different ones.
Didn't really like just how bright they were. That's where these came in 'cause these are actually designed to go inside of a 18 to 24 inch light fixture. If you're replacing your fluorescent bulbs. So overall these are just gonna give him much better visibility and allow him to easily get down and do the work that he needs to do. So as you can see down in our cabinets is pretty dark.
Our neighbor uses his race trailer quite a bit at night. He said that he's mostly out at the track from 10:00 PM to 1:00 AM. So there's no sunlight to help shine through his generator door that he has over on the side here to get any visibility so that he can work with either his compressor, maybe he has to do something with his wench he also has his battery and his AC distribution panel in there. So if he had to do any work or gets any of this stuff it's gonna be kind of hard to see. So that's where our light strips are gonna come in and give us some better visibility.
So our neighbor obviously had some lighting issues down here. We looked through a few different kinds like this one right here, which just has a sticky backing. And it's more like a rope light type of light. And it just really, wasn't gonna give him the lumen rating that he was needing down here to really see stuff in the dark. 'Cause like I said, he's usually racing and out at the track at 10:00 PM to 1:00 AM where there's no sunlight.
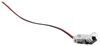
So these are just gonna give him a much, much higher lumen rating and make everything a whole lot more visible while these aren't technically the designed to use for them. 'Cause these are actually designed to replace fluorescent bulbs inside of an 18 to 24 inch ballast. This is still just the best situation for our application here. So we have all four of our lights tied into each other and then running through the switch right here. Super easy, all he has to do is reach down and press in and our lights will go off. One more time to turn it back on and easily have the visibility that he needs to operate down here. So as far as the installation goes, it's fairly simple. These do come with wiring harnesses that make it real easy to plug into and then easily attach. Obviously for ours it's a little bit different just because we we're running four all together and then running them to a switch. One other thing with these is that they're actually compatible with dimming switches, which is kind of a big thing most RVers want. So that'll definitely help you out in the long run. If you're going to be replacing maybe some fluorescent bulbs, if you have 'em in your trailer. Other than that, this also has a built in surge protector. So even though I did fuse it, we didn't really have to I just preferred to be cautious. So your kit it's gonna come with two lights. Each with a wire coming off of it that's got a little connector and then you're gonna have a wiring harness that's gonna have two connectors on it so that you can put the two together and then run that out to your power. So what I'm gonna do first is I'm gonna mount this in place but I'm gonna make sure that I have my wires both kind of next to each other when I'm mounting it that way I can easily have our wiring harness run to it that way I'm not having to splice on extra wires and making it a little bit more difficult. So we'll go ahead and take our screwdriver. So I'm just gonna be lining this up with our cabinet door. Doesn't really have to be perfect just for our application. And then 'cause we have a particle board top here for our cabinet. I'm gonna be able to use the screws that came with our kit. Get started here. Each of these lights is gonna need four screws. And like I said, that's gonna come with all the screws that you need. Obviously, if you we're putting this into something else you may have to use different screws. Like if you we're going into metal. So I'm gonna do the same thing with my second one in our kit. And like I said, I'm gonna make sure that I have our wire harness side facing the same side so that I can easily hook up our lights together. But now I can go ahead and get that in place with our screws, just like we did with the first one. So over on the other side here in the corner of our cabinets, we're replacing one over that door and then one over here so that we can have some light over our battery, our AC panel. The only problem with that is wire harness is not gonna be long enough to go between the two lights. So we will have to do a little bit of splicing there which we'll show you further on in this video but let's get these in place for right now. Now, like I said before on this side we're not gonna be able to just use our wiring harness and then make our connections at the end of the harness. We're gonna have to actually cut this off 'cause I wanna keep these connectors. And then we're gonna strip these back a little bit and add a little bit more wire to 'em because this gauge is so small. I'm gonna cut quite a bit of casing off just so that I can fold it over on itself to kind of thicken it up a little bit. So it'll stick in the butt connector correctly just because the wire I'm gonna be adding on to this is a little bit thicker of a gauge. So I'm gonna crimp on some butt connectors so we can make our connection to our extra wire. Same thing with our other connector. So I've just got some brown wire and some white wire that I'm gonna be using to run our extension here. May be using brown for our power, a butt connector and crimp it down. And white for our black wire here. And I'm gonna go ahead, I'm gonna clip this in place, and then we can see how much we need to run over to our other connector. All right, now we can click it into place here with our connector on our light. Now we can kinda see how much wire we gonna need. I'm gonna wrap it around this board, keep it in nice and tight, with the cabinet, and we'll cut it off right about there. So we just have a little bit extra in case we need it. And we go ahead and do the same thing. We're gonna connect it right in with our butt connectors on here, but we're also going to have an additional wire that we're gonna run over to our other lights. So now I'm gonna go ahead and add on some additional wire and we'll splice these together, and then put that into our butt connector. Like I said, brown is gonna be for our power wire running to our red. Crimp that on. Do the same thing with our white wire. So now we can go ahead and make our connection to our little light. And then we can run our excess wires over to our other connector over there. So like I said, when we install these add 'em close enough together that we can just still reuse our harness here. Click that on. And then at the end of our harness here I'm just gonna cut this off. 'Cause we're not gonna be using these. We can strip that back and then we're gonna connect it to our white and our brown wire. And we're also gonna connect in an extra wire that's gonna run to a switch, which will then run to our power. So now I'm gonna connect my white wire with my black wire over here on this harness. Just gonna twist these up together, and we're gonna have these on one side of our butt connector and then the other side's gonna run to our switch and our brown wire over to our red. So running from our harnesses for all of our lights we're gonna be putting in a little switch. Obviously you could use a variety of different ones. We're gonna be using this one just because of how small it is, super tiny. And it's a simple push button on and off because it's gonna fit right here up on the frame of our door for our cabinet. So, just stick it on there. I'm gonna be using some industrial double sided tape which I'm gonna press to the back of this press on there. And then we can connect our wiring. Go ahead and cut off our piece. All right, now I got my double side tape attached and I've taken off the backing. I'm gonna go ahead and get this exactly where I want it. I'm gonna put it right in the middle of a cabinet. That way our neighbor knows exactly where it is. So it's real easy to get to. He's not gonna have to bend down and look for it. He can easily just reach down and know exactly where it's gonna be. Hold that on there 'cause this takes about 30 seconds to really fully set. So I strip back the casing a bit on my switch and I'm gonna go ahead and twist up our wire and fold it over on itself. Make it just a little bit thicker. And then now I've also cut a little strip of wire. It's gonna run from our power on our lights over to our switch. I'm gonna crimp that in right now. And then we can crimp it onto our switch. Now all we need to do for our power is just run the wire from the other end of our switch over to our battery. So I'm gonna go ahead and crimp onto my switch. Want some extra wire and then run that over to our battery. To make sure we got plenty of it here. I'm gonna try and loop it around the corners here just keep it out of the way. So this inline fuse right here and this other wire right here is running to some other LED lights that we've already installed. So I'm gonna go ahead and I'm gonna put this on here just so that we have these lights, fuse protected as well. So what I'm gonna do is pull off my wingnut here and then splice these all together. Took off quite a bit extra just to really get these connected well. Put these together and put our wingnut back on and now we have power. Now we can go ahead and run our ground. I'm gonna be putting in my white wire for my ground, running this over. I'm actually gonna crimp on a ring terminal and then use our converter screw and just screw it right into that that way we know the big ground bare metal. Alright with our ring terminal in place on our screw, I'm gonna go ahead and start tightening that down. Trying to put this up out of the way. Now with all of our wiring in place we can go ahead and test our lights. And as you can see they're fully functioning, offering plenty of light for our neighbor to use his wench or any of the other components that he has down here. So the only thing that's left for our installation is gonna be just cleaning up our wiring here, getting it all tucked up out of the way. Now with all of our wiring tucked up out of the way that'll complete our installation of the Diamond LED T8 light strip..
Average Customer Rating: 4.3 out of 5 stars (23 Customer Reviews)
LED light strips with 27 diodes replace T-8 fluorescent light bulbs to provide cool white light from 18" to 24" lighting fixtures. Compatible with dimmable fixtures. Built-in surge protection. Easy wiring with quick connect plugs.
Have had these lights installed in my work fan for over a year and after a year they’re still working great no problems at all. Highly recommend them and I am an HVAC contractor and let me tell ya we’re not easy on anything and these lights have stand the test of time.
Disappointed that the lights did not come with installation instructions, contacted Diamond Group, no response, called etrailer, no installation instructions available.
Led strip lights worked great! Installed in no time!
The led conversion kits are the easiest and most durable ones available to replace flourescent lights. Twice as bright as flourescents. Etrailer has the best price on the internet.
Awesome lights to replace flouresents in my RV. Very bright cool white. A warm light option would be nice. Very simple to wire. Instructions were hard to read but the eTrailer video was very helpful.
Fast Shipping and great product!
Product worked as advertised,
How to disassemble the light fixture to accommodate the lights.
easy to install, nice bright white light & easy on the batteries
Very simple install
Great replacement/upgrade!
Very quick and communication was excell ent.
I like these a lot. Installed last nite. Very bright.
Easy to setup and install
Do you have a question about this RV Interior Light?
Info for this part was:
At etrailer.com we provide the best information available about the products we sell. We take the quality of our information seriously so that you can get the right part the first time. Let us know if anything is missing or if you have any questions.


Thank you! Your comment has been submitted successfully. You should be able to view your question/comment here within a few days.
Error submitting comment. Please try again momentarily.