
To see if this custom-fit item will work for you please tell us what vehicle you'll use it with.
Thank you! Your comment has been submitted successfully. You should be able to view your question/comment here within a few days.
Error submitting comment. Please try again momentarily.
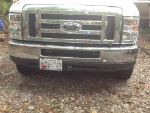
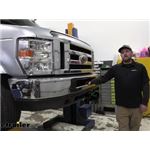
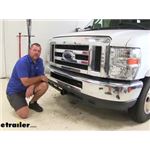
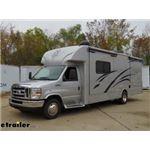
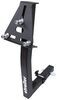
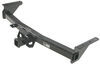
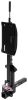
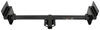
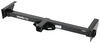
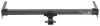
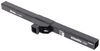
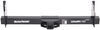
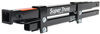
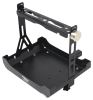
Easily attach a variety of accessories to the front of your vehicle with this fully welded, corrosion-resistant trailer hitch receiver. Perfect for winches, spare tire carriers and more.
Features:
Specs:
Draw-Tite's Tested Tough program provides testing standards far superior to those outlined by the Society of Automotive Engineers (SAE), the go-to source for engineering professionals.
Each Draw-Tite trailer hitch receiver undergoes extensive fatigue testing and static testing with the ball mount that is either supplied or recommended for use with that particular hitch, thus ensuring results that are applicable to real life use. Fatigue testing is also conducted on hitches rated for use with weight-distribution systems.
In addition, Draw-Tite performs static testing on a simulated automobile, as opposed to the rigid fixture used for SAE testing, resulting in a more true-to-life scenario.
At etrailer.com we're committed to the products we sell, and to our customers. Our experienced and knowledgeable staff are available via both phone and email to address your questions and concerns for the lifetime of your hitch. The technicians at etrailer perform hitch installations on a daily basis, making them a valuable resource for do-it-yourselfers. The one-on-one, personal service you'll receive comes straight from an expert in the towing and automotive field. We've installed it, we've wired it and we've towed with it, so whatever your question, we can answer it.

California residents: click here
Average Customer Rating: 4.9 out of 5 stars (225 Customer Reviews)
Easily attach a variety of accessories to the front of your vehicle with this fully welded, corrosion-resistant trailer hitch receiver. Perfect for winches, spare tire carriers and more.This fit my Ford 2023 E-450 (cutaway) perfectly. I had measured the frame of previous year E-450’s and didn’t see any difference so I gambled and ordered the 65053 which fit.
Installation was straight forward with modification and fitting of the splash guard taking 50% of the time.
Fit and finish was good except at the front of the receiver itself. Unfortunately that’s the only two inches of the whole hitch that show and had weld splatter and sharp bits under the paint. This took a bit of filling to smooth out which I then repainted.
Attached are photos installed on my 2023 E-450.

Easy installation, nice sturdy hitch that fits on the front of our C- Class RV to haul our electric bikes. Highly recommend it.
I ordered this literally less than 24 hours ago and it arrived to my doorstep!!! I think etrailer needs to call Amazon and tell them how it is done. Like honestly, I am not even prepared to put it on yet as I was expecting a week for delivery! Holy cow, do you all sell groceries as well?
This hitch from etrailer made by DrawTite is fantastic Perfect fit.. Easy installation and great video installation instructions. I highly recommend this product or any others they have to offer.
Thanks everyone at etrailer for making my day.
Trailer hitch arrived quickly in perfect condition. Installation went smoothly. Installation video and paper instructions were helpful. Price was very competitive.
Remove bumper found that to be the easiest way to install the hitch and then we cut the splash shield underneath for a perfect fit so far so good everything works the way it should
Use it all the time for pushing trailors around and as a front reciever for my winch
The #65053 front trailer hitch fitted perfectly to our 2019 Ford E450 Jayco 31F RV.
Thank you for a precision product with the necessary hardware and draw wire to make the installation straight forward.
Removing the front grill completely, made it easier to measure and cut out the square hole than is shown in the instruction video.
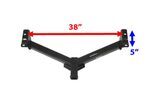
A 2 3/4 inch square opening fits easily behind the flange of the hitch when remounting the grill.
Remove retaining screws and plastic retainers to dismantle the front grill. The plastic retainers are removed by lightly knocking out the square centre pins with a suitable punch.
See photos.
The instruction video shows the removal of one lug on the number plate mounting to relocate it.
This is not necessary. Simply separate the grill from the chrome bumper with a screw driver at that point and push the mounting with attached lug between the two.

Bill A.

4/6/2022
The hitch has been very useful on several occasions. Always consider air flow through the grill and obstruction of headlights. When driving, be aware of extra distance in front.
The Draw-Tite Front Mount Trailer Hitch Receiver was easy to install, the installation video was very helpful. Works great for carrying our ebikes on the Kuat bike carrier, and leaves our van doors in the rear more accessible. Bombproof mount. Also great customer service as always from etrailer.

Greg
1/28/2022
Still works great, after a year and 10,000 miles of travel in our motorhome van.
Very easy to install with no help. But beware - the video shows cutting the bumper facia all the way thru, don't do it, only a small portion needs cut out above the line, if done properly it's not noticeable when it's all done (unlike the video). Be sure to read the directions.
Also directions say NOT to remove the bumper, not sure why. Once I installed the hitch the bumper went back in with no problem.
My splash guard needed a bit more trimming than the directions called for, not sure if it's due to the year model (mine is a 2014), once I did the initial cut and put it back in place I could easily see where more cutting was needed.
I did the whole project - alone - in just a few hours.
I would definitely recommend this hitch. Draw-tite hitches are well made and - in my experience - always easy to install, not to mention etrailer's great price.

Mike L.
3/13/2019
According to Draw-Tite, the amount of bumper fascia that needs to be trimmed can vary by model year as some use a longer fascia.
The hitch was delivered in a strong cardboard box with handy holes for carrying. Easy install. Works great for my scooter rack. The hardest part of the was trimming the plastic shield. Bumper was easy to remove which gives you more room for the install.

Jeff P.
4/19/2019
The hitch has worked out great! I used it again just last week with a cargo carrier. Great addition to my motorhome.
Take some time to read the instructions and you can install the hitch while retaining all the factory plastic parts.
I pulled the front bumper off as some others suggested. It made it easy to get the bolts and plates in the frame. Overall was very easy I had a couple step stools to hold the hitch up close enough to get the nuts started. Next week I will see how it does hauling my honda adv150 scooter on a dirt bike carrier.
The hitch installed without incident. The only glitch was the trimming patter was a little off and required additional cutting. This resulted in a couple of areas the didn't need to be cut. I suggest you test fit the shield without trimming first it won't fit) and get an idea of what exactly need to be trimmed. The instructional video was spot on and the instruction very clear. The hitch will work flawlessly and provide the connection point I was counting on. We will be moving our bike rack form the back to the front to secure the bikes while camping.
etrailer's customer service and follow through is top notch. Delivery was speedy. I was notified by the package's progress and it actually arrived sooner than initially expected. Well done. You have a happy customer.

Philip
3/28/2023
The front hitch receiver works like a dream. Perfect fit. No rattles. Very useful.
2016 E450 Minnie Winnie - Perfect fit!!
I was disappointed to not find any bolt up front receivers for my 2016 E450. Seems like they only "officially" support E450 up to 2014. But then a Google search led me to this site where customers reported that this fit their newer model E450 cutaways. For a $100 I thought it worth a shot since my local trailer/hitch shop wanted to charge me $650 minimum for a custom front receiver.
I read other customers posts which gave me the confidence to go ahead with this purchase and I was very pleased I did. The receiver bolted up perfectly per the instructions.
Like other customers I HIGHLY recommend removing the front bumper. It's only four bolts and easily drops down and I was able to do this myself. Tip: Remove the L & R bottom nuts and loosen the L & R top nuts from underneath. Then get out in front and remove the remaining nuts with your hand and lift off the bumper. Easy! It made inserting the bolts into the frame a million times easier. (See photos)
The most difficult part was refitting the plastic air pan underneath. I basically just held it up in it's approximate position from the front then, through the bumper opening, used a Sharpie to trace around the receiver frame. Then I used some tin snips to cut out the shape and went back and forth, fitting and trimming until it fit adequately. (See photos)
Cutting out the notch in the plastic of the front bumper for the receiver to go through was pretty easy. I held up the bumper in place while I had my son mark the sides of the receiver. Then I just used a dry wall knife to cut out that section. I took a little too much off. You can use my photo as a guide to see how far you'll need to go.
Apart from that the installation was really easy. I'm extremely pleased with this product and of course etrailer was awesome. :D
Super fast delivery! Ordered on Tuesday mid morning, received Friday afternoon, Missouri to Texas on my porch, amazing! Watching the install videos super helpful. It took me a little over 3 hours to install stopping a few times to play with the dog, let spray paint dry on the drilled holes and have a cup of coffee. Being alone, I had to get creative holding up one end with stands and blocks to bolt up the hitch. The ‘fishing’ wires that came in the install package worked great! I installed this front hitch on a 2021 E-350 Ford Class C motor home in my driveway laying on a piece of cardboard. I am 69, not the best or worse mechanic.
I installed this trailer hitch receiver on the front of my Ford E-450 motorhome, so I could carry a spare tire. I followed the video installation instructions, and found the installation quite simple. Since I did the installation by myself, I did not remove the bumper as others have done, and used the method shown in the installation video. To hold the receiver up into position, I propped it up on plastic milk crates and 2x4's. I quite easily cut the plastic trim with a sharp utility knife. Do not be intimidated, you CAN install this yourself!
2018 E350 24f Thor Chateau Class C - This installed very easily even by myself. The directs/video are very straight forward. The grill area can be cut much smaller than directions indicate. I actually angled hitch through modified hole and looks totally factory. Same with the template to modify the plastic air tray, it was a bit off. I started by trimming in smaller bites then mocking up tray to see where it needed further trimming. License plate I maintained both push in tabs. I utilized the one factory slit and with my multi tool created another slip at other end and snapped right into place. over all took about 90mins. but looks totally factory
good luck
Front Hitch has been one of the best investments I’ve made on my RV. Had to do minor trimming but fit perfectly. Having the option to place bike rack in the front & dinghy flat tow in the rear has made my glamping excursions more fulfilling. etrailer did a magnificent job with quality on this product. Highly recommend
Fitted to a 2014 Ford E250.
I fitted it in 1hr 45mins, because the hardest thing to refit was the front bumper.
I removed the front bumper completely, (4 nuts)and the splash guard from underneath, drilled the forward hole in the chassis with 1/2" drill bit, fitted your hitch, torqued the nuts to 75lbs. the splash guard wouldn’t go back on even with the notches cut out, so I left that off, had to cut a bit out the under bumper plastic trim to refit the front bumper.
Was very easy to fit and I've already used it :)
Great product and simple to install thanks to the etrailer video. Added this to our C Class motorhome for our bike rack and works perfect. Just needed to relocate the license plate.
I got the hitch three days after ordering.Installed front hitch on a 2017 Winnebago C class ,which is a ford 450 super duty e series frame. Drilled out front holes on frame and hitch bolted up with no problems.I did take front bumper off which made it easier.
2018 Ford e450 Super Duty, Forest River Forester Class C
- Read all the reviews for Hints to install
1) TOP HINT TAKEN FROM OTHER REVIEWS: I spray painted the back side of the bumper bracket to show me exactly where it was supposed to go once I reinstalled it. Spray painted around Nuts and extra holes on backside of bracket, made locating the reinstallation of bumper much easier.
2) Like most folks, determined that the fairing was not going to be able to be put in the exact same position and ended up using tie straps on the back end to hold in place.
3) Took less than an hour to remove bumper & fairing , install receiver, and reinstall bumper; took another hour to reinstall fairing.
4) The measurements on cutting out hole in plastic bumper were spot on.
5) Had to take out some plastic rivets and small bolts around license plate to take it off, as it was right where I needed to cut out for receiver to pass through. Once I took it off, slid it to the right and reintalled, so I can put on the front license plate.
Great product, easy installation, great price and customer service from etrailer. A couple of installation notes: rather than totally removing the front bumper like many have mentioned in their comments I followed the mfg’s instructions and used the included “fishing” wire springs to get the bolts and spacers into the frame rails. They worked very well in my opinion. Also, I sprayed the washers, nuts, and bumper mounting flange with white paint before I loosenef the 4 nuts. This was to give me witness marks so I could get the bumper alignment back to its original position. Don’t be surprised if your bumper is not centered perfectly, check before you start. Mine was off by about 1/4”. It’s not a big deal, but it can make the 3”x3” hole you cut in the plastic facia not match perfectly. You may have to trim a bit bigger to get the front of the receiver to pass thru. Like others. I couldn’t get the small screws back into the rear of the trimmed plastic air deflector, so I used zip ties for the 2 rear screws. Lastly, I was able to reuse the plastic front license plate mounting frame by cutting off the drivers side top tab. I then installed it back on the plastic facia by snapping the passenger side plastic tab into the original drivers side small facia slot. This offsets the front plate to the right side by enough to clear the new front receiver, and yet leaves the plate visible. Total install time was about 2.5 hrs.
I just received and installed the front hitch on my 2013 Jayco Greyhawk 31SS Ford E450 motor home. Was not hard to install. Finished the install in under an hour and a half. Instructions were good. I felt it was easier to take the bumper off rather than leaving it on but loose. Made it easier to put the bolts through the frame after drilling out the two front holes to a bigger size. Cutting the plastic under the bumper was simple. Relocation of the license plate was also simple. Did not have to cut any tabs. Moved it over and drilled into license plates bottom tabs and zip tied to plastic under bumper.Easy Peasy. etrailer is a great company. Very knowledgeable and will research the information for you. They answer your questions in a timely manner. Will order from them again.
Do you have a question about this Front Receiver Hitch?
Info for this part was:
At etrailer.com we provide the best information available about the products we sell. We take the quality of our information seriously so that you can get the right part the first time. Let us know if anything is missing or if you have any questions.


Br
3/25/2024
Install went perfect! Havent had to actually use it yet thank goodness but I know the moment that I do, it will work exactly how it is intended.