

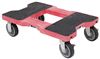
Use this kit to convert your Snap-Loc dolly into a pushcart and get more control over your load. The handle snaps together easily using spring-loaded pins, and the upright bar curves back so you can easily grab hold of the handle.
Features:
Specs:
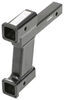
Attach this base bar and handle to your Snap-Loc dolly (sold separately) to quickly create a heavy-duty pushcart that is great for hauling heavy equipment or tools. The base bar attaches to 1 side of the dolly to provide mounting points for the handle.
To assemble, just push in the pins on the bars and slide the handle onto the base. The spring-loaded pins lock the handle in place. The handle can be broken down for convenient, out-of-the-way storage. Get more control over your load with this pushcart conversion kit from Snap-Loc.
Videos are provided as a guide only. Refer to manufacturer installation instructions and specs for complete information.
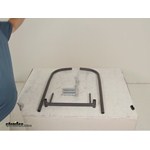
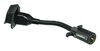
Today were going to review part number SLADBPT319-P. This is the Snap-Loc pushcart handle conversion kit for a Snap-Loc moving dolly. This kit will mount onto, its to convert your Snap-Loc dolly into a pushcart and gives you more control over the load. I just want to show you the we do sell the moving dolly separately. Ive got an example here. Were going to show you how to install it.Basically, this moving dolly we sell separately is part number SL1500DR319-P.
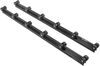
Basically its very easy. It comes with the base bar. Comes with the two piece for the handlebar, and then the three piece connectors with the spring loaded pins. Its very easy to put together and take apart using those spring loaded pins on the connectors. It breaks down very quickly for convenient storage.
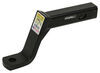
Now the bars, the base bar and these two piece handlebars, they are made of a rust resistant, inch and a quarter inch steel tubing, and its finished with a hammertone gray powder coat finish. Very nice finish, keep it rust resistant. Now this does have a one year limited warranty on the product.Basically what you would do to install it, again, let me just pull this dolly up here. I want to show you on the bottom of this dolly the plastic base is actually mounted onto a steel frame. At each end, the frame will have the square tube frame 00:01:45 you can see will have the openings and basically they come actually with these black plastic caps that will be in there.
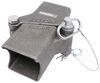
What I did is already pop those out. You can do it on either end. You can put the handle on each, whatever end you prefer. This one Ive already popped out the plastic caps. Then what youll also notice, down a little further is a hole for the spring loaded pin to pop into and lock it into place.Basically what well do let me just drop this down here.
You take this base bar and the square pegs right here that have the spring loaded pin in it. What youll do is just line it up with those square tube frame 00:02:27, push the pin in on each side. Youll notice as I push it down, youll hear the pins engage. There you go. Its actually locked into the dolly right now. That gives you your base bar to hook into. Then what you want to do is just going to move these out of the way. Lets lift this cart up onto the table. Well show you theres the dolly with the base bar on it. Youll take these connector, these connection points with the spring loaded pins in them. Go ahead and drop, push the pin in. Lock it into one side. Do the same on the other side. Now you have your connecting points for the handles to go to.One thing you want to keep in mind the handles, thats two pieces that will eventually just be snapped together like this to give you one handle but if youll notice, the handle, once its together, it actually will bend, has a bend to it. You can see it actually will bend back. When you install this handle, you want to install it so the bend is back towards you pushing the part. You dont want the handle bend to be facing the middle of the cart.What Im going to do here is take our last connection point with the pins in it, go ahead and push it in. Push down on the pin until it locks into place. Theres one. Push the other side on. There you go. Now youll have the two pieces pretty much are one. Again, make sure the bend is back towards you pushing the cart. Go ahead and just stick those handles up onto those push the pin in on that side. Push it in on this side. As it falls down you can hear it lock into place.Right there youve changed your dolly into a nice pushcart. Very simple and easy to do. One last thing I want to give you is a measurement. The handlebar height is going to be 33 inches. One last thing I do want to mention is we also sell this, if you want to get the cart and the handle all together, we do sell a part number for that also. It is part number SL1500PTR319-P and thats the pushcart, I mean the dolly with the handle already installed. That should do it for the review on part number SLADBPT319-P, the Snap-Loc pushcart handle conversion kit for the Snap-Loc moving dolly. .
Info for this part was:
At etrailer.com we provide the best information available about the products we sell. We take the quality of our information seriously so that you can get the right part the first time. Let us know if anything is missing or if you have any questions.


Thank you! Your comment has been submitted successfully. You should be able to view your question/comment here within a few days.
Error submitting comment. Please try again momentarily.