
Thank you! Your comment has been submitted successfully. You should be able to view your question/comment here within a few days.
Error submitting comment. Please try again momentarily.

Videos are provided as a guide only. Refer to manufacturer installation instructions and specs for complete information.
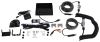
Shane: Shane here with etrailer.com. Today we're going to be going over the RVS, rear view safety camera set up. This system typically is just going to come with your monitor. You're going to have to get your rear camera and your two side cameras if you decide to put those on.Another thing is typically we put these on campers or RVs. Because they're so big, it makes it a lot easier to either see past the camper or to see a couple of lanes over. The reason we put it on this car is the owner of the vehicle has a hard time turning his neck, so he wanted something that he can see a couple lanes over when he's either changing lanes or getting ready to turn, to give him that extra view that he needs because obviously he cannot turn his head.The camera set up, the RVS screen is going to be a 5.6 inch screen.
It's going to be LCD. It's going to be colored. It's also going to have a speaker on it that allows you to . If you're getting close to something, it will beat like a normal backup camera. It's also going to have grid lines that you can turn off and on.We have a camera set here, we have a camera over there, and we also put a camera in the back.
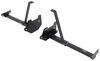
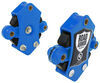
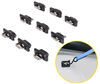
For this particular setup, we had to change the camera that goes in the back to an actual tailgate camera from a truck because of where we had to mount it.Our two side cameras, they're going to be aluminum housing, completely waterproof, and what they are, they're going to be fish eye screens or fish eye cameras, so the distance that you're going to be able to see is amazing. You can almost see straight out from the side where this camera is pointed.As I mentioned, we had to put a tailgate camera on this because of where we had to mount it. Typically the camera that you would buy with this, with the rear view camera, it actually the post has to be mounted in an upright position. Mounting it here, it would not work that way, so we just switched it out for the tailgate camera. Again, fish eye camera.
You're going to be able to see really wide back here, so three or four cars beside you in the back. You're going to get plenty of distance, plenty of sight. You're not going to have to worry about it.Just to give you an idea of how much you can see with this camera, I'm standing about level with the camera. Not only can you see up the side of the car, but if you notice this third trailer over, from this camera I can see this left edge or this left side of the trailer all the way down to that parking lot over there. That's how much distance you're going to get out of your side view cameras.
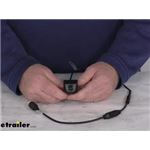
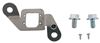
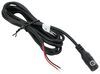
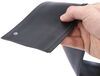
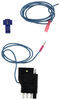
They are going to have a driver's side and a passenger side also, so you make sure when installing them there's going to be sticker on the back. You just want to make sure you're putting them on the correct side.As you can see, I'm standing right here next to the car. As I mentioned before, you can see the edge of that third trailer. I'm going to go ahead and walk over there.Right here, I'm standing right even with the wheel on the front of the car. I'm approximately three lanes over. This is straight out from that camera, so you can see the amount of space that you have or site distance you have in those side cameras.You can see here, I'm directly behind the car. You can see the grid lines. As I walked closer, you're going to hear the beeping on the screen.We're going to have a 5.6 inch screen. It is going to have a sunshade on it. This shade is removable. You can change your camera brightness, contrast, hue, saturation, sharpness, volume. That's going to be the volume for your speaker. You can flip it, and the V1 and V2 is it actually your other two cameras on the driver and passenger side of the car.If you have it set up with your blinker, you won't have to mess with this button. When you turn on your blinker, it's automatically going to come on. The way we have it set up when you put it in reverse, reverse automatically comes on. Turn on your blinkers, that camera automatically comes on.You can also set that up a different way where you just plug the blue wire in the system to a power wire that's powered when you turn the key on. That means that the camera screens are going to automatically come on. It's going to show this view all the time.Your grid lines can be turned off if you want to turn them off. These are your grid lines. You can turn them off where you don't have them if you decide to install it that way where this screen is always on.As far as the installation process, it's pretty simple. Everything's pretty much going to plug in together. Your side camera, you're going to have to drill a small hole depending on where you want to put them on the vehicle. You're going to have a flat washer, lock washer, and a nut that you'll put on the back when you run the wire through, and that's going to hold this camera onto the car.On the back side, there's going to be a little piece of sticky tape, double sided sticky tape. It's actually going to be kind of a rubber sealer that when you stick it on there, it's going to seal around that hole as you tighten it down.The wire that comes here needs to run inside the vehicle. The back camera, wherever you decide to mount that, you're going to have a cable that connects to it that you have to route from back there up to underneath the dash of the car. Same thing with your passenger side camera. You're going to route it and route it inside the vehicle through a grommet.Once you get all of your wires ran to the front of the vehicle or to the floorboard of the vehicle, you're going to have four wires. You're going to have a white wire, brown wire, blue wire, and a red wire with a fuse on it. The red wire with the fuse has to go into a 12 volt power that's only powered when the key is on. If you run that wire straight to the battery, it's going to run down your battery, because the camera's always going to stay on. We ran ours right over to the center counsel there and found the lights in the center, found the wire that turns them on when you turn the key on.The blue wire, if you decided to hook it up to your reverse light signal, you're just going to find the wire that when you put the car in reverse, that wire comes on. If you don't, you can tie that to the red wire and hook to your 12 volt power. That's what's going to keep the camera on all the time. So then you can turn your grid lines off and they won't have to be on.Your other two wires go to your driver and passenger side turn signals. You, have to find the left turn signal and right turn signal and you're just going to tie those wires into those other two wires.Other than that, everything else just plugs together. Directions are fairly clear on what plugs go with what plugs, and most of them are colored. Blue plug is going to be your number three camera. Then you're going to have a brown and white, which is going to be one and two, goes to driver and passenger side. Blue one always goes to the rear camera.Your screen's going to come with a couple of different mounting plates. You can mount it directly to the dashboard, but you will have to drill a couple screws into it, which I don't like doing. You can mount it to your headliner. It's also going to come with this sticky plate here or this plate here that mounts right on the back. It's going to have a red piece of paper on it. You peel that off, and you can see here I have it stuck right to the glass.All in all, I think this system works out great. It's pretty simple, straightforward installation, whether you're putting it on a vehicle or on your camper or RV to give you that added site distance and extra safety that you need when you're going down the road.Again, I'm Shane. That's going to do it for our look at RVS rear safety camera set up.
Average Customer Rating: 5.0 out of 5 stars (1 Customer Reviews)

Added a back up camera to a 2001 F250 (had upgraded the radio to one that takes video input) functions well and still working after 1.5 years...
Do you have a question about this Accessories and Part?
Info for this part was:
At etrailer.com we provide the best information available about the products we sell. We take the quality of our information seriously so that you can get the right part the first time. Let us know if anything is missing or if you have any questions.


Stephen
6/20/2023
Another year by and camera is still working great. Still 5 star!