
Rear View Safety Camera Washing System
(1 reviews)
Price: $127.19


Need help with installation?
Locate installers near me- All Info
- Reviews (1)
- Q & A (0)
- Videos (1)
- Photos
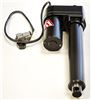
Rear View Safety Accessories and Parts - RVS-LC105
- Backup Camera
- Washing System
- Rear View Safety
- Rear View Safety camera washing system
- Compatible with RVS-770 and RVS-771
- Clips to side of backup camera (sold separately)
- Includes:
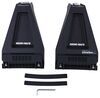
- 1 Water storage container
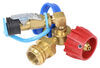
- 1 Aqueduct cable
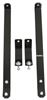
- 1 Mounting bracket
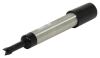
- 1 Adjustable spray nozzle
- (1) 20-m Power cable
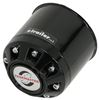
- 1 Control box
- 1 Screw kit for installation
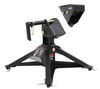
RVS-LC105 Rear View Safety Camera Washing System
Installation Details


Video of Rear View Safety Camera Washing System


Videos are provided as a guide only. Refer to manufacturer installation instructions and specs for complete information.

Video Transcript for Review of Rear View Safety Inc Backup Cameras and Alarms Accessories - Camera Washer - RVS-LC105
Hey everyone. I'm Ellen here at etrailer.com. Today we're taking a look at the rear view safety camera washing system. With that camera it's going to be out in the elements, it's going to get dirt and debris clogged up on the lens, and it can make it hard to see, can make it really impossible to use anymore. This is going to be a sprayer system to use with the RVS hardware that comes with the original camera. This is designed to use with RVS camera systems, so not really applicable for other systems since it mounts to the hardware there, so might not be the best for every system, but for RVS it'll work out great.
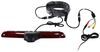
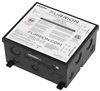
We'll have our water tank reservoir, the plastic tubing going from the sprayer to that reservoir, and then we'll have our electrical connection going to this control box. That's going to go to our power source.It has an inline fuse, and then it's also going to go to our long button here so that we'll have a little button to press and that'll deploy the water. One note that I'll make with this, you probably want to mount the tank lower than the sprayer. Whenever this gets lower than the tank, it'll leak water, and it's not the best. The pressure of the water coming up on it, it kind of leaks out.
That's one thing I have noticed, but the pressure seems to be pretty good whenever you do hit that button. Go ahead and spray this. Whee! That's pretty fun. But as you can see, good amount of pressure comes out of there, and it should clean off that camera face and you'll be able to see what's going on again behind you without any issues. If I go to a little closer look at this, I'll spray it again.I'm trying not to get my studio too wet here, but again, this is going to be our little button, so it's just going to have this stick material or a double sided tape.
Take off the backing, stick this wherever you want it. This cable is going to be 20 meters long or about 65 feet long, so it should be plenty of length for your RVs to get that wherever you want it to be, somewhere close at hand but out of the way of your line of sight. Again, I'm going to press that. You can see that water comes out, you can hear the tank move there, and it cuts off as soon as you let go of that button so you don't have to worry about it spraying the whole time.Now I'm just using water in this tank. You'll probably want to replace this with something with a little bit more oomph to it, something more like your typical washer fluid for your vehicle.
Something that you'd have normally in your reservoir there should work out pretty well for this system. As far as numbers to consider with this, give you some measurements really quick.It's going to have a tank capacity of 1.5 liters, so should be a good amount of fluid to press the button there, get everything cleaned up. The tank is going to measure about eight inches tall by five and a half inches wide and five and a half inches deep, accounting for the hardware up here at the front. It does have a bracket already in place. Let's take some more measurements here. Looks like that's about three inches distance between the mounting holes. It is about two inches roughly, so it should be pretty easy to mount that up. It doesn't come with any mounting hardware for that bracket, so you will provide that on your own. It's going to depend on what you're going to be attaching this to. Hopefully something sturdy, something out of the way. Again, you'll probably want to mount this somewhere lower on your tank or lower on your vehicle so that the sprayer is above that.On your RVs, most of the time that camera is going to be mounted kind of high, so it should be fine. The length for this cable going from the reservoir to the sprayer is going to be about nine feet or about three meters long, so again should be a decent amount of length. Our wires here should also be about 20 feet as well, so everything should be long enough that we can reach to wherever we need to go. We just have to hook up power and ground to get everything powered again. It does come with a fuse in line that's going to be a 10 amp fuse, and it also comes with some hardware to mount that control box. Going to be a few screws, and then this hook and loop material to adhere to the back.But that's pretty much all there is to it for our RVS camera washing system. Don't know why that's so hard to say. Hopefully I've answered all of your questions. If you have any other concerns with this, please leave us a comment. We'll try to get back to you as soon as possible. Thanks for watching and we'll see you next time.
Customer Satisfaction Score:
91% were satisfied with this product
9% of customers were not satisfied
- Arrived Damaged
Customer Reviews
Rear View Safety Camera Washing System - RVS-LC105
Average Customer Rating: 1.0 out of 5 stars (1 Customer Reviews)
by: ScubaZ03/05/2019
The washer system is worthless. Once you spray water out the water keeps flowing after you let off the button until the tank is dry. It siphons the entire tank dry on the first use. It might work slightly better if you can mount the washer/camera above all the hose and tank, but I doubt it. The pressure at which it sprays the water is also fairly low. It’s more of splashing water on the camera, not a high power spray like high end cars do with headlamp washers.
Save your money and install time. Don’t buy this.
1
1
See what our Experts say about this Rear View Safety Accessories and Parts
Info for this part was:

Edited by:
Tyler C

Installed by:
Kathleen M

Updated by:
Wilson B

Written by:
Daron K
At etrailer.com we provide the best information available about the products we sell. We take the quality of our information seriously so that you can get the right part the first time. Let us know if anything is missing or if you have any questions.
Product Experts Available Now!
Call 1-800-940-8924
Thank you! Your comment has been submitted successfully. You should be able to view your question/comment here within a few days.
Error submitting comment. Please try again momentarily.