
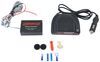
Replacement LED Monitor Light for Demco Air Force One and Stay-IN-Play Duo Braking Systems
(22 reviews)
Price: $31.46
In Stock
Replacement LED Monitor Light for Demco Air Force One and Stay-IN-Play Duo Braking Systems
Item # SM99612
Our Price: $31.46
Will this fit?
To see if this custom-fit item will work for you please tell us what vehicle you'll use it with.
In Stock


- All Info
- Reviews (22)
- Q & A (0)
- Videos (2)
- Photos
Demco Accessories and Parts - SM99612
- Tow Bar Braking Systems
- Wiring
- LED Monitor Light
- Demco
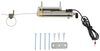
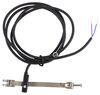
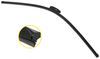
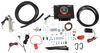
Replace the LED monitor light of your Demco Air Force One or Stay-IN-Play Duo supplemental braking system.
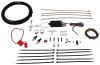
Features:
- Replaces the LED monitor light for your Demco Air Force One and Stay-IN-Play Duo braking system
6228 Replacement Demco SBS (Formerly SMI) LED Braking Monitor for Air Force 1 Flat Tow Brake System and Stay-N-Play Duo Flat Tow Brake System
Replaces Demco SBS SM99612


Video of Replacement LED Monitor Light for Demco Air Force One and Stay-IN-Play Duo Braking Systems


Videos are provided as a guide only. Refer to manufacturer installation instructions and specs for complete information.


Video Transcript for SMI Supplemental Braking System Replacement LED Monitor Light Review
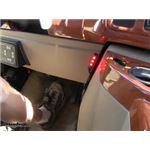
Today we'll be taking a look at, and installing, the SMI Replacement LED Monitor Light, for SMI Air-force One, and Stay-In-Play Duo Supplemental Braking Systems, port number SM99612. As you can see, we can barely see the indicator light on the dash of the jeep. That is the purpose of installing the indicator light, inside your RV. That way you can see exactly what's going on, easily, in all light conditions. We'll get going a little bit here, and apply the brakes, and you can see the lights are being applied in the jeep behind us. Here's what our kid consists of.
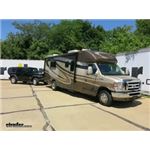
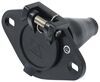
We have two butt connectors here to install it, and the actual monitor light itself, which has a double sided tape to help secure it to the dash, or wherever we want to mount it. It has a fairly long wire lead, so we can run the wires behind the dash and not have to see everything hanging out. Now we'll go ahead and show you how to install it. Our motor home here, today, we have a standard seven way connector on it. This motor home currently does not have a break controller installed on it. What we're going to is we're going to use the wire that the electric power breaks would be used on a trailer behind it, and send the signal from our jeep, back through that, and into the unused break control connector, behind the dash.
That way we don't have to run any wires through the motor home itself. We're going to use a pre-existing wire that's already there. The electric brake signal circuit on this particular motor home, and all signaling connectors use the bottom right pin, right here. So I went away and marked that our our umbilical that connectors our motor home and our jeep. Now, since it's a 7 way here, and our jeep uses a 6 way, the wires are changed. So with the multi meter here, I'll insert into the bottom right pin, and go to the other side of the connector to find out which wire it uses.
So on our jeep, we need to go to the pin that corresponds to this one, so what we'll do is we'll take a paint marker here, and we will mark it, just so it's easier to see. Just mark right to the side of it, and take our six way connector off the front of the jeep. This way we have access to it. Slide the dust cover on back, and we'll loosen the screw here for the one we need to hook our wire up to. Because our jeep here today has to have the battery disconnected, when it's being flat towed behind our motor home, we need to access the blue wire of our breakaway switch, because that's where we already tied in our indicator light on the dash of the RV, to show when the brakes are being applied with the SMI Stay-In-Play Duo that is installed in this jeep. So, we'll take back some of this black electrical tape here, just to gain access to the wires inside.
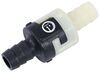
Now that we're done with that, we will cut the blue wire, and strip it back a little bit on each end. Now we'll take a segment of spare wire we have lying around, strip off the one end, and we'll tie it together with one of the ends of the blue wire, like so. Take a butt connector here, install it, and we'll crimp it into place, make sure our connections nice and tight. Take the other end of the blue wire, and we'll reinstall it to the other end of the butt connector, crimp it down. Now we used a heat shrink butt connector on this, so we'll take a heat gun, and we'll seal our connection up securely. With that done, we'll take the other end of our white wire, wrap it up to the bumper, insert it through our dust cover here, measure off how much we're going to need, and we'll cut off the excess. Strip off a little bit of the insulation, and we'll install it inside of the terminal that corresponds to the one we marked earlier, and we'll tighten the screw back down. Make sure it's nice and tight, which it is, and slide our dust cover back on. Wrap it with electrical tape. Once it's all taped up, we can reinstall our six-way connector on the prong sticking off our base plate. Put our self-tapping screws back in there. Now we can move on to the motor home. The factory brake controller wiring, on this particular van, is behind this upper part of the dash here. We'll take a trim panel tool, get the top lose first, and pop it out. Here's the connector we need to use right here. There's a quick connect wiring harness available on our website, as Part Number 3034-S, which we have right here. We'll go ahead and plug into it, like so. This will give the wires we need to work with here. The quick connect wiring harness here has four wires on it. We don't need to worry about the black, the red, or the white. We just need to use the blue. The red wire here, we're going to go ahead and tape off the end of it by itself. We'll do the same for the other two wires that we're not using because two of these wires do have power running through them occasionally. One of them has constant power, and this red on here, has power whenever the brake pedal is depressed on our motor home. We just want to make sure these don't actually touch anything and cause a short. Once we have them wrapped up separately, we'll just wrap them up together too. Now we can drop this wire down behind the dash and we should have access to it down below now. If our wires drop down, we're going to cut the white wire, like so, so we can use it as a ground wire. So we'll have our blue wire, for our connection, from the back. This is where we're getting our signal from the jeep, that the brakes are being applied, and the white wires are ground. So we'll take both these wires, we'll strip off a little bit of insulation, take our butt connector, that's included with the indicator light that we have, and crimp it into place. Do the same for the other wire. Make sure they're secure, which they are. Now we need to find a place to mount our indicator light. I'm just going to stick it right here on the side of the dash, so you can see it while driving, and it's not in our way. Peel off the double sided tape backing, and we'll apply it to the dash right here, and we'll make our connections thread wire here. We'll go to our blue wire, crimp that down, and the black wire will go to the white. Now we'll wrap up our butt connectors here, with some electrical tape, just to make sure we have a nice, solid, secure connection. We'll tuck our wires up here underneath the dash. There's a nice little pocket in side there where it'll rest, and it won't fall out. Now with our connections made, and our wires secure behind the dash, we can reinstall this panel piece. Just push it back in place, just like so. That will do it for our look at the SMI Replacement LED Monitor Light, for SMI Air Force One, and Stay-in-Play Duo Supplemental Breaking Systems, part number SM99612.
Customer Satisfaction Score:
99% were satisfied with this product
1% of customers were not satisfied
- Wrong item was ordered
Customer Reviews
Replacement LED Monitor Light for Demco Air Force One and Stay-IN-Play Duo Braking Systems - SM99612
Average Customer Rating: 4.8 out of 5 stars (22 Customer Reviews)
Replace the LED monitor light of your Demco Air Force One or Stay-IN-Play Duo supplemental braking system.by: Richard 08/26/2018
Bought Jeep Wrangler to pull behind our coach and had a MSI Stay in Play brake put on it. The brake notification light the technician put on back side of rear view mirror shows up as a small white dot. He said this is a complaint a lot of people have. Told me to go to E-Trailer web site and look up their video on how to install a light in coach. Your video was spot on and made installation about one hour. Highly recommend this to any one who has trouble seeing light in coach rear camera. Mounted light on bottom LH side of coach windshield pillar.


by: Robert 02/14/2023
This light wasn’t as bright as I had hoped, but it does the trick. That’s why I gave it 4 stars. I would give the customer service experience 5 stars, since they carried this in stock, and they shipped it quickly. I received feedback anytime the statue changed, such as “order received”, “order shipped”, etc. I’ve done business with eTrailer in the past, and will continue to do so in the future. They are my go-to for anything trailer or towing related.
by: NC Roger12/13/2014
One stop shopping - a great site for everything I wanted! I was unsure whether some of the items were even available as spare parts, but etrailer.com had them all. Some of my hitch and towing items were getting tired, but I was able to find replacement dust covers for the hitch locks and for the hitch base plates, plus they even had the replacement LED monitor light for my SMI Air Force One. Shipping was great, they waited for a few days until they had the parts in stock, but kept me informed of progress. A huge thank you!!
by: Charles11/28/2018
It is just what I wanted. Although I haven’t installed it yet, it is good quality and easy to install. I think later I will up grade to the smi 99945 wireless coach link. Etrailer has a good reputation in my book. Thank you
by: Herbie08/15/2020
I ordered the replacement LED Monitor light for the SBS Air force one on my tow vehicle for better visibility of the light through my RV camera.
by: Jeff B08/08/2017
Accidentally cut thru my original one. Ordered on etrailer, had one in stock and fast shipping, back in service. Thank you etrailer you guys are the best!!!
by: Herbert02/01/2019
As ordered. ETrailer is a great source for our RV needs.
by: Charles 08/20/2018
No problems. Products are what we expected, and they came ahead of schedule. You can trust this business.
by: Nick04/30/2021
The parts worked with our existing system. The parts came quickly.
by: Pamela 04/11/2024
by: Jerry01/04/2024
by: Ed07/11/2019
Just installed it, directions on website were great. Going on the road this weekend
by: Mark04/27/2022
Great service
by: Todd 11/15/2021
by: Joe08/28/2020
by: Alvie06/04/2023
by: Jason 06/30/2021
by: Jon A12/03/2022
by: Clifford04/16/2021
by: Alvin 07/18/2022
by: Donna 08/05/2022
by: Travis 03/13/2021
22
22
See what our Experts say about this Demco Accessories and Parts
Info for this part was:

Expert Research:
Mike L

Expert Research:
Jameson C

Video Edited:
Joshua S

Written by:
Laura H

Updated by:
Wilson B

Updated by:
Kristina F

Updated by:
Amanda K

Video by:
Zach D

Test Fit:
Brent H
At etrailer.com we provide the best information available about the products we sell. We take the quality of our information seriously so that you can get the right part the first time. Let us know if anything is missing or if you have any questions.
Thank you! Your comment has been submitted successfully. You should be able to view your question/comment here within a few days.
Error submitting comment. Please try again momentarily.