
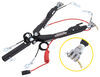
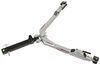
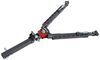
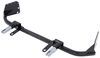
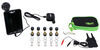
Use this kit to swap out the Demco Air Force One on your towed vehicle for a Stay-IN-Play Duo. Includes all the hardware and components you'll need.
Features:
If you are changing out your RV with air brakes for one with electric/electric-over-hydraulic brakes, this kit will get you what you need to convert your flat tow setup. You'll save money and get all the components you need, with no extras.
Videos are provided as a guide only. Refer to manufacturer installation instructions and specs for complete information.
Hey everybody, how's it going Today we're gonna be going over and showing you how to install the Demco Towed Vehicle Conversion Kit. So our conversion kit is gonna allow us to adapt a vehicle that has an Air Force One supplemental braking system installed to be used with a Stay-IN-Play supplemental braking system. Now, it's pretty simple in regards to the differences between the two. The Air Force One is gonna be designed for motor homes that have air brakes, whereas the Stay-IN-Play is gonna be designed for motor homes that have normal hydraulic brakes, just like your vehicle. So, most likely, the reason that you're looking at this conversion kit is because you previously had a motor home with air brakes, but you now have a new motor home with hydraulic brakes. We can't actually use the Air Force One braking system on motor homes with hydraulic brakes, which is why you need the conversion kit to transfer over to the Stay-IN-Play, so you can still use part of your supplemental braking system, and you can still effectively tow your vehicle with your new motor home without having to purchase an entire new system.
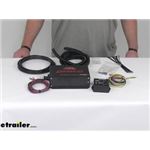
So something else I really like about this kit is Demco has made it very simple. This is the only thing we're gonna need to transfer everything over. We don't have to worry about piecing together all these separate parts. This complete kit is gonna have everything we need to make the swap. So in regards to installation, this one is actually not too bad at all.
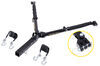
One of the more challenging things with these braking systems, the Stay-IN-Play or the Air Force One, at least that I struggle with most, and that's gonna be mounting the anchor point to the firewall for the actuator, and then adjusting that on the brake pedal. Thankfully, we're not gonna have to do that because we're gonna be able to re-use the existing. Therefore, pretty much all we're gonna be doing is routing some lines and attaching some wires. It's all fairly simple. And we can walk you through this entire process step by step.
Now, keep in mind the vehicle we're gonna be installing it on is this Jeep Grand Cherokee, but this is gonna be more of a generic installation. So therefore, the exact process and steps in regards to the component locations can vary for your particular setup. So before we start our installation, we have to remove a few of the existing components. So two things in particular we need to remove and that's gonna be the operating unit, which is what we have here. Now, granted, this is the older Air Force operating unit.
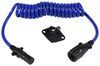
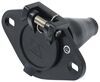
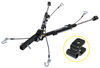
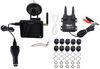
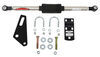
The newer one is a little bit of a thinner profile. So it may look a little bit different, but not to worry. The installation or removal procedure will be pretty much the same. So we first need to locate this and then we're gonna remove it. So how we remove it, we're gonna have two wires coming from this, we're simply going to clip those wires. We have two airline fittings here. These are pushed to connect fittings. We'll simply push in on the airline, hold down that collar, pull out. And then we have a vacuum fitting that we just took a pair of tubing cutters and we cut that off. So the removal of this is pretty much gonna vary depending on where the previous owner installed this, our particular unit was mounted over on the passenger side, in the engine bay, up in that pocket there. But once we have that removed, there's one other thing we need to remove that you can leave this in place if you want, but I chose to go ahead and remove it. So this is the port that connects to the towed vehicle via the umbilical cord. So this gets mounted on the front of the vehicle. We have the schrader valve there. So for our particular application, this customer had it mounted to the electrical connector bracket. So this simply unscrews there, and then we can remove it out the back side. So the airline here that went to this valve, this was actually plugged in to one of the ports here on our operating unit. So you can go ahead and pull the rest of the airline tubing out with this valve here. So now we're ready to install our new operating unit. We're gonna be installing it in the same place that our old one came out, just because that's where all of our wires and lines are already ran. So we wanna be able to utilize those connections to make our installation simpler. So here you can see we have our new operating unit in place. So basically, how the old owner had this mounted is, so there's a flange on each side of this with four pre-drill holes in that flange. And we have a zip tie through each of those holes in the flange, and it's actually secured to the factory wiring harness that's ran right here through the PCM. So it's actually pretty solid mounting here. Now, you're probably gonna want some longer zip ties for those bottom two holes there, but, essentially, we're just tying each of the four sides off to the factory wiring harness behind here. As you can see, it is pretty solid. So this isn't really a bad mounting location. So once we have the unit mounted, we can make two connections right off the bat. We shouldn't have to run any lines for this. So here is the vacuum port that we removed from the old operating unit. And here's one of the two airline tubes that we removed from the old operating unit as well. So if you're not sure which airline tubing went where, one of these was gonna be running to the front of the vehicle, that's to that schrader valve that we removed, the other one should be running inside the vehicle to the brake pedal, where we have our actuator mounted. So the one that's running inside of the vehicle to our actuator, that's the one we're gonna be reusing. We'll simply just press that into the airline fitting on the top of the operating unit here. So now we need to go ahead and take care of our wiring. So we're gonna have four wires coming from our new operating unit. We're gonna set the red and the black ones aside. We'll show you those connections later. But as far as the brown and the blue one goes, the blue one is pretty simple. So the blue wire that we cut free from the old operating unit, we should still have sitting in here. That's gonna be this end of that wire. All we did was we took a butt connector and simply attached it to the blue wire coming from the operating unit. That blue wire actually goes through our breakaway switch. So we did actually cut some excess off. You're gonna have plenty of extra. The brown wire, however, we actually need to use that. We're gonna be running that down to the breakaway switch as well. Now, the best way to get there is just follow the route. If the blue wire was ran from the previous installer, it actually comes down through here. And then down in this area here, it just goes straight down. We'll show you the connection underneath in a minute. But what that brown wire does is that's gonna be splicing in to the other wire from our breakaway switch. So we're gonna have two wires going through our breakaway switch, an orange wire and the blue wire. The blue wire comes up here, goes to the blue wire on the operating unit. The orange wire is gonna connect to our brown wire down underneath, and then it's gonna T in and splice and run over to the battery and hook up to the battery with a circuit breaker or fuse holder in between. So again, we'll show you that connection in a second. One other thing I do wanna make note of is that if you're using a monitor light, you will have to splice into the breakaway wires and run those into the cab of the vehicle. Now, this particular customer, they didn't have one installed previously and the kit doesn't come with one. So unless you're gonna be reusing your old one, you'd go ahead and hook those wires up. But if not, the unit will still work without it. So if we come to the front of the vehicle here, we can see our breakaway switch. This is where the previous owner chose to mount it or the previous installer, rather. And as we said, there's gonna be two wires coming from it, an orange wire and then a blue wire. So that blue wire went up to the blue wire on the operating unit. Here is the brown wire that came down from the operating unit. And you can see what you have at spliced in line with the orange wire. The other side of this orange wire should already be ran. That should be going up to the battery with a circuit breaker in between, or rather a fuse holder was used. So next we're gonna be mounting our G-Force controller. So this is gonna be mounted inside the vehicle here. We're gonna mount it in this location here. It's simply gonna be a self tapping screw on either side that just screws into this panel. And you can see we have our wiring harness. We actually taped ours together to make things a little bit less clutter. But what we're gonna do now is we're gonna find a grommet in the firewall there that we can feed our wires through, up into the engine bay. So in order to get your wiring harness up into the engine bay, you should already have some sort of grommet or pass through that we can use. If you find where the airline tube that comes in and attaches to the cylinder, if you find where they spliced into the vehicle with that, you can easily use that same hole to run your wires out of. For our particular application, there's gonna be a smaller grommet located right under here. And we simply just sort of opened up the grommet a little bit more as best we could with the screwdriver. And then we slid the rest of our wires through that and pulled them up into the engine bay. So here's where our wires are gonna come out. You're gonna have five total wires, yellow, white, green, and then you're gonna have the red and black. So what we need to do at this point here, you can see I've already got some wire loom, but we're gonna be separating the red and black wires, used some of the wire loom that comes in our kit here, because we're gonna be routing this over the passenger side. And these are gonna attach to the black and red wires coming from our operating unit. And we'll set these three wires aside for installation here later. So we're gonna go ahead and route these wires up over the engine here, tying it to some existing lines that we already have ran, and then we'll hook it up to the operating unit. So now that we have our black and red wires ran over here to the operating unit, you're again, gonna go ahead and cut off your extra slack. Now we'll just peel back some of the jacket and attach them to one another using the butt connectors provided in your kit. So granted, yours are gonna look a little bit different than the ones we're using. We're actually using heat shrink butt connectors. We do sell these here at etrailer, if you wanna pick them up. But again, the ones that come in your kit are gonna work fine. If you are using the heat shrink butt connectors, you're gonna make sure that you go ahead and seal them up with a heat gun. And we also just like to tape them up with electrical tape as well, just to make sure everything is nice and solid. And now to finish up. We have our three remaining wires that came from the G-Force controller. So these wires here are actually gonna splice in line with our diode wiring. So in order to use this kit, you do need to have some sort of integrated wiring in the vehicle. You can't use any magnetic lights with this. So the installation process for these wires is really gonna vary depending on how the previous installer ran the wires from the front to the rear. What we're gonna do is we're gonna splice in just directly behind the trailer connector 'cause that's the easiest way to find those wires. So what I'm gonna do now is I'm gonna take some of the included wiring in our kit here. I'm gonna cover these wires and then I'm gonna run them down along the fender here over until I can go straight down around where our trailer connector is. So now you can see, we have our three wires routed towards the front of the vehicle where we have our trailer connector mounted. This is where the previous installer installed theirs. So what we're gonna do is we're gonna follow the wires from behind the trailer connector, and we should see this bonded cord pole here. And what we're gonna do is we're simply gonna tie these three wires into the three wires that corresponded to correct colors from this harness here using the butt connectors provided in our kit. Now we do actually need to make an additional ground in line with the diodes in the wires coming from the G-Force controller. However, I think we're gonna go back up top and do that after we finished this, because there isn't really a good spot down here to create that additional ground. For now, we can just splice the wires in like we already know how. So now you can see, we have our connections made. I just simply spliced in between all of these wires. And then I cut the white, yellow, and green that we'll be using and see all the connections are made. Now, what we're gonna do now is we're gonna go ahead and seal all those up with a heat gun, and then we're gonna tape everything up nice and good. Make sure we have all of our wiring back on and then tuck those wires back behind the bumper there. But as I said, now the last thing you need to do is you need to create an additional ground in line on that white wire and go back up into the engine bay and we'll show you that next. So here's what our additional ground looks like. So if you look directly behind by the battery and then the fuse box here, we're gonna see an existing ground stud. So you're gonna take an eight millimeter socket. You're gonna loosen up that stud. And then what you're gonna do is you're gonna take the white wire from the three wires that came from the G-Force controller. We're gonna split that in half. One end goes to the butt connector, the other end is gonna go to the other end of the wire coming from the controller. And then we actually have an additional lead here that we splice into that as well. So there's two wires on this end, one on this end. And then we just simply use the ring terminal to secure to this existing ground stud. But now we're ready. We'll go ahead and test our system to make sure everything's working properly. And if it is, and then we can go ahead and seal up all our connections using electrical tape and a heat gun. So in order to test the system, we're gonna wanna pull the breakaway switch and then we'll come inside the vehicle here. We'll just simply flip on the G-Force controller. As we can see the actuator's engaging so we know everything was hooked up correctly. And that's gonna do it today for our look and installation of the Demco Towed Vehicle Conversion Kit..
Average Customer Rating: 4.9 out of 5 stars (15 Customer Reviews)
Use this kit to swap out the Demco Air Force One on your towed vehicle for a Stay-IN-Play Duo. Includes all the hardware and components you'll need.the conversion kit seems to be working. I haven't hooked it up to the rv yet but it all seems good so far

I used this on a jeep I bought that came with the air force one installed. It was pretty straight forward to convert to the stay n play duo.
EVERYTHING WENT PERFECT WITH MY NEXT DAY AIR
Thank you etrailer for offering this conversation kit. I look forward to it giving me years of reliable service as the Air Force One did. Richard
The conversion kit was truly a Godsend. For the most part easy to install in our 2016 Subaru Forester. One issue I had, user error, was resolved with a Phone call to Demco. Etrailer was very responsive and helpful when I ordered and the kit was delivered quickly. Still working as designed. Wouldn’t hesitate to order from Etrailer again, I have two t more times.
not installed yet but it wase a money s aver
This is a conversion from a Demco Air Force One to a DUO braking system. The parts were all provided and in good order. My disappointment with Demco was the installation instruction booklet provided. The installation booklet was for a complete DUO installation, not the conversion kit that I ordered. It was challenging to sift through the instructions and determine which components were needed and which were already installed from the previous Air Force One system. Wiring was particularly hard to figure out. A call to Demco was required, but to their credit, they resolved my issue, but if the instructions provided were truly for the conversion kit only and not the complete installation package, I don't think any call would have been necessary and installation time would have been reduced.
This was an awesome experience doing it myself. My trailblazer was set up by previous owner for a do. I saved a bundle over take out units. The videos gave me confidence to install it myself. It worked the first time. Only problem was reversing the check valve as I have electric brakes
Good recommandation & fast delivery
This kit was great to make the change I need on my toad. Directions were great. System works great.
Do you have a question about this Accessories and Part?
Info for this part was:
At etrailer.com we provide the best information available about the products we sell. We take the quality of our information seriously so that you can get the right part the first time. Let us know if anything is missing or if you have any questions.


Thank you! Your comment has been submitted successfully. You should be able to view your question/comment here within a few days.
Error submitting comment. Please try again momentarily.