
Coach Air Kit for Demco Air Force One Flat Tow Brake System
(60 reviews)
Price: $420.20
In Stock
Coach Air Kit for Demco Air Force One Flat Tow Brake System
Item # SM99627
Retail:$441.00
Our Price: $420.20
You Save: $20.80
Will this fit?
To see if this custom-fit item will work for you please tell us what vehicle you'll use it with.
In Stock
Thank you! Your comment has been submitted successfully. You should be able to view your question/comment here within a few days.
Error submitting comment. Please try again momentarily.


- All Info
- Reviews (60)
- Q & A (0)
- Videos (26)
- Photos
Demco Accessories and Parts - SM99627
- Tow Bar Braking Systems
- Second Vehicle Kit
- Demco
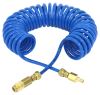
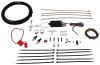
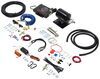
Add or replace the coach-side components of your Demco Air Force One supplemental braking system. Includes all the needed parts and hardware on the motorhome side with no extras.
Features:
- Replaces the RV-side components of your Demco Air Force One braking system
- Includes components for motorhome-side only
6231 Replacement Demco SBS Coach Installation Kit for Air Force 1 Supplemental Braking System - Proportional
Replaces Demco SBS SM99627
Replaces Demco SBS SM99251
DM6231


Video of Coach Air Kit for Demco Air Force One Flat Tow Brake System


Videos are provided as a guide only. Refer to manufacturer installation instructions and specs for complete information.


Video Transcript for Demco SBS Air Force One Coach Air Kit Installation - 2019 Tiffin Allegro Red Motorhome
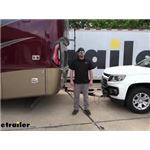
Hey everybody, Ryan here at etrailer. Today on our 2019 Tiffin Allegro Red motorhome, we're gonna be showing you how to install the Air Force One supplemental braking system just for the coach side. But before we do that, why don't we check it out and make sure this is a kit that's gonna be right for you. Before we get too carried away talking about the braking system and kind of checking all that out. I figured it'd be beneficial to just spend a minute or two and refresh ourselves on the main things that we're gonna need to flat tow our vehicle down the road in the first place. There's gonna be a total of five main parts that you're gonna need.
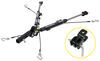
Now the first one is going to be the base plate and that's gonna provide us with a solid and reliable attachment point. That way we can hook our tow bar up to it. And the tow bar is gonna be the second component. That's gonna be the physical link that actually connects the front of your vehicle to the back of your motorhome. The third main component is going to be safety cables.
And these are just there in the event of an unlikely disconnect. They're gonna keep everything paired together. The fourth main component is going to be tow bar wiring. And what this is gonna do is transfer the lighting functions from the back of your motorhome, to the back of your Chevy keeping you safe and legal. And last but not least the fifth main part will be a supplemental braking system.
And what this is gonna do is apply the brakes in your Colorado whenever you hit the brakes in your RV, helping to bring you to a more predictable and complete stop. There are a couple more parts that aren't absolutely necessary but I definitely like to recommend just to give you a good experience overall. And one of 'em is what's called a battery charge line. And what that's gonna do is essentially maintain or trickle charge your truck's battery whenever you're flat towing it behind your motorhome. That way, you know, it won't be drained from the braking system.
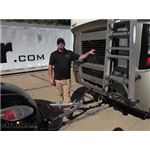
A lot of times the supplemental braking systems are gonna use your truck's battery power. So what happens over time, you know, they keep using power and power and power and you just run outta juice. And so that's where that charge line is gonna come into play. It's gonna keep your battery full, that way when you get to where you're going you'll hit the key and everything will start up. And the other thing that I suggest for the Colorado is what's called the automatic battery disconnect. And I always recommend this for these trucks because with these, whenever you flat tow 'em, you have to disconnect the battery. And so that really leaves you a couple of choices. One of 'em being to pop the hood undo the battery, whenever you're flat towing it, hook it back up whenever you're ready to start your truck. And I mean, is it doable Sure. It'd probably get annoying over time. And that's where something like this would come into play. Alright, so, instead of having to deal with all that you simply just push the button, it disconnects the battery. Whenever you're ready to start the truck, push it again, power comes on and you're ready to roll. With this kit being the parts just for the motorhome side, this is probably only going to interest a small group of people with a very particular set of needs. But the good news is, if you fall into this category there's gonna be an option for you. So with that said, you know, there's a couple scenarios where this would come into play. One of 'em being, let's say if you already have, or are familiar with the Demco Air Force One braking system, you like the way it works, you know, it's reliable. And let's say you end up upgrading motorhomes, right You get a new motorhome. You know, is it really worthwhile to go underneath and rip all them parts off and put 'em on your new motorhome Some of you may say yes, a lot of people probably aren't gonna want to have to deal with it. So there's an option instead of getting the whole kit when you don't really need the whole kit, you can get just the motorhome side. Gets you squared away, your old vehicle already is set up to be flat towed, so you can just hook everything back up and get the show on the road. Another thing, or another reason some of you may want this kit is maybe the original one got damaged in some way. Maybe it was improperly installed. Something happened along those lines. You know, it's rare but, you know, stuff does like that happen. You get a ton of miles out on the road, weird things can happen, right Or maybe if, you know, you get a new motorhome and you still got the old one but you want to tow with your new one. This will, this will kind of translate over to that as well. So there's a bunch of scenarios that this can be used in, probably the most popular though getting a new motor home and getting it set up and already being familiar with the vehicle side of things. So, you know, if that's what you're running into this is definitely a solution for you. So, one thing I do wanna mention as well if you actually need just the vehicle side there's also second vehicle kits available. Or if you need the whole package, you know, the side for the vehicle, the side for the motor home there's that kit available as well. So a lot of different solutions out there for all those different types of situations. But other than that, at the end of the day, I mean really not much to it. It'll have all the parts you need to get things going on your RV and be able to hook up to your tow vehicle and go out on the road and enjoy yourself. As far as getting this installed goes, it's really not too bad, nothing complicated per se. You know, it's not the most fun crawling underneath of a motorhome, but something you gotta do one time, then you're done, right So, as long you stay focused you should be in pretty good shape. But speaking of that, why don't we go ahead and get this installed together now. To begin our installation on our motorhome side, we're gonna be working essentially just in front of our rear axle and we have to get all the components and air lines and fittings installed. I wanna mention you don't have to have a lift to do this. We just get it up in the air so we can see what we're doing a little bit easier. And hopefully give you guys at home a better visual as well. But this is definitely doable on the ground, just be a little bit tighter. Underneath the motorhome, we are just in front of our rear axle. And the first thing that you need to do is find a good spot to mount up your tank. So it turns out, right here in this area, the perfect spot. It's close to our lines that we're gonna be teeing into and it's outta harm's way and everything else. And it turns out, there's actually a factory bracket here holding on this air valve. I just removed the two nuts off of that. And the bracket on our tank already has some slotted holes in it. And so this was able to just push right up in place and then I can simply tighten them nuts back down. And that's what's keeping it secure, this thing is not going anywhere. So once this thing is mounted, we're gonna have a total of three air lines that we need to hook up, alright And you're gonna have this one here which will be the supply line and you'll plug in a piece of air line tubing into the quick connect fitting. And I'll show you in a minute how to do that properly and how to cut it properly and everything else. But you'll have one plugged into there. And then this one will go to your metered air. And so you'll plug one into there and both of them lines are just gonna shoot up about a foot above us, that's where all of our main connections are. And then this one here, this is gonna go back to the fitting at the very back of our motorhome that we can hook up. And this is what's actually gonna give air to the vehicle side when we have it plugged in towing behind our motorhome. So, we'll get to this one in a minute. Let's focus on the supply, or I'm sorry the metered air and the supply line, like I said those are gonna go up maybe a foot or so and get plugged in to the main lines up top. So our supply line, what that's gonna mean is it's going to have constant air pressure all the time. And it's usually the thicker line. And in our case, it was, it's this thick green line. And so what you want to do with that is make sure all the air is depleted out of the system, because obviously if you cut that line with a hundred plus PSI in it, could get interesting. But you, to get the air out, you just hit the brakes a bunch with the engine off and eventually all the pressure will come out. But what you're gonna do is cut that line clean, take the included quick connect fitting, simply plug it in, and then obviously plug in the fitting or I'm sorry, the air line, into the other one that came off of our tank. Same exact deal with our metered air connection. So this is our metered air connection. And usually this is a smaller line but sometimes there'll be a couple of these. But with the metered air, what you're looking for, it's only gonna have air pressure when you hit the brakes. So, you can test it by putting, starting the motorhome up, you know, getting some air pressure into the system. And then you can unplug this line and have an assistant hit the brakes and then, when they hit the brakes, if air shoots out of this line then that's how you know that it's the metered air. But same concept, once you've figured that out, cut that line clean, put in your T and then plug in the line that comes from our new tank. And I wanna say too, with these lines, before you plug these quick connects in, make sure they're clean, take some rubbing alcohol or some brake cleaner or something like that and just wipe 'em clean because a lot of times you can have like undercoating and dirt and stuff on 'em and then cause a leak. So, make sure they're nice and clean, get 'em plugged in, and once this is done, we can route the remaining air line coming out of our tank all the way to the back of our motorhome. So now we're at the back of our motorhome. I ran our airline tube back here, and it's just so difficult to see underneath there but pretty straightforward, run this all the way back, do your best to avoid any hot or moving parts. And this is gonna get connected to this fitting. And this fitting here I just secured to our fiberglass here. It's pretty thick and I drilled a couple holes through it. Just used some nuts and bolts to get that secure. So I talked about how you want to cut these lines to plug 'em into the quick connect fittings. And so you wanna use a tool like this or a tubing cutter or a regular straight edge. And you want to cut it and inspect it. So you want this to be straight and clean. You don't want any, like, rough edges or burrs on it 'cause those can potentially cause a leak. So, don't use regular snips. Don't use your regular pair of Dykes or cutters to do this 'cause it'll pinch the air line and then you'll probably get a leak. So, you know, use something like this or some of the other tools I just suggested. But from there you're just going to simply just plug that right in. You'll feel it kind of snap into place and it'll lock in there and it'll be good to go. So now that we have everything hooked up, what I like to do, start the motorhome, fill it up full of air, check for any air leaks. So by checking, you can obviously listen or a better way is to take some soapy water, spray down where we're working. If you see any bubbles forming now you know you have a leak. If you don't, you know you're in good shape. If you do have a leak, drain the air, unplug the line. With these quick connects, you can kind of just hold the end of the connect with your finger and then pop the line out. So do that, recut the line, plug it in again and check it again until you verify that you don't have any leaks. And that'll finish up our look at and our installation of the Demco Air Force One supplemental braking system for the motorhome side only on our 2019 Tiffin Allegro Red..
Customer Satisfaction Score:
96% were satisfied with this product
4% of customers were not satisfied
- Wrong item was ordered
- Arrived Damaged
- Defective
Customer Reviews
Coach Air Kit for Demco Air Force One Flat Tow Brake System - SM99627
Average Customer Rating: 4.9 out of 5 stars (60 Customer Reviews)
Add or replace the coach-side components of your Demco Air Force One supplemental braking system. Includes all the needed parts and hardware on the motorhome side with no extras.by: Anton 05/05/2024
Product delivered on time. How to videos made it an easy install for a non-technical person such as myself
by: Paul 03/27/2024
Need in a hurry so ordered at 11 one day and had by 10 next morning. As usual etrailers great customer service
by: Todd 02/12/2024
Simply to install. Great product. Thank you
by: Mark 10/18/2023
Everything I needed to get my new coach to control the brakes on my tow vehicle!
by: curt b05/30/2019
smi air brake for tow cars is the best brake system for a tow car and diesel pusher or class a motorhome with air brakes bare none ,once its installed all you do is hook up plug in and your off.I price checked multiple sources and etrailer had by far the best price.
by: David 08/08/2023
Excellent service and support
by: Larry 06/26/2023
Great response and fast delivery
by: Don 07/23/2022
Everything needed to get it installed. I installed it on an older air over hydraulic coach. Only required a longer airline as the connections we're made up front.
by: Russell02/02/2021
I haven't installed the system yet, but I have given 5 stars for the OUTSTANDING customer service I received from etrailer. Shortly after I placed the order, I found the item listed for about $75 less on [another] store, and I submitted a claim under their 110% price guarantee policy. Even though the lower priced item had a fixed price and wasn't up for auction, I still didn't really expect etrailer to honor their pledge because the item was listed [online] Much to my surprise they honored their policy without question and credited the 110% my purchase almost immediately. The item was well packged and arrived quickly. I cannot recommend this company highly enough.
by: Georger12/06/2016
Thank you for sending the Air Force One supplemental braking system quickly. Placing the order was easy. I did appreciate the free shipping. In the near future, I will make an effort to check on any RV parts that your company has to offer.
by: George J04/20/2018
Would have been 5 stars, but no instructions. We'll have to find them on the web. Etrailer price pledge saved $30.
by: Phil09/22/2022
Everything works great. Delivery up to Canada was not a problem. etrailer did themselves proud.
by: S Kevin10/26/2021
The new regulator on the tank did not come with information on which hoses to connect where, But I did find a etrailer online video that gave that information. The install went pretty fast.
by: Jason 12/20/2021
I have used this system for several years and was fortunate to get a new RV, but it wasn't set up with supplemental braking. It was as easy to install as the first time and convenient that I did not have to buy the entire kit or piece it together myself. Easy from ordering to install. Thank you,
by: Jerry02/27/2018
I received the product quickly and the product was every thing they said it was. Installation was easy and the brake system works great.
by: Dennis 05/13/2020
Bought another Allegro Bus that didn't have towing setup i had on my towable.
Was advised as to which kit to order, installer had no problems installing it. Everything went smoothly. Great service
by: Michael 01/20/2023
i havent installed the part yet but i was amazed at how fast it was delivered
by: Kerry04/07/2022
Received everything we needed to install on our coach. Instructions were very plain and easy to follow. This was my 2nd unit to install, I highly recommend these products, they are easy to install and they work very well.
by: Frederick01/22/2019
Best braking system and easy install
by: Ed D05/02/2020
Demco coach air kit was exactly as advertised and performs flawlessly
by: Kevin 10/07/2022
Just what I needed to switch my brake to my new coach.
by: Ken01/25/2018
Always good prices. excellent customer service on the phone. item delivered as promised.
by: Peter 12/12/2022
It arrived sooner than expected. Have not installed yet.
by: Cb01/14/2017
Looks like a decent product as i havent installed. Howver no instructions for install in box. But I found instructions on smi web psge.
by: Tom 11/07/2020
Fantastic service and fast shipping!
25
60
Show More Reviews
See what our Experts say about this Demco Accessories and Parts
- Installing A Second Motorhome Kit For The Demco Air Force One Supplemental Braking SystemSince you're just replacing the coach side of your Air Force One system you'll just need the Demco SBS Coach Air Kit for Air Force One Supplemental Braking System # SM99627. You'll need to mount the tank and the quick disconnect air line fitting that goes at the rear of the motorhome. You'll have to splice into the factory air lines (supply and metered) to connect to your AFO tank, which will also require you to drain the air out of the lines prior to splicing. You'll want to get a...
view full answer... - Motorhome Side Kit for Demco Air Force One Supplemental Braking SystemWe do, actually! For just the motorhome side of the Demco Air Force One Supplemental Braking System # SM99243 you need the following kit: - Demco SBS Coach Air Kit # SM99627
view full answer... - Demco Air Force One Supplemental Braking System Coach-Side Replacement Yes, you'll just need the Demco SBS Coach Air Kit for Air Force One Supplemental Braking System # SM99627 to replace the coach side of your Demco Air Force One Supplemental Braking System w/ Wireless Coachlink - Air Brakes - Proportional # DM26VR. This kit will come with everything you need to replace the coach side of your system and continue to flat tow your vehicle.
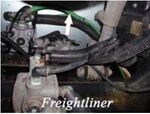
view full answer... - Location Of Air Lines For Demco Air Force One Supplemental Braking System On Freightliner ChassisYou will not have any problems fitting the Demco SBS Coach Air Kit for Air Force One Supplemental Braking System # SM99627 to your 2015 Newmar Ventana 3635 with the Freightliner chassis. I have included images from the instructions showing the air lines to connect to on your Freightliner chassis.
view full answer...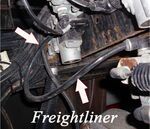
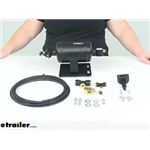
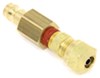
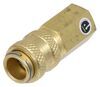
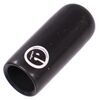
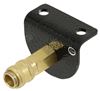
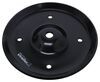
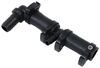
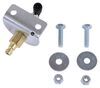
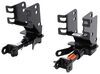
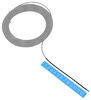
- Package Contents Of Replacement Installation Kit for SMI Air Force One Supplemental Braking SystemThe Replacement Motor Home Installation Kit for SMI Air Force One Supplemental Braking System, part # SM99627 includes everything needed on the coach side for the Air Force One. The package includes the tank valve, brass tees, 1/4 inch air line, and the L bracket needed for mounting at the rear of the coach.
view full answer... - Is SMI Air Force One Compatible with M&G Engineering Motorhome Braking SystemMy contact at SMI strongly cautioned against using the towed vehicle part of their Air Force One system SM99202 with a coach that has the M and G Engineering braking system because there is a risk of loss of air braking force on the coach itself. He recommended using a new motorhome side kit # SM99627 on the new coach.
view full answer... - Motorhome Parts Needed to Install Demco Air Force OneFor just the portion of the Demco Air Force One that would install in the motorhome what you'd need is the kit part # SM99627 which comes with only the components you are in need of.
view full answer... - Motorhome Side Components for the Demco Air Force One Braking System in a 2007 Fleetwood DiscoveryFrom what I could find on your 2007 Fleetwood Discovery, it has air brakes. That means the Demco Air Force One Supplemental Braking System will work for motorhome. The Demco SBS Coach Air Kit for Air Force One Supplemental Braking System # SM99627 is a half system that provides the components for the motorhome side. So the # SM99627 is what you would need for your motorhome if the towed vehicle already has the components and it is compatible with your Discovery.
view full answer...
- Replacement Motorhome Side Only Components For The Demco Air Force One SBS The motorhome side only kit for your Demco Air Force One Supplemental Braking System for Motor Homes with Air Brakes - Proportional # SM99243 that you're looking for is the: -Demco SBS Coach Air Kit for Air Force One Supplemental Braking System # SM99627. This kit includes the RV side only and fits all the Air Force One supplemental braking systems. Attached are a couple of videos for you to check out if you haven't already.
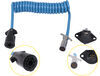
view full answer... - Correct Parts for Motorhome Side of Air Force One Supplemental Braking SystemIt sounds like you're looking for the Demco SBS Coach Air Kit for Air Force One Supplemental Braking System part # SM99627 and also possibly the Air Jumper for Demco SBS Air Force One Supplemental Braking System part # SM99666. This would be everything for the motorhome side of the Air Force One Supplemental Braking System.
view full answer... - Is The SMI Replacement Motor Home Installation Kit Manufactured by SMIThe Replacement Motor Home Installation Kit for SMI Air Force One Supplemental Braking System # SM99627 referenced in your question is a direct replacement kit from SMI. This kit includes the necessary coach installation components for the SMI Air Force One Braking System # SM99243 and SM99202. The kit is produced by the manufacturer and will work perfectly. For the vehicle-side kit, you can use part # SM99226.
view full answer... - Installing Demco Coach Air Kit SM99627 And Locating Air Hose Connections On A 2018 Newmar Dutch StarTo install the Coach Air Kit # SM99627, you will first need to locate the supply hose. The supply air hose is usually green. It will be running from the service relay valve to the braking air tank. The line will be either 1/2" or 5/8" in diameter. I believe I see the green line in your picture so if you can just verify what the line is going to and the diameter of the line you should be able to determine which one is the supply hose. Do not confuse this hose with the treadle-valve hose...
view full answer... - Availability of Replacement Parts for SMI Air Force One Supplemental Braking System SM99243We do offer replacement parts for the SMI Air Force One Supplemental Braking System # SM99243. These items include a replacement Installation Kit for the motorhome, part # SM99627, a Replacement Towed Vehicle Installation Kit # SM99226 as well as other smaller individual parts such as a replacement Air Jumper # SM99666. You can see all replacement parts by clicking on the linked page for the Air Force One and scrolling down to the heading Replacement Parts.
view full answer... - Is Demco SBS Coach Air Kit SM99627 the Same as Demco 6231 Motorhome KitYes, the Demco SBS Coach Air Kit # SM99627 is the same as the Demco 6231 that you referenced. This is just our part number for the same kit. I am attaching a sample installation video that you can check out.
view full answer... - How Long Does It Take To Install Air Force One Supplemental Braking SystemThe Coach Air Kit for Air Force One Supplemental Braking System part # SM99627 includes the motor home installation components that come with the full kit Air Force One system part # SM99243. Keep in mind the coach air kit is only half the kit of a full supplemental braking system setup. The full Air Force One Kit takes our experienced installers 8 hours to install so the coach air kit would be around 3-4 hours. It is our recommendation to take it to an experienced mechanic that has installed...
view full answer... - Second Motorhome Kit for SMI Air Force One # SM99627 We have just what you are looking with the # SM99627 as this comes with everything needed for just the motorhome portion of the SMI Air Force One # SM99243. I attached an install video for this kit for you to check out as well.
view full answer... - Just Motorhome Components of Demco Air Force One Supplemental Braking SystemFor just the portion of the Demco Air Force One that would install in the motorhome what you'd need is the kit part # SM99627 which comes with only the components you are in need of since your 2021 Jeep Cherokee has the other components.
view full answer... - How Long Does it Take to Install Demco SBS Second Vehicle Kit # SM99209 on a 2020 Jeep Gladiator? We haven't had the chance to install the Demco SBS Air Force One Supplemental Braking System # SM99243 on a 2020 Jeep Gladiator, but I checked with a couple of our in house installers, and they said it typically takes them a whole day (about 8 hours) to complete the install from start to finish. Now, some of that time they spend filming the installation, but they are also working in a professional setting with commercial lifts and all the necessary tools readily available as well, so in...
view full answer... - What are Devices on Either Side Demco SBS Coach Air Kit for Air Force OneOn either end of the tank from the kit part # SM99627 that you referenced is basically regulators. On the input side it's a valve that opens at 80 psi and above and closes at 70. The other side is a regulator that provides the system the correct amount of air pressure to apply the vehicle brakes until it runs out of air pressure.
view full answer... - Second Motorhome Kit for Demco Air Force One Supplemental Braking KitFor just the portion of the Demco Air Force One that would install in the motorhome what you'd need is the kit part # SM99627 which comes with only the components you are in need of.
view full answer... - Availability of Air Tank of Demco SBS Air Force OneSounds like you are looking for just the air tank of the # SM99243 that you referenced which we offer as the # SM99627.
view full answer... - Replacement for Motorhome Components of Air Force One Supplemental Braking SystemThe Demco SBS Coach Air Kit for Air Force One Supplemental Braking System # SM99627 is what you need. This has all of the RV-side components including the air tank, hose, fittings, and installation hardware. Once installed, you will be able to use it with the Air Force One on your vehicle.
view full answer... - Did Tee Size Change on the Demco Air Force One KitsThe tee sizes didn't change at any point with the Demco SMI Air Force One so the Coach Air Kit part # SM99627 that you referenced would work for you.
view full answer... - Replacement Motorhome Components For The Demco Air Force One Supplemental Braking SystemIf you're talking about the compressor, hose, and fittings for the coach then yes, we do offer the Demco SBS Coach Air Kit for Air Force One Supplemental Braking System # SM99627, which will have everything you need to install the motorhome components of the Demco Air Force One System # SM99243.
view full answer...
Do you have a question about this Accessories and Part?
Info for this part was:

Test Fit:
Joe V

Test Fit:
Randy B

Test Fit:
Shane H

Test Fit:
David F

Test Fit:
Ryan G

Test Fit:
Bradley B

Test Fit:
John A

Expert Research:
Jameson C

Expert Research:
Jeffrey L

Video Edited:
Joshua S

Video Edited:
Jacob T

Video Edited:
Dustin K

Video Edited:
Chris R

Video Edited:
Jonathan Y

Video Edited:
John S

Video by:
Kathleen M

Video by:
Zach D

Video by:
Michael B

Video by:
Ethan H

Video by:
Rick G

Written by:
Laura H

Updated by:
Wilson B

Updated by:
Kristina F

Updated by:
Carrie F

Updated by:
Amanda K
At etrailer.com we provide the best information available about the products we sell. We take the quality of our information seriously so that you can get the right part the first time. Let us know if anything is missing or if you have any questions.
Product Experts Available Now!
Call 1-800-940-8924
Mike L.
4/21/2018
If you click the provided link, you can see the installation instructions for the whole SMI Air Force One kit, the instructions specific for mounting the air system on the Coach begin on page # 8.
Helpful Links
instructions.aspx?pn=SM99243