

Installing Brake Controller On 1998 GMC Sierra
Question:
I have. 98 Sierra 4x4. I am trying to install my journey hd trailer brakes. I found the factory wiring that was zip tied up in the crossmember. However I cant find anything at the front.
asked by: Jake
Expert Reply:
To install a brake controller in your 1998 GMC C/K series 1500, there are a couple of items you will need in addition to the brake controller.
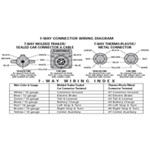
If the truck does not have a 4-Way trailer connector, you will need to add one like part # 118315. The harness plugs in so no cutting or splicing is required. After making that connection, you will just need to attach the white ground wire to a clean, bare metal surface.
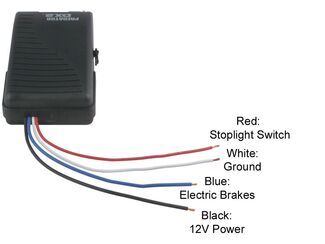
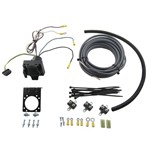
Then you will need the 7 and 4 Way Installation Kit, part # ETBC7. First, mount the 7-Way using the included bracket. Next, plug the 4-Way installed earlier into the 4-Way plug coming out of the back of the 7-Way. Now there are 4 wires remaining that need to be hardwired. First, ground the white wire to the vehicle frame. If the trailer has reverse lights or you need an auxiliary circuit, you will attach the yellow (sometimes purple) wire to the reserve light circuit. If not needed it can be taped up and stowed out of the way.
Next, take the included duplex cable and attach the black wire inside to the black wire on the # ETBC7. Attach the white wire in the cable to the blue wire on the # ETBC7. Then, route the duplex cable under the vehicle, avoiding areas that may pinch or burn the wire, up through the engine compartment near the battery.
Under the hood, separate the 2 wires. Route the white wire through the fire wall and to where you plan to mount the brake controller. Keep any excess wire because it will be needed later. Under the hood, mount the 40 amp circuit breaker in a location near the battery. Route the black wire to the AUX post. Cut off any excess wire. Connect the black wire to the AUX post using a ring terminal. With the extra black wire, attach one end to the BAT post and route the other end to the positive battery terminal and connect it.
Back in the cab, attach the white wire routed earlier to the blue wire on the brake controller.
Next, using the extra white wire, attach one end to the white wire on the brake controller. Route the other end through the fire wall and connect to the negative battery terminal. Back in the cab, take a length of excess wire and attach it to the black wire on the brake controller. Route it through the fire wall, and over near the battery. Next, mount a 20 or 30 amp circuit breaker (see brake controller instructions for which size to use). Attach the recently routed wire to the AUX post. Then, route another length of wire from the BAT post to the positive battery terminal and attach.
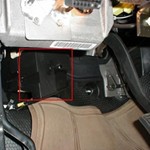
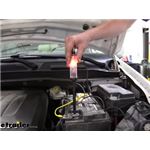
Last, you will need to use a circuit tester, like part # PTW2993, to find the correct attachment point for the brake controller red wire. On the brake switch located above the brake pedal, find the wire that carries a signal ONLY when the brake pedal is pressed. Attach this wire to the brake controller red wire. After mounting the brake controller installation will be complete. After talking with another Expert, they told me that sometimes the switch is very hard to access, so you can locate a module under the dash to the left of the brake pedal that looks like the attached photo. The photo is blurry but use a circuit tester to test one of the positions labeled with NAT that will show current only when the brake pedal is pressed.
I have attached some helpful articles that explain how to install the part # ETBC7, and a brake controller from scratch you can check out.


Products Referenced in This Question
T-One Vehicle Wiring Harness with 4-Pole Flat Trailer Connector

- Custom Fit Vehicle Wiring
- Trailer Hitch Wiring
- No Converter
- Custom Fit
- 4 Flat
- Tekonsha
more information >
Universal Installation Kit for Trailer Brake Controller - 7-Way RV and 4-Way Flat - 10 Gauge Wires

- Accessories and Parts
- Trailer Brake Controller
- Installation Kits
- etrailer
more information >

Product Page this Question was Asked From
Wiring Kit for 2, 4, 6, and 8 Brake Electric Trailer Brake Controllers

- Accessories and Parts
- Trailer Brake Controller
- Installation Kits
- etrailer
more information >
Featured Help Information
Instructions
Miscellaneous Media


Continue Researching
- Article: Breakaway Kit Installation for Single and Dual Brake Axle Trailers
- Shop: Brake Controller
- Shop: Trailer Wiring
- Article: How to Install a Brake Controller on Chevrolet / GMC 1999-2006 Pickups
- Shop: Curt Echo Wireless Brake Controller - 7-Way Plug Mount w/ Bluetooth App - 1 to 2 Axle - Proportional
- Q&A: Troubleshooting Curt Echo Trailer Brake Controller Not Pairing To Manual Button On App
- Q&A: Brake Controller Install Harness Recommendation for 2000 Chevy Silverado 2500
- Q&A: Troubleshooting Danger Notification and No LED Light on Curt Echo Brake Controller
- Shop: Universal Installation Kit for Trailer Brake Controller - 7-Way RV and 4-Way Flat - 10 Gauge Wires
- Shop: T-One Vehicle Wiring Harness with 4-Pole Flat Trailer Connector
- Shop: Demco Hydraulic Brake Actuator w/ Electric Lockout - Disc - Zinc - 2" Ball - 7,000 lbs
- Q&A: How to Properly Set Gain/Sensitivity of The Curt Echo Wireless Brake Controller # C51180
- Shop: Square Direct Weld Jack w/ Footplate - Drop Leg - Sidewind - 28-7/8" Lift - 7,000 lbs
- Shop: Stromberg Carlson Electric Trailer Jack - Drop Leg - A-Frame - 23" Lift - 4,500 lbs - Black
- Shop: Demco Hydraulic Brake Actuator w Drop and Electric Lockout - Disc - Zinc - 2-5/16" Ball - 12.5K
- Video: Review of etrailer Trailer Hubs and Drums - Hub with Integrated Drum - AKHD-545-35-EZ-K
- Q&A: What is the Capacity of a Dexter P-12 Model D100 Axle
- Video: Review of Buyers Products - Electric Winch - 3375571000
- Shop: Tailgate
- Search Results: break away cable
- Video: Review of Demco Brake Actuator - Surge Brake Actuator - DM62VR
- Video: Demco Electric Lockout Hydraulic Brake Actuator Installation
- Video: Review of Dexter Brake Actuator - Replacement Master Cylinder with Solenoid - DX44FR
- Search Results: sc63vr
- Search Results: spindle
- Search Results: tru74fr
- Q&A: Trailer Spindles to Fit Inner Bearing L68149 and Outer Bearing LM67048
- Search Results: tjd~7000
- Search Results: tjd7000s
- Search Results: grease cap

on Accessories and Parts


