
Troubleshooting Brake Controller Installations
Common Brake Control Issues
Problem
Possible Issues
Testing Procedures
Short on brake signal wire, trailer or vehicle side. Corrosion in trailer and/or vehicle plug. Short on brake magnets on trailer. Malfunctioning brake magnet(s).
Method 1 Method 2 Method 3 Method 4
Ground wire was not connected to negative battery terminal, ground area does not have solid connection to ground. Adapter wiring does not match OEM connector on vehicle. Ground connection to negative battery terminal is loose. Ground wire has been damaged and exposed wiring is touching a metal area.
Connect ground wire to negative battery terminal. Method 1 Method 3
Brake assemblies are not properly adjusted. Boost/Gain on brake controller is set too high for trailer size.
Adjust brakes properly (see video). See brake control owner's manual for proper boost/gain settings for trailer size.
Incorrect stoplight wire connection. Adapter wiring layout does not match OEM connector on vehicle.
Method 1 Method 2
Trailer has too many brakes for brake controller to handle. Corrosion in trailer and/or vehicle plug. Brake signal wire on trailer is damaged, exposed wiring is touching metal area or another circuit. Malfunctioning brake magnet(s).
Check brake control owner's manual for limit on number of trailer brakes. Method 1 Method 3 Method 4
Short to battery on 12V wire connection. Short on brake signal wire, trailer or vehicle side Corrosion in trailer and/or vehicle plug. 12V wire was not connected to vehicle battery, 12V source used is not constant.
Method 2 Method 3 Connect 12V wire to positive battery terminal.
Corrosion in trailer and/or vehicle plug. Brake signal wire on trailer or vehicle is damaged, exposed wiring is touching metal area.
Method 3
Incorrect stoplight wire connection. Corrosion in trailer and/or vehicle plug. Adapter wiring does not match OEM connector on vehicle.
Method 1 Method 3
Connection to battery is not complete. Vehicle is missing a fuse or relay required to power 12V power circuit. Adapter wiring layout does not match OEM connector on vehicle.
Method 1 Check fuse block for missing fuse/relay. See vehicle-specific FAQ if available, or check owner's manual.
Basic Testing Procedures
Method 1: Verifying Correct Wire Connections (Hard Wire Installs)
Make sure that each wire is connected in the correct location. Standard wire colors are listed, but check connections by function if colors vary. 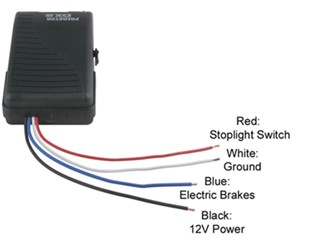
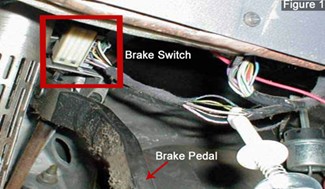
Verify that the white brake controller wire (ground function) is connected to the negative battery terminal. Verify that the black brake controller wire (12V power function) is connected to the positive battery terminal with a 20 or 30 amp circuit breaker installed in line. For trailers with 2-4 brakes, use a 20 amp breaker and for trailers with 6-8 brakes, use a 30 amp breaker. Use a 12V probe-style circuit tester to verify the stoplight wire (red) connection (Figure 1). Click here to see our circuit testers. The tester should show power when the brake pedal is pressed, and should not show power when the pedal is released. If all connections are correct, proceed to Method 2.
Method 1: Verifying Correct Wire Connections (Plug-in Installs)
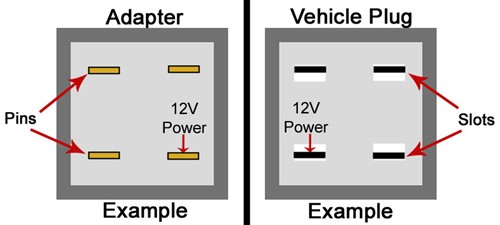
Use a 12V probe-style circuit tester to verify that power is present at OEM connector. You should be able to get a solid power reading on one pin/slot, a reading on a second pin/slot only when the brake pedal is pressed, and at least two other pins with no power present. Verify that the pin/slot layout of the wiring adapter you are using matches the layout in the OEM connector. The two plugs should be mirror images. Check the part number on the adapter and make sure it is the same as the listed fit for your vehicle. If all connections are correct, proceed to Method 2.
Method 2: Testing for the Brake Signal
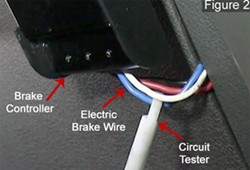
Use a 12V probe-style circuit tester to verify that power is present on the blue wire behind the brake controller when you use the manual control (Figure 2). If no power is present, the brake controller may be malfunctioning and require replacement. See video for reference. Without the trailer plugged in, use a circuit tester to verify that power is present at the vehicle 7-Way when the brake pedal is pressed or the manual control is used. The electric brake pin should be in the 5 o'clock position. If no power is present, proceed to Method 3. With the trailer connected, check for power on the electric brake wire coming out of the trailer's 7-Way plug. You can repeat the test on this wire, moving further back toward the magnets each time. If power stops, look for a short or ground issue (Method 3).
Method 3: Looking for a Short or Ground Issue
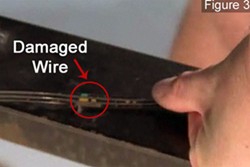
If controller was hard wired (controller wires were spliced - no plug used to connect to OEM brake controller wiring), verify that the white ground wire is attached to the negative battery terminal on the vehicle. Check along any wiring that was run from front to back on the vehicle and look for spots that have been nicked, pinched, or rubbed and have copper wire showing through the jacketing. Wrap any damaged areas with electrical tape. Inspect the trailer wiring that runs from the trailer plug, again looking for any damaged spots (Figure 3). Wrap any damaged areas with electrical tape or replace the wire section, if the damage is great enough. Look inside the front and back sides of the vehicle and trailer plugs to determine if any white or green corrosion has accumulated over time. If you see any corrosion, you will need to either thoroughly clean the plug or replace it. A wire brush works best for cleaning. Check the wires on the trailer brake magnets. Each magnet should have two wires: one for power, and one for ground. Make sure that the ground wire is attached to a clean metal area without any paint or corrosion. The power wire should be intact and have a solid connection to the electric brake signal wire. It does not matter which wire does what, just that one wire is powered and the other is grounded.
Method 4: Inspecting the Brake Assemblies
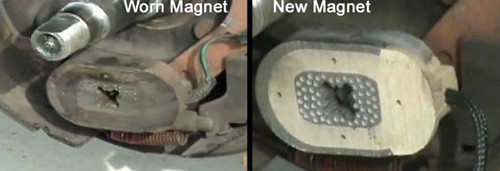
Visually inspect brake magnets for excessive wear. If the magnets have heavy grooving, are worn unevenly, or the internal windings are visible, replace the magnet. See Trailer Hub Brake Magnet Replacement Demonstration for reference. If magnets are not visibly worn, refer to Testing Trailer Brake Magnets for Proper Function. Test each magnet for general function, for a short, and for proper resistance. You will need a 12V battery and a multimeter to complete the testing. Ensure that the brake assemblies are properly adjusted. The brake shoes should be adjusted out until you cannot turn the wheel by hand. You would then back off the adjuster 8-10 clicks, or until you feel the wheel has a slight drag as you turn it by hand. Refer to This Old Trailer: Electric Trailer Brake Installation Part 1.
For more information, see:
Vehicle-specific FAQ articles, if available. Trailer Brake Controller Information Brake Controller Installation: Starting from Scratch Brake Controller 7- and 4-Way Installation Kit (ETBC7)


Mike L.
8/1/2023
Steven
6/15/2023
I just connected my Curt 51110 to my 2013 Toyota Tacoma and the display is so dim, it’s almost impossible to read. Any ideas on why this could be?
Roy
5/8/2023
My brake controller reads no camper, but if I push over the sliding switch on the controller, the brake lights on the truck and the camper light up, but the brakes do not activate.

Jason
6/7/2023


Mike L.
6/9/2023

Jason
6/9/2023

K C.
5/18/2022
My trailer break controller does not disengage when I initially stop pressing the break pedal. If I tap the pedal after initially releasing the break pedal it disengages?

David B.
5/18/2022
Helpful Links
Verlyn H.
3/23/2022
I have had a tekonsha P3 that I have used without problems for at least 4 years or more. Starting last week it no longer works. It shows the trailer connected and it show battery voltage and stop voltage when I push the brake but has zero output voltage and Amps. If I flip the switch on the controller it shows output voltage but no Amps and it does not stop the trailer. What would cause controller to not have any output?

Les D.
3/23/2022


Verlyn H.
3/23/2022

Chris
2/20/2022
Just hooked up P3 to 2007 Ram 1500. No power up. It’s wired to factory harness with quick connect. I did notice that the 3rd Brake bulb is possibly blown as I hit the brakes and no light, but the cargo light works. Would that affect it?

Les D.
2/21/2022
Helpful Links

Chris
2/21/2022

Les D.
2/22/2022

Ronny B.
1/3/2022
Installing a electric break up to a 2021 Freightliner it's getting all the signals but it won't put a signal out except my hand will not put a signal out when I press the brake

Les D.
1/3/2022

Gary S.
12/30/2021
1996 suburban 2500 with the Tekonsho voyager controller. My question is my slide bar manual braking is not working. The pedal brake works fine. I have owned this controller for about 3 yr. Any help would be greatly appreciated.

Les D.
12/30/2021

Gary S.
12/31/2021

John S.
9/7/2021
We just bought a brand new camper. Towing it with a 2013 Yukon. We were about a mile from the RV dealer when the Prodigy p2 controller started showing oL and I would lose brakes. Sometimes it would show sh when stopped. Everything works perfectly when stopped. I hear the brakes engage and see no issues. At a slow speed it sometimes works fine. But as soon as I am moving more than a couple MPH, I get oL and no brakes. Occasionally, it might get up to .8 power for just a second before it drops to oL. I want to believe the problem is with my 8 year old truck and not my right off the line trailer, but I am at a loss. I bought a new controller (also a P2) which strangely worked fine for a test drive around town with the trailer, but now does the exact same thing as the other controller. I installed a new connector on the back of the truck and re-hardwired the controller under the dash and even ran a new brake wire from the controller to the truck connector. No change. The maddening thing is I cannot replicate the problem when stopped. The plug-in tester shows things are fine. I hook up to the RV and hear all the brakes engage. I even jacked up each wheel and spun them by hand and the brakes all engaged fine. It is only when I am hooked up and moving that I have the issue. The only thing that I am not sure might be a clue is the brake light on the plug-in tester flashes every 10 seconds or so. More like a flicker. Don't know if that is normal. I've seen the stuff online about problems with the wire running through the axle (which it does) and worn magnets, but this trailer was literally built on 8/19 and has only the miles it took to drive it from IN to NC. Before I take the trailer back to the dealer, is there anything else I should/can do to rule out the truck? Thanks.

Victoria B.
9/9/2021

John S.
9/10/2021

Jacob
9/1/2021
I got a after market brake controller installed in my truck, it’s been working fine up till now but yesterday I noticed that my dexter trailer brake actuator never shut off. It’s keeps running continuously. Brakes just have a very slight drag to them. It’s an hydraulic brake system. Do you have any suggestions what it might be? Thanks

Victoria B.
9/9/2021

Richard D.
8/6/2021
Everything was working just fine until one day I noticed that the brakes were not actually activating on my trailer. The controller indicated that everything was working fine. So I tried the manual lever on the controller and it appeared to be working, but the brakes were not applied. I don’t hear the magnet click when I use the manual lever or when I use the brake pedal. However,The numbers roll pass on the brake controller so it’s acting like it’s working. I checked all the fuses and the cabling. Everything looks fine. I’m thinking it’s the controller that is the problem. Any thoughts?

Victoria B.
8/13/2021
Helpful Links

Richard D.
8/13/2021

Nige
7/22/2021
My brakes are wired to rear tail light but when I put my foot on the brake, the electric brakes work sometimes not all the time. Basically if I brake and they aren’t on, I wiggle the pedal and they turn on. How does wiggling my brake pedal side to side affect the on off status of the electric brakes? What needs replacing or fixing? Brake lights always work when I press brake. Have a holden Colorado 2013 and Hayman Reese electric brakes.


Jon G.
7/22/2021

Nige
7/23/2021


Jon G.
7/26/2021

Duncan
1/1/2022

Nige
1/3/2022

Duncan
1/4/2022

Scott D.
7/17/2021
Hi, I have a 2012 Toyota Tundra. I have the C51362 plug to the truck side. I plugged in curt venturer 51110 controller to the harness. The green light flashes and truck brake lights come on as soon as I plug the controller in. The keys where not in the ignition. The 7 pin looks great, no signs of corrosion or damage. I am puzzled. I am unable to use the controller.


Jon G.
7/19/2021

Scott D.
7/19/2021


Jon G.
7/20/2021

Korey G.
7/3/2021
The brakes on the trailer work when jumped directly with a battery but not when hooked up to my truck. The plug in at the truck shows power and the light on my brake controller comes on when trailer is hooked up. I just re wired the brakes on the trailer from the tongue all the way back to all 4 brake assembly’s and I still have no brakes. Please help.


Jon G.
7/6/2021

Paul M.
7/2/2021
When I start my truck my breaks are not working as they shouldn’t. The first time I engage the breaks with the controller or the pedal all four breaks engage fine. When I release the breaks three breaks disengage but one stays engaged. I can hear the magnet humming and the wheel will not move. Not sure where the power could be coming from?


Jon G.
7/6/2021

Joe O.
7/2/2021
So the other day i hooked up my trailer and realized that the trailer brakes (set to the same number as always) were doing almost nothing. Now when i turn the controler way up it does start to do something. Would this be a problem with the brake controler or in the wiring


Jon G.
7/6/2021

Chad K.
6/27/2021
My brake control is showing 4.6VDC directly out of the control pigtail (same at the 7 pin) with no brakes applied and 12VDC with brakes applied. I've read i should have 0 voltage with no brakes applied. Could this be a faulty controller? I can't have it hooked up because it smokes the trailers brakes


Jon G.
6/28/2021

Scott L.
6/21/2021
Hi on the brake control. With a tester on the red and white wires. When I push on the brake pedal should I be reading 12 volts?because I am not. With trailer connected e brake works but doesn’t show that trailer is connected


Jon G.
6/23/2021

Scott L.
6/23/2021

Scott L.
6/25/2021


Jon G.
6/25/2021

Neko
6/17/2021
Just installed promise iq 90160. Shows trailer connected. When I press brake pedal, does not engage or register on brake assist. No lights on trailer or truck light up. When I press the manual override calibration slide, brakes engage and lights work? Why won’t the pedal when pressed, engage trailer brakes or trigger brake lights but the slide when pressed does?


Jon G.
6/22/2021

Randy L.
6/10/2021
Just installed and Curt 51140 Triflex with pigtail and when I connected my 2019 Chevy Silverado to my 2019 travel trailer the one decimal didn't change to 2 decimal points as I read it should. I haven't towed the trailer to check to see if the brakes are working. Any ideas on the 1 decimal reading? Thanks.


Jon G.
6/10/2021

Rob S.
5/25/2021
I Just purchased a travel trailer, and the brakes seem to lock up for a second when slowing down, regardless of what the gain is set at. Only if it is at zero to i not get the jerk braking. also the display screen shows no output for braking and when i use the manual lever it says no trailer is connected.. any suggestions?


Jon G.
5/26/2021

Geoff R.
5/13/2021
2016 Ford F150 Lariat (3.5 litre Eco Boost) towing a 2015 24 foot Cougar travel trailer that I've been towing with this truck for 5 years without issue: On a recent fishing/camping trip, I had been driving for around 5 hours and as I neared my destination, I decided to stop and fill my gas tank on the way there, rather than on the return trip. After filling up, I jumped in the truck, started it up and went to pull away from the pumps, but I was unable to move. I also got a message on my dashboard display saying "Trailer Wiring Fault". Thinking that perhaps my trailer had somehow become unplugged from the truck, I got out to take a look. Everything looked okay (including the break-away switch), so I unplugged the trailer to have a closer look at the plug and receptacle and I heard the trailer brakes release and the truck (running, but in park) settled forward slightly. I plugged the cord back into the receptacle and I could hear the trailer brakes engage again. Just to be sure, I tried again to move the vehicle, but the brakes were definitely engaged. So, I cleaned up the connections, checked fuses, pulled the pin on the break-away switch and plugged it back again, but the brakes remained engaged. Exasperated, but being very close to my destination, and only having to drive on a quiet country road, I decided to just unplug the trailer and drive to my camping spot. Throughout the week (before and after fishing) I attempted to sort the problem out. I visually inspected all the wiring on the trailer for the trailer brakes and checked all the connections, but everything looked good on the trailer end of things. On the truck though, I was still getting a "Trailer Wiring Fault" alarm on my dashboard display as soon as I put the truck into drive and started moving. I finally decided to take a day off fishing and went to a nearby Ford dealership and talked with them about the problem, describing everything that I had done to troubleshoot. They said that it could be a number of different things that are causing the problem, but recommended that I start by changing the 7 pin receptacle on the truck. So I bought a new 7 pin receptacle, installed it on the truck and nothing changed. Fast forward to today: I'm back home and I've had the truck into the dealership where I bought it and they've checked it over and say they can find nothing wrong. They're now asking me to bring my trailer in with the truck, but because I couldn't safely bring the trailer home from my trip, I decided to leave it at a nearby storage facility and drove home without it. Anyone out there have any other ideas about the source of this problem. Personally, I think it's the integrated trailer brake controller that has malfunctioned. I'm told that it's a $250 part - wondering if I should just have it replaced?


Jon G.
5/13/2021

Norm
4/24/2021
we have a 2021 chevy 3500. when i hook up our 5th wheel and test the brakes before leaving the driveway. they work fine. about 1/2 mile down the road . the brake controller shows no display and the brakes don't work. display on dash says connection good no faults. any ideas.


Jon G.
4/28/2021

Dave D.
4/18/2021
I've been troubleshooting a pulsing brake problem, my dual axle trailer has a distinct pulsing when braking around 50% or more and the frequency is not the same as the wheel rotation. Wiring is factory (12-14 gauge wiring) but there are some connections I can't get to to check, I've checked and the trailer draws a little over 12 amps while stationary at max gain and the resistance of each magnet is normal around 3 ohms. I tried brake isolation and found the pulse never really goes away, but increases as I hook more wheels up. I suspect this to be an amperage issue due to a faulty connection but wanted to get opinions on the matter. My ultimate plan is to rewire them all with 12 ga wire and eliminate the thru-axles wires. Thoughts? Thanks!


Jon G.
4/21/2021

Steve M.
4/11/2021
When manually pressing the brake controller switch I get full power to trailer brakes depending on how hard I press, but when using the foot pedal my controller is only showing 0 or 5, meaning I’m using mainly the truck brakes to stop the trailer. Any suggestions?


Jon G.
4/12/2021

Ryan
4/7/2021
What if you have a functional brake controller that you’ve tested , and works, on other trailers, just installed new brake assemblies on both sides, adjust both assemblies properly, and can hear the brakes electronically activate when the brake pedal/manual override is being pressed, and yet there is still no braking happening on the trailer? Oh, and the brake controller settings have been set all the way up and down, and everything in between, still no change. Thoughts?


Jon G.
4/7/2021

Ryan W.
3/31/2021
What if you have power to the red stop wire when the brake pedal is not pressed and my Redarc Tow-pro elite is giving me an error of there being a short in the trailer brake wiring? It’s a new travel trailer and I have 13V all the way back until I get to the plug in 7 pin harness. Before the black box is 13v and after the box at the 7 pin female adapter is reading 6v. All camper lights work, but the error for a short in the blue wire.


Kef G.
4/1/2021

Ryan W.
4/1/2021


Jon G.
4/2/2021

Ryan W.
4/3/2021

Show All (29) Replies
Hide Replies

on Trailer Brake Controller
Videos
for Trailer Brake Controller
Help Articles
for Trailer Brake Controller
Expert Answers
for Trailer Brake Controller
You are correct, you should only be getting output when the brake is applied, or the override switch is activated. It sounds like the controller might be bad, but to make sure, you should probably bench test it before tossing it. Use a circuit…
view full answer...Sounds like your brake controller will apply your trailer brakes if you apply the manual override lever but not when you press the brake pedal. This is a fairly common problem and the solution is the red wire of the brake controller. Make sure it…
view full answer...This sounds like the trailer brakes are not receiving the signal from the brake controller when you apply the brakes. I believe what is happening is that you may have a loose, broken, or inaccurate connection on the red wire from the brake…
view full answer...To determine why you do not have any power on the blue brake output wire, I recommend starting at your brake controller. First, make sure the brake controller is on and receiving power. Most brake controllers have 4 wires, blue (brake output to…
view full answer...There are a number of reasons why the brakes on your trailer may not be working. Lets start with the easiest things to check. First, check the vehicle and trailer connectors for corrosion. This can cause a short inside the connector and the brake…
view full answer...I would check the magnets for wear before going on to test them with a meter. If the magnets show abnormal wear or if you can see the windings beginning to show through the friction surface of the magnet then they will need to be replaced. To further…
view full answer...Since the trailer was off of the ground it would not take much voltage to stop the wheels from spinning so they may be getting power but they may not be getting enough power due to a short or wiring issue. But 9 times out of 10 weak trailer brakes…
view full answer...Generally when the Curt Echo Under-Dash #C27JR says the 7-way is disconnected but it isn't, the issue is actually the 7-way is problematic, either on your vehicle or trailer. I'd check to make sure the 7-way on both does not have bent pins,…
view full answer...I do have an option for you but we don't offer replacement circuit boards for any of our electric over hydraulic brake actuators and if I'm being honest here, that is no something you can purchase and replace yourself. If you wish to have…
view full answer...Hi Michael; thanks for the question and for your 2024 Kia Telluride, if you like you can hardwire in the Curt Echo Under-Dash Bluetooth Brake Controller #C27JR. The connector isn't fused so nothing would be eliminated.
view full answer...The controller shouldn't have been showing voltage without a trailer connected. Typically this is caused by corrosion on the 7-way which is putting a slight draw on the circuit and causing the controller to think a trailer is connected. If the…
view full answer...I am not entirely sure what process you took so I'll give you some other things to try, or maybe a different way to test the Prodigy P3 #90195. First, sever the blue wire a couple inches from the back of your controller. Then use a circuit tester…
view full answer...Departments
Towing
- Trailer Hitch
- Fifth Wheel
- Gooseneck
- Towing a Vehicle
- Front Hitch
- RV Hitch
- ATV Hitch
- HD Truck Hitch
- Vehicle Wiring
- Brake Controller
- Ball Mounts
- Weight Distribution
Sports and Recreation
Trailer Parts
- Utility Trailer
- Boat Trailer
- Landscape Trailer
- Enclosed Trailer
- 5th/Camper Trailer
- Car Hauler
- Horse Trailer
Vehicle
Contact & Help

What our customers are saying:
"In these days of customer "no service" I am usually disapointed when doing business with people I don't know. It was refreshing doing business with you. I'm impressed!"
Popular Vehicles
- Subaru Forester
- Ford F-350 Super Duty
- Ford F-250 Super Duty
- Chevrolet Silverado 1500
- Jeep Wrangler Unlimited
- Jeep Wrangler
- Ram 3500
- Toyota Highlander
- Ram 2500
- Chevrolet Silverado 2500
- Subaru Outback Wagon
- Chevrolet Silverado
- Dodge Ram Pickup
- GMC Sierra 2500
- Ram 1500
- Ford F-250 and F-350 Super Duty
- Jeep Grand Cherokee
- Toyota Tacoma
- GMC Sierra 3500
- Toyota Tundra
- Ford Escape
- More >>
- Jeep Cherokee
- GMC Sierra
- Toyota RAV4
- Nissan Rogue
- Dodge Grand Caravan
- Toyota Sienna
- GMC Sierra 1500
- Honda Odyssey
- Chevrolet Equinox
- Chevrolet Silverado 3500
- Ford Explorer
- Chrysler Town and Country
- Ford F-150
- Jeep Liberty
- Nissan Murano
- Ford Edge
- Subaru XV Crosstrek
- Hyundai Santa Fe
- Chevrolet Silverado New Body
- Ford F-250 and F-350 Heavy Duty
- Kia Sorento
- Chevrolet Traverse
- Dodge Journey
- Acura MDX
- Honda CR-V
- Chevrolet Silverado Classic
- Jeep Patriot
- Ford Focus
- Acura RDX
- Honda Fit
- Ford Fusion
- Ford Flex
- Honda Pilot
- GMC Acadia
- Toyota Prius
- Dodge Durango
- Nissan Frontier
- Nissan Pathfinder
- GMC Terrain
- Honda Accord
- Volkswagen Jetta
- Kia Soul
- Dodge Dakota
- Chevrolet Cruze
- Chevrolet Sonic
- Mazda 3
- Toyota FJ Cruiser
- << Less


Dennis E.
10/1/2023
MY prodigy works great andei am able to adjust it for fine tune regarding weight HOWEVER OCCASIONALLY the brakes grab to sometimes skid on the first application of the pickup brake pedal. If I tap pedal lightly when I know I need brakes it doesn't grab on second depression of pedal. It's maddening and dangerous