

How to Add Tension to Solera Slide-Topper
Question:
How do you put more tension on topper? When it rains the water stays on top of the topper and makes it sag. Thanks for your help
asked by: Ralph
Expert Reply:
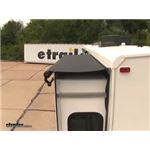
When installing/adjusting the Solera RV Slide-Out Awning # LCV000163285 tension is applied by rotating the awning roller 14 times. This should apply the needed spring tension so that the fabric doesn't billow in the wind or leave enough slack that it sags when collecting some rain water.
Also make sure that you have at least a slight decline from the awning rail to the end of the fabric so that water can flow off the awning.


Cindy
4/16/2020
My slide topper has lost all tension. How do I correct/get tension back?? 2019 install.


Product Page this Question was Asked From
Solera RV Slide-Out Awning - 79" Wide - White

- RV Awnings
- Slide-Out Awnings
- Extends 48 Inches
- 74 Inch Wide
- 75 Inch Wide
- 76 Inch Wide
- 77 Inch Wide
- 78 Inch Wide
- 79 Inch Wide
- White
- Lippert
more information >
Featured Help Information
Instructions
Miscellaneous Media

Continue Researching
- Q&A: Proper Solera Slide Topper Tension Adjustment
- Shop: RV Camera
- Shop: Voyager WiSight 2.0 Wireless Backup Camera System w/ Night Vision for Prewired RVs - 7" Screen
- Shop: Replacement Left-Side Head and Roll Bar for Solera RV Slide-Out Awnings - Black
- Shop: Replacement Right-Side Head and Roll Bar for Solera RV Slide-Out Awnings - Black
- Shop: Voyager WiSight 2.0 Wireless Backup Camera System w Night Vision for Prewired RVs - 4.3" Screen
- Shop: Voyager WiSight 2.0 Wireless RV Backup Camera System w/ Night Vision - Rear Mount - 7" Screen
- Shop: Solera RV Slide-Out Awning - 79" Wide - White
- Video: Review of Lippert Components RV Awnings - LC87FR
- Shop: Fifth Wheel Hitch
- Shop: Suspension Enhancement
- Video: Review of Lippert Replacement Drive Head And Roll Bar For Solera RV Slide Out Awning - LC34FR
- Shop: Furrion Vision S Wireless RV Backup Camera System w/ Night Vision - Rear Mount - 4.3" Screen
- Video: Solera Slide-Topper Slider Installation - 2009 Forest River Sunseeker Motorhome
- Q&A: Setting Tension On A Solera Slide Topper Awning
- Q&A: Adding Tension To The Tension Springs On A Solera Slide Topper Awning
- Shop: RV Jack Pads
- Video: Review of ASA Electronics RV Camera System - Backup Camera - ASA57YR
- Shop: RV Mattress
- Video: Voyager WiSight Wireless Backup Camera System Installation - 2018 Coachmen Apex Travel Trailer
- Video: Voyager WiSight Wireless Backup Camera System Review
- Video: Review of Furrion RV Camera System - Backup Camera with Monitor Screen - FOS43TASF
- Search Results: solera slide topper
- Search Results: lc87fr
- Q&A: Compatibility of SumoSprings Trailer Helper Springs With 4" Between Trailer Frame and U-Bolts
- Q&A: How Many Times to Wind Solera Slide Topper for Proper Tension
- Q&A: Resetting The Tension Springs On A Solera Slide-Out Awning
- Q&A: Tension Setting Solera RV Slide-Out Awning
- Shop: RV Bike Racks
- Search Results: 235/75 r15 trailer tires

on RV Awnings


Brent
5/23/2020
Looking at the slide out, the right side has lost all tension. Left side is still under tension. How do I reset tension on one side?