

Diagnosing Overload Warning, No Brakes, On a Tekonsha Prodigy P3 Brake Controller
Question:
i have tekonsha P3 brake controller conected to my 3 axle car hauler giving me error msg over load warrning no brake please help me
asked by: Malik
Expert Reply:
The overload warning you are seeing indicates that the P3, # 90195, detects an excessive current overload condition during operation. This means that there is most likely a short in the brake output wire.
The P3 has diagnostic troubleshooting settings, see instructions link. Press the lower button on the right side of the controller, this is the Menu/Options button. Select the Help setting and press the menu button again. Now, select troubleshoot and press the menu button. Now, using the buttons on the left side of the P3 you can toggle through the battery voltage display, stop lamp display, output voltage display and output current (amps) display.
Using these menus you can determine if your problem is on the power wire to the P3, stop light switch wire or output wire.
Since you have an overload warning you will most likely find that there is a short on the output wire. Once this is determined, the first step would be to make sure the brake controller itself is functioning properly. Sever the blue wire about 6 inches from the back of the controller and apply the manual brake lever and vehicle brakes. If the overload condition goes away, then the brake controller is good, reattach the blue wire. If the condition persists, then there is an internal problem in the brake controller and you will need to replace it. Brake controllers have no user serviceable internal parts.
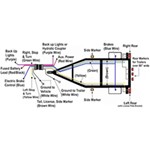
If the brake controller is good, most likely it is, then turn your attention to the trailer connectors on the truck and vehicle. Check them inside and out for proper wiring, see wiring link, and make sure there are no wires shorting to the brake output wires or connections. Also clean out any corrosion you may find in the trailer connectors.
If you do not find any corrosion in the trailer connectors, it is time to check out the trailer. Make sure the ground wire at the trailer tongue is grounded properly to a clean rust, paint and primer free portion of the trailer frame. Also, make sure one wire from each brake magnet is grounded properly either to the ground wire from the trailer connector or to the trailer frame.
Next, check the brake feed power wire all the way back to the brake magnet connections. If the wire is pinched frayed or broken and contacting the trailer frame or another wire, correct any of these issues.
If the solution to the problem is still not found, check the brake magnets themselves for wear. This will require removing the trailer hub and drum, and visually inspecting the trailer brake magnets. If you see the magnet windings coming through the face of the magnet or abnormal wear, the magnet is shorted and will need to be replaced.
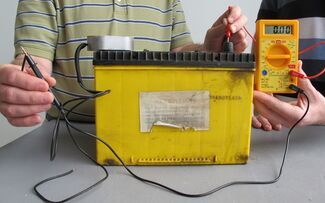
If there is no apparent damage, the magnet can be tested, see brake magnet testing link, by connecting the base of the brake magnet to the negative post of a 12 volt battery and connecting one of the brake magnet wires to the negative lead of a multimeter, # PT89ZR. Connect the positive lead of the multimeter to the positive battery terminal. If there is any amperage the magnet is shorted and will need to be replaced.
While you have the trailer hubs off of the axle, now would be an excellent opportunity for inspection and greasing of the bearings and checking out the brakes on the trailer.


Products Referenced in This Question
Digital Multimeter with 42" Long Test Leads - LED Display

- Electrical Tools
- Testers
- Multimeter
- Yellow
- Performance Tool
more information >
Product Page this Question was Asked From
Tekonsha Prodigy P3 Trailer Brake Controller - 1 to 4 Axles - Proportional

- Trailer Brake Controller
- Proportional Controller
- Electric
- Electric over Hydraulic
- Automatic Leveling
- Under-Dash Box
- Dash Mount
- Up to 4 Axles
- LCD Display
- Up to 360 Degrees
- Tekonsha
more information >
Featured Help Information
Instructions
Miscellaneous Media

Continue Researching
- Video: etrailer Electric Trailer Brakes Installation - 2019 Grand Design Reflection 150 Fifth Wheel
- Shop: Brake Controller
- Shop: Square Direct Weld Jack w/ Footplate - Drop Leg - Sidewind - 28-7/8" Lift - 7,000 lbs
- Search Results: drop leg trailer jack
- Search Results: weld on safety chain loop
- Shop: Buyers Products Weld-On Safety Chain Retainer For 3/8" Chain
- Shop: Demco Hydraulic Brake Actuator w Drop and Electric Lockout - Disc - Zinc - 2-5/16" Ball - 12.5K
- Shop: etrailer Electric Trailer Brakes - Self-Adjusting - 12" - Left/Right Hand - 5.2K to 7K
- Shop: Tekonsha Prodigy P3 Trailer Brake Controller - 1 to 4 Axles - Proportional
- Shop: Trailer Wiring
- Shop: Redarc Tow-Pro Elite Brake Controller - Dash Knob - 2 Braking Modes - 1 to 3 Axles - Proportional
- Video: etrailer Electric Trailer Brakes Installation on a 2017 Grand Design Reflection Fifth Wheel
- Shop: Dexter Electric Trailer Brakes - 12" - Left/Right Hand Assemblies - 7,000 lbs
- Search Results: safety chain loops
- Search Results: axletek~12~gg
- Q&A: Axletek-12-GG Replacement Brake Assembly and Hub Recommendation
- Q&A: Correct Replacement for AXLETEK-12-GG Trailer Brakes
- Search Results: curt bluetooth
- Search Results: kdbc225dac
- Search Results: lug nuts 1 2 20
- Article: Testing Trailer Brake Magnets for Proper Function
- Shop: Trailer Hitch
- Video: Trailer Hitch Installation - 2014 Ford Edge - Draw-Tite
- Article: Replacing the Bearing, Races and Seals on a Trailer Hub
- Q&A: Tekonsha P3 Brake Controller 90195 Displays Message Output Shorted No Brakes
- Q&A: Do Trailer Axle Spring Seats Weld to Axles
- Q&A: Can the Spring Seats Be Moved on the Dexter 3,500 LB Drop Axle
- Article: Trailer Wiring Diagrams
- Video: Camco RV Sewer - Hose Adapters and Fittings - CAM39072 Review
- Q&A: Troubleshooting Warning Power Overload On Tekonsha Prodigy P3 Brake Controller

on Trailer Brake Controller


