
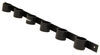
Corner Bracket Kit for Yakima LockNLoad Platform Rack - 110 lbs
(4 reviews)
Price: $71.00
In Stock

Corner Bracket Kit for Yakima LockNLoad Platform Rack - 110 lbs
Item # Y05036
Retail:$89.00
Our Price: $71.00
You Save: 20%
In Stock


Need help with installation?
Locate installers near me- All Info
- Reviews (4)
- Q & A (0)
- Videos (1)
- Photos
Yakima Accessories and Parts - Y05036
- Roof Rack
- Brackets
- Yakima
- LockNLoad
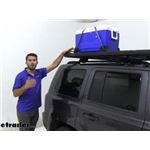
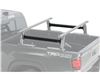
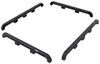
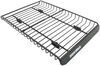
Secure a cooler, toolbox, or other hard-shell container up to 3' tall on your LockNLoad platform with these heavy-duty corner brackets. Brackets easily adjust to fit the size of your cargo. Simple bolt-on installation.
Features:
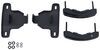
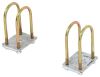
- Corner brackets secure hard-shell containers on your Yakima LockNLoad platform
- Perfect for coolers, toolboxes, and other containers up to 3' tall
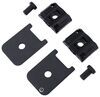
- Adjustable brackets can be positioned to fit your cargo's shape
- Just loosen eye bolts, reposition brackets, and re-tighten
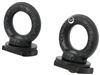
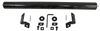
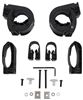
- Included eye bolts provide tie-down points to secure your gear
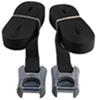
- Tie-down straps (sold separately) are required to secure gear
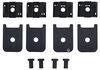
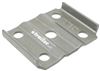
- Simple bolt-on installation in platform's top channels
- Eyebolts drop through brackets and secure them around cargo
- Rugged construction designed for off-road use and tested in the Australian Outback
- Heavy-duty stamped-steel with black-zinc coating is durable and resists corrosion
Specs:
- Quantity: 4 brackets to carry (1) 3' tall hard-shell container
- Weight capacity: 110 lbs
- Application: Yakima LockNLoad platform racks
- Dimensions: 4-1/2" long x 4" wide x 3-3/4" tall
- Lifetime limited warranty
Yakima Off-Road Rating
This accessory was tested to ensure that it is able to handle regular adventuring over rough terrain. Yakima extensively tested it with worst-case-scenario lab simulations and real world driving to make sure it exceeded ISO requirements. This accessory is built to handle evasive maneuvers, swerving, speed bumps, emergency stops, and whatever else you encounter while off the beaten path.
8005036 Corner Bracket Kit for Yakima LockNLoad Platform Rack - Qty 4 Brackets
Installation Details


Video of Corner Bracket Kit for Yakima LockNLoad Platform Rack - 110 lbs


Videos are provided as a guide only. Refer to manufacturer installation instructions and specs for complete information.

Video Transcript for Yakima LockNLoad Platform Rack Corner Bracket Kit Review and Installation
Hey guys, it's Colin here at etrailer and today we're going to take a look at and accessory for the Yakima LockNLoad platform rack. This is the corner bracket kit, now this kit is going to get four of these brackets that have a 90 degree angle so that you can better secure any rectangular designed objects like our cooler up here, which has four corners. We can get these brackets on each corner to make sure it doesn't shift side to side at all and then together with the eyebolts that come with it, we can use a strap to secure it down onto our platform rack, it's just going to make for a better ride for our cooler.Now this cooler is very sturdy up there, the brackets are going to be taken away that side to side or front to back movement, but you still want the strap to take away any of the up and down movement you might get maybe going over a speed bump. And what's nice is that while the eyebolts are great tie-down points, they're also what you use to secure each bracket into the T-slot of your LockNLoad rack, you just tighten them down and then it's going to keep those brackets secure and then they double as tie-down points.Keep in mind though that the strap does not come with the corner bracket kit, but we've got plenty of straps available on our website if you are in need of some. Now, as far as how big of a container you can get up here using the corner bracket, there's really no limit to the length or width, you probably just going to be limited by the size of your LockNLoad rack, or maybe even just a space you have available on your rack. But as far as the height goes, you do want to make sure that you don't really put anything up here and use the corner brackets for anything over three feet tall, just because it's not rated to carry anything over that height.And if you're going to carry a bigger container, that is still going to be under that three foot mark, make sure you abide by the weight capacity, which is going to be 110 pounds.
Now, a lot of times with these platform racks, like our LockNLoad, that don't have any raised side rails, you can still get these bulkier items like coolers or other containers loaded without the corner bracket kit, and still use some straps to get them secure.But we've all been there where we do use a lot of straps, we get it really secure, but there still is a little bit of shifting which personally that makes me a little bit uncomfortable, so that's why the corner bracket kit comes into play, it's just going to take out all of that shifting so that the straps can focus on keeping the cooler from going up or down.The brackets have a very durable, stamped steel construction to them, it's going to be very high quality and really hold up well to a lot of rugged use, it's also going to have a black zinc coating, so that's going to help resist rust and corrosion. What I really like about these brackets is that they got a lot of adjustability, you can really put them anywhere on the platform rack that's going to best suit your needs and what's nice is that if you've got an odd shaped item, let's go ahead and take two of these brackets and scoot them back this way.If you've got an odd shaped item and maybe it's pretty bulky and you just need a couple more inches of space, we can just take these two right here, go ahead and slide them out and to get a couple extra inches, we can put them on the outside. It gives us more space to get other cargo up here and sometimes that extra two to three inches could make all the difference.And the brackets themselves also have nice adjustability with the slot right here, we can slide it back and forth because there's going to be a lot of things out there that are different sizes for securing and you want to make sure you get it as tight as possible, so with this two to three inches of adjustability, you can be able to slide it back and forth and you'll see when we install it, we'll be able to use it. And combined with the other one, you're going to get about five to six inches of adjustability to make sure you get a snug fit on your items. When installing your brackets, you first want to pick the placement on your roof, we know that we want it at the back right of our LockNLoad rack so we'll just drop the eyebolt through with a washer and then thread on our little silver piece just a little bit.You don't have to measure out exactly the dimensions between your brackets, just kind of get them all four installed and make sure they're very spread out, so we're going to get this one way up here.
Again, we're not going to tighten anything down yet, but we'll do the same for the other pieces as well and you also want to make sure that the longer sides of your brackets are going to be touching the longer sides of your cooler, so we're going to have it facing the long way, so we're just going to have it sit like this so that the width of our cooler is right here with the shorter side of our bracket, so just make sure you get the appropriate ones installed.And then with these back here, we're going to slide it into the track and pull all the way to the outside. Again, you just want to make sure there's a wide open space in the middle to have plenty of space to get your cooler or other cargo up here. Now we'll just raise our cooler up and in there, climb up and get it situated. Now from here, this is where you just going to pull your brackets towards the cooler on all four sides before you tighten anything down, make sure that you get it snug against your cooler.We're just going to pull it all the way to the corner right here of our platform to make sure we maximize the storage space on our platform rack. Pull these over, once you have it snugs, go ahead and tighten down all of your eyebolts.
Now we can strap down our cooler, we're just going to use some cam buckle straps from etrailer, now if you don't have any, there's plenty of options available on our website, just check it out. And it's pretty important to make sure you get this secure to make sure it cannot go up or down and so the pattern I'm going to do is going to be probably the most efficient pattern, we're just going to put it through here, come through the backside, put it through this eyebolt.Now from here, we're going to go over top of our cooler and cross it over to this outside bracket and then we'll come over to our final bracket to our eyebolt and feed it through there and then we'll bring it up top and cross to where it meets our cam buckle up here. So you can see we've got that nice crisp cross pattern going, we got two straps coming across in different directions to make sure that secure and then we'll just cinch it down.What's nice about these etrailer straps is that they got that nice, soft padding that we can protect the cam buckle with, we'll take our excess strap, fold it up and then put it in our little storage band, here's a little bit loose, so what I'm just going to pull it up, twist it just like you would with a rubber band if you're trying to secure a deck of cards or something like that. Now, once your cooler is secured, you ready to load up the rest of your LockNLoad rack and then hit the road.Well, thank you all for watching, but that's going to do it for our look at the corner bracket kit for the LockNLoad rack from Yakima..
Customer Satisfaction Score:
99% were satisfied with this product
1% of customers were not satisfied
- Wrong item was ordered
Customer Reviews
Corner Bracket Kit for Yakima LockNLoad Platform Rack - 110 lbs - Y05036
Average Customer Rating: 4.8 out of 5 stars (4 Customer Reviews)
Secure a cooler, toolbox, or other hard-shell container up to 3' tall on your LockNLoad platform with these heavy-duty corner brackets. Brackets easily adjust to fit the size of your cargo. Simple bolt-on installation.by: Chris 12/02/2020
I like the way the corners cradle square packages . I do wish they would put a little padding on touch surfaces .
by: Joshua07/10/2021
by: Edward 03/02/2023
by: Nicholas 09/19/2021
4
4
See what our Experts say about this Yakima Accessories and Parts
- Is Yakima Eyebolt Same as Inno Eyebolt IN37FRThe Inno eye bolts part # IN37FR are different slightly than the eyebolts that come with the Yakima part # Y05036. In general these both perform similar functions but they wouldn't be considered to be interchangeable.
view full answer... - Will the Rhino-Rack Cam Buckle Strap Kit for Pioneer Platform Fit the Yakima LockNLoad Roof PlatformI can't confirm fit of the Rhino-Rack Cam Buckle Strap Kit for Pioneer Platform part # RTDH3-RR43178 on the Yakima LockNLoad Roof Platform Rack but I can confirm fit of the Corner Bracket Kit part # Y05036 which is similar and designed specifically for the Yakima LockNLoad Roof Platform Rack.
view full answer... - Will Yakima LockNLoad Fit Lower Crossbars of EasyRider Double Decker TrailerYes, there are a few Yakima LockNLoad trays that will fit on the lower portion of the Yakima EasyRider Double Decker Trailer # Y08129. According to Yakima their largest tray is the "E" which measures 84"x49" which can be found here: - Yakima LockNLoad Platform Rack for Crossbars # Y05047-39 Since the MegaWarrior comes with the raised sides I don't recommend going that route because it will make loading and unloading gear a little more of a hassle (like what you mentioned). If you want...
view full answer...
Do you have a question about this Accessories and Part?
Info for this part was:

Video by:
Andrew K

Video Edited:
Jacob T

Installed by:
Colin H

Edited by:
Daron K

Written by:
Brian T

Updated by:
Michael B
At etrailer.com we provide the best information available about the products we sell. We take the quality of our information seriously so that you can get the right part the first time. Let us know if anything is missing or if you have any questions.
Thank you! Your comment has been submitted successfully. You should be able to view your question/comment here within a few days.
Error submitting comment. Please try again momentarily.