
Summer Starts Here - Save up to 70%
To see if this custom-fit item will work for you please tell us what vehicle you'll use it with.
Thank you! Your comment has been submitted successfully. You should be able to view your question/comment here within a few days.
Error submitting comment. Please try again momentarily.
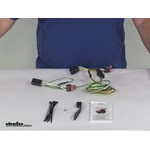
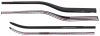
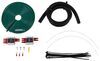
Quickly and easily install a 4-way trailer connector on your vehicle with this custom harness. T-connector plugs directly into existing wiring - no cutting, splicing or tapping required.
Features:
Installation
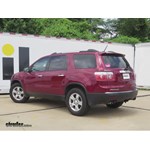
This custom-fit T-connector plugs into your vehicle's wiring harness, which is located behind the driver's-side and passenger's-side tail lights. You will have to remove the tail light assemblies to access this harness.
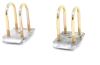
Once installation is complete, the 4-way connector will be stowed beneath your vehicle, near the trailer hitch. A mounting bracket (sold separately) is recommended to keep the connector secure.
It is recommended that you use a small amount of grease on all electrical connections - the plugs on your automobile and the 4-pole connector itself - to help prevent corrosion.

California residents: click here
Videos are provided as a guide only. Refer to manufacturer installation instructions and specs for complete information.
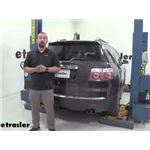
Hello neighbors. It's Brad here at etrailer and today we're installing a Curt trailer wiring harness on a 2009 GMC Acadia. So here you can see our trailer wiring installed and hanging on our hitch here, has this nice little cap. So let's take a look. As you can see, this is what's going to plug into our trailer wiring, and that's going to allow you to send the signals from your turn signals, and your brake lights and running lights to your trailer. And that's going to allow the people behind you while towing to see what you're doing and it's going to keep you safe and legal.
Now installation is very straightforward, you'll simply remove your tail lights, plug it into the factory plugs, and then they jumper onto your tail lights. It's all very easy. Everything's included in the kit that you need to do it. And really you could probably do this in your driveway and with minimal amounts of tools. I'm going to walk you through it so you can get your trailer wiring installed.
To begin our install. We're going to open up the rear hatch and that's going to gain us access to these plastic little plugs here, 'cause we're going to need to go behind the tail light to access those plugs. So I recommend using a small flathead and just kind of getting the crack there and give it a quick twist and it should pop open. Do that to the top and bottom. And then back here, you're going to see two seven millimeter bolts.
So we'll go ahead and loosen those up. Now, once you have those loose, you can already start to see the tail light kind of moving a little bit. And so we're going to need to pop this out. The plastic here does sit kind of behind this rubber trim. So pretty easily just kind of wiggle it back and forth.
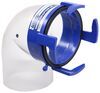
And there is going to be a tab kind cut on this back side. So a little bit of force and wobbling back and forth should allow that to come loose. Be patient with this step. I want to make sure you don't break any of the clips. And also if any hardware drops like I just did, make sure you pick that up, 'cause you're going to need it for install. Now with the tail light out, you're going to see this plug here that goes to our tail lights. This is where we're going to be connecting. So go ahead and repeat the same process on the passenger side. Once getting into the clip, you're gonna see this red tab here, simply going to pry this up. That's going to help pull this up and it should pop out like that. And go ahead and set your tail light, maybe inside your hatch or somewhere safe to where it won't fall. So now I take the harness and kind of lay it out so we can get an idea of where it's all going to run. So obviously you have your four-pole here and that's going to be close to the hitch so you can attach to your trailer. Now, your yellow and brown wire, these are going to go to your driver's side. And they're simply going to plug into this factory plug with this and jumper on to that same plug on the rear of the tail light. In order to get this ran, we're going to need to go underneath and feed this up. Now that seems like it could be a daunting task, but there is a good method for it. And here I have a just spare airline that we have around the shop and you don't necessarily need one of these, any string or maybe a wire, whatever works to fish this down. And what we're going to do is take this up and pull it through. And once you kind of just wiggle this through it may get caught up on a few things but once you have the airline or your fish wire pulled through, you'll be able to connect the connector to it with some tape. So we have our wire pulled through. Now, I'm going to tape this up onto the actual cable. And what I'm going to do is I'm going to stagger it out. And that way it keeps it a little bit more narrow when pulling it through. Sometimes it can get a little bit tight so spacing that out to where it's not a big bundle is going to make it a lot easier. We just wrap it around enough to where it shouldn't come off easily. Now we'll simply pull this up. Now, be careful on this step and you may want to kind of feed underneath as well in that way you know it's not getting caught on anything and it can get a little bit tight up here at times, so don't put too much force on this. Just kind of simply move it back and forth and find that groove. And if you do need a little bit of extra space, you can actually remove these little clips here and there's going to be screws and pull the fascial out. But I think we should be able to slip this through pretty easily. There's one. And then the next. Now we can take our fish wire off, and as you can see, pretty simple. It's the identical plug to the OEM one. And really all this is doing is making a jumper here. So you're going to connect this female end to the male end of your factory plug. Make sure it's nice and snapped in place. And then this part of the plug is simply going to attach where your factory one went to on your tail light. Nice little audible click there. And now you may need to tuck this a little bit, just so that tail light can go back in place, but it does look like it has plenty of space. So very carefully just set these cabs. You can see these little pokeys here. Those are going to simply slide in there and then it should line up where your screws will go into place. Now we're going to be using the same fish wire technique to feed our plug, our green and white wire, I should say with our ground up to our passenger side. But before doing that, we want to route our wire in a way that it's not going to cause any issues, hang down, make contact with the exhaust or become damaged long-term. So I'm simply using the inside of this bumper and the impact bar as well as the hitch and just rounding it over to where it's going put our four-pole right where it needs to be, and also get our other plug to the other side. Now, once I have it routed properly, and I know it's not going to make contact with any exhaust, I can go ahead and zip tie this into place. So on the passenger side, it's going to be the same as we did on our driver. So we'll simply plug this in. And then plug in our tail light. Now, before doing that, while I have a little bit of clearance here, you're also going to notice this white wire has a ring terminal on it. Now this is going to be our ground. So we're going to need to take the self-tapping screw that's included in the kit and mount this to raw metal here. So we'll find a good spot for it to make sure that there's not any clearance issues putting the taillight back on and we'll get this drilled into place. So on your ring terminal, you're going to see that one side is flat and the other side has the wire on it. You're going to want that flat side facing against the metal. So I kind of mocked up my tail light just to see clearance wise, where the best spot is going to be and I think I'm gonna do it right about here. Now, sometimes it makes it a little bit easier by drilling a small hole there, and that way you have a pilot to run the self-tapper through. But if you don't have drill bits around you can also just zip this into place, just be patient with it. Now with your self-tappers and you want it tight, but this is a good chance while it's in place to move this back and tighten it down. But you don't need to crank it too hard because it can break the screw or strip out that metal. So as long as it's stuck, you should be good. Now we'll just simply take our plug, put it into our tail light And then put this back in place. So I have all my wiring ran and zip tied up. And with this hitch, it's kind of nice so there's these dropdown for these two holes. So I actually ran my four-pole through there and that's going to keep it in place. I also put a little bit of wire loom on there just to kind of keep it looking good. Now you're going to see included in the kit is this dust cover, and this simply slides over the four-pole and allows you to cap this up when not in use, keeping your connection nice and clean. Now, another twofold thing with this that a lot of times customers will do is when not in use, they use it to hold this in place through their safety chain loop. And that works perfectly fine. We also sell brackets here that require no drilling, and they're going to zip up to your hitch and allow that pole to stay on there and it looks really, really nice. But that's up to you depending on the look you want and how you want to mount your plug. So really the only final step is to test to make sure that the wiring is working properly. Now there's two ways to do this and you can buy a four-pole tester here at each trailer. And these are really nice because it's going to isolate this plug. So that way, if you plug it up to your trailer and something's not working, it's possible your trailer could be the problem, not the wiring. And this here will tell us for sure if our wiring is working well. So simply plug this in and I'm going to run it through the sequence of brake light turn signals and our running lights and we're going to see these lights light up and know that it's working. So now I'm simply going to run through the lights. I'm going to check my running lights first, my left turn signal, my right turn signal, and finally my brakes. And that was the look and the installation of the CURT trailer wiring harness on a 2009 GMC Acadia..
Average Customer Rating: 4.9 out of 5 stars (70 Customer Reviews)
Quickly and easily install a 4-way trailer connector on your vehicle with this custom harness. T-connector plugs directly into existing wiring - no cutting, splicing or tapping required.I saw etrailer's video on Youtube on how to install this wiring harness on my specific model of vehicle, and the video was extremely easy to follow so I went ahead and placed an order immediately. I was on the fence of trying to do it myself or just taking it in and letting someone else handle it, but after watching the video I had the confidence to tackle it! Just finished the installation a few hours ago and everything was a perfect fit!
Very easy to install. No less than 30 minutes. This meant that my entire installation, bolting the hitch to the car and installing the wiring harness was less than 11/2 hours.

I received a 1 year follow up reminder. The wiring is still intact, a bit dirty now, but working fine. I have not had any issues after installation with the wiring working or needing any adjustments. I would recommend the product. The protective cap doesn't keep it overly clean, so some cleaning is sometimes needed for good contact, but that's the case with exposed wiring often.

Timothy

4/15/2021
Still in the same shape a year later. No concerns with the product. Happy with the purchase.
Very easy install. Quality product
I have an Acadia that did not come with the tow package. I had to get an aftermarket trailer harness. etrailer helped me get the correct one quickly. The installation was pretty easy, and only took a bit more than an hour. Now I can safely take my boat on the road and get fishing!
Great product. I needed trailer lights for my SUV. I went to several big name parts stores with no luck. I found Etrailer online, I ordered the recommended wiring kit. It was an exact match and I received it quicker than I expected. It was easy to install and included everything I needed. I would recommend to anyone.
etrailer shipping was excellent with updated status for easy tracking. The hitch is well built, installed the hitch and wiring kit with little difficulty and fit perfectly on my 2012 GMC Acadia. I would definitely recommend etrailer. Thank you!!
I ordered a hitch and wiring kit for my wife's 2009 GMC Arcadia
Here are the top 5 reason you should buy from etrailer.com
1) Quality Products at affordable prices ( best I could find in a 5 search look )
2) Walk through videos with tip and trick of the trade makes the job easier
3) Customer service top notch
4) Shipping was fast and no damage everything I ordered was in the box
5) Would not hesitate to buy from again
Very easy to install , directions were clear & had photos of how to do the install. I installed trailer harness in about 1 hour in my driveway the kit built well. I would recommend this product
Very easy to install after watching the instructional video.

J.b.
3/20/2018
I appreciate the follow up. To be honest, we havent used it yet. We bought it for my wifes car because she was needing to pull a small trailer. Things changed for that trip and she didnt need to pull it. Theres not yet been a time where we needed it again.It did work when I installed it :
Ordered a trailer hitch and wiring harness on Dec 18 th and got it in two days. I was really impressed.
Great Product! I installed this trailer wiring plug in about 20 minutes, and the fit and operation were perfect.
Curt hitch and wiring harness for 2011 Acadia was delivered on time. Installation was exactly as video. Would recommend to anyone.
I would highly recommend this product. It only took 45 minutes to completely install including the wiring adapter, product fit perfect in factory holes on my 2009 Acadia. Online videos was very helpful I would buy this product again.
I would highly recommend this product. It only took 45 minutes to completely install including the wiring adapter, product fit perfect in factory holes on my 2009 Acadia. Online videos was very helpful I would buy this product again.
The wiring harness Delisa suggested worked great. & was an easy installation. I would order from her again...
Excellent product. The only way to wire a vehicle for trailer lights in my book. Very simple to install. Four screws to remove taillights and plug it in. Done.
The hitch and wiring went together just as the instructions stated. The installation was easy and quick. It only took about 30 minutes to install the hitch.
Very helpful sales representative. Received hitch and all accessories in two days. Straight forward installation. Etrailer has my business.
It was delivered when they said it would. Very professional!
Everything I ordered minus one item came in a timely manner. Emailed the company letting them know I was missing a part, a few emails later i received packing confirmation and i have my item i will not use any other company for trailer supplies these guys are amazing and very friendly
Installed within 15 minutes with nothing more than a star tip ,Phillips tip screwdriver and a coat hanger .The zip ties are a little short had to put two of them together to go around the Factory hitch . Worked just as advertised no complaints
installed harness in about 20 min, worked great, also installed hitch on a 2010 acadia in about an hr,10min, also worked great , would recommend trhis co. for the novice diy er.
Product was delivered on time and survived the trip intact. The kit installed easily, and I knew what to expect thanks to the video provided on the product page.
The price with shipping was equal or better than the three auto parts stores in my town - and delivered a week sooner than any of them could provide.
Great wire harness perfect fit
Do you have a question about this Custom Fit Vehicle Wiring?
Info for this part was:
At etrailer.com we provide the best information available about the products we sell. We take the quality of our information seriously so that you can get the right part the first time. Let us know if anything is missing or if you have any questions.


Daryn W.
5/16/2021
Great. Not had any problems