
To see if this custom-fit item will work for you please tell us what vehicle you'll use it with.
Thank you! Your comment has been submitted successfully. You should be able to view your question/comment here within a few days.
Error submitting comment. Please try again momentarily.
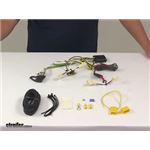
Quickly and easily install a 4-way trailer connector on your vehicle with this custom wiring harness. T-One connector plugs directly into existing wiring. Powered ModuLite reduces strain on wiring system.
Features:
Specs:
Installation
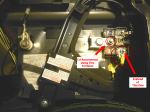
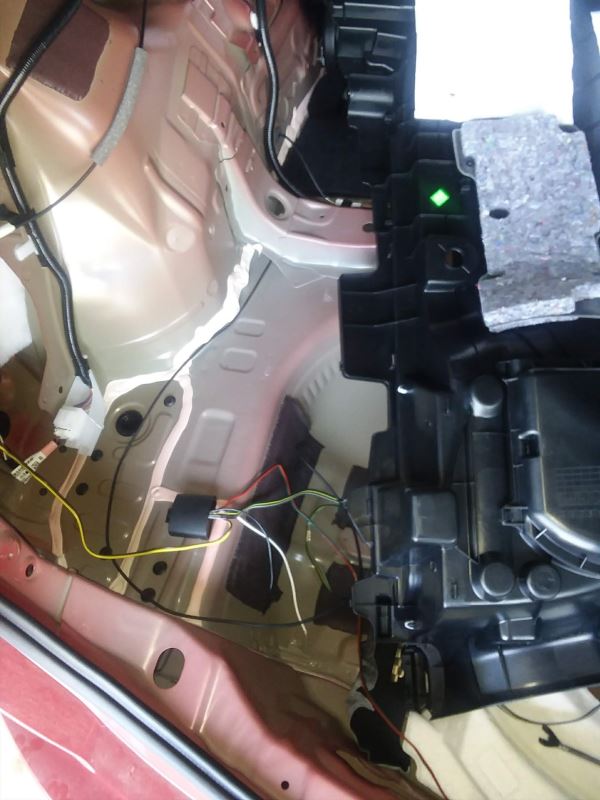
This custom-fit T-One connector plugs into your vehicle's wiring harness, which is located inside your trunk, behind the tail lights on both the driver's side and passenger's side. You will need to remove some interior trim or carpeting to access the harness. Once you've plugged in the T-connector, run the hot lead up to your car battery. Connect the lead to the included fuse holder, and then connect the fuse holder to the positive terminal on your battery and insert the provided fuse.
Once installation is complete, the 4-way flat connector will be stowed in an out-of-the-way location within your trunk.
It is recommended that you use a small amount of grease on all electrical connections - the plugs on your automobile and the 4-pole connector itself - to help prevent corrosion.
A ModuLite power module is built into this T-One connector. Because most trailers run on a two-wire system - wherein the brake and turn signals are carried on one wire - the separate brake and turn signals from your vehicle's three-wire system need to be combined so they are compatible with the wiring system of your trailer. This power module functions as a tail light converter to combine the brake and turn signal functions of your automobile so that they run on one wire to properly activate your trailer's tail lights. Note: This will not affect how the tail lights on your vehicle operate.
With a ModuLite, your trailer's lights will be powered without overloading your vehicle's electrical system. Because the module draws power directly from your car's battery and bypasses the electrical routes that are used by a basic wiring harness, there is virtually no draw on your tail light circuits.

California residents: click here
Average Customer Rating: 4.8 out of 5 stars (591 Customer Reviews)
Quickly and easily install a 4-way trailer connector on your vehicle with this custom wiring harness. T-One connector plugs directly into existing wiring. Powered ModuLite reduces strain on wiring system.
Harness fits perfect into our 2016 Rav 4. Video instructions were spot on. I only added (not necessary) a wire insulating cover when running it outside and under vehicle. Also, I had bought the special trim removal tools years ago, highly recommend....just buy a set, you'll use them throughout your life. Thank you.
Hi Carol, I emailed my feed back. Out here in the sticks your website couldnt load properly. It a great product. Perfect for this light duty purpose.
It was a very easy install. I used part of the instigation video provided by e-trailer. Specifically the panel removal and tail light connector access portions of the video. I did, however, route the wires slightly differently; personal preference. Instead of routing the black power wire beneath the vehicle, I removed enough interior paneling, and the threshold paneling in the door ways in order to route the power along the drivers side wire bundle. Additionally I used 1/4 “ loom to protect the entire run of wire. The 2017 RAV4 routes the hood release cable and a wire harness through the fire wall bulkhead into the engine box. There is an auxiliary knock-out in the fire wall grommet perfectly suited for trailer wiring. I use a blunted 1/16” wire fish tape to pierce the rubber grommet knock out, and I fished a nylon line from the cabin and into the engine box. I attacked the nylon line to the power wire with electrical tape. I soaped the wire and pulled the wire easily through into the engine compartment. I routed the wire to place the trailer fuse near the vehicle fuse box. Except for the interior routing, and using preferred wire connectors an loom, I followed the e-trailer installation procedures.
If I were to make any recommendations for this light vehicle kit, I would want 6 additional inches of wire harness between left and right tail light connectors. It would be easier to totally obscure wire harness within the paneling, and allow one to place the power module behind a panel. My only fear is that an exposed module on the wall of the spare tire cavity could get knocked around.
The entire product works like a charm. I think they did a fabulous job making this a plug and play product. Thanks guys and gals.
Ordered it on a Monday received it on Friday the same week! I would encourage anyone who is putting a hitch on a older vehicle to purchase a wire brush that would fit inside of the bolt holes on your vehicle to clean out the rust and dirt. Installed my hitch on a 2018 rav4. Used a wire brush from my gun cleaning kit!
Wire from RS to LS was 24" too short, had to add wire to make it work. Plugs for tail light were behind the top panels not at the bottom as stated in instruction. Once I straighten out wiring it worked.
Excellent component quality.
Installation photos did not properly show the location of the light connectors for a 2017 Rav4 Hybrid. Otherwise, very happy and would buy again.
Outstanding! Worked perfectly. However, the video didn't describe the 2018 RAV4 Hybrid install. Connecting the tail-lights was the same, but the module/battery install was different. I read several of the Q&A's about hybrids, but couldn't find any of the references to the supporting videos. I mounted the white neutral wire to the battery frame ground rather than using the "zip" screw. I didn't have to use any of the black power wire extension. The fuse wire was long enough to easily reach the battery positive terminal. Also, I used heat-shrink tubing rather than electrical tape to cover the splices. Thanks for providing a quality product.
I think that the product overall is good. But, I don't think putting this Assy. together is for novices. The video was helpful but, I improved on the safety and more professional installation. One thing I have a problem with is running the hot wire over the sub frame of the car. This is how the video shows the installation. The first time you go to your tire dealer for tires he probably will place his lift support guess where? On top of the hot wire you ran over the sub frame. Guess what happens then - Electrical short! I drilled an additional hole (in the sub frame) and then ran the wire through a piece of rubber hose for protection. Also, an electrical plug mount is welded on the hitch. Why not use it rather than slamming your trunk on the plug wire? Such an armature set up.

John D.

7/24/2019
It is working out fine. I only use my Rav 4 for pulling small light trailer. I think that my pictures show a quality professional job. I was a machinist for many years and can make custom parts that I needed.
Easy to install with the guide along YouTube videos
I installed wire harness myself, Utube video made it a lot easier to do. Everything worked perfectly.
The hitch was very easy to install and video instructions were perfect. The wire harness wires were not as long as in the video, but overall install was as in the instruction. FYI , the Hybrid battery is in the rear, so a bonus with not having to run the power cable & fuse to the front of the vehicle to attach to the battery.

Toyoda Rav4
4/8/2020
Year later and everything is working perfectly with no issues.
Wiring went well. Also, mod you might consider is if you don't use the trailer connector often, just run the positive through the vehicle to the cigarette lighter for eas of installation :?) seems to be working well so far. thanX!
Outstanding hitch, wiring harness & attachments. Online help (when given the trailer manufacturer and year) chose correct size and offset for ball to perfectly align trailer and car. You can see the lawn tractor sitting absolutely level on the trailer with the snow flying. It shows why I was in such a rush to acquire the hitch. From online chat with sales agent to her selection of right fit for the particular trailer and car to the ease of installation and the perfect ride behind my RAV4...RATING: A+! Couldn't be happier. Expedited 2 day shipping arrived exactly as promised. So impressed!!! Thank you etrailer for outstanding service. Very happy customer!
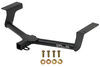
The 76134 receiver is well made. All weld beads are continuous and consistent and the material is sized right for adequate strength and minimum weight. Mounting bolt hole pattern is right on. Paint is good and consistent with no dings or scratches. Installation was straight forward. It was necessary to procure a M12 X 1.25 tap to run through the mounting weld nuts in the frame in order to get the bolts to thread in; not a fault of the receiver but the effects of four years of over the road use of the 2015 RAV4. Also the small amount of extra money for this hidden crossbar version of a receiver was worth it when looking at the final installation.
The 118578 T-One harness kit installation was also straight forward and it works as it should. Installation was made a little less difficult with the use of the ALL648544 trim pad remover that was purchased with this order.
I mounted my new the Draw-tite 2 inch Hitch Receiver on my 2017 RAV4 in about an hour, then spent a couple of hours doing the wiring - dropped back to the video for the 2014 RAV4 to see recommendations for running the power wire up front - the 2016 video involves the RAV4 Hybrid and the battery is mounted aft. My base model's battery is under the hood. The video did not make it clear why you might want to run the wire on the passenger side of the vehicle, but once underneath it was plain enough why. Also I was able to do the entire job on my garage floor without jacking anything up, though the clearance was tight a couple of times (I'm 5'11" and 170 pounds).
I would recommend getting the trailer light tester as it removes the worry that things are wired up right. I did not feel confident in the butt connectors so I tested everything before I buttoned up the plastic trim in the back (which was the hardest part of the job, in fact). Also I had a bag of white zip ties and used those so the trailer wire routing is plain underneath. Labeled the fuse holder on the battery with a permanent marker, both as 'trailer' and '15 amp' for future reference.
It went well! The wiring kit was complete, except for the screw I added to anchor the electrical adapter box. I will be following the method of pulling the wire over the hatch gasket (watch out you don’t get it in the latch!) to plug into the trailer harness. I used this method several times with my old Honda with ‘nary a problem’.
Quality product, fast delivery and, even though the box suffered some abuse in transit (the harness was packed in its own plastic box, then in an inner box beside my hitch which managed to punch a couple of holes through the outside – third! – heavy cardboard box), the contents were complete and in fine shape. I could tell you folks have (1) done this before and (2) care!
Thank you!
I bought the wiring harness for my RAV4. It was very easy to install with supplied videos and literature. Very happy with outcome and the product.
My products:
118578 wiring harness for 2014 RAV4
C13149 trailer hitch for 2014 RAV4
The hitch was a breeze to install. I didn't even need to drop the exhaust. I used a bottle jack to support one side just high enough so I could get one bolt started, moved to the other side and inserted the 2 bolts and the rest is history.
The wiring harness is another story due to the requirement to disassemble the rear interior trim panels. I assumed the first connector I found was it. It did not match the connector on the harness. I called for help and spoke with Cathy T. and she got me on the right track. The connectors are located about chest high, the ones I mistakenly chose are mounted near the floor. All went well other than getting my forearms a bit bloodied by the sharp edges of the plastic trim panels.
etrailet.com saved me approximately $615.00, the dealer wanted $835.00 to install a hitch and wiring harness.
Wish Toyota had provided for a less janky trailer connection for the RAV4, but this harness solved the problem.
The product and support that etrailer provided was far and above what I had expected. The video on the website that helped me choose the best hitch for my car was informative and vital in picking the right one. Then the product was a great price and of great quality and delivered promptly. And most importantly, the installation video that helped me install my new hitch was very detailed and was absolutely the best part of the whole experience. Everything together made it a five star experience all the way through. Especially since I saved over $500 by doing it myself. I since have referred your company several times to family and friends who were equally impressed with their experiences. Please tell everyone involved Great Job and Thank You! I plan on buying another one soon for my son’s new Toyota Rav 4.
All in all, I'm very happy with this harness and with the process of installation. A year later, and everything is still working smoothly.
The hitch and wiring came quickly and was relatively easy to install with the instructions given.
I ran the wire inside so the installation took longer since I had to remove several trim panels to run the wire under. I used the hood latch cable to fish the wire thru the firewall - like a found in another post.
Installation of the hitch was fairly easy. I used the box as my assistant to hold up the hitch while I bolted it on. As others have stated the holes don't line up perfectly from side to side but with a bit of maneuvering I was able to get the bolts in. Installing the light wiring kit was a bit harder. Removing and reinstalling the panels was easier than I expected. (Although I got a few cuts and my hands and arms) The hardest part was running the wire up front to the battery. As I don't have a car lift in my garage getting under the vehicle was challenging. I did jack up one side and that helped. I went up the center and followed other wiring. I was able to route the tail through the jack storage box and it makes a good storage place for the cable as well. The best part was saving about $200 over a business install and about $800 over a dealer install.
My car was a little difficult because of where my tail light connectors are, lots of trim panels to remove to access stuff. Plug and play though. I ran my power wire under the vehicle because it was easier... I zip tied it to the brake lines and stuff like that.
Harness is perfect. It was an easy inst all.
Easy to install, instructions were surprisingly detailed.
Do you have a question about this Custom Fit Vehicle Wiring?
Info for this part was:
At etrailer.com we provide the best information available about the products we sell. We take the quality of our information seriously so that you can get the right part the first time. Let us know if anything is missing or if you have any questions.


William K.
5/24/2022
Great! No problems at all!