

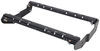
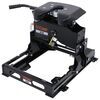
Draw-Tite Max-Frame Trailer Hitch Receiver - Custom Fit - Class III - 2"
Item # 75888
Retail:$366.13
Our Price: $189.83
You Save: $176.30
Confirmed to Fit
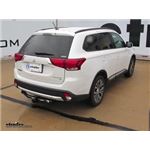
2015 Mitsubishi Outlander
Will this fit?
To see if this custom-fit item will work for you please tell us what vehicle you'll use it with.
In Stock

Thank you! Your comment has been submitted successfully. You should be able to view your question/comment here within a few days.
Error submitting comment. Please try again momentarily.


- All Info
- Reviews (96)
- Q & A (0)
- Videos (5)
- Photos
2015 Mitsubishi Outlander - Draw-Tite Max-Frame Trailer Hitch Receiver - Custom Fit - Class III - 2"
- Class III
- 2 Inch Hitch
- 4000
- Visible Cross Tube
- Draw-Tite
- 600
- 4000 lbs WD GTW
- 600 lbs WD TW
- Custom Fit Hitch
Fully welded Mitsubishi Outlander trailer hitch is strong and durable. Draw-Tite's Tested Tough guarantee ensures that this hitch exceeds industry standards. The combination of an e-coat base and a powder coat finish provides excellent rust protection.
Features:
- Custom-fit trailer hitch lets you tow a trailer or carry a bike rack or cargo carrier with your vehicle
- Computer-aided, fully welded steel construction ensures strength and durability
- Tested Tough - safety and reliability criteria exceed industry standards
- Easy, bolt-on installation - no welding required
- Complete hardware kit and installation instructions included
- Lifetime technical support from the experts at etrailer.com
- Black powder coat finish covers a-coat base for superior rust protection
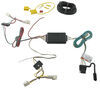
- Integrated mounting point lets you attach a bracket for a 4-way or 7-way plug (sold separately)
- Stylish, round-tube design
- Ball mount, pin and clip sold separately
Specs:
- Receiver opening: 2" x 2"
- Rating: Class III
- Maximum gross trailer weight: 4,000 lbs
- Maximum GTW when used with weight distribution: 4,000 lbs
- Maximum tongue weight: 600 lbs
- Maximum TW when used with weight distribution: 600 lbs
- Maximum gross trailer weight: 4,000 lbs
- Limited lifetime warranty

Draw-Tite Tested Tough
Draw-Tite's Tested Tough program provides testing standards far superior to those outlined by the Society of Automotive Engineers (SAE), the go-to source for engineering professionals.
Each Draw-Tite trailer hitch receiver undergoes extensive fatigue testing and static testing with the ball mount that is either supplied or recommended for use with that particular hitch, thus ensuring results that are applicable to real life use. Fatigue testing is also conducted on hitches rated for use with weight-distribution systems.
In addition, Draw-Tite performs static testing on a simulated automobile, as opposed to the rigid fixture used for SAE testing, resulting in a more true-to-life scenario.
etrailer.com Technical Support
At etrailer.com we're committed to the products we sell, and to our customers. Our experienced and knowledgeable staff are available via both phone and email to address your questions and concerns for the lifetime of your hitch. The technicians at etrailer perform hitch installations on a daily basis, making them a valuable resource for do-it-yourselfers. The one-on-one, personal service you'll receive comes straight from an expert in the towing and automotive field. We've installed it, we've wired it and we've towed with it, so whatever your question, we can answer it.
75888 Draw-Tite Class 3 Trailer Hitch Receiver - Max-Frame
87656 Hidden Hitch Class 3 Trailer Hitch Receiver
Installation Details
Weight Carrying Capacity
Gross Towing Weight (GTW):
4,000 lbs.
Tongue Weight (TW):
600 lbs.
Weight Distribution Capacity
Gross Towing Weight (GTW):
4,000 lbs.
Tongue Weight (TW):
600 lbs.
Gross Towing Weight (GTW):
4,000 lbs.
Tongue Weight (TW):
600 lbs.
Weight Distribution Capacity
Gross Towing Weight (GTW):
4,000 lbs.
Tongue Weight (TW):
600 lbs.


Tech Tip
No drilling required for installation , Exhaust must be temporarily lowered for installation
California residents: click here
Complete Towing Package for 2015 Mitsubishi Outlander


Retail:$459.47
Package Price:$337.08
2015 Mitsubishi Outlander Owners Who Purchased This Trailer Hitch Also Bought...


Replacement Parts Available For This Product

Popular Outlander Trailer Hitch Accessories


Video of Draw-Tite Max-Frame Trailer Hitch Receiver - Custom Fit - Class III - 2"


Videos are provided as a guide only. Refer to manufacturer installation instructions and specs for complete information.


Video Transcript for Draw-Tite Max-Frame Trailer Hitch Installation - 2020 Mitsubishi Outlander
Hey everyone. How's it going Today, we're gonna be going over and showing you how to install the Draw-Tite trailer hitch receiver here on your 2020 Mitsubishi Outlander. So here's what our trailer hitch looks like installed. A couple of things I'd like to point out, one of them is specific to the Draw-Tite hitch is that they come with an integrated mounting bracket. So if we're towing a trailer, we're gonna need a wiring harness as well. And this included mounting bracket here is gonna be an excellent option to mount your trailer connector to.
It's gonna cut down on the overall amount of parts you need, and everything's gonna have an integrated seamless design. So a couple of other things in regards to the actual aesthetics of the hitch, number one, you're gonna see we have this nice rounded collar on the outside of the receiver tube. And then number two, you're gonna see we have a nice black powder coated finish which is gonna do a great job of protecting our hitch from rust and corrosion being that it's on the underside of the vehicle. So adding a trailer hitch to your Outlander, it's gonna be an excellent option 'cause it's gonna make your vehicle that much more versatile. So with our hitch here, we can do a number of different things.
We can obviously use our trailer hitch for towing but we can also use it to attach a bike rack if we wanna go hit the trails or we can use it to attach a cargo carrier if we just simply want to free up some space inside our vehicle. So our trailer hitch here holds a class three rating, which is gonna provide us with a 4,000 pound gross trailer weight rating which is the amount we can pull outward on the receiver tube. We're also gonna have a 600 pound tongue weight rating which is the downward force on the receiver tube. Now I would like to point out that the trailer hitch is actually tested separately at the vehicle. So if the vehicle is rated lower, that's the number we need to go by.
Furthermore, if we are gonna be towing, preferably towards the upper end of the towing capacity of our vehicle, you may want to consider a weight distribution system. We have plenty of those to choose from here at etrailer. And the great thing about this particular hitch here is that it is rated for one of those systems. So the actual receiver tube opening here is gonna be 2-inch by 2-inch, which is an industry standard measurement. It's gonna allow us to choose a much greater variety of hitch-mounted accessories than we would normally with the smaller 1 1/4 inch by 1 1/4 inch.
So be sure to check out our selection of those accessories here at etrailer. So if you take a look at the side of the receiver tube, you're gonna see we have two holes here. The larger one towards the rear is the hitch pin hole, 5/8-inch in diameter. It will accept a standard 5/8-inch diameter hitch pin and clip. Keep in mind the hitch pin and clip is sold separately. Most bike racks and cargo carriers, however, do come with their own. The smaller hole here, directly in front of our hitch pin hole, that's gonna be used with a J-Pin stabilization device. We do offer that. It is sold separately. And basically what this device does is it works as both an anti-rattle and a security mechanism because it has a lock. And what the anti-rattle mechanism does is essentially puts pressure inside the receiver tube on our accessory. It holds it in there tighter, so we have a more stable connection. And now moving on to the safety chain loops welded to the bottom of the cross tube and the receiver tube. Those are gonna be plenty large enough to accept the larger clevis style hooks, as well as the smaller S type hooks. So now we have a couple of measurements for you guys. The first one I like to do is the distance from the ground to the bottom edge of the receiver tube which is our ground clearance, essentially. That's gonna be 10 and 3/4 inches. Then I like to get the distance from the ground to the top inside edge of the receiver tube. And that measurement there is useful when you're selecting your ball mount, that way you can make sure you get the correct rise and drop to tow your trailer level. That one's gonna be right at 13 inches. And then finally the distance from the center of the hitch pin hole to the outside edge of the bumper. So normally, we'd like to do that when we hitches a little bit more recessed, that way you can make sure that while you have your folding accessories on there, that while they're in the stowed position, they don't contact the bumper. But for this one, it looks like the hitch pin hole to the outside edge of the bumper, it's actually going to stick out about 1 1/2", so you shouldn't have any issues at all with your folding accessories. So in regards to installation, this one is super simple. Definitely something you guys can do at home by yourselves. You don't have to have a lot of mechanical knowledge nor do you really need to have a lot of specialized tools. A basic socket set will get the job done. Let's go ahead and walk you through that now. So to start off our installation, we need to go ahead in our lower exhaust down. And the reason we need to do this is because we have to fit the trailer hitch into position above the exhaust and below the frame. So to give ourselves more room to work, we're gonna be lowering the exhaust. It's super simple to do this. We're gonna take some sort of support device. If you're on the ground, you could probably use a jack stand, a couple of blocks of wood, or if you're in the air, you're gonna use a cam buckle strap, most likely. Just go ahead and hook it to two points on the frame here. Doesn't really matter where and pull that tight to provide support. The next thing we're gonna do, we're gonna take a spray lubricant. We're gonna go ahead and spray down our hangers. We have three hangers, here, here, and here. So we're gonna spray those down to make them easier to remove. Now, we're gonna take an exhaust hanger removal tool or a pry bar, whichever you have and you can even use both to remove the metal hanger from the rubber isolator. And this is about how much space we need between the exhaust and frame to install our trailer hitch. So anywhere around here, it's gonna be fine. So the next thing we're gonna be removing is the tie-down hook. So it's gonna be a good idea to go ahead and spray down the threads on our bolts here with some lubricant, make them a little bit easier to remove. So now we're gonna take the 14 millimeter socket. We'll remove our three bolts. We have one on the bottom and then two on the side here. We can go ahead and set this aside. It will not be reused. Now with an extra set of hands, we'll go ahead and lift our hitch up into position using the fastener supplied with our kit. So we'll come up and over the exhaust side first. Over here on the driver's side, we're gonna be using our carriage bolt. We're gonna be coming from the outside in. On the passenger side, it's the reverse, we're gonna be coming from the inside out. So over here on the passenger side, as we said earlier, you wanna make sure that the carriage bolt here, the head of it is facing in and the threaded portion is gonna be facing out. So as far as actually securing the hitch to the vehicle once we have our bolts in place, for the top two bolts on either side here, you wanna make sure that you're using the 1/2 inch black flat washers as well as your nut. So you do have another type of washer in the kit, it's a conical tooth washer. Those will be used for the bottom bolts. Just make sure we're using these washers on the top two bolts for either side. So now over here on the driver's side, these top two bolts use the same washers that we used over there. So once we get the two top bolts secure, we need to go ahead and install the one that goes from the bottom of the flange on the hitch here up into the frame. Before we do that though, there's gonna be an access hole directly in front of this flange here. We need to go ahead and enlarge that because we have to stick both a spacer block and a carriage bolt through that hole. So if you have a step up drill bit that'll work as well or what works really good is the burr bit here. So we use that to enlarge the access hole, just enough until we can fit both our spacer block in the carriage bolt through. So we've got our hole opened up a little bit on each side, go ahead and test fit our spacer block and then our carriage bolt. Perfect. So now what we're gonna do is we're gonna take the pull wire that comes in our kit here. We're gonna stick one end of it in the coiled end to the hole that we wanna insert the bolt through. And then we're gonna fish it out, the access hole that we just enlarged. But let me show you guys a little trick here because it's such a short distance there, especially we wanna go ahead and bend the pull wire about like this. It's gonna make it a lot easier when we're trying to fish it out, that access hole. So you're still gonna want to stick your finger up there to guide it in place, but just that slight little bend on it should make things much easier. But once we have it through the access hole, place our spacer block on, all that up with carriage bolt. And then we will shove the spacer block up into the frame first and then follow that up with our carriage bolt. And then we can pull it down through the hole in the frame, pull off our pull wire, then we're gonna place a conical tooth washer over that, making sure the teeth are facing the hitch. And I'll use that washer to pin the bolt to the side, that way it doesn't jump back up in the frame and insert our hex nut. Once we have that on, the next thing we're gonna do is we're gonna come back to our access hole there. Now we shaved away some of the frames so it exposed bare metal. We're gonna come back with a paint marker or if you have a can of spray paint, we're just gonna go ahead and seal up that bare metal as best we can. And now it's time to tighten and torque all of our hardware. So now all that's left to do is to raise our exhaust back up into position. And that's gonna do it today for our look and installation of the Draw-Tite trailer hitch receiver here on your 2020 Mitsubishi Outlander..
Customer Satisfaction Score:
94% were satisfied with this product
6% of customers were not satisfied
- Wrong item was ordered
- Arrived Damaged
- Product did not meet expectations
Customer Reviews
Draw-Tite Max-Frame Trailer Hitch Receiver - Custom Fit - Class III - 2" - 75888
Average Customer Rating: 4.6 out of 5 stars (96 Customer Reviews)
Fully welded vehicle trailer hitch is strong and durable. Draw-Tite's Tested Tough guarantee ensures that this hitch exceeds industry standards. The combination of an e-coat base and a powder coat finish provides excellent rust protection.by: Rodrigo05/09/2024
2020 MitsubishiOutlander
Perfect fit 2020 Mitsubishi outlander make sure you look if it’s sport or not I accidentally ordered sport and was different fitting and they charge almost $[XX] to return and have to wait 2 weeks to receive refund after receiving it
by: David07/21/2022
2019 MitsubishiOutlander
Reasonable delivery time, but rough transit. The box came destroyed with the hitch receiver sticking out. UPS driver said happens all the time. No packing material just the hitch receiver in an empty oversized box. There were several spots where the paint had been scratched off. There was also a spot that had not been fully coated when dipped. Installation was fairly simple and took about 1.5hrs on my own.


by: Matthew 05/09/2024
2019 MitsubishiOutlander
Quick shipping, great updates, arrived intact, great fit. Thanks!
by: Joshua11/21/2018
2017 MitsubishiOutlander
The hitch is great, fits as stated and installs as easy as the instructional video shows. The hitch shipped quickly but arrived slightly damaged nothing a little black paint wouldnt fix, and customer service was quick to help me out with the issue. Over all very satisfied whit this purchase. Would recommend for all your hitch needs. I am currently waiting for my reese 2-4 bike cradle rack to go along with my new reciever.


by: Eric07/25/2023
2016 MitsubishiOutlander
The trailer hitch came scratched up.

Jenny N.
7/27/2023
Oh no! I will have our Customer Service team reach out to you.
by: Teegan05/14/2023
It fits, works and is relatively easy to install. I installed on the 2020 Mitsubishi Outlander SE and the hardware did not include everything needed to install because the producer expects the vehicle to have internally welded nuts to the vehicle frame, but mine did not. I had to purchase 2 nuts, 2 washers, and 2 bolts in order to install.
Jenny N.
5/18/2023
It is definitely unusual that the vehicle does not have weld nuts. May I ask if you have the Outlander Sport or PHEV model?
by: Nader01/22/2019
2018 MitsubishiOutlander
What a Great Hitch , it took my friend and I
25 minutes to install , very fast free delivery
Thank you etrailer for the great Deal on my hitch,
The best prices online


by: April Sharp02/18/2017
2017 MitsubishiOutlander
Product is perfect! Packaging was terrible and resulted in several dents and scuffs but did not damage the overall product. Installing did take 2 people and the muffler had to be dropped mostly for ease of installation. However, once attached... Perfect!


by: Steve03/20/2023
A mechanic friend and I just installed the Draw-Tite Max-Frame Trailer Hitch Receiver you sent me for my 2016 Mitsubishi Outlander. It took us an hour exactly. I have never installed an aftermarket device with such ease!! Kudos to you for the great instructions as well as the precision of the device and to Mitsubishi for having the holes and nuts in the exact places they needed to be for an easy installation. Thank you as well for the timely delivery via the standard shipping method.
Thank you
Satisfied customer
by: Marcin08/27/2021
2016 MitsubishiOutlander
Installation on my MITSUBISHI OUTLANDER 2016, took about 45 minutes.
All pars fits perfectly.


by: Ryan05/27/2023
2016 MitsubishiOutlander
Shipped without the appropriate nuts and bolts and had to make a trip to Home Depot to finish the job. Also the written instructions were limited; a video instruction would have been helpful. Still better than paying U-Haul $[XX] to install a hitch.
by: Susanne 01/04/2022
2017 MitsubishiOutlander
We just love our new hitch. It works well on our Outlander and the bike carrier we bought works just great. Very happy with it.

Susanne

1/5/2023
The trailer hitch worked perfectly fine. We used it many times to go to bike trails near us that were too far to bike to. We have since sold the car but just bought a Kia Sorento and our first thought was to get another etrailer hitch. This one is just as good if not better. The Sorento hides most of it under the back bumper. Drove to the beach already a few times to bike there. We are very happy with etrailers.
by: Eric06/03/2019
2017 MitsubishiOutlander
Hitch itself is great! Very sturdy, supportive, and well made. The only reason I gave 4 stars is the hitch sits too low to the ground. I have it on a 2017 Mitsubishi Outlander. The hitch sits well under the bumper and if you have a rack connected you'll scrape the ground on driveways and low roadways. This is not a hitch issue it's more a car design issue. I wish I would of known though before purchase.

Eric
6/3/2020
Still working great. I purchased a riser from Amazon to compensate for the low hanging and it worked great. The hitch itself is great, sturdy, and has withstood travel. Ive utilized it a lot with travel baseball trips, trips to Tennessee all with no issues. Worth the purchase.
by: Mark S.05/05/2015
The hitch works as advertised. Installation was relatively easy but definitely not a one person job. I'm not a mechanic and I only have the basic tools in my garage. I used a standard floor jack and jack stands to lift the back of the vehicle up. It took me a little over an hour to install. The hardest part was dropping the exhaust. Additionally I pulled my spare tire out as it made clearances and general maneuverability easier. This step was not part of the installation instructions.
Nat
5/15/2015
Hello Mark,I was wondering if you put on this hitch to a 2014 Outlander. Does the end of the receiver flush to the rear bumper or stick out a couple inches? Thanks.
by: Victor Huerta03/22/2017
2016 MitsubishiOutlander
Hitch was delivered 3-20-17. Went on with little effort, my son helped for about 5 minutes just long enough to get the bolts in. The rest was a breeze. You guys are a Godsend. I was charged [less than $150] and I spent about 1 1\2 hours. [Local installer] wanted $350.00 It was a know brainer. Thank you etrailer
Victor H.
3/22/2018
Hitch went on pretty easy. About a mouth after I put it on I got rear-ended. If it wasnt for the Hitch they might have totaled the car.

by: Derek05/13/2023
2018 MitsubishiOutlander
Two side bolts are jot the right size for the frame on my outlander.
Jenny N.
5/17/2023
This actually happens where the bolts feel like they are too small. What happens is that road debris gets into the weld nuts and needs to be cleaned out using a wire brush. Using PB blaster in the holes works well. Once they are cleaned out the bolts will fit,
Helpful Links
by: David C.10/22/2019
This trailer hitch works great! Not much to really say about it. It does its job properly and it in installed correctly and safely. We used it to move the last of our stuff from Charlotte to St. Louis via Uhaul. Will definitely be back if we have other things we want to get installed from them.
by: Steve H01/30/2017
Item delivered today. The box was damaged, but the product looks fine. Service was above average as we were kept informed from day one. A delay in delivery was relayed to us immediately and we hope installation will be a snap.
Steve H.
1/31/2018
Alls well and working as expected. Im a mechanic by trade so had no real problems with installation although the holes did not match up.
by: Nooch09/12/2018
2018 MitsubishiOutlander
This is now my second trailer hitch receiver I purchased from etrailer, once again the box came all torn up . Inside the product had paint missing and it was all scratched. I understand that this is only a trailer hitch and it will get worn but these products tend to rust quickly and need paint often. I wish I didn't have to touch up and paint a new one before installing but that is exactly what I did. Install was ok and it fit just like they said it would. Price was right so I will deal with painting it. I will purchase from etrailer in the future.
by: Daniel01/24/2018
Honda Pilot
This the third hitch I have purchased from retailer. Ist for a Honda pilot 2nd for a Toyota prius. The problem I had with this one is I could not figure out the instructions so I sent to a auto repair shop. They called and told me the hard ware and instructions were for a land rover so it cost me an extra 80 dollars for my hitch. I was very disappointed with this. I would not have said anything but you asked for a review.
by: Daniel 05/29/2021
Customer service from beggining to end in my buying process was exceptional. The customer service personel helped me find the correct hitch for my car, tracked my sales, updated me constantly about the status and managed to have the product delivered earlier than expected. Product appear to be of high quality although only time will tell how long it will last me.
by: Quinten07/24/2019
2017 MitsubishiOutlander
Product seems strong and durable. Got it over the curt hitch because of the harness bracket and extra j clip hole. Install was pretty easy and near the estimated time. The videos on the website were excellent in helping make a decision and the install. The instructions could be more user friendly.
by: Keith L.06/10/2017
2016 MitsubishiOutlander
I installed the hitch on our 2016 Mitsubishi Outlander today and had no problems at all. The video recommended an extra set of hands, but since two more were not available, I used my handy shop stool to support one side while I inserted one bolt in the other side. The driver side is a little tight when tightening the carriage bolt nuts, but it just took a little longer. All in all, once I got all the right tools around, it took me just under an hour to get everything tight and ready. The manufacturer does a great job in assuring that all the holes line up. Extremely satisfied with the hitch. Thanks
by: Mike z04/17/2017
Solid hitch, all parts there and very easy to install. Took about 1.5 hrs by my self and a floor jack for support. Wiring harness easy to install as well with instructions provided.
by: Ryan09/06/2019
This hitch fit perfectly and, other than dropping a wrench on my forehead, installation was simple. After on year of light use the hitch still meets my expectations.
25
96
Show More Reviews
See what our Experts say about this Draw-Tite Trailer Hitch
- Trailer Hitch that Fits 2018 Mitsubishi Outlander GT Non-PHEVHey Dj, we have hitches that fit the non-PHEV versions of the 2018 Mitsubishi Outlander like the Draw Tite part # 75888 but the EcoHitch part # 306-X7379 only fits the PHEV models.
view full answer...
Info for this part was:

Expert Research:
Jameson C

Expert Research:
Adam R

Expert Research:
Jeffrey L

Video by:
Joshua S

Video by:
Jonathan Y

Video Edited:
Jacob T

Video Edited:
Chris R

Written by:
Laura H

Test Fit:
Randy B

Test Fit:
Shane H

Test Fit:
Robert C

Test Fit:
Conner L

Test Fit:
Ryan G

Updated by:
Sarah H

Updated by:
Leah S

Updated by:
Wilson B

Updated by:
Alexander C

Updated by:
Amanda M

Updated by:
Michael B

Updated by:
Isabelle B
At etrailer.com we provide the best information available about the products we sell. We take the quality of our information seriously so that you can get the right part the first time. Let us know if anything is missing or if you have any questions.
Katrina B.
8/2/2022
Im sorry to see that your hitch has received some scratches on it due to shipping. This does tend to happen and when it does, we recommend using a Rust-oleum type paint to cover up any scratches and prevent corrosion in the future during use. I have a link below for your reference. I have also sent this information over to our Customer Service Department for them to get into contact with you.
Helpful Links
https:www.etrailer.comfaq-rust-prevention-maintenance.aspx