
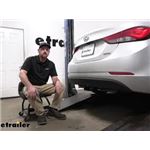
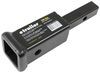
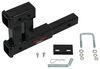
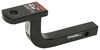
Draw-Tite Sportframe Trailer Hitch Receiver - Custom Fit - Class I - 1-1/4"
(121 reviews)
Price: $178.38
In Stock
Draw-Tite Sportframe Trailer Hitch Receiver - Custom Fit - Class I - 1-1/4"
Item # 24902
Our Price: $178.38
Will this fit?
To see if this custom-fit item will work for you please tell us what vehicle you'll use it with.
In Stock
Thank you! Your comment has been submitted successfully. You should be able to view your question/comment here within a few days.
Error submitting comment. Please try again momentarily.


- All Info
- Reviews (121)
- Q & A (0)
- Photos
Draw-Tite Trailer Hitch - 24902
- Class I
- 1-1/4 Inch Hitch
- 2000 lbs GTW
- Visible Cross Tube
- Draw-Tite
- 200 lbs TW
- Custom Fit Hitch
This fully welded, corrosion-resistant vehicle trailer hitch receiver is perfect for your light-duty towing needs. Draw-Tite's Tested Tough guarantee ensures that this hitch exceeds industry standards. Drawbar sold separately.
Features:
- Custom-fit trailer hitch lets you tow a trailer or carry a bike rack or cargo carrier with your vehicle
- Computer-aided, fully welded steel construction ensures strength and durability
- Tested Tough - safety and reliability criteria exceed industry standards
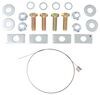
- Bolt-on installation - no welding required
- Complete hardware kit and installation instructions included
- Lifetime technical support from the experts at etrailer.com
- Black powder coat finish covers e-coat base for superior rust protection
- Sturdy, square-tube design
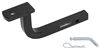
- Drawbar and pin and clip sold separately
Specs:
- Receiver opening: 1-1/4" x 1-1/4"
- Rating: Class I
- Maximum gross trailer weight: 2,000 lbs
- Maximum tongue weight: 200 lbs
- Limited lifetime warranty

Draw-Tite Tested Tough
Draw-Tite's Tested Tough program provides testing standards far superior to those outlined by the Society of Automotive Engineers (SAE), the go-to source for engineering professionals.
Each Draw-Tite trailer hitch receiver undergoes extensive fatigue testing and static testing with the ball mount that is either supplied or recommended for use with that particular hitch, thus ensuring results that are applicable to real life use. Fatigue testing is also conducted on hitches rated for use with weight-distribution systems.
In addition, Draw-Tite performs static testing on a simulated automobile, as opposed to the rigid fixture used for SAE testing, resulting in a more true-to-life scenario.
etrailer.com Technical Support
At etrailer.com we're committed to the products we sell, and to our customers. Our experienced and knowledgeable staff are available via both phone and email to address your questions and concerns for the lifetime of your hitch. The technicians at etrailer perform hitch installations on a daily basis, making them a valuable resource for do-it-yourselfers. The one-on-one, personal service you'll receive comes straight from an expert in the towing and automotive field. We've installed it, we've wired it and we've towed with it, so whatever your question, we can answer it.
24902 Draw-Tite Class 1 Trailer Hitch Receiver - Sportframe
60329 Hidden Hitch Class 1 Trailer Hitch Receiver
Replaces 24864
Installation Details
This Product Fits The Following Vehicles
- 2013 - 2014 Hyundai Elantra Coupe
- 2011 - 2016 Hyundai Elantra Sedan
California residents: click here


Customer Satisfaction Score:
92% were satisfied with this product
8% of customers were not satisfied
- Wrong item was ordered
- Product did not meet expectations
- Defective
Customer Reviews
Draw-Tite Sportframe Trailer Hitch Receiver - Custom Fit - Class I - 1-1/4" - 24902
Average Customer Rating: 4.7 out of 5 stars (121 Customer Reviews)
This fully welded, corrosion-resistant vehicle trailer hitch receiver is perfect for your light-duty towing needs. Draw-Tite's Tested Tough guarantee ensures that this hitch exceeds industry standards. Drawbar sold separately.by: Mike Rogalinski11/06/2023
2016 Hyundai Elantra
Seems very solid and installation took about an hour. Did have to cut a small portion of the heat shield away but that was pretty easy. Although easier with two people I did it by myself so it can be done by yourself. 2016 Hyundai Elantra Sport. I added a Curt bracket for the 4 pin harness for a cleanerlook.


by: Scott G03/24/2020
I wanted to get away from trunk mount bike racks and needed a receiver.
Installation went exactly like the online video, it could not have been easier. Obviously a well thought out product and install plan. I watched the install video and was done in less than an hour. My buddy was convinced I had previous experience. It really is as easy as they make it look.


by: Thomas10/06/2021
Unit was delivered 1 day sooner than expected. YEAH!
Box was 3/4 open and unit broke through the box. Worried hardware to install would be lost. It was bagged and taped to the unit. Ah...
Website does have good video for step by step installation.
There are paint scruff marks on the inside of the frame. Potential rust problems.


Sierra K.
10/15/2021
I apologize for the scuffs. You should cover them with anti-corrosive spray paint to keep rust away. There are more tips in this help article:
Helpful Links
by: Chuck M12/29/2019
I have been very happy with my trailer hitch mount. I was a little apprehensive about installing it on my 2016 Hyundai Elantra before I got started, but installation was easy. Installation was easy with the instructions and video provided by eTrailer. Everything thing has gone, as they say, without a hitch. Sorry could not pass up a good pun. I have done business with eTrailer for roof racks and carriers, bike racks and a hitch mount for an earlier vehicle, I have always been happy with their excellent service and follow up. I have highly recommended them to my friends.


by: Boris07/28/2018
2013 Hyundai Elantra
Purchased 3 items from etrailer (Swagman-S64650, Hitch -24902, Anit-Rattle Lock -S64029)- Product review below etrailer review (both get similar star rating)
Decided to use etrailer based in their support videos and upfront information. For example: on some products I reviewed they provided (in the title info ) Class I or II. For other retailers you had to dig deep into description. Being a novice at the ratings it not only educated but prevented incorrect part ordering.
I will not hesitate to use etrailer based on the above and AFTER the purchase support
First time DIY on hitch. Mounted on 2013 Hyundai Elantra
Provided video was extremely careful. It took me probably 2x time install than normal as I like to "test" assembly (measure x times, assemble once to borrow a phrase). Except for reconnecting exhaust (use car jack) entire assembly was done "on the ground". Most difficult part of entire process was dis-assembly/assembly of rear exhaust mounting rubber. While the video starts showing lower "attachment" to be removed it switches to the top one. Took me a few times to catch this. Use of WD-40 or x lubricant is strongly suggested.
Hitch mounts as advertised.
No surprises to fit/finish. Mounted Swagman-S64650 without any issues
My Elantra has appearance panel (driver side rear) that needed trimming. Did not use overall area to trim but rather (trial and error) cut out just enough for a tighter fit (pic included)


by: Marc B 07/04/2015
2016 Hyundai Elantra
I installed the hitch receiver this morning. The installation was on a 2016 Hyundai Elantra. The staff at etrailer assured me that the 24902 would fit even though there was no data for a 2016 Hyundai listed on their website. Once again they were right. It fit perfectly!
I did receive the hitch without the mounting hardware. A quick call to etrailer and the hardware was in the mail immediately and was received a few days later.
One comment about the instructions. Figure 3 shows the dimensions for the cut out required in the under-body trim panel. The dimensions are referenced to a screw hole in the panel which is used to fasten the panel to the rear bumper. That screw hole is not there in the 2016 model. I've included a photo to show where I made my cuts, a photo of the panel mounted on the vehicle with the hitch receiver in place and a photo showing the appearance of the hitch from the back of the car.
I am very satisfied with the product and the support from etrailer. This is my 2nd great purchase from the company.


by: Gompka10/24/2016
Hyundai Elantra
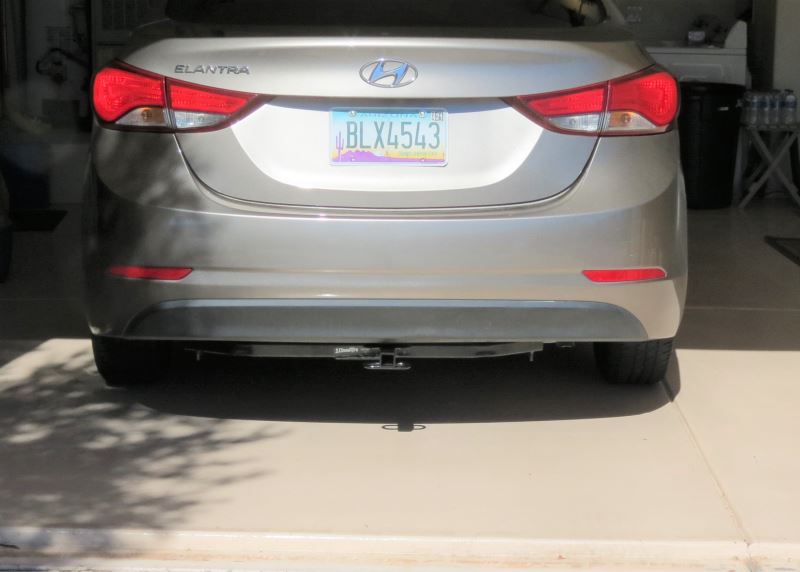
Was easy to install by myself with just a floor jack and safety stands. The instructions provided were clear and even explain how to cut the protective cover under the car to fit over the hitch support. Most hitches i have seen attach at 2 points, this one attaches at 3 points and utilizes the oem tow loop in the center of the car, which i think makes it much more stable, especially when used with a bike rack which puts a lot of tongue weight on the hitch. The hitch is barely visible from the back of the car.


by: Kathryn04/30/2020
The hitch install went as expected and you definitely need a second person to help hold it in place. I'd recommend increasing the bolt hole size by a 1/16th on the frame. This will make the bolt with fish wire easier to get into place. The Inno Aero bike rack works great as well


by: David04/25/2019
Looks great on my car and not an eyesore. Had someone else install it because I had no place to do it. Satisfied with the hitch and already purchased a cargo trailer to pull behind my car..
Awesome hitch!


by: Cameron M.05/26/2012
2012 Hyundai Elantra
To Drill or Not to Drill!
I ran into the same problem as "Gul-A-Bull". I understood that there was a possibility of having holes drilled, but there was such a gross misalignment between the hitch and the holes that it felt I ordered the wrong hitch! The men and women at etrailer are great! They talk to you like a real human being by phone and email. They understood my confusion and sorted it all out.
The bottom line: this is the correct hitch. If your 2012 Elantra was manufactured in Alabama, the hitch holes will probably line up just fine. However, if your 2012 Elantra was manufactured in Uslan, Korea - you will have lower the muffler and drill holes (or let a hitch installer do it).
If you do not know where your car was manufactured, here are some possible guidelines:
- VIN# starts with a K
- GLS with preferred equipment package
- Limited
- Limited with Premium Package
- Hankook tires
- Paint colors have different names (e.g. Black Noir Pearl (Korea) vs. Midnight Black (Alabama). you'd have to research.)
- OR take your VIN to the dealer and ask
The hitch is PERFECT. I love it.
The bottom line: this is the correct hitch. If your 2012 Elantra was manufactured in Alabama, the hitch holes will probably line up just fine. However, if your 2012 Elantra was manufactured in Uslan, Korea - you will have lower the muffler and drill holes (or let a hitch installer do it).
If you do not know where your car was manufactured, here are some possible guidelines:
- VIN# starts with a K
- GLS with preferred equipment package
- Limited
- Limited with Premium Package
- Hankook tires
- Paint colors have different names (e.g. Black Noir Pearl (Korea) vs. Midnight Black (Alabama). you'd have to research.)
- OR take your VIN to the dealer and ask
The hitch is PERFECT. I love it." />


by: Harry M.12/20/2020
This hitch fit perfectly on my 2015 Hyundai Elantra. It was a easy to install using the video instructions. After 1 year of use the hitch has held up very well with about 8k miles of pulling a 4' x 8' trailer hauling my dual sport motorcycle.


by: Marc05/25/2018
2016 Hyundai Elantra
Installed this on my 2016 Hyundai Elantra so I can carry my bicycles on my hitch mount Saris bones rack. Instructions were clear, install took me about 30 minutes with a few tools and a floor jack.


by: Melanie04/15/2024
2013 Hyundai Elantra
Excellent service and shipping was fast.
by: Jared05/04/2019
2014 Hyundai Elantra
I know jack **** about installing on cars but this has to have been the easiest thing ever. Installed on my 2014 Hyundai Elantra and got a 5x8 trailer. Have been moving easily ever since. Thank you E TRAILER!!


by: Chris 02/12/2024
2013 Hyundai Elantra
Looks great can't wait to install it.
by: James03/18/2019
2011 Hyundai Elantra
Excellent hitch for my Hyundai 2011 Elantra.
I had my service mechanic put it on - cost me $50.00 but saved me the time. I know it was done right. It looked easy but had a hard time getting the exhaust rubber holders loose.
Looks great.


by: Bridgette Watson06/27/2020
I love my hitch to haul our bikes! It saved me from having to buy a truck, It fits perfectly on my 2013 Hyundai Elantra! Highly recommend!


by: Eric02/10/2018
Easy to install. Package was delivered quickly. It took me 40 min to install and clean up. Not bad for a complete beginner.


Eric

2/11/2019
The hitch is great and so was e-trailer. You certainly will see more business from me in the future. I am very glad I made the purchase.
by: Jim M.07/13/2019
2014 Hyundai Elantra
2014 Hyundai Elantra Sport. This had a really great result when it was all over!
Hyundai doesn't make the model designation for the Sport model easy to figure out. In common automobile descriptions a "Coupe" is a 2 door car. In Hyundai Elantras the Sport model is a 4 door vehicle that Hundai calls a Sport Coupe.
Take the plastic panel off the drivers side of the car as discussed in the installation instructions. It is held on by 4 plastic holders and 4 10mm nuts. I would NOT recommend discarding this panel. It covers a deep area that can fill with snow and mud beneath the car and could lead to rust if you leave it off. Be careful when cutting the panel. The instructions call for a slot that is much larger than necessary. I suggest making this cut the last step as you finish the installation.
The Elantra Sport is made in Korea so you'll want to stop at Menards to get a decent drill bit and drill out the frame holes as stated in the instructions.
You will NOT need to loosen the exhaust to finish the work on this year make and model. :)
You might consider trimming away the aluminum heat shield that would be between the hitch and the frame so the hitch and frame will be in full contact. The total amount removed is about an inch wide and maybe six inches long. It's easy to do with tin snips. A 10mm wrench will release part of the heat shield to make it easier to clip the shield. I did not trim off the area around the 10mm nut which holds the shield to the frame.
I was pleasantly surprised to see that the muffler on the Sport does not come near the hitch.
You DO want to use the Coupe holes on the hitch, NOT the Sedan holes. The hitch has both sets of holes already drilled for you.
Start by loosely securing the center fastener that connects the hitch to the towing loop at the center of the rear of the car. Be sure you use the right size nut and bolt combination. The other two nuts and bolts will be different from this center bolt and they will match each other. Check the installation instructions for more information about the nut and bolt sizes.
The fish wires are easy to work with. You SHOULD NOT tighten either side fully until you have nuts and bolts in place in all 3 locations (left, center and right).
Be sure to follow the torque settings in the instructions. The center bolt has a different torque value than the right and left bolts.
Final outcome: easier than I expected, cleaner installation than I expected and a perfect fit.
One other note: Big iron like this can arrive with chips and scrapes. You might want to get some decent RustOleum black spray paint for about $5 and paint over any scrapes or scratches before mounting it. It's worth your time to do this.

Jim M.
7/14/2020
Its been a year. I live in cold, snowy, salty Minnesota and I dont see the early rust that is so common on hitches. I think its because I touched up the hitch with some decent paint before mounting it.
by: Ella R. 04/30/2017
2015 Hyundai Elantra
Elantra 2015 install. Hardest part was dropping the exhaust from the car as the rubber hangers were tough. Total install time 20 minutes. Once drivers side cover plate was off, we fished the bolts just like the video showed. Then we aligned the center bolt and attached. This made working each side easier because the bar was already in place since we were on the ground with limited room and not jacked in the air. Bolts tightened with torque wrench quickly. Cutting the cover plate was easier using a band saw we had handy but the utility knife would have worked too with just a little more time.
Ella R.
4/30/2018
Not only are they awesome my second time purchasing as I bought a new car and needed a new hitch bar I highly recommended you guys to people on Reddit home improvement sub! A lot a people didn’t realize how easy it is to install a hitch onto a car and pull a tag along trailer for east home improvement stuff pick ups. So many were thinking they’d need to purchase a truck just to haul things. I recommended your site because if it’s easy to use ordering and videos to watch the simple installs. Thank you for your company and it’s great service!
by: Kevin B.07/07/2014
2012 Hyundai Elantra
Installation was very easy. I think disconnecting the exhaust hangars was probably the part that took the longest. After the exhaust is out of the way the rest of the installation is a breeze. With regard to the hitch, the only slight annoyance I have noticed is that when installing my Thule bike carrier and trying to tighten the bolt, there is little clearance between the chain loops on the bottom and the reinforcement plate on the top. That clearance only allows you to tighten the bolt about 1/8th of a turn or less at a time using the Thule flat wrench. If you use a ratchet and extension it wouldn't be a problem, but I typically only carry the Thule flat wrench that came with the bike carrier.

Patrick B.
7/15/2014
We run into this quite often, and it happens with any bike rack that uses an anti-rattle bolt to secure. The solution that we use is a ratchet and the correct size socket. You can tighten and loosen faster with a ratchet and it gives you a bit more clearance around the chain loops. Those of us that regularly use hitch bike racks like this keep an extra ratchet and socket in the trunk or cargo area.
by: Erik 11/16/2022
Install was relatively easy. I had to make some adjustments by drilling. 1 inch hitch has too much powder coating and would not take an adapter for 2 inch converstion.
by: Les G.03/30/2017
I received the hitch in good time; the directions were clear; it was easy to install. All the electrical connections have been checked and functioned as intended.

by: Rose05/16/2017
2011 Hyundai Elantra
Quick delivery. Ordered it on Monday and it was delivered on Friday. Despite part of the hitch protruding through the box, the hitch was undamaged with all hardware soundly wrapped and tapped to the hitch. Directions and video were simple, accurate and straight to the point. Great service. Would purchase from them again.

Rose B.
5/22/2018
One year in and hitch is in great condition. No problems at all. Great purchase. Great quality.
by: Tom Z11/02/2016
2013 Hyundai Elantra
Fits my 2013 Elantra Sedan well. Before arrival I looked at videos from etrailer so I was ready to go. Bought low profile car ramps so I could work on my car. Should be an easy peasy job I believed. But when hitch arrived and I looked under my car and boy was I surprised. It looked nothing like the videos. Called etrailer to verify I had the correct hitch. Anyway, I had to take off a splash guard on my divers side to get to the frame. Also had to mark up my muffler guard to cut some of the guard off so that the hitch fit snug to the frame. My wife helped me lift up the hitch to mark the cuts mark the cuts I needed to make. Used my dremel tool to make cuts and enlarge hole openings. After installing hitch I used my dremel tool to make a slit in my splash guard also so I could still put it back up and use it.
So if you are purchasing this product, I expect it to fit. Just be prepared to deviate from the etrailer videos provided. They are helpful but the job is not as easy as they make it look. If you're handy though, it's not that hard either. All and all I like the hitch.
25
122
Show More Reviews
See what our Experts say about this Draw-Tite Trailer Hitch
- Trailer Hitch for 2016 Elantra GT Manufactured in South KoreaI have a solution for you, but the Curt # C11400 is not going to be a confirmed fit for your 2016 Hyundai Elantra. Even though Hyundai is a South Korean car manufacturer, they do have plants in other countries. It appears that for whatever reason, the 2016 Elantra models that were produced within South Korea were not drilled with the holes that are required to mount trailer hitches on the frames of the vehicles. This is why it's proving so difficult to find a hitch that will work on your...
view full answer... - Hitch and Bike Rack for Hyundai Elantra for Carrying Schwinn Signature Mens Largo Cruiser BikeSince there are no trunk mounted bike racks with a high enough weight capacity for your bikes you'd have to look into a hitch mounted solution. For that you'd need the part # 24795 for a hitch on your 2008 Elantra and # 24902 for your 2012. Then for a bike rack that is rated for the weight of your bikes we have the # HR200Z which is rated for 45 lbs per bike and since it uses an arm to grab the top tube of the bike your frame style and fenders would not be an issue.
view full answer... - Hitch Recommendation For 2013 Hyundai Elantra Sedan The trailer hitches we offer for your vehicle are Class l hitches with a 1-1/4 inch receiver opening and are all rated with a 200 lb maximum tongue weight and 2,000 lb maximum towing capacity. I was unable to find information about the towing capacity for your 2013 Hyundai Elantra Sedan. You will want to check your owners manual and or with your dealership to find out what the capacities are for your vehicle. The hitch I recommend for you is the Draw-Tite Sportframe Trailer Hitch Receiver,...
view full answer... - Recommended Trailer Hitch Receiver and 2 Bike Rack for 2012 Hyundai ElantraFor your 2012 Hyundai Elantra, the hitch you will need will depend if you have a sedan or a touring model. If you have the sedan, then I recommend the Draw-Tite # 24902. If you have the touring, then I recommend the Draw-Tite # 24844. Both are Class I hitches that are a great fit. For your bike rack I recommend the Swagman Chinook # S64683. This bike rack will be a great fit for your vehicle, has the ability to fold when not in use and tilt away for cargo access, and comes with the...
view full answer... - Trailer Hitch Recommendation for a 2014 Hyundai Elantra Made In KoreaFor your 2014 Hyundai Elantra GT made in Korea the Draw-Tite part # 24902 has been confirmed as a fit. Since vehicle was one that was built in Korea rather than the US then you will have to drill a hole for installation. See the install link I attached for more info on this.
view full answer... - Trailer Wiring Harness Fits for 2013 and 2016 Model Years of Hyundai Santa FeThe 2013 and 2016 model years of the Hyundai Santa Fe are both part of this vehicle's third generation. They share common fits for hitches and trailer wiring for the specific versions offered. I have linked for you two pages, one each for the wiring harness fits for each of the two model years. As you compare the products shown for each you'll see that the same items will fit specific versions of both model years. For the 2016 Sport, SE and Limited versions WITH the factory tow package...
view full answer... - Recommended Trailer and Vehicle Towing Components for 2013 Hyundai Elantra to Tow a MotorcycleThe Draw-Tite Sportframe Trailer Hitch Receiver - Custom Fit - Class I - 1-1/4" # 24902 is rated for 200 lb tongue weight and 2000 lb towing. This receiver is not compatible at all with a motorcycle carrier that would require a 2 inch trailer hitch receiver and tongue weight rated high enough for your motorcycle's complete weight as well as the carrier's weight. Instead, I recommend you use this hitch along with the ball mount # 3594 and hitch ball # 19258. Then you will need wiring...
view full answer... - Trunk Mounted Bike Rack Recommendation for a 2016 Hyundai Elantra GTFor your 2016 Hyundai Elantra GT the nicest bike rack we offer that has been confirmed as a fit is the Thule OutWay # TH45JV. What makes this rack far superior to the others is the attachment system. It uses 2 rubber coated straps to attach to the vehicle rather than 6 nylon straps like other racks. This makes installation quick and easy and the cables also last longer. The cables store inside the rack so there are no loose straps ends to flap around. The cables can also be locked into...
view full answer... - Trailer Hitch and Bike Rack Recommendation for 2013 Hyundai ElantraFirst let's get you set up with the correct hitch. You'd want to go with the DrawTite # 24902 if you have a sedan or coupe. If you have a GT Hatchback you'd want the part # 24905. For a bike rack I really like the Hollywood Racks Destination Bike Rack # HLY94FR. This is a platform bike rack that only weighs 20 lbs. The biggest drawback to platform bike racks has always been the weight of them, but with this rack you get the best of both worlds. The preferred attachment style with the...
view full answer... - Trailer Hitch Recommendation for 2012 Hyundai ElantraFor your 2012 Hyundai Elantra Sedan the hitch I would recommend is the Draw Tite part # 24902 because it has the best price, the shorter install, and if you were to ever carry a bike rack you wouldn't have to use a stabilizer strap like the Curt requires. I attached an install video for this for you to check out as well. For trailer wiring you would then want the # 118532 which is a confirmed fit and would work well. The recommended ball mount is the part # 3594 so for balls you'd want...
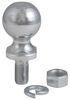
view full answer... - What is the Correct Ball Mount for a Draw-Tite Trailer Hitch on a 2011 Hyundai ElantraIt sounds like you are referring to the ball mount that fits into the 1-1/4 inch square receiver on the Draw-Tite Trailer Hitch, # 24902. The ball mount, pin and clip is not included with this trailer hitch. With a Class I trailer hitch like this, you can only use the ball mount recommended by the trailer hitch manufacturer. If you are talking about the installation hardware, parts 1, 2, 3, and 4 in the instructions, those items should have been included with the rest of the hardware. For...
view full answer... - Which Trailer Wiring Harnesses Will Fit a 2011 Hyundai Elantra SedanThere are a couple of possible wiring options for the 2011 Hyundai Elantra. I have included a link to them for you to view. I would go with the Tow Ready harness # 118532. It requires a direct connection to the vehicle battery to power the trailer lights. This protects the vehicles sensitive wiring. I have included a link to the installation instructions for you. I have also included a link to an FAQ article I wrote with tips on routing the power wire for the wiring harness.
view full answer... - Trailer Hitch Receiver Recommendation for 2014 Hyundai Elantra SedanWhen it comes to a trailer hitch receiver for your 2014 Hyundai Elantra, I recommend going with the Draw-Tite Sportframe, # 24902. This hitch offers a 2,000 lb towing capacity and 200 lbs of tongue weight. One of the perks of the Draw-Tite hitch is that a support strap, like part # 18050, is NOT required on non-trailer loads in order to maintain your warranty. If you plan on doing any towing with your Elantra, I recommend that you start by checking your owner's manual to determine it's...
view full answer... - Draw-Tite Class I Trailer Hitch for 2015 Hyundai SonataAccording to my Draw-Tite contact, their # 24902 Class I receiver hitch is a fit for all models of the 2015 Elantra Sedan or Coupe. I was not able to find any information about a Hyundai Elantra Sport...could you have meant a Hyundai Elantra GT? For the GT model, you'd need the Draw-Tite Class I hitch, part # 24905. If you'll be using the hitch for light duty towing purposes, you'll need a few other items to complete your towing system: Trailer wiring harness, for the coupe or sedan-use...
view full answer... - Is the Install Video for the Draw-Tite 24902 that Same For a 2016 Hyunda ElantraThe install video that shows the Draw-Tite part # 24902 being installed on a 2012 Hyundai Elantra would show the exact same process you would need for installing this on your 2016 Hyundai Elantra. I attached the video for you to review again if you like. For trailer wiring you would then want the part # 118678.
view full answer... - Trailer Hitch Recommendation for 2015 Hyundai ElantraFor towing a small trailer with your 2015 Hyundai Elantra you would want the Draw Tite hitch # 24902. This has a 2,000 lb trailer weight capacity and would work well. For a ball mount you would need part # 3594 and for hitch balls you would need # 19258 for a 2 inch ball and part # 19256 for a 1-7/8 inch ball. For trailer wiring you would want the part # C56126 which is also a confirmed fit.
view full answer... - 2011 Hyundai Elantra Hitch and Cargo Carrier RecommendationI know you said you plan on buying a Curt hitch for your 2011 Hyundai Elantra but I would actually recommend the Draw Tite part # 24902 instead as it has a better price and doesn't require a stabilizer strap like the Curt does with a hitch carrier. The most popular cargo carrier that would work well for you would be the Curt part # C18110. The etrailer Cargo Bag # e98990 would then fit the carrier well and would be a great choice as it's dimension closely match the carrier. The bag would...
view full answer... - Hitch, Cargo Carrier, and Cargo Bag Recommendation for 2011 Hyundai Elantra GLS SedanWhile both the Draw-Tite # 24902 and Curt # C11303 trailer hitches are considered no drill for your 2011 Hyundai Elantra we've been informed that some may have a drilling component due to different plants making this vehicle and they varied the position of the access holes per plant. You at most will need to drill a hole in the frame or drill to enlarge the access hole for the hardware. I would recommend the Draw-Tite hitch over the Curt hitch, because to be covered under Curt's warranty...
view full answer... - Recommended Class I Hitch and Compatible Platform Rack for 2014 Hyundai Elantra LimitedOftentimes Class I hitches like the Draw-Tite # 24902 have a tab in them to keep users from using accessories that are not rated for Class I hitches in them. You would need to use a platform rack that is rated for use in a Class I hitch like the Hollywood Racks Trail Rider # HR200Z in this (or any) Class I hitch, so that's something to be mindful of when shopping for a rack. I've linked a review video of the Trail Rider, as well as our entire selection of platform racks compatible with...
view full answer... - Does Tongue Weight for Draw Tite Hitch 24902 Factor in Weight of PassengersThe Draw Tite hitch part # 24902 which is a confirmed fit for your 2012 Hyundai Elantra has it's own 200 lb tongue weight capacity that is independent of the capacity of your vehicle. It doesn't "care" if you have the weight of passengers in the vehicle, but if your Elantra says you need to calculate that for the vehicle capacity and it's lower than the capacity of the hitch...then you have to use it as the overall capacity since you are only as strong as your weakest component. There's...
view full answer... - Recommendation For Platform-Style Hitch Bike Rack on a 2011 Hyundai ElantraOn your 2011 Hyundai Elantra you will be limited to a maximum of two bikes on a hitch bike because the hitches that fit your vehicle will all be a Class I rated hitch. A Class I hitch has a maximum tongue weight capacity of 200 lbs. That is how much weight that can be applied to the hitch opening. Since you mention about opening your trunk I would assume you have the Elantra Sedan model and not the Hatchback. If you need a hitch I recommend the Draw-Tite Class I 1-1/4 Hitch, part # 24902,...
view full answer... - Trailer Hitch Recommendation for a 2013 Hyundai Elantra GT to Carry Go Go Sport Mobility ScooterAll of the trailer hitches for your 2013 Hyundai Elantra GT are Class I hitches rated for 200 pounds tongue weight. The carrier you use will have to be compatible with a Class I hitch and the combined weight of the scooter and the carrier cannot exceed the 200 pound tongue weight capacity of the hitch. For a trailer hitch I recommend Draw-Tite trailer hitch # 24902 because the Curt hitch has special requirements for non-trailer loads that the Draw-Tite hitch doesn't. We have several...
view full answer... - Hitch-Mount Bike Rack for Use on 2012 Hyundai Elantra and Ford F-250The hitches we offer for the 2012 Hyundai Elantra are all light-duty 1-1/4-inch Class I types that have a maximum carrying capacity of only 2 bikes (even if your rack can hold 3). This has to do with the limitations of the hitch and the vehicle frame where the hitch attaches. In a Class I hitch you are limited to using a 2-bike Class I rack such as one of those shown on the link provided. You might refer to the linked articles on hitch classes and how to choose a hitch rack that fits well...
view full answer... - Recommended Hitch, Wiring and Related Towing Components for 2011 Hyundai ElantraYou are correct - Tow Ready wiring harness # 118473 does NOT require you to run a 12V power wire up to the battery when installed in a Touring edition of the 2011 Hyundai Elantra. If you have the sedan then the harness you need is part # C56126 which also does NOT require you to run a power wire. With ball mount # 3594 you can use 1-7/8-inch hitch ball # 19256 or 2-inch ball # 19258. These are the recommended hitch balls for use with this ball mount. Hitch # 24902 from Draw-Tite will...
view full answer...
Do you have a question about this Trailer Hitch?
Info for this part was:

Expert Research:
Mike L

Expert Research:
Michael H

Expert Research:
Jameson C

Expert Research:
Adam R

Expert Research:
Jeffrey L

Written by:
Lindsey S

Video by:
Joshua S

Video by:
Jonathan Y

Video Edited:
Jacob T

Video Edited:
Chris R

Updated by:
Laura H

Updated by:
Wilson B

Updated by:
Alexander C

Updated by:
Amanda M

Updated by:
Jenny M

Updated by:
Isabelle B

Test Fit:
Shane T

Test Fit:
Shane H

Test Fit:
Ryan G
At etrailer.com we provide the best information available about the products we sell. We take the quality of our information seriously so that you can get the right part the first time. Let us know if anything is missing or if you have any questions.
Product Experts Available Now!
Call 1-800-940-8924
Scott G.
3/25/2021
The hitch has worked perfectly. I never have to think about it which is what I want in a hitch. A year later, Im still 100 happy with my purchase.