
In-stock alternatives that are ready to ship
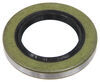
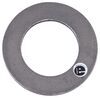
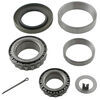
| Outer Bearing | Outer Race | Inner Bearing | Inner Race | Seal | Seal I.D. | Seal O.D. |
|---|---|---|---|---|---|---|
| L44643 | L44610 | L44643 | L44610 | 204507 | 1.249" | 1.983" |
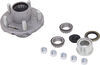
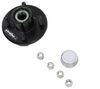
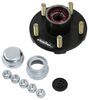
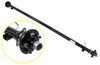
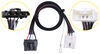
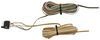
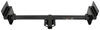
This replacement bearing and race kit contains all components needed to replace the bearings on one hub of your trailer axle. Kit includes inner and outer bearings and races, seal, cotter pin, and grease cap.
High-quality tapered roller bearings and races last twice as long as other brands leaving time for what really matters. Special alloy blend reduces vibration which extends bearing life and reduces noise. Uses industry-standard numbers.
Videos are provided as a guide only. Refer to manufacturer installation instructions and specs for complete information.
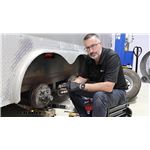
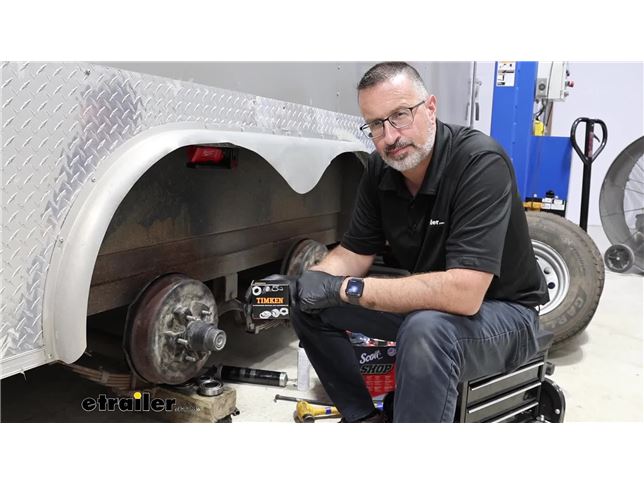
Hi, John with etrailer. Today, we're gonna be taking a look at the line of Timken bearings, races, and seals here at etrailer. Look, if it's time for you to do axle service on your trailers, this is a brand that over the years has been a premium to me. If I could get Timken bearings, I did. And I use them on my cars, my pickups, and my heavy trucks. It's a bearing that I go to.
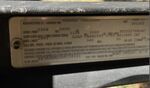
It's made in the USA and it's always been on my cars. So I'm happy that they're here at etrailer now. The easiest way to figure out what type of bearing you've got is to identify your axles. Of course, that's gonna be on your vin plate or the axles will have tags on them. That's one way to identify them.
Another way to identify the bearings that you need are to just pull the old ones off. In the case of a grease seal here, it's gonna be hard to see on camera but just look around and you'll see the numbers. In this case, I was able to highlight the numbers here and here and we used the Fit Guide on our website to cross reference to get the Timken number for this seal right here. As far as the bearings go, the bearings are gonna have numbers on the backside. Again, these cross-reference over to Timken in the majority of cases.
If you punch these numbers into our Fit Guide, more than likely you're gonna find the right Timken bearing that you need. Same deal with the races. These are gonna have their numbers up here as well. Now we've got kits that we put together for the most popular sizes of axles and weights of axles. So if you check out our website you can see kits already put together for you as far as you need cotter pins and grease seals, everything that you need.
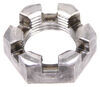
Now, in this particular case, the kits that we had, we kind of had a one-off axle. So, also on our website you can go through and again, use the Fit Guide and if you need to piece this together, you can do it. So, how do you get these parts off to identify 'em Well, I'm about to show you. Today, we've got a Rockwell 5,200 pound axle. Just to let you know what I'm working with here. I've got a six lug. It's an EZ-Lube and like I said, we have kits that will fit 5,200 pound axles. This one was a little weird once we pull the parts off. So if you've done axle service before on a trailer then you already know what to expect. For you folks out there that are wondering if you could do it at home, I'll let you know that you do need some special tools and it's gonna be something there's a little bit of a learning curve. This isn't for everyone, but I can show you step-by-step how to disassemble this and how to reassemble it, and we'll get to it right now. Now, to begin the axle service here, you want to get your trailer up in the air so both tires are off the ground. And even before you start any work, you want to kind of get a condition of your trailer's bearings and suspension and make sure that everything is working normally. So I'll give the tires a shake, see if there's any movement in the bearings. I have very little movement in this one. This one here has got quite a bit of movement in it. It's not necessarily a bad thing. It's a little bit more movement than I would like. This one's a little bit tighter than I would like. So we're gonna get these tires off, and we'll see what's going on. (drill whirring) Once your tires are off, we need to remove the dust cover. This is gonna be best done with a plastic hammer. Just kind of give it a tug. And I'm doing a hammer down here on an angle like that. Just work your way around. Not too hard. You don't want to dent it 'cause this is gonna go back on. I'm just kind of pulling with my left hand, hammering out with my right hand. (hammer tapping) That'll come off. Now we can remove the cotter pin that's keeping our slotted nut here from turning. Got a pair of needle-nosed pliers. We're just gonna straighten these up as best we can. The straighter this is, the easier that cotter pin's gonna come out. Now, to get the cotter pin out, we've got the head of it on this side. Just taking the screwdriver for right now. We might have some drag on the castle nut. It's considerably looser now. Once the cotter pin is removed, we can loosen up this main nut here. Got a big set of pliers here. This shouldn't be tight. This really should be finger tight at best. This one was a little tight here but it wasn't bad. When we go to put this back on, we'll reset the torque on it. Pull that off. You're gonna have that. You're gonna have a thrust washer that's in there too. And an easy trick to get that out is just lift up on the drum. That'll bring the thrust washer and this outer bearing to you. Since we're gonna be replacing these bearings, it's still a good idea to clean them up so we can inspect them to see if we've either had overheating or a running dry condition or an overtight condition. All of those would be problems. Gotta remove the entire drum. We're just gonna pull it off. And again, we're gonna be replacing all the seals and all of the races. So just pull straight out. That way we can inspect both the spindle and the inside of our drum here and our braking system. From here, you're gonna definitely want a good supply of shop towels. Before we wipe the grease off, this is gonna tell you if your grease seal was working or not. You want to see a definite line where the grease stops, and this is pretty normal. This is actually looking good. If the grease seal was bad, we would have grease not only back here but probably along the entire braking system as well. Since everything's off, I also would like to take this chance and check the brake linings check the magnet for wear, check the drum for wear as well. And like I said, everything here is looking pretty good. I mean, it has wear on it, but it's wearing normally. There's nothing abnormal about this. No signs of bluing which would indicate overheating. So, this is okay to rebuild. This is worth popping out all of these bearings and the races and putting new in and returning this drum to service. You can check the spindle as well. Just grab some towels, and we're gonna wanna get all the grease off. Since this is a greasable spindle right here, we'll be pumping new grease through it. We're gonna have it come out here and back here. And it's important to do that in case you decide to change greases. Either if you run into a synthetic or a semisynthetic, you don't want to mix the new grease and the old grease together. We'll be doing that later on. For right now, what we wanna do is get this spindle good and cleaned up. So once your spindle's cleaned, you could check the surfaces here for any signs of bluing or abnormal wear. Our spindle looks fine. So we're just gonna move on to dissembling our drum. First thing we need to do, we're gonna remove the grease seal. Now to do that, they have a seal remover that you can use. I've got just a pry bar right here. Again, we are gonna be replacing the bearings on the inside so it's not too big of a deal. We're just gonna get underneath of it. This is held in, this is a press fit, so just give it a tug and it will come up. And if it comes apart, no big deal. This is not getting reused. We're putting a new one in. There. So that'll just pop off of there. And again, we're gonna be having to clean up all of this grease 'cause our magnet rides on this surface. But at least we can pull the bearing out of here. We'll clean that up and inspect that as well. Make sure that everything's been running fine inside of here. So I'm gonna clean up the grease on the inside and then we'll drive out these races. All right, with everything cleaned up, we can remove the larger race here. Now this is gonna come out this way so we're gonna take our drum. I'm gonna have the inner and outer to take out. It doesn't matter which one you start with. I'm just gonna start with the large one. Gonna put the drum flat on the ground and on the inside, you're gonna have a lip on that race that you can hammer against. Now the best tool for this is gonna be a brass drift punch. If you don't have one and if you're careful, you can use steel like this, but I don't know if you can see down on the inside, this is gonna be, if I point to it here, this is the surface all the way around, this silver. We're gonna drive this all the way down until it comes out. Just using my pry bar, I've got a dead blow hammer. This helps a little bit. Or if you've got a big hammer at home, that really helps. And just kind of keep it even as you go all the way out, it'll just make it easier and keep it from jamming up on you. (hammer tapping) So I ended up switching to a bigger hammer and that worked. So we can flip this over. We're gonna do the same thing. (hammer tapping) Now this one's only gonna go so far. You'll end up having to tilt it because it will contact the ground. Once you get the races out, take your time, get these drums nice and clean on the inside. Get rid of any metal shavings, any grease. These need to be nice and clean before we install the new parts. It's a good idea to also clean off your old parts for a number of reasons. One, you wanna double check the part number that you're gonna find on your races, on your bearings, on your oil seal. Make sure that you have the right parts. Second reason is if you didn't buy your trailer brand new, you bought it used, there's also a chance that someone could have installed the wrong parts. So you want to clean 'em up. And that's why we also inspected the spindle, the brakes, everything when we took the wheels off to make sure that the parts are fitting correctly, that things are operating like they're supposed to; like we don't have grease all over the place or we have ill-fitting bearings or races. So one of the things we can do to ensure that we have the correct parts on here is to actually dry fit these bearings. These should fit extremely tight on their surfaces. They should even want to jam up a little bit if you don't get it on straight. So that's our inner, and the outer. And just from the fit, I can tell that these are fitting our spindle very nice, really tight. And so more than likely we have the correct parts for our spindle and our assembly here. So we're gonna get these installed. First thing we're gonna do is drive the races into the drum. So I've got the drum up on a block of wood and we're gonna take our inner race, that's gonna be the larger one. And even though it's brand new, I still like to inspect it and make sure we don't have any nicks or gouges on it. I'm gonna take a little bit of the grease that we're using. Now, on this trailer, I'm using high temperature red grease on everything. You just wanna stay with the same type of grease. You don't wanna mix greases when you're doing this. So if you're gonna use high temperature red, which is what I recommend for this, then stick with that. I'm gonna apply a very, very thin film on the outside of this. That'll just help keep things moving along as we get this hammered down into the bore. Real quick before I do that, let me show you on the inside of this, there is a shelf. And as we hammer this race down, you need to pay attention, you need to keep it level. But you will hear a sound and feel a difference when it hits that and we drive it down to this. It may not show up on camera here, but you will hear the difference as you hammer that down. So to start with, you wanna make sure it's as level as possible all the way around. I recommend getting a bearing and race driver. Look, a lot of your auto parts stores rent these. You can also pick these up at a lot of discount tool places. They're not too expensive and they make a huge difference on a job like this. You can use a brass drift if you want and tap that down, go around the edges. It's just if you damage any part of this on the inside, when you go to put your bearings in you've just wasted your work. So the right tool for the job is the best thing in this case. So we're gonna set this up and even this one wasn't quite big enough so I've got it flipped over, but it will work for us. We'll take a hammer, we'll do some short taps. (hammer tapping) And we'll check our work and find out. We're about even over here, high over here. So we'll come over to this side. (hammer tapping) Okay, got it evened up. So now we'll just go down. (hammer tapping) So we can check all the way around. We can also flip the drum over, and you'll see the edge of our race on the inside. Just check and make sure it's even all the way around. And we'll do the same process for the outer race. (hammer tapping) Now same thing with the inner bearing. You can look down on the outer bearing, and look all the way around and make sure that it's seated against the shoulder in here. We're gonna pack our bearings. You can take the grease that you're using, in our case, high temperature red. Take your bearing, take the wide part of it. You can hold the narrow part. I hold it just like this. Put a little bit of grease in your palm. And if you've ever played Hungry, Hungry Hippo, this is exactly the move that you want to do. You wanna just start scraping like you're cleaning your hand off. Don't take too big of a bite. You're gonna see that we're starting to force grease up into the rollers here. This is what we want to do. We're just taking little bites, forcing the grease up. Now when you're done, you can see at the top up here how it's starting to come out the top. This means we have grease all the way from the bottom, through the cage and up to the top. When we've done that, just rotate your hand a little bit and do the same thing until the entire top of this looks like that. When you need to add more grease, get you some more grease in your hand. So I've got mine all the way around here. I'm gonna clean up the bottom. Make sure you give it a spin, and clean up the excess before you drop it in. Now we're gonna install the grease seal on the back. And this step is optional. Some people like to do this and some don't. I'm one of the guys that do. So some of these grease seals will have a rubber surround on the outside. If that's the case, then they just get driven in. This one does not. It also doesn't have any type of coating on this outer surface. So when I have grease seals like this I like to apply a very, very thin film of Black RTV sealant, silicone sealant. And this does a couple of things. It will keep the grease seal from shifting around, which they don't shift around much anyway. It really is just another barrier to prevent dirt from getting in or any seepage of the grease from coming out. So like I said, it's a super thin film and this is optional. You don't have to do this. So, also on the case with this one, you're gonna see a lip all the way around. Same deal with this thing. So when we're measuring this up, if you didn't pay attention when you took these out how deep they were, you can look at the width of this and know that we're probably gonna be below, we're not gonna be flushed, we're gonna be below this. So these get hammered down until they touch the inner wall there. A good tool for driving this down is the old race. They are the exact same size. So if you don't have anything at home or a tool that's big enough to hit the surround on this, you can use the old race. This is what we'll do today. We can just get this started. (hammer tapping) My hand's covering up a lot of it right now. They like to bounce around when you first get them started. This is one of those things that you definitely want this to be nice and even as you go down. And you want to be careful and do little movements so that you don't end up warping this. So right now we're about even all the way around. So I'm gonna keep driving this down. (hammer tapping) A little bit at a time until it touches that shoulder on the inside. So it's hard to come across on the camera, but you're gonna have an audible change in tone when this grease seal bottoms out on that lip. And then you'll also have a visual, which is gonna be the relief cut all the way around, basically we're the same thickness all the way around and it's nice and even. This is probably the most important step, is keeping this thing even. Now we can flip the drum over and same as the inner bearing, we're gonna pack the outer bearing. We're going to do that on the wide surface. Same deal. Now this is an EZ-Lube axle. We wanna clear out the old grease that's in here. We don't want to contaminate our new grease. So inside this grease gun, I got the same type of high temperature red grease. I like to do this before I put everything on. You can visually see the change as the grease is gonna come out over here. I'm just gonna keep pumping until I got fresh red grease come out. So that's good right there. You can see the older grease that was gonna stay in there get pumped into the new bearings. We can take a little bit of grease and we're gonna put a thin layer on the spindle before we put the hub on here. Now we can carefully place the drum on here. Keep in mind that that bearing in the back will pop out if you're not careful. So you wanna keep kind of everything lined up as this goes on so we don't damage the grease seal. Once we get it seated, we can take our thrust washer and the spindle nut. We're gonna tighten this down by hand for right now, and we're gonna spin the assembly as we do this. Once you can't spin the spindle nut by hand, I've got the torque wrench here and both the Rockwell axles and Dexter axles, and this is also my go-to if I can't identify an axle, we're gonna spin this. I have the torque wrench set to 50 foot-pounds. We don't normally give the ratios on here, but the majority of axle manufacturers have this method. So I'm gonna keep spinning this as I slowly tighten the spindle nut. And what this is doing is it's loading the bearings. It's a bearing preload is what they call it. Okay, so I'm spinning it. I've reached 50 foot-pounds. Stop spinning it and back the spindle nut off. Once you've backed it off, tighten it by hand until you can't go any further. And we're looking for the hole for the cotter pin. Just like this right here, it's stopped. Don't tighten it, never tighten it. Just go back one hole. This is gonna be the correct amount of bearing preload that you need. Once this is here, we're gonna take and bend the cotter pin back. So the general rule right now is that the nut should be loose and the cotter pin should be tight. Obviously the best thing to do would be identify your axle and use the correct method that they recommend. If you cannot identify your axle, this is gonna be the method that you want to use. Now clean out your dust cap. In our case here, this one isn't too bad. We had a couple of the other ones that had quite a bit of contamination. But again, the cleaner that you can keep this right now, the better off and the longer service you're gonna get outta your bearings. And then to reinstall it, I kind of like to use the same method. I've got a plastic hammer. (hammer tapping) Till it seats. And that'll complete your removal and reinstallation of your axle bearings and races, and how to correctly torque your spindle nut. Of course you're gonna want to complete that for the other locations on your trailer. If you have any other work that you need to do, like suspension work we're getting ready to do on this one, now's a great time to do it while it's still up in the air. And that'll do it for our look at the installation of Timken's bearings, races, and seals.
Average Customer Rating: 5.0 out of 5 stars (3 Customer Reviews)
Fast shipping and Made in the USA Timken bearings, What else could you ask for?
Do you have a question about this Trailer Bearings Races Seals Cap?
Info for this part was:
At etrailer.com we provide the best information available about the products we sell. We take the quality of our information seriously so that you can get the right part the first time. Let us know if anything is missing or if you have any questions.


Thank you! Your comment has been submitted successfully. You should be able to view your question/comment here within a few days.
Error submitting comment. Please try again momentarily.