
Inno Aero Roof Rack for Naked Roofs - Black - Aluminum - Qty 2
Item # IN49FV
Our Price: $485.96
Confirmed to Fit
2019 Honda Accord
Will this fit?
To see if this custom-fit item will work for you please tell us what vehicle you'll use it with.
In Stock


- All Info
- Reviews (124)
- Q & A (0)
- Videos (3)
- Photos
Inno Roof Rack - IN49FV
- Aero Bars
- Crossbars
- 54 Inch Bar Space
- Black
- Inno
- 2 Bars
- Overhang
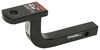
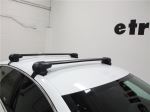
Low-profile, aerodynamic crossbars create an aftermarket roof rack for your vehicle. Aluminum bars have T-slots that let you mount channel-mounted carriers and accessories. Flexible rubber strips in T-slots keep out dirt and won't need trimming.
Features:
Inno Aero Aluminum Load Bars - 54" Long - Black - Qty 2:- Low-profile crossbars let you build a roof rack for your vehicle
- Elliptical shape helps to create an aerodynamic system with no need for a fairing
- Integrated T-slots make it easy to slide channel-mounted carriers and accessories onto the bars
- Clamp-on accessories conveniently wrap around bars
- Flexible rubber strips keep out dirt and allow for simple mounting in T-slots
- Press down on strips and slide accessories into slots - no trimming required
- Plastic coating on strips allows T-bolts to slide easily along channel
- Bottom channels allow easy installation to Inno roof rack feet
- Simply clip the foot into the crossbar and slide it along the channel
- Lightweight aluminum construction is durable and rustproof
- Internal extrusions provide exceptional bar strength
- Glass-blasted powder coat finish resists corrosion, scuffs, and scratches
- Matte black color
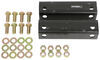
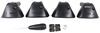
Inno Custom Fit for XS200, XS250, and INSU-K5 Roof Rack Feet:
- Custom-fit clamps and pads let you install Inno roof rack feet on your vehicle with a naked roof
- Clamps are designed specifically to fit the curves of your doorjambs
- Mount to roof rack feet with bolts
- Molded pads are custom designed to fit the contours of your roof
- Protect your roof surface from scratches and abrasions
- Press onto the bottoms of your roof rack feet
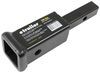
Inno Through Feet for Aero Crossbars - Naked Roofs - Qty 4:
- 4 Feet let you mount Inno Aero crossbars on your vehicle's naked roof
- Through design helps create an extended-length roof rack that maximizes carrying capacity
- Torque tool included to secure feet to your roof
- Easy, slide-on installation to channels in bottoms of crossbars
- Locking covers secure system to your roof
- Also secure T-slot-mounted accessories to your crossbars
- 2 Keys included
- Durable, weather-resistant AES plastic construction
K710 Inno Fit Kit Hooks for Flush, Through, and INSU-K5 Stays
XB138 Inno Aero Aluminum Load Bar - Black - 54" Long - Qty 1
XS250 Inno Aero Bar Through Stays for Bare Roofs - Qty 4


Video of Inno Aero Roof Rack for Naked Roofs - Black - Aluminum - Qty 2

Videos are provided as a guide only. Refer to manufacturer installation instructions and specs for complete information.


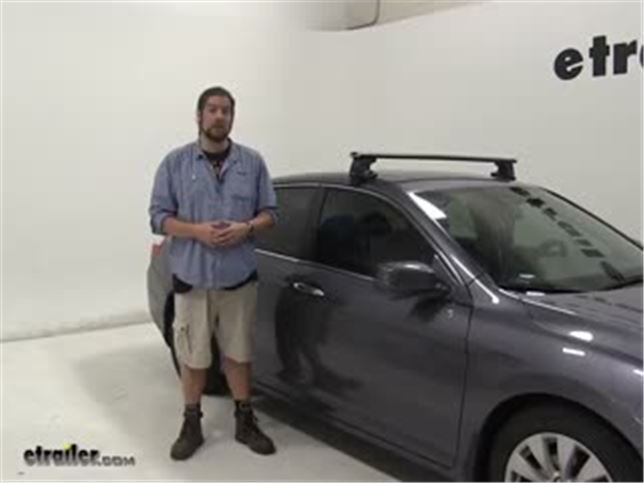
Video Transcript for Inno Roof Rack Review - 2015 Honda Accord
Speaker 1: Today on our 2015 Honda Accord, we're going to be test fitting the Inno Aero Roof Rack System, consisting of part numbers INXB130-2. These are the Inno aero crossbars, 51 inches long. And then to hold them in place we have the Inno Through Feet, part number INXS250. And then to attach it to our vehicle, we have the fit kit here and that's going to be part number, INK592. Now this roof rack system is great for carrying a wider variety of accessories such as bike racks, cargo baskets, and cargo boxes. And unlike the flush mount system, you actually have a little more space to fit more accessories on top and if you wanted to, we do offer another style of this where the bars come out past the actual feet here to provide even more space.These are aero shaped bars that will cut down wind noise and drag while you drive.
And they also have this strip up at the top here. That means you can utilize T-track accessories with this. Unlike the other roof racks, you don't have to take out the strip and cut it to length, you can push this down and slide the accessories in place once removing the end cap here. Moving down to the through feet, they do lock into place. The locks do come included with this, so it can be secured to your roof rack once it's installed.
And then moving down to our clamp kit here, it's going to attach itself to the door frame of your vehicle, and it is rubber coated, and it does have the rubber pad on the bottom of the through foot here, so that's actually going to help protect your vehicle once this is installed to make sure there's no scratches or dings or anything like that while you're installing this.And how we got it into place initially, we put it down where you see it now and then we measured from the center of the door jamb here to the center of the bar, and we did this on both sides to keep it even. So let's go ahead and show you how the other bar gets put together. We have it partially assembled on our table here. And we'll show you how the rest of it goes into place. We have everything in front of us that you're going to need for this particular install, So to make things a little bit easier, we're first going to flip our bars, our bar upside down and start our installation.We'll start by taking our bracket here, and this gets slid into the end of our bar.
We'll see that it has a little bit of a notch, to let you know which side it needs to be put in place, like so. Then we'll take our through foot, and this tab up at the top here, that gets slid to this portion here, like so. And gets pushed back, but not too far. Get it started with this bolt in the center, and our handy tool here. Next we're going to measure between the two feet to make sure that the spacing is what it needs to be in accordance with the instructions.So measure from the edge here, to this point here, as we can bring that in.
All right, once that's done, we'll take our Allen tool, and we'll finish tightening that down, so it'll stay in place. At this point we can take our foam pad, and how this works is you push it into the end here to take up that extra space that's not used and then cut it to length. This is what's going to help cut down the noise a little bit further, But for demonstration purposes we'll go ahead and leave that out. We'll install our end cap.Now we can move on to our fit kit. We'll start by installing our rubber pad along the bottom here. You can see how it fits into place. Move on to our clamp here. And now we can set this on the roof of our vehicle. We'll start by opening up our two rear doors. While we're setting our bar into place, we're just going to make sure that we do so gently, because we don't want it to come crashing down or anything like that. And you don't want that to happen either. Next we're going to measure from the door jamb to the center of the rear bar on both sides. Again, you'll find this measurement in your instructions. And then we'll make sure it's sitting evenly on both sides. This way a little bit.Alright, now we can start tightening it down. We'll take the included tightening tool, it's folded up position right now, and then we'll just snug it up against the doorframe. Once we have it snugged up, we're going to go back and forth and tighten it down evenly. Now, word to know to remember here, as you're tightening this down, it's going to give two or three audible clicks once you have it torqued to its proper specifications, just to let you know you don't need to tighten it any further. It does sound like you're breaking it, but I swear to you, you are not breaking it.And some other additional accessories that you can get for this, range anything from ski and snowboard carriers, kayak carriers, all from Inno. You can find it on our website. And our final step is we're going to install our end caps and I'm going to give you a couple quick measurements. These just slide in. And the measurements I'm going to give you, is going to be from the center of the roof, to the bottom and top of the bar. This is going to give you an idea of how high the sits off of your roof.So from the center to the bottom it's going to be about 2-7/8 of an inch. From the center to the top, it's about 3-7/8 inches. So that's more than enough space to fit those accessories that wrap around the bars, as opposed to use the T-track accessories. Plus should be able to use your sun roof without any issues. The weight capacity for these bars is going to be 165 pounds, but you always want to double check with your vehicle's manual to make sure your roof can take those weights. And there you have it for the Inno Aero Roof Rack System on our 2015 Honda Accord.
Customer Reviews
Inno Aero Roof Rack for Naked Roofs - Black - Aluminum - Qty 2 - IN49FV
Average Customer Rating: 4.8 out of 5 stars (124 Customer Reviews)
Low-profile, aerodynamic crossbars create an aftermarket roof rack for your vehicle. Aluminum bars have T-slots that let you mount channel-mounted carriers and accessories. Flexible rubber strips in T-slots keep out dirt and won't need trimming.by: ft05/21/2024
Waste of money. Most annoying couple hours spent in a long time. Extremely disappointed. Does not fit well. Not exactly a cheap option, but a cheap option in terms of fit and engineering. The instructions online and in the kits do not agree. But there is no helping the design. Plus there are no universal set of instructions--they are all individual items for the fit kit, the bars, etc. But a reasonably inclined person can figure it out so no big deal, but the engineering design is garbage--requires precise measurement yet the design is such that exact measurement is impossible due to the design.
Additionally, the parts are low quality Either low density plastic or easily stripped bolts. Even when as precise as possible, I wouldn't trust it with my kayak. What a mistake. Do yourself a favor and get a Yakima trailer or similar. It isn't that much more money in the scheme of things and then it isn't tied to your car. Can add a hitch to most vehicles anyway.
by: Brian01/13/2024
Works great wouldnt have bought anything else and protects paint from getn scratched since i dont roof rails


by: Zack03/20/2024
Noisy driving down the road. The whistle driving at 60mph is ridiculous and the best part, you can’t even exchange them! Thank you for making me look elsewhere for anything that you sell.
by: Peter04/22/2021
Installation went pretty smoothly. The trick is to fully understand each step before moving to the next. There are a lot of small parts which at first was a little intimidating, but soon I was able to "get with it". I love the finished product and think you helped me get a good deal. Thank you for that

by: Michael06/29/2020
Installation was a little tricky but once the "feet" were attached to the roof and the bars properly spaced, everything wrapped up very well.
There is no noticeable wind noise with these installed.

by: George12/06/2023
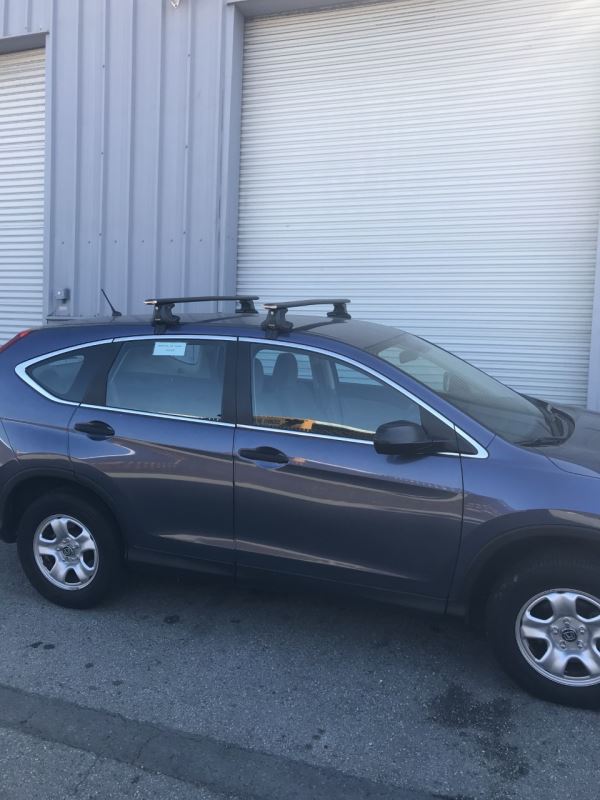
Great fit for my 2023 4Runner and looks amazing.
I was concerned that other brands that clamp to the existing roof rails could pop-off from upward forces due to bumps/wind (I have 2 17’ sea kayaks) - these INNO clamps have a strap that securely holds the bars in place.
Perfect height to be able to get straps/clamps under the bars, but low enough to keep them from hitting my garage door opening.
Great quality and super easy to install.
by: Nathan04/30/2023
2019HondaAccord
Feels premium and was pretty straight forward to install. I think it looks really good on the 2019 Honda Accord Sport. I plan to pair it with the Inno Wedge 660 cargo box. So far, it seems really well made and has a rubberized texture throughout. I installed it by myself in about 30 minutes without the instructions. It also shipped in only 2 days.


by: Bren09/29/2020
One was extremely hard to get on compared to the others (not sure if it was rough machining or something), but once it was on, all was good.


by: RJK in Delaware08/26/2023
Acura MDX
Racks were perfect for my Acura MDX. They fit like a glove and I have used them several times.
by: John A.04/26/2023
Has worked great for transporting my fishing Kayak as well as small loads of lumber. It has worked fine for about a dozen and a half boards at a time or a couple of sheets of plywood. Just make sure that you have a good way to strap them down as well as maybe a rubber mat to help hold everything in place. The noise from it on the high way can be a lot but certainly not as bad as some that I have heard. I figure that anything on the outside of a vehicle like that will produce some noise.
by: John B.04/09/2022
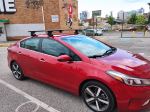
These crossbars are awesome!
by: Preston Ghim06/23/2023
2016 Subaru Outback Wagon
worked as expected, I used them to carry my hobie outback kayak (about 100lbs) on my Honda Civic 2016 Coupe (2 doors). They worked with no problem so far (1 year) even under high speed like 70mph.
by: Doug03/12/2022
Easy install on 2021 4runner off road premium. Looks clean, matchs blacked out on white, eadges of chrome cap matches mirror accents and tail lights. Etrailer video was simple to follow. What it didn't show was the foam rubber strips that you put on under the t tracks slot. With cover off and top most flat part of clamp to edge of bar measures about 5.5inches. Make sure the clamp is flush with bar when you measure. Overall looks good
by: Debbie11/12/2018
2017 Lincoln MKX
We recently purchased 2 kayaks & Thule roof racks from our local outdoor store.
After waiting 2 weeks for our roof racks and J bars to come in we found that the Thule racks did not fit our 2017 Lincoln MKX and they didn't make any racks that would. The vehicle does not have roof racks and has a moon roof.
After a couple of days searching the internet we discovered etrailer.com. We found the Inno roof racks, but still was not sure they would work. We spoke to a repesenative and he assured us that the racks we chose would fit and the Thule J bars we did return would also work. As you can see by the photos 2 days later we were happy Kayakers.


by: Matthew05/22/2023
This kit does not fit well. All measurements have been double and triple checked down to the millimeter. The lock on the covers interfere with the hooks. You have to apply so much pressure to get it to close that it makes the rack come loose. Not very satisfied
by: Mark05/15/2022
2014 Ford Flex
I bought these as part of a kit with 60" Aero bars and the appropriate kit for my 14 Flex. I spent probably an hour and a half double checking my measurements and getting them torqued down properly. I spaced the bars on top of the car just a little wider than proscribed because I was planning on carrying 4x8 plywood, and it looked better to my eye. One thing to watch for: The instructions for the car-specific kit (in my case INK263) show the foot spacing measurements for a square bar, and the measuring point for these feet and Aero bars is different. That measurement point is indicated in the instructions for the feet, not the kit. Same numbers, just different reference point. Otherwise, they look good and are rock solid.


by: Michael06/29/2020
Installation was a little tricky but once the "feet" were attached to the roof and the bars properly spaced, everything wrapped up very well.
There is no noticeable wind noise with these installed.


by: Craig01/19/2023
Dodge Durango
I did a lot of searching before selecting this rack for my Durango RT (no factory roof rails). It is easy to reinstall once the initial process is followed, I marked my doorjambs with a sharpie and it is easy to set up. Great product!
by: Linda03/23/2022
Definite five star….having all glass roof we were handled super, guided from phone to delivery , video to guide are installing, quality product thank you we’ll be back
by: Christopher10/09/2022
Great racks. High quality parts. Fit perfectly. Went together easily.


by: Daniel 08/29/2023
Well made product with durable components. Fit was good and assembly pretty easy. I would recommend this product.
by: Young07/12/2023
Everything in the end turned out great! Thank you Josh for expediting the situation and sending good vibes
by: Peter 10/03/2021
Pontiac Trans Sport Van
These are made perfectly for your vehicle. They are very secure when combined with the other Inno products. No worries of the rack system coming off. Using them to transport kayaks using kayak holders.
by: Spencer 07/05/2021
These feet are easy to use and go well wit the Inno system. I was worried since my car did not come with any roof racks, but this is the solution to haul things on my roof. They work well and are very secure.
by: Bren09/29/2020
One was extremely hard to get on compared to the others (not sure if it had some rough machining or something), but once all we’re on, all was good


25
857
Show More Reviews
See what our Experts say about this Inno Roof Rack
- 2021 BMW X3 Inno Roof Rack Options for Flush Factory RailsYes, there are Inno roof rack fits for the flush rails on your 2021 BMW X3. I prefer the crossbars that overhang the legs instead of ending in them because you get more real-estate to work with but there is something to be said for the sporty look the latter offers. Below are the parts needed for either roof rack style for your vehicle. Flush Feet Style (Sporty) 42" Aero Crossbars - # INXB108-2 Flush Feet - # INXS400 Fit Kit - # INTR140 Through Feet Style (Standard) 54" Aero Crossbars...
view full answer... - Does Inno Roof Rack Fit 2019 Nissan Rogue Sport With Bare RoofYes, the Inno rack does indeed fit your 2019 Nissan Rogue Sport with a bare roof, and you'll need a few parts to make the crossbars you listed fit, which are the feet that mount the crossbars, and the fit kit that the feet go on. So, the exact parts you need for the Inno roof rack on your 2019 Nissan Rogue Sport with a bare roof are the following: - Inno Aero Crossbars # INXB138-2 - Inno Through Feet for Aero Crossbars # INXS250 - Fit Kit # INK764 I verified all of this with Yakima...
view full answer... - Recommened Eye Bolts, Load Stops, and Load Straps for Inno Aero CrossbarsFor your Inno Aero Crossbars # INXB138-2 you can use the Eye Bolts for Yakima HD Bar, JetStream, FlushBar, and RailBar Crossbars # Y01162 with the Load Stops for Yakima HD Bar, JetStream, FlushBar, and RailBar Crossbars # Y01161 and the Yakima HD Hook Straps with Cam Buckles # Y01165.
view full answer... - Are Inno Crossbars Compatible w/ the Rhino-Rack Nautic Sup on a 2019 Toyota 4Runner?The Rhino-Rack Nautic SUP item # RR570 will work great with Inno crossbars. The 54" Inno Aero Crossbars item # INXB138-2 you were looking at are 3" longer than what is recommended for your 2019 Toyota 4Runner. They will still work with the Inno Through Feet for Aero Crossbars item # INXS150 that attach to your side rails, however they will stick out an extra 1-1/2" on either side. For 51" crossbars you will want item # INXB130-2. I have linked an installation video below of this roof...
view full answer... - Which Inno Roof Rack System for 2017 BMW X5Yes. The Inno Roof Rack System that uses parts # INXB138-2, # INTR140 and # INXS450 is the correct fit for your 2017 BMW X5 and has been confirmed. I've linked a photo of the way these attach to the rails and you can see the clamp that will attach to the outside of the flush mounted rails on your X5, and provide a secure fit.
view full answer...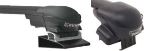
- Roof Rack Fit on a 2014 CamryThe Rola 59733, is not a confirmed fit for your 2014 Toyota Camry. The good news is, there are a number of options available to you, and I recommend the Inno Crossbars # INXB138-2, Feet # INXS250, and Fit Kit # INK872.
view full answer... - Roof Rack Recommendation for a 2019 Honda Civic Coupe with Naked RoofFor your 2019 Honda Civic Coupe we have roof rack fits from Inno and I recommend using the aero crossbars as they look better and do a better job at reducing wind noise and drag than the square crossbars. Here are the parts you'll need: 54" Inno Aero Crossbars - # INXB138-2 Through Feet - # INXS250 Custom Fit Kit - # INK683
view full answer... - Comparing Inno and Rhink Rack Roof Rack Systems for 2017 GMC YukonThere are a couple of things that set the Rhino Rack system using # RRVA150B-2, # RRRCH4, # RRRCP43-BK apart from the Inno system that uses parts # INXB138-2, # INXS350, # INTR154 you're looking at. I'll start out by saying that when it comes to installation, they will install in basically the same manner on your 2017 GMC Yukon, so there's no real benefit of one over the other. Comparing the two, I generally think that having the extra few inches of bar space that the Rhino Rack provides...
view full answer... - Recommended Roof Rack For Carrying Cargo On 2012 Honda Accord SedanI recommend going with the largest crossbar available so that you have as much room as possible for your cargo. A nice large setup that fits your 2012 Honda Accord Sedan is the Inno Aero Crossbars - Aluminum - Black - 54" Long - Qty 2 # INXB138-2. You'll also need the appropriate Feet # INXS250 and Fit Kit # INK745.
view full answer... - Recommended Roof Rack for 2016 Toyota CamryI reached out to my technical fit contact at Thule and she said that the fit for Thule Aero 400 feet stopped in 2011 so there are no compatible fits past that date. For your 2016 Toyota Camry, I recommend the Inno system consisting of crossbars # INXB138-2, feet # INXS250, and fit kit # INK872. This is a complete system with Aero Bars compatible with your vehicle. If you want a Thule roof rack, I recommend the Thule SquareBar Crossbars - Steel - 43" # TH712100, the Evo Clamp Feet...
view full answer... - Comparing Rhino-Rack and Malone Roof Cargo Boxes for a 2016 Audi Q5When comparing the Malone and Rhino-Rack cargo boxes I recommend Rhino-Rack. Malone is more of an entry-level product line while Rhino-Rack is more of the mid-tier brand and quality - so while they both might be priced around the same and have similar features, I can guarantee the Rhino-Rack is built better. I then recommend pairing this with the Inno roof rack system for the flush rails on your 2016 Audi Q5 because they have great quality at a mid-tier price-point as well. This means...
view full answer... - Placement of my Inno Roof Rack System on my 2017 Lincoln MKXWhen installing the Inno Aero Crossbars part # INXB138-2, Inno Through Feet for Aero Crossbars part # INXS250 and the Custom Fit Kit for Inno Crossbars part # INK676 we must follow the installation instructions exactly. This is where the rack was designed to to be installed and tested for performance. Mounting it in any other location would void the warranty and may lead to damage occurring to your 2017 Lincoln MKX.
view full answer... - Do The Feet Of An Inno Roof Rack Have To Be Retightened Every Install On A 2022 Honda Pilot Hey Christian, Since Inno designed their roof rack system to use the fixed mounting points on your 2022 Honda Pilot's rails you would have to loosen the tension knob and retighten it every time that you wanted to remove/reinstall the crossbars. The Allen wrench is just there to help give you a bit more leverage when tightening the knob. I've listed out the components you'll need for the roof rack below: Inno Aero Crossbars # INXB138-2 Inno Through Feet for Aero Crossbars # INXS350 Custom...
view full answer... - Roof Rack Recommendation For 2007 Toyota SiennaIf by Thule Pro you mean the Thule ProRide XT Roof Bike Rack # TH598004 it is compatible with all types of roof rack bars. The same goes for if you have the older version of the Thule Pro Ride. If neither of these are what you have, I would be happy to provide another recommendation if you can let me know what model you have. If your 2007 Sienna has raised rails, I recommend the Inno Aero roof including parts # INXB138-2 and # INXS150. This quality rack features aero crossbars that reduce...
view full answer... - Recommended Roof Rack And 2 Kayak Carrier For 2016 Toyota 4RunnerFor your 2016 Toyota 4 Runner, I recommend the Inno Aero Crossbars # INXB138-2 and Inno Through Feet for Aero Crossbars # INXS150. For your Kayak Carrier, to avoid the J-style, I recommend the the Thule Stacker Kayak Carrier System # TH830. For a bottom riding option, I recommend the Thule Top Deck Rooftop Kayak Carrier System with Tie Downs, # TH881. The only issue you may run into with this style is the width of your kayaks.
view full answer... - Roof Rack and Kayak Carrier Recommendation for 2016 Mazda CX-5 With Naked RoofThe best option for a roof rack on your 2016 Mazda CX-5 with a naked roof will be one with longer crossbars to make loading your kayak easier, as well as having an aerodynamic shape for minimizing wind noise and resistance, and durability to withstand a lot of use. The most cost-effective option for a roof rack that fits your '16 CX-5 and meets all of those criteria is from Inno and consists of the following parts: - Inno Aero Crossbars - 54" Long # INXB138-2 - Inno Through Feet for...
view full answer... - How to Carry Spare Tire on Roof of 2014 Mazda CX-5Typically we only see front mount hitch receivers for bigger trucks or vehicles that are known for going off-road like a Jeep. To carry your spare tire in an alternate location on your 2014 Mazda CX-5 we will need to look to the roof. I recommend using the Yakima OffGrid # Y07138 and the Spare Tire Carrier # Y07076 to accomplish this. The OffGrid has a really sleek look and it's really easy to install. The crossbars on top can double as roof rack bars for a bike or kayak carrier if you...
view full answer... - Best Roof Rack and Surfboard Carrier for a 2020 Toyota 4Runner with the Raised Side RailsWhile it is true that price does typically reflect quality, when it comes to roof racks you will be just as happy with the performance of a middle-of-the-road aero-style rack as you would with one of the ones at a higher price-point. Because of this I highly recommend the Inno roof rack for your 2020 Toyota 4Runner with the raised side rails. This consists of 54" Aero Crossbars # INXB138-2 and the Through Feet # INXS150. It not only gives you the aerodynamic crossbars but the feet also...
view full answer... - Rhino-Rack Roof Rack for 2009 Chevy UplanderIf your 2009 Chevy Uplander is equipped with factory raised rails that run front to back on the roof then we do have the Rhino-Rack Vortex Roof Rack System that consists of # RRVA118B-2 for the two 46 inch Vortex Aero Crossbars in Black or # RRVA118S-2 for Silver and # RRSX100 for the SX Series Legs. This is a sleek, aerodynamic system that will provide you with a quiet ride and a weight capacity of 165 pounds. I have attached a video review that you can check out as well. If your Uplander...
view full answer... - Can I Mount the Rightline RL100D90 Next to a Ski Carrier on My 2016 Volkswagen Tiguan?I have a solution for you. In order to mount the Rightline Gear Car Top Duffel Bag # RL100D90 to your vehicle with crossbars, you will have to mount the bag vertically (pointing toward the front/rear of the vehicle). and use the straps to either attach to your doors or to your rails on your vehicle. This is the setup used in the video I attached to this answer. To find out whether you have enough room to use the Rightline Gear Car Top Duffel Bag # RL100D90 with a roof-mounted ski rack,...
view full answer... - Do Rhino-Rack Roof Racks Require Drilling on a 2006 Toyota TundraThe roof rack that you mentioned, part # RR69GR, is not compatible with the 2006 Toyota Tundra. The only Rhino-Rack roof racks for your vehicle do require drilling to be used with tracks. Instead, I recommend using Inno Aero Crossbars, part # INXB138-2. They're aero-style bars with T-slots, so they're compatible with most accessories. To mount them, you need the Through Feet, part # INXS250, and the Custom Fit Kit, part # INK153. This doesn't require drilling since the fit kit mounts...
view full answer... - Is It Possible To Fit Two Thule Hullavator Kayak Carriers On 2010 Mercury Mariner?The Thule Hullavator Kayak Carrier # TH898 requires a minimum of 28-1/2" crossbar space and the crossbars must overhang at least 4" on each side of the towers/feet. If you installed crossbars that were 57" long that overhang 4" on each side then this would work, however, the weight limit of your vehicle's roof or roof rack may be an issue. Each Hullavator weighs 40lbs then you have the weight of each kayak. I checked the owner's manual for your vehicle and Ford states that you should not...
view full answer... - Will Rhino-Rack Ski and Snowboard Carrier Fit 2021 Acura ILX With Naked RoofThe Rhino-Rack Ski and Snowboard Carrier # RR576 is designed to clamp onto or fit the T-slot on roof rack crossbars. You will need to add a roof rack to the 2021 Acura ILX to be able to attach any ski/snowboard carrier. I recommend the Inno Aero roof rack which will clamp onto the doorjambs for installation and can easily be removed when not in use. This is a nice rack at a reasonable price point. You will need the following parts: -Inno Aero Crossbars # INXB138-2 -Inno Through Feet for...
view full answer... - Roof Rack Recommendation to Carry Ladders on 2015 Mazda CX-5 with Naked RoofThule has a roof rack that will fit and work great for your 2015 Mazda CX-5 that has a naked roof and moonroof with the roof rack part numbers # TH711420, # TH710501, and # TH145110. This gives you an aerodynamically shaped roof rack (minimal wind noise) with plenty of capacity that's very well made and easy to install. Then for a set of load stops that fit these bars to make carrying a ladder easy you'd want the part # 753-3761. For straps then to hold the ladders to the rack the part...
view full answer... - Recommended Roof Rack For A 2016 Ford Fusion SE Hey Alec, For your 2016 Ford Fusion I recommend the recommend a roof rack from Inno: Inno Aero Crossbars # INXB138-145 Inno Through Feet for Aero Crossbars # INXS250 Custom Fit Kit for Inno XS200, XS250, and INSU-K5 Roof Rack Feet # INK860 As with any other roof rack option for your vehicle you will not likely be able to open the sun roof while the bars are in place, but if you did the wind/noise from the crossbars would be very annoying. This isn't an issue with the quality of the...
view full answer... - Roof Rack For 2015 Ford Fusion For KayakFor your 2015 Ford Fusion I do recommend the Inno roof rack because it's a great value. It will perform just as well as other options, but at a lesser cost. The correct fit for your '15 Fusion is the following: - Inno Aero Crossbars # INXB130-138 - Inno Through Feet # INXS250 - Custom Fit Kit # INK860 Then for a kayak carrier that will fit the rack and has the capacity to haul your 75 lb kayak, I recommend the Swagman Exo Aero Rooftop Kayak Roof Rack # S65145. This carrier has a 100...
view full answer... - Recommended Roof Rack for 2023 Kia Sportage with Bare RoofThe roof rack I recommend for a 2023 Kia Sportage with bare roof is the Thule WingBar Evo Crossbar System composed of part # TH711400, part # TH710501, part # TH145050. This system uses custom fit door clips which clamp onto the door sill for a tight, custom fit. The crossbars have an aero shape for the best wind resistance and they have integrated channels so you can use all of your favorite accessories.
view full answer... - Mixing The Old With The New On My 2010 Toyota Prius With Thule And Inno Roof Rack PartsI can definitely find a solution that will work for your 2010 Toyota Prius. Unfortunately, it will not be a Thule roof rack. The Thule foot pack and fit kit for your Volkswagen Jetta are not compatible with the new Thule products. Our best solution would be using the Thule square crossbars with an Inno roof rack. The Inno roof rack you need will consist of the following: Inno Feet for Square Crossbars - Naked Roofs - Black - Qty 4, part # INSUT and Custom Fit Kit for Inno XS200, XS250,...
view full answer...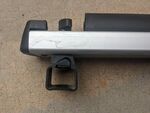
- Does Inno Roof Rack Fit 2019 Nissan Rogue Sport With Bare RoofYes, the Inno rack does indeed fit your 2019 Nissan Rogue Sport with a bare roof, and you'll need a few parts to make the crossbars you listed fit, which are the feet that mount the crossbars, and the fit kit that the feet go on. So, the exact parts you need for the Inno roof rack on your 2019 Nissan Rogue Sport with a bare roof are the following: - Inno Aero Crossbars # INXB138-2 - Inno Through Feet for Aero Crossbars # INXS250 - Fit Kit # INK764 I verified all of this with Yakima...
view full answer... - Roof Rack Recommendation for 2016 Kia Soul and 2014 Honda CrosstourIf possible it's a better option to go with a roof rack that attaches to fixed mounting points on the roof of the vehicle than using door clamps. This will give you a quieter and less likely to damage vehicle paint solution. For that the best option is the Rhino Rack Roof Rack part numbers # RRVA137B-2, # RRRLKVA, and # DK404. Thule doesn't have any racks that fit your 2014 Crosstour so the best option for that would be the Inno Aero rack part numbers # INXB123-130, # INXS250, and # INK587....
view full answer... - 2019 Ford Fusion Roof Rack RecommendationWe definitely have some roof rack options for your 2019 Ford Fusion but unfortunately none of them are from Rhino-Rack. I recommend using the Inno aero-style roof rack setup which includes the following: 54" and 57" Aero Crossbars - # INXB138-145 Through Feet - # INXS250 Fit Kit - # INK860 There is a square bar system from Inno but it's about the same price which is why I recommend going with the nicer aero bars. Not only do they look more sleek but they also help to cut down on wind...
view full answer... - Inno Roof Rack and Yakima Kayak Carrier Fitment on a 2010 Honda Accord CrosstourThanks for reaching out to verify, Frank! Yes, those parts (listed below) will fit great together and on your 2010 Honda Accord Crosstour with the naked roof. Inno Roof Rack - Aero Crossbars # INXB130-138 - Through Feet # INXS250 - Fit Kit # INK587 The Yakima Kayak Roof Rack w/ Tie-Downs # Y04083-04082 is designed to clamp around this very style of crossbar to everything will fit very neatly together!
view full answer... - What Roof Rack Set Up Works with My 2020 Chevrolet Traverse with a Bare Roof? For a great roof rack for your 2020 Chevrolet Traverse with a bare roof, I recommend the following parts: - Inno Aero Crossbars - Aluminum - Black - 60" Long - Qty 2 # INXB153-2 - Inno Through Feet for Aero Crossbars - Naked Roofs - Qty 4 # INXS250 - Custom Fit Kit for Inno XS200, XS250, and INSU-K5 Roof Rack Feet # IN63FR With this roof rack system, you will be able to transport cargo and accessories up to 120 pounds. The Through Feet come with locks to secure the system to your roof...
view full answer... - Recommended Crossbars for a 2004 Toyota Tundra Double Cab With a Naked RoofFor your 2004 Toyota Tundra, I recommend checking out the Inno Aero Crossbars # INXB145-2, with the Inno Through Feet for Aero Crossbars # INXS250 and the Custom Fit Kit for Inno XS200, XS250, and INSU-K5 Roof Rack Feet # INK532. This cross bar setup will work with your naked roof and provide you with 57" long crossbars with integrated top channels for mounting roof top accessories. These bars also have a maximum dynamic weight capacity of 165 lbs, so you'll have plenty of capacity for...
view full answer... - Recommended Inno Roof Rack For 2013 Honda Civic Coupe Naked RoofThe custom fit kit part # INK642 that you referenced is the correct fit kit for the 2013 Honda Civic Coupe. To complete the roof rack system you will need Inno Aero Crossbars part # INXB130-138 and Inno Through feet part # INXS250. The Inno crossbars are aerodynamic to cut down on wind noise and have integrated T-slots to make mounting accessories easier. The through feet are designed so the bar sits on top of the feet and allows for bar overhang, which comes in handy if you have a water...
view full answer...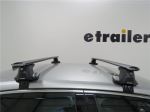
- What Roof Rack Fits Both My 2011 Volkswagen Jetta and My 2007 Toyota Matrix? I have a great solution for you. While we don't have a complete interchangeable roof rack that fits both your 2011 Volkswagen Jetta (bare roof) and your 2007 Toyota Matrix (bare roof), we do have a system that can use the exact same crossbars and mounting feet. The only difference between the two sets of roof racks are the fit kit that connects the feet to the roof of the vehicles. The difference parts are needed because fit kits are designed for specifically to fit the contours of roofs...
view full answer... - Recommended Roof Rack and Ski/Snowboard Carrier for a 2012 Volkswagen JettaThe Inno Dual Angle Ski and Snowboard Carrier INUK729 (discontinued) is a great ski/snowboard carrier but it only fits with certain vehicles which unfortunately does not include your 2012 Volkswagen Jetta. The good news is that we still have options for you though! For your application I recommend installing the Inno Aero roof rack system because it's simple, yet doesn't lack any features and is more cost-effective than most of the other roof rack systems that fit your vehicle. Here are...
view full answer... - What Inno Aero Bar Roof Rack Parts Are Needed for a 2004 Toyota TundraYes, the Inno Roof Rack part numbers # INXB153-2, # INXS250, and # INK532 have been confirmed as a fit for your 2004 Toyota Tundra so it would fit and work well for you.
view full answer... - Roof Rack Fit on a 2014 CamryThe Rola 59733, is not a confirmed fit for your 2014 Toyota Camry. The good news is, there are a number of options available to you, and I recommend the Inno Crossbars # INXB138-2, Feet # INXS250, and Fit Kit # INK872.
view full answer... - Roof Rack Recommendation for a 2019 Honda Civic Coupe with Naked RoofFor your 2019 Honda Civic Coupe we have roof rack fits from Inno and I recommend using the aero crossbars as they look better and do a better job at reducing wind noise and drag than the square crossbars. Here are the parts you'll need: 54" Inno Aero Crossbars - # INXB138-2 Through Feet - # INXS250 Custom Fit Kit - # INK683
view full answer... - Recommended Roof Rack For Carrying Cargo On 2012 Honda Accord SedanI recommend going with the largest crossbar available so that you have as much room as possible for your cargo. A nice large setup that fits your 2012 Honda Accord Sedan is the Inno Aero Crossbars - Aluminum - Black - 54" Long - Qty 2 # INXB138-2. You'll also need the appropriate Feet # INXS250 and Fit Kit # INK745.
view full answer... - Recommended Roof Rack for 2016 Toyota CamryI reached out to my technical fit contact at Thule and she said that the fit for Thule Aero 400 feet stopped in 2011 so there are no compatible fits past that date. For your 2016 Toyota Camry, I recommend the Inno system consisting of crossbars # INXB138-2, feet # INXS250, and fit kit # INK872. This is a complete system with Aero Bars compatible with your vehicle. If you want a Thule roof rack, I recommend the Thule SquareBar Crossbars - Steel - 43" # TH712100, the Evo Clamp Feet...
view full answer... - Most Hidden Hitch For A 2010 VW GTI GolfAfter using the fit guide, we see that there is only one hitch available for your 2010 Volkswagen GTI and the one you're looking at # 24825 will not fit. Even if it did, it would stick out quite a bit but I have one for you that won't. The Curt Class 1 Round Tube Trailer Hitch has a maximum gross trailer weight: 2,000 lbs and maximum tongue weight: 200 lbs. Even though this has a visible cross tube, it is not super noticeable because it sits a bit back and under the vehicle. Check out...
view full answer...
- Inno Roof Rack for 4-Door 2018 Ford Focus Yes, the Inno Custom Fit Kit # INK528 that you referenced is the correct Fit Kit for an Inno Roof Rack on your 4-Door 2018 Ford Focus. You will then just need to add the appropriate mounting feet and crossbars. I recommend the Inno Through Feet # INXS250 paired with the 51" Aero Crossbars # INXB130-138 because their sleek design is going to allow for a much quieter ride during travel along with just looking really nice on your Focus. I have included a short video demonstration that you...
view full answer...
- 2013 Toyota Prius Cost-Effective Roof Rack RecommendationSince Thule and Yakima roof racks are premium options with similar pricing I recommend going with the Inno roof rack for your 2013 Toyota Prius since pricing is a factor for you. Even though Inno is at a lower price point it still has great quality that I know you'll be happy with: 51" and 54" Aero Crossbars - # INXB130-138 Through Feet - # INXS250 Fit Kit - # INK865 48" Fairing - # INA262 The nice thing about the Inno crossbars is that you can definitely upgrade them so that they are...
view full answer... - Recommended Roof Rack With Highest Weight Capacity For 2015 Toyota Prius The Inno aero roof rack that you are referring to includes InnoAero Crossbars - Aluminum - Black - 51" Long and 54" Long # INXB130-138, Inno Through Feet # INXS250, and Custom Fit Kit # INK865. This system is indeed locking; it secures the roof rack to your vehicle's roof and also secures any track-mounted accessories to the crossbars. The track-mounted accessories simply slide into the integrated T-slot track on top of the crossbars. The weight capacity for this system is 140lbs, but...
view full answer... - What Roof Rack Do I Need for My 2001 Naked Roof Acura TL to Carry a 45 Pound Kayak?For your 2001 Acura TL to transport a 45-pound kayak, I recommend the following roof rack system: - Inno Aero Crossbars - Aluminum - Black - 51" Long - Qty 2 # INXB130-2 - Inno Through Feet for Aero Crossbars - Naked Roofs - Qty 4 # INXS250 - Custom Fit Kit for Inno XS200, XS250, and INSU-K5 Roof Rack Feet # INK249 If you need a kayak carrier to transport on the Inno Aero Crossbars, I recommend the Rhino-Rack Nautic Roof Kayak Carrier w/ Tie-Downs # RR571. The Nautic Kayak Carrier is...
view full answer... - Recommended Roof Rack for 2017 Fiat 500x with SunroofFor your 2017 Fiat 500X, the roof rack I recommend for your vehicle is the Inno Aero Crossbars # INXB130-138, along with the Inno Through Feet # INXS250, and the Fit Kit # INK482. This combination will allow you to use your Thule accessories whether they are channel mounted or clamp on. This system comes with the integrated locking covers for increased security and has the aero bars for a quieter rack. This roof rack will give you a crossbar spread of 26 inches, so it will work with...
view full answer... - Will the K710 (IN95FR) Fit Kit Work With Both the INSU-K5 and INSUT Inno Feet For Square BarsGood news! The Custom Fit Kit # IN95FR is the K710 and will work with both your INSU-K5 and the newer # INSUT.
view full answer... - 2020 Accord 4dr Sedan Inno Rack Bar SpreadThe 2020 Honda Accord Roof Rack by Inno has a bar spread of 26 1/4". It consists of the following; Inno Square Crossbars - Steel - Black - 50" Long - Qty 2, part # INB127, the Inno Feet for Square Crossbars - Naked Roofs - Black - Qty 4, part # INSUT, and the Custom Fit Kit for INSU-K5 Roof Rack Feet K710, part # IN95FR. This roof rack has a weight limit of 120lbs. With the square crossbars you can attach any accessories that clamp to crossbars. This rack has locking torque knobs that...
view full answer...
Do you have a question about this Roof Rack?
Info for this part was:

Edited by:
Daron K

Updated by:
Alex H

Written by:
Ashley K
At etrailer.com we provide the best information available about the products we sell. We take the quality of our information seriously so that you can get the right part the first time. Let us know if anything is missing or if you have any questions.
Product Experts Available Now!
Call 1-800-940-8924
Thank you! Your comment has been submitted successfully. You should be able to view your question/comment here within a few days.
Error submitting comment. Please try again momentarily.