
To see if this custom-fit item will work for you please tell us what vehicle you'll use it with.
Thank you! Your comment has been submitted successfully. You should be able to view your question/comment here within a few days.
Error submitting comment. Please try again momentarily.
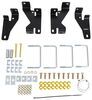
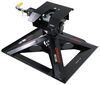
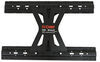
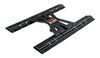
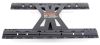
Install your fifth-wheel trailer hitch in half the time with this vehicle-specific bracket kit. Requires no drilling and provides a custom fit for your vehicle. Includes everything you need for installation.
Features:

Videos are provided as a guide only. Refer to manufacturer installation instructions and specs for complete information.
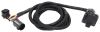
Today on our 2006 Dodge Ram Pickup, we'll be installing the Curt Custom Fifth Wheel Install Kit, part number C16420-204. To begin our install we'll first go ahead and raise the vehicle and remove the rear wheels. Now, with our rear wheels off, you'll notice the spare tire is also missing on this application. If yours is still in position, recommend to go ahead and lower and remove it to gain more working room underneath the vehicle. Next, we'll need to relocate the manufacturer's wiring harness on the inside of the frame rail to allow for our brackets and hardware. To do that, we're just going to use our trim panel tool and pop the fasteners free that hold it to the frame.
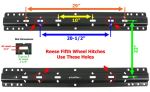
In this application there's a total of 4 fasteners and we'll also be compensating for the air line. Next, we're going to put the rear rail in position. For a short box bed like this one, we'll be 26 3/4" from the end of the pickup bed. It is very important to measure it out and make sure that you're parallel to the end of the pickup bed and even from side to side. Next, we're going to drill out the second row attachment points. In accordance with the rail, it will be the inside hole of the 4 possible outside attachment points.
Quick tech tip, to keep it straight I'm going to go ahead and use a paint marker to mark the attachment points. It also helps me to find the center of the attachment point. We're ready to drill out the attachment points for this application. Because we have a spray in bed liner, using a center punch is not as effective as if it we're just a painted bed surface. If you have a painted bed surface, it is recommended to go ahead and center punch your attachment point and then drill it out. For this application we're going to use an 1/8" bit as a pilot for our attachment points.
Note most 1/8" bits are not long enough to go all the way through the pickup bed and then through the hat channel. If that's the case, you may need to move up to an extra long 1/4" bit to go down through your attachment points including the hat channel underneath the pickup bed. Now, with our holes drilled out we're going to go ahead and move back underneath the pickup bed, take our rear brackets, set them into position, and make sure that our pre-drilled holes that go through the pickup bed and the hat channel line up with the bracket. Here's our pre-drilled hole. Here's our driver's side side bracket with the 2 attachment points that go to the inside of the frame rail.
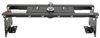
The taller one goes to the rear of the vehicle, with an additional attachment point both at the bottom of the frame and side of the frame. Go ahead and slide the bracket into place. Now, as I hold the bracket in position tight to the hat channel in the frame, you can barely see our pre-drilled hole in the window. Our pre-drilled hole is going to have to move closer to the rear of the pickup bed approximately 3/8" in order to fall inside the slot that we can get our hardware in place. In a perfect world, our pre-drilled hole would have landed here in our hat channel, so we'll need to relocate our pre-drilled hole. Now we'll move back into the pickup bed and repeat the same process of drilling out our attachment points. Once we've drilled the second set of attachment points, we'll again move underneath, put our brackets in position, and verify that they line up with the slots of the bracket. We'll now go ahead and re-position the rail back over our attachment points. Note, that will be the second set of attachment points that we drilled out so that it better suited the hat channel and bracket. Now, with our rear rail in place, we're going to put the front rail in position 22" from the center of the rear rail to the center of the front rail. We'll center it in our pickup bed and we'll draw out our attachment points for row 3. Once we have our pilot holes drilled out, we'll move underneath the vehicle, hold our brackets up to the frame and make sure it lines up with the attachment points in the bracket. Now, we'll take our front bracket, we'll set it up on the frame and line it up with our pre-drilled hole and the attachment point. Now, once we've verified that our rails line up with our brackets and attachment points, we'll go ahead and drill out the remaining attachment points for both rails. Now, with all our pilot holes made, we'll use a step fit process to open them up to their final size of 9/16. Next, we're going to move underneath the pickup bed, put the rear frame brackets into position, then install a U-bolt, 1/2" conical tooth washer and nut to loosely secure the frame bracket into place. Now we'll install the conical tooth washer, the teeth of the washer facing the bracket, and then our nut. Just install our fasteners finger tight at this time. Now with our passenger's side installed, I'll repeat the same process on the driver's side. Next, we'll take the 1 3/4" carriage bolt and 3" by 1 1/2" large spacer block. We're going to feed them into the frame using the 1/2" bolt leader provided with the install kit. Then, once we pull it down through the frame through the bottom of our rear bracket, we'll secure it with a conical tooth washer and nut. We've already got our hardware in position, we'll have to slide the carriage bolt and block into the frame. You can use the pre-drilled hole in the bottom or the side. However, you'll need to enlarge it slightly so that we can get our block into the frame. Using a round bit on a drill, we're going to hone it out just enough so we can get our block in place. You could also use a file or a drill bit and drill out a small section so that your block will fit. Now once we have it large enough to get our block in place, we'll go ahead and take the bolt leader, go through the attachment point and out the access hole. Feed the block into the frame, the bolt following. Once we pull it down through the bracket, we'll go ahead and remove the bolt leader and install the conical tooth washer and nut. Keep in mind the teeth of the washer will face the bottom of the bracket. Now, with our passenger's side done, we'll move over to the driver's side and repeat the same process. Next, we need to install the support collars into the hat channel for our rear rail, second row attachment points. The support collar will sit inside the hat channel and once it's tightened down, won't allow the hat channel to be crushed. To make it easier to get it in position, use a bolt leader or pull wire that's provided with the install kit. You can feed the pull wire through the attachment point in the pickup bed, through the collar, then down through the hat channel and bracket. Now, once I've fed the pull wire and collar into the hat channel, I'm going to push it past the attachment point where I can grab the pull wire with a pair of pliers and pull it down through the bottom of the hat channel and the bracket. Now, when settling this collar, it actually made it a little easier on me in that I didn't have to feed my pull wire through the bottom of the hat channel or bracket. As I would push the collar into the hat channel it stood right up against the bottom of the pickup bed and then I just used a pry bar or pliers to push it into position. Now with the passenger's side done, we'll move over to the driver's side and repeat the same process. Now we've got the lower bracket hardware on, then we put the shoulders into the hat channel. We'll re-position the rail back over our attachment points and put our hardware in place. For row number 1, closest to the end of the pickup bed, we're using the 1/2" carriage bolt, 1 3/4" long. Then for row number 2 that goes down through the hat channel, we'll use the 1/2" carriage bolt 4 1/2" long. Now, I'm going to need a little persuasion here on the longer carriage bolt here for the driver's side. I'll just use the soft side of my hammer to tap it in place. Now, to secure the 4 1/2" carriage bolt, we'll be using the 1/2" conical tooth washer and 1/2" nut. For the front row fasteners, the 1 3/4", 1/2" carriage bolt here, we're going to use the same fasteners only we're going to add a U shaped spacer block around the bolt between the bracket and the bottom of the bed so that it will compensate for the bed corrugation and doesn't get smashed as we tighten down our hardware. Once we get our U shaped spacer block in place, we then install the conical tooth washer and nut. Again, we'll install each of our fasteners finger tight until we have them all in place. Now, with the passenger's done, we'll move over to the driver's side and repeat the same process. Now we're ready to put the front rail back over our attachment points. Before we put the rail in place, I'm going to go ahead and set my U shaped spacer blocks into position. This will prevent smashing the bed corrugation when we tighten down the hardware here in the front. Next, using our fifth wheel head or slider, in this case, we're going to set it into position on top of our rails to help square up the rear to front rail. Now with the slider unit in place, we're going to go ahead and take the pins and put it in position. We don't need to install the keepers as we will be taking it back out, but this will help to line up the front and rear rails with each other. We'll go ahead and position our front bracket on the outside of the frame with our U bolt going from inside out to secure it with our 1/2" conical tooth washer and 1/2" nut. Again, we'll just install our fasteners finger tight this time. With our passenger's side installed, I'll move over to the driver's side and repeat the same process. Now, with our front brackets in place, for the third row through the bracket, we'll go ahead and take our carriage bolts, drop them down through the base rail, through the pickup bed and for the front row, we'll simply go down through the pickup bed where we'll secure it with additional fasteners. Now, for the fourth row, front rail, closest to the cab, for fasteners that just go down through the base rail and then through the pickup bed, we'll install a block, split lock washer, and then a nut. Here on the passenger's side, you'll also need to work around the shock tower. For our third row fasteners, we'll have a conical tooth washer, teeth facing the bracket, and then a 1/2" nut. Move over to the passenger's side and repeat the same process. Now we're ready to start tightening down our fasteners. We'll tighten down the carriage bolts that go through the pickup bed and our brackets first. After we tighten those down, we'll then tighten down the fasteners that secure the brackets to the frame. Once we have all the fasteners tightened down, we'll then go and torque to specifications a indicated in the instructions. Keep in mind when tightening and torquing our hardware, each process we do here on one side, we're going to repeat identically on the opposite side. Now, with all the installed fasteners secured and torqued to specifications, we're going to go ahead, pull our pins, take our slider unit out, and re-install it to make sure it lines up nicely. Now we know we've got a good fit and our pins go in nice and easily, let's check and make sure that the unit will slide. We'll pull our handle out, lock it, and then slide it. Now that we know our slider is operational, we'll need to install 2 more fasteners. They're going to go on the rear edge of both base rails in the dead center. We'll install an additional 1/2"carriage bolt that will go down through the U shaped spacer block, through the pickup bed, and then get fasteners underneath. We'll need to drill it out. Again, we'll use a small pilot bit and then open it up to a 1/2" size. Now with the hole drilled out, we'll slide our block in place and drop our carriage bolt in position. Now our fasteners will get a spacer block, split lock washer, and a 1/2" nut. We'll repeat the same process for the second rail. Once we have our hardware installed finger tight, we'll go ahead and run it down, then we can torque to specifications as indicated in the instructions. Now, with all our fasteners installed, secured, and torqued to specifications, we can go ahead and re-install the wiring harness and air lines that we removed earlier. Now, with our install complete, we can go ahead and re-install the rear wheels and we're ready to hit the road. With that, that's going to complete the install of the Curt Custom Fifth Wheel Installation Kit, part number C16420-204, on our 2006 Dodge Ram Pickup 2500. .
Average Customer Rating: 4.6 out of 5 stars (130 Customer Reviews)
Install your fifth-wheel trailer hitch in half the time with this vehicle-specific bracket kit. Requires no drilling and provides a custom fit for your vehicle. Includes everything you need for installation.2012 ram 3500 mega cab short bed! Well from all the reviews I’ve read, and the video, I gathered about 5-6 hours to install by myself, which was very accurate, directions say 90 min instal, not! It was the 5-6 hour range, regardless it went in as the directions and video said! Take your time measure it out double check everything, the kit is great, follow directions and watch the video you can do it in your driveway!
Takes a bit longer than expected. Figure in a day for the above bed install kit. I'll post back after I make a 2000 mile trip with the 40' RV. Have a great day everyone!

I had to customize some of the brackets to make them work on my truck. As well as add some spacers under the front rail so when it was tightened it would remain flat. The kit is usable if you have the ability to make it work. But when I buy something like this I expect it to go on without messing with it.
THE RAILS AND BRACKETS WERE JUST AS DESCRIBED AND CAME VERY QUICKLY AND REASONABLY PRICED. THE INSTRUCTIONS WERE VERY HELPFUL INCLUDING THE VIDEO ONLINE. INALL IT TOOK ME ABOUT 5 HOURS TO INSTALL WITH TAKING MY TIME TO DOUBLE CHECK EVERYTHING. IT FIT JUST AS IT SAYS AND FIT MY PICKUP PERFECTLY. GREAT PRODUCT AND GREAT COMPANY
This is a well put together package. The fact that you do not have to drill the frame makes things much easier. That said, it is still a lot of work and if you do not have all the tools needed and a lift you will be at this install for quiet some time.
The spare tire has to be removed and if there is a spare tire shield it will have to go as well. The inner fenders need to come out and at that point you will find it is easier if the tires and wheels are out of the way. It is a bit of work to get the right rear bracket in with the tail pipe in place. Also the spacers that go into the frame are also hard to get in place. Lastly, you will still have to drill holes in the bed.
With all this work required, I am very glad that I did not have to drill the frame also.
fair price. Simple installation.
2005 Ram 2500 Quad Cab Short Bed. Xlnt kit, easy install. The installation instructions could have been better. I suggest watching the video on youtube and setting up the rails and hitch on the garage floor first. Take measurements between rail hole rows (row 2 to row 3 - 17 3/4") and add 3/4" for front bed support clearance - 18 1/2". Looking over a rear tire and measuring from the front bed support, My row 2 needed to be rear of center by 1/2". This puts my rear rail at 26 1/4 instead of 26 3/4" from the tailgate. Then everything lined up perfect. The fish wire provided really works great ( threads on to the bolt like a nut). My only problem was the spacer that gets fished with the carriage bolt was to wide for the large hole in my frame. I cut a 1/4" off the spacer and that was the only modification I made to this kit. Not all trucks are the same. XLNT kit, I was impressed !

Jerry C.
3/27/2014
This is a little confusing. Is the correct measurement 26 34 or 26 1/4 ??I installed a Curt rail kit a couple years ago. I do recall that if you use the instructiondimension...things line up better on a Dodge front rail if everything would have been about a 1/2 inch further rearward. Is there any way this can be clarified? I am starting on another install today. thanks.

Fish wire was too short for long bed installation. Instructions did not address how to clear my brake lines on the left side front bracket. Overall the installation was not as easy as the video depicts. I am a professional mechanic for over 30 years.
So here I am 1 year later and 7000 + miles later having towed/hauled a 30' Keystone Cougar with the Curt E16K hitch and bed rails.
I installed the item and it was fairly easy with the help of a friend to help tighten bolts and nuts. On the rails I have the E16K Curt Hitch in a 2007 - 2500 Dodge Ram Cummins. I used to remove the Hitch after every trip. That lasted for the first 2-3 times. It is darn heavy to remove and put back in. So now I leave it installed in the truck and remove it when/if I need to haul something in the bed.
Hope this helps your decision and Happy Hauling :o)
Installed on a 2012 Ram 3500 long box. The rail kit itself is excellent and appears to be very strong. I was able to install with the truck on the ground and the tires on. I did have to remove the inner fender liners to access some of the bolts for torquing. I do not see how the nuts can be brought to proper torque without the use of a 3/4 inch crowsfoot, as it is impossible to get a socket on some of the nuts. The shock mount welded to the frame on one side is an example...it prevents the use of a socket. The single most important step is measuring properly because there is very little margin for error. The etrailer.com video was very helpful. Took me about 6 hrs without jack stands or a lift, but I'm very happy with the finished product and they went on without interfering with my AIR LIFT 57295 LoadLifter 5000 Series Rear Air Spring Kit.

Don C.

8/26/2018
So far excellent!!!
The accessories weren't correct for my application but upon researching etrailer products was able to find the correct brackets for use under body.
Very pleased etrailer.com and very appreciative with customer service because when receiving order from UPS the box was torn open and majority of hardware was missing. After taking inventory i called customer service explaining how it arrived the representative immediately ordered another hardware kit shipping out same evening, the install took about four hours with one small modification to a mounting bracket. Works great and very pleased so far

Robert
3/16/2020
So far really good. Thankyou
Took some time to install but overall wasn't horrible. I'd recommend these rails to anyone looking for this mounting style. Didn't have to remove tires or drill any holes besides through the bed of the truck. They are very strong and solid. etrailer.com is a great place to order from. Great customer service and tons of information for all your trailer and towing needs. I'll be ordering more in the near future. Overall a great shopping experience and a quality product!

Arron M.
2/19/2017
Another great item that has worked flawless. Would definitely buy it again!
Instructions were spot on, also had viddos on youtube to help as well
I bought a Curt 5TH wheel hitch and it took a bit longer to install then I planned for but It has worked great the customer service is fantastic! I have told my friends about Etrailer and two of them have bought their hitches from Etrailer you will not find a better price.
It installed just as advertised, the video was helpful but the one I found on YouTube shows an actual install which was even more help by showing some of the minor issues during installation. The written directions were well done too. Also a quality product with a very good website to help order the right parts with ease.

Ed S.
9/17/2018
After 1 year still working as when I installed it, nothing loosened up and solid the rails are a definite plus.
Received my parts to install my 14K Reese 5th wheel hitch in a timely manner and free shipping .. Started the installation on my 2005 Ram 3500 Dually and the parts all fit GREAT... Installation time was exactly what the instructions said ... The following week we hooked up to our 2010 Cougar 34ft RV and left the Wet Coast of the Pacific Northwet and made the 2600 mile adventure to Northern Michigan.... E-TRAILER is AWESOME........
I spent a few hours researching hitches before i settled on the Curt installation kit to go with my Anderson hitch. The directions were easy to follow, but i recommend watching the video as well. I installed this on my 2007 Dodge 2500 on my garage floor. I am sure this added a bit more time to the install, but for my first ever hitch install I had it installed and cleaned up in about 3 hours. I would definitely recommend this installation kit. etrailer was also very responsive to make sure they had my correct mailing info since I use a P.O. box for mail.
If you are towing with a Dodge with a boxed frame...This kit works perfectly. Every bend...every bolt hole...every piece and par of this kit fit perfectly....No holes to drill...
Duane I.
11/4/2015
Still looks new after near constant use
Etrailer is a company that I will recommend to anyone that has the need for trailer equipment. Thank you to the team that got my order shipped ahead of schedule. As for the Curt Q20/R20 hitch and installation kit it was a fairly easy installation on my Dodge Ram 2500. Everything was exactly as the videos on the etrailer site had stated.
This kit fit my 2004 Ram 2500 exactly as advertised. Took way longer than the 90 minutes the directions state, to install, but I took my time and made sure all steps were done correctly. Something I should have done, that is not mentioned in the directions, is to "pre-mount" the hitch on these rails, prior to drilling and bolting. If you get it even a bit off parallel, you have binding..like I do..when trying to dismount the hitch. I will have to fight it, to put back on these rails also. My fault, not the kit. Etrailer is very helpful, quick and responsive. They have me as a repeat customer already.
The worst hitch I have ever installed! All the pieces are nicely built and appear that they will hold up well, but I would rather install a universal hitch any day.
While I did not have to drill any holes in the frame, it was still a nightmare to put in. The bolt locations are next to impossible to get to with an end wrench much less a torque wrench.
The worst part is the exhaust hits heavy on one of the brackets. No fixing this....
This is the second time I used this hitch mount. It wasn’t too hard to install on the ground. A vehicle lift, as shown on the product video, makes it look a lot easier but install is still very doable. The video is necessary to have in addition to the enclosed instructions.
The ordering staff has always been friendly and knowledgeable about the product.
etrailer will continue to be my first stop for all my RV products.
What a Pain in the Butt. Watch the Video. It will help. Be ready to order additional parts/spacers if needed. You can do it by yourself but could really use another person at times. The rear tire removal is very helpful. Drop the rear drivers side shock tower. Then the back is pretty easy. The front is a pain. My brackets didn't reach up to the bed so I had to use spacers on top and bottom. Didn't have enough to do it so I had to order more. The screws for that location were too short so I had to go to Lowes to get longer ones. Those were a pain to get the nut on. I am still working on getting that done. Other than that, it does work.
very good product . takes a little more time to install on the dodge , but that is all good any way. Its been really good product.
Dvae H.
2/24/2018
IT take longer on a dodge .
Do you have a question about this Fifth Wheel Installation Kit?
Info for this part was:
At etrailer.com we provide the best information available about the products we sell. We take the quality of our information seriously so that you can get the right part the first time. Let us know if anything is missing or if you have any questions.


Sequel
9/9/2015
I still have no complaints I have pulled my 35ft fifth wheel camper multiple times already and it did great. I have since recommended etrailer site to everybody I know that needs hitches. Thank you again for making it so easy to order and install!