
To see if this custom-fit item will work for you please tell us what vehicle you'll use it with.


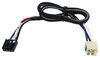
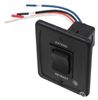
Quickly and easily install a 4-way trailer connector on your vehicle with this custom wiring harness. T-One connector plugs directly into existing wiring - no cutting, splicing or tapping required.
Features:
Specs:
Installation
This custom-fit T-One connector plugs into your vehicle's wiring harness, which is located behind the driver's-side and passenger's-side tail lights. You will have to remove the tail light assemblies to access this harness.
Once you've plugged in the T-connector, locate the "towing fuse" position in your fuse box and insert the included 15-amp fuse.
It is recommended that you use a small amount of grease on all electrical connections - the plugs on your automobile and the 4-pole connector itself - to help prevent corrosion.

California residents: click here
Average Customer Rating: 4.5 out of 5 stars (14 Customer Reviews)
Quickly and easily install a 4-way trailer connector on your vehicle with this custom wiring harness. T-One connector plugs directly into existing wiring - no cutting, splicing or tapping required.Very easy installation! Looks Great!
I'm blown away how quickly my order arrived. My parts came in unbroken & on time! Couldn't be happier with my choice to order from etrail.com!
Very easy to install but I have a few tips
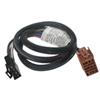
From left to right on the diagram of the wiring harness:
• Driver side wiring
• One pin housing - this is the hot wire to the 15A fuse (original was 20A)
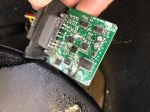
• Black box (converter) - connected and mounted to the side of the "trunk"
• Ground - I grounded it to the metal side of the "trunk". Sanded the area around the mounting
• Connection to the trailer
• Passenger side wiring
• Used this wiring harness on a 2014 model and it worked perfectly.
• Removed panel across the back bottom of trunk (turn Phillips a little to release the pins)
• Loosened the driver's side panel - just pried carefully (pins that can be replaced but I didn't break any)
• Removed one of the grommets on the driver's side and slit it edge to edge (ie; outside rim of grommet was still intact on both sides.
• Pulled 12 pin connector, ground, and hot lead through the trunk wall and grommet. These parts remain in the trunk area
• Fastened black box (two sided tape on the box) and ground (white) to side of trunk area. Hole for the ground screw needs to be bigger than 3/32 (think I used 5/32). Clean the grounding area carefully with sand paper
• Connected one pin black to the jack (white jack on a white wire) low in the rear behind the driver's side panel (Black). Sort of hard to reach.
• Removed tail lights (two bolts and then pull to back. Front pin and two rear pins. Again, this was difficult. Don't pry or you might break a very expensive light.
• Pulled driver's side wiring up from bottom into tail light area and inserted into circuit (Red, Yellow, and black)
• Ran passenger's side wiring (Green single wire) across trailer hitch and up from the bottom into the tail light area (this is done outside of the car). Tie downs, tape, etc.
• Fastened 4 Flat to the trailer hitch
• 15A fuse does not fit. Need the very tiny mini fuse. Note that it changed the fusing from 20 to 15A.
• Didn't work at first since I put the fuse in the wrong spot. Fuse functions are labeled on the fuse box cover but I just missed a line of fuses.
Watch the video for this installation. Everything goes together just like the video. The instructions follow along in the same order so have them in the car to reference. Everything is there to do this install except the mini fuse (this was mentioned in the video also). Took me about 1-1/2 hours from start to finish.
I also bought the Universal bracket (118140) to hold the flat electrical connector. You also need Wiring Mount (118144) to complete the holder. There are (2) pieces to this bracket and you have to buy each piece. I missed this so had to re-order.
Product was exactly what I expected. Installation was fairly easy and straight forward as described. The only comment I have is that the 15amp fuse they give you is the regular size fuse...while the 2012 Nissan Quest I installed this on uses mini-fuses. I would recommend this.
Install this and you wont go wrong. No cutting, no splicing. Mine did not come with the correct fuse to go to the trailer circuit. Lucky I had extra's.
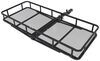
Just received my front mats liked 'em enough to order second row and cargo mat

Parts worked and fit exactly as expected. No issues at all!
All is fine. No problem at all.
Excelent!! it works fine and easy to in stall...thanks
Can't wait to install it...
Do you have a question about this Custom Fit Vehicle Wiring?
Info for this part was:
At etrailer.com we provide the best information available about the products we sell. We take the quality of our information seriously so that you can get the right part the first time. Let us know if anything is missing or if you have any questions.


Thank you! Your comment has been submitted successfully. You should be able to view your question/comment here within a few days.
Error submitting comment. Please try again momentarily.