
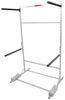
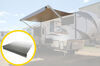
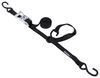
The Cycle Glide allows you to hang 6 bikes from the ceiling of your garage or basement. Gliding rails let you quickly access each bike individually, or slide them all together for compact storage. Adjustable hooks fit most bike wheelbases.
Features:
Specs:
The Saris Cycle Glide lets you hang up to 6 bikes by the wheels from the ceiling of your basement or garage for convenient, out-of-the-way storage. The rack has gliding rails that let you access each bike individually, or you can simply slide them together for more compact storage. The sturdy aluminum rack is rust-resistant, and the tracks are securely anchored to your ceiling joists with included hardware to ensure your bikes stay safely suspended overhead.
Convenient Gliding Rails
The gliding rails let you store your bikes closer together to save space, and they quickly slide apart so you can gain access to any single bike without the need to remove adjacent bikes. The system has integrated rollers located inside the ceiling-mounted tracks that let you move the rails with minimal effort.
Adjustable Wheel Hooks
You can adjust the wheel hooks along the rails to accommodate bikes of different sizes. Slide the hooks close together for a children's bike, or move them farther apart to hold an adult bike. The hooks can also be positioned to allow you to offset your bikes for easier, more compact storage. Rubber-coated hooks help protect wheel rims from scratches.

California residents: click here
Videos are provided as a guide only. Refer to manufacturer installation instructions and specs for complete information.
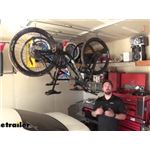
Hello neighbors. It's Brad here at etrailer and I'm taking a look at the Saris Super Glide Bike Storage System for your ceiling. Now this is available in a four-bike configuration, like we have here as well as a six-bike configuration. As we all have activities that we like to do as a family or if we have hobbies or a work shed in our garage, our garage is definitely a space where space seems to fill up pretty quickly and the best way to solve that problem I've found is storing things up in some pretty prime real estate that generally is unused and that's because we don't have a way to store things up. Well, bikes are a activity that tend to take up a lot of space, as well as you can see I have my family's bikes here, all four of 'em and this allows me to store them up and also get them down easily without having to worry about making contact with anything else in my garage. You know, the great part about this system that I really like is they're not fixed on those center rails.
In fact, when I need to get my bike down it's no problem to just slide these along and get it to a point where it's gonna be easier for me to actually remove the bike rather than reaching over my cars and hoping that I don't scratch them in the process. Now, the other great thing is actually getting our bikes back up is gonna be pretty easy here and the fact that the hooks actually kind of move around and it's actually adjustable to the wheel base just by sliding these around, you just hook those on nice and easy. It's definitely a wide open hook too and that's gonna make it easy to hook on there. You're not having to fight to put it up there and then once it's hanging, I can actually take this and kind of stow it back next to the other bikes and that's gonna allow me to actually gain access to my toolbox still. And you can see here even a child's bike like my daughter's here.
You're able to actually adjust it to the different wheel base of the bike which is really nice. Another thing is these hooks are actually rubber coated and they're just gonna slide on the wheel. So there's gonna be no frame contact which is gonna be great for all different styles of bikes. Going along with that, you may see the max load of 50 pounds. So that's really gonna open it up to a lot of different bikes whether it be the kids' bike or road bike or even a heavy mountain bike, this is gonna be no problem.
Now it may not work with your fat tire bikes as the hook isn't probably wide enough to actually get a secure hold on there but you can see my mountain bike tires are a 2.35 and it's able to hook on there no problem and I know that it's gonna stay on there, nice and sturdy. Now you may say I can mount my bikes up on the ceiling with some standard hooks and you can see the red one there and you may get away with that, but we also have this nice track system that makes it easy to get into our actual studs so it's gonna be a nice secure mount. It's really easy to just throw a few wood screws in this and it's gonna be pretty secure. Another great thing about this is the fact that it is adjustable. So if you permanently mount some hooks on there and your bike's in the way, well, your bike's gonna stay in the way, unless you take it down.
I can actually move these around if I need to gain access. So if I need to go to the other shot I can simply just slide these all over and I'll be able to get to that wall. Whereas some of those permanent mounts, again you're kind of stuck with what you got. So if I need to get up on my shelf to grab some car parts, I can move those and I still have all that room to do it. The sliding rails are really nice not only for the ability to gain access to things in your garage, but also compact storage. You can really get these nice and close and you can kind of determine if they're gonna make contact with one another or not. But if say the trails are muddy and I can't take my mountain bike out, that's not a problem. I just slide this out of the way and I can gain access to my road bike, and still be able to hop in here and pull my bike down with no problems. Now, mounting it up is actually pretty easy just by finding some studs. So really if you're not limited to just a garage. If you have a walkout basement, or if you have an apartment flat with a storage area, pretty much anywhere where there's gonna be studs you're able to actually put this up. It also looks really nice. And the fact that it is a nice aluminum finish and it's also gonna be rust resistant and lightweight when you're actually putting it up. So sliding this is nice because those rails are pretty light and it just overall makes her a very compact shape. It's not hanging down, it's flushly mounted against the ceiling. So that's really nice. Another option too. You can see how wide this is and I have four bikes and that's all I have. There's four members of the family, but if I wanted to add another bike or if your family is growing, you can always pick up the two bike add on and those are just gonna have those rails to where you can have six bikes. Now, if you are a bike enthusiast or your family is already expanded, you can actually pick up these six bike out the gate. It's kind of up to you, whatever your life requires for your bike mounting solutions. Now, if you don't have four bikes and you don't need to use all those rails, that's actually kind of an added storage solution for you. So you can put your air hoses up here. I can put my electrical cords up here and it's just gonna move everything up and out of the way and you still have that adjustability. So it really is a virtual storage solution for whatever you can be creative with assuming you stay under that 50 pound weight limit. As far as the installation goes, when it comes to putting it up in your garage, a lot of times it's gonna be unfinished and so you can actually kind of follow the nail lines and figure out exactly where your studs are gonna be. I also suggest maybe using a stud finder just to be sure because that's really what's gonna have that nice hold and give you that weight capacity but really it's just four screws per rail kind of lay it out as far as you're width and then you just kind of zip it into the studs and you're pretty much ready to go. So overall, you can probably get this knocked out in about hour hour and a half, and you're gonna be able to have that storage ready to use whenever you need it. Now, if you are still worried about doing this install yourself, we're actually gonna take a look at that right now and I'm gonna walk you through how to get your bike storage solution installed. So the biggest portion of this whole installation is really planning out where you want this to be. You're gonna have to live with it and so finding a spot where it's easily accessible yet still gets it out of the way with no overhead problems coming in like your garage door or anything like that, that's gonna be really important. Something else you're gonna wanna consider. If you're putting this close to a wall, you're gonna wanna stay about 11 inches away from it and that's gonna make sure that you have room for your handlebar. Now, some of the smaller bikes, that shouldn't be a problem but as we get to my bike, it's got quite large handlebar and that's gonna become an issue getting it up and off. So let's go ahead and we found a nice big space here and what we're gonna wanna do is start looking for are joists. Now you're able to actually adjust for the width of this but you really wanna go as wide as possible. That's not only gonna give it a nice sturdier hold but also you're just gonna get that real estate and be able to use the entire track. Now, if you're looking you kind of plan out how you're gonna load your bikes up and how you're gonna get them down and see what works best for you but you have the ability to run it perpendicular to your joist or actually parallel with your joist. Kind of depends on what you're looking for. We're gonna be doing the perpendicular mount here and what that means is I can tell that my joists are actually running here. You can kind of follow the nail pops here as a lot of your garages are gonna be unfinished. So you're gonna be able to see that that joist is running this way. So what we'll be doing is mounting it up to the actual joist and then we'll make a nice line here. Now they recommend having a straight edge to run a line but you can actually use your bar here to make that line. So now that I've kind of planned out how I want to lay mine out, what I'm gonna do is actually make a mark in the center of where that bar's gonna go. There's actually a spot where you can put a screw in and that's gonna hold it in and allow us to actually adjust to make sure that it's squared up that way it's not crooked. Now, if you need to use a stud finder that's gonna help make sure that you're right on the stud and it's gonna have a solid hold. If you don't have a stud finder, again you can follow the nail pops. A lot of times, if you knock you're gonna notice a difference of where it's solid. You can actually go up into your attic and also see the way that the joist are running. You just wanna make sure that you are hitting wood. Another way that you can test to see where there is actual stud there is gonna be taking a nail and a hammer and you can find that spot, take your hammer, hit it in, and if you hit wood, you'll know pretty quickly that you have a good spot. So again, just kind of double-checking where I wanna mount this up. I see I have a nail pop here, so I'm gonna just make a mark actually right below that here and I'm gonna check with my stud finder just to make sure that I have a good spot. That looks like that's gonna work out perfect for us. So I'll go ahead, I'm gonna make a nice little mark here and that way I can install my screw to kind of get this partially mounted up. So we'll go ahead and get this up. Now it's gonna be a phillips head screw or you can actually use a quarter inch bit, kind of whatever works best for you. And I'm gonna just drill this up, make sure I make contact with wood and you should leave about an inch gap. I've already kind of started to feel that I'm biting into the wood, so that's a good sign. Leaving this gap is gonna allow us to slide that rail on and kind of give it a quick hold, that way we can make our other points of where we're gonna mount up. So you're gonna see it actually has a slot here to be able to put this over the screw, slide it over and that should hold it in place for now. So that's gonna kind of give us a nice little outline of where we need to be. And again, you can use this as a straight edge. It's gonna be kind of nice following our tape line here but if you want to get precise, you can actually measure from the wall from each side, just to make sure that you have the same distance, but again sometimes your interior walls aren't exactly square. So find one that looks parallel and just find a reference point, that's gonna help. I can use my garage door opener bracket here, but other way, just make sure that you have it nice and parallel. So I'm gonna add the one holding it up. What I'm gonna need to do is find our other studs and you can see I'm just gonna follow these along and I can double-check with my stud finder again. So we'll go ahead and do that and it's gonna be kind of easy here. I'm just gonna be able to mark this out. And again, we're just gonna kind of get a rough spot here where we know that the joist is. Looks like we're good right about here and that makes sense, we have our nail there. So I'm gonna just make a mark here. And what I'm gonna do is just kinda move this over and I can see that I have the holes there, the slots and I can see my mark but I'm gonna make sure that I am actually squared up. And as long as you follow that perpendicular line you're still gonna be on the stud. So once you're happy with that spot, go ahead and take one of the wood screws that we put in like before and we'll go ahead and get this mounted up. Kind of where I had my mark. I'm kind of eyeballing here. Again, I can follow my tape line and that's gonna put us pretty close to where we need to be to make sure that it's nice and squared up. So I'll go ahead and get this one mounted up. So now just a double-check. You're gonna see we have it nice and squared up. I have two of these screws in so we got two of the four screws in. The other two, this is a good chance to make sure that you are covering the stud spread. So I can see right here where this nail pop is, that's gonna go into a stud and then on the other side, I also have the same thing. So that's gonna allow for a nice even spread. It's gonna hold this bar up and make sure that it's sturdy. Now, once you have the four screws in you can actually start tightening them down but something you're gonna wanna check is making sure that the ones that are on those slotted slides with those holes, you're gonna wanna make sure that the screw head is actually in the small part. That way it's not popping out. Now that we have our one rail up, it's gonna make it a lot easier to make sure that the other one's square and that's just gonna be real easy by measuring out the distance and I'll just make a line and we can actually use the bar to get a straight line, that way we can figure out that it's perfectly parallel. Now you are going to wanna make sure that you are doing the widest available. So ours gonna be 48 inches. So we'll go ahead and I'm gonna just measure from each kind of screw hole and then just kind of make a line and then I'll clean that up by using the bar to straight line it. Now, if you really wanna make sure that it's squared up properly, you can actually take a carpenter square and kind of use the rail and get this nice 90 degree here and then that should give you a direct line of exactly where you're gonna be going. That way you can kind of determine the distance on the other side and that way you know they're lined up perfectly. So we have our main rails actually installed. Everything's looking good and nice and solid and tightened down. So now we need to get our cross rails put together. That way we can get our bikes hung up. So grab one of your crossbar and then you're gonna grab your hook here. And this has this little trolley and we're just gonna slide these in for now. You can kind of just place 'em in the center and then based on the actual width here this is where it's going to sit in. It's gonna be pretty easy to do here. So this is gonna sit up top allowing it to actually slide along our main rails. So we're gonna wanna make sure we have this pin in the proper orientation. We're gonna be doing ours on the widest one here just because we spaced it out that way. So pin goes in, this is gonna slide through here and it can go either way, there's no proper way to do it. So just kind of put that through and you might have a little more luck if you kind of push that with your finger if you can get it in there and you're gonna see there's a little notch there and that's gonna be for your e-ring or your e-clip whatever you want to call it. And these are kind of tricky to get on if you don't have the right tools. Essentially what they do is just with tension they're gonna kind of clip on. So two ways to do it. If you have an actual cotter pin or a e-ring plier, these make it a lot easier to just kind of, you can put 'em in the actual grooves here and then it'll space it apart making it pretty easy to just press in. And that's gonna spread that, go around that notch. Just take your time, cuz these can fly off under tension. But once you have that spread apart, that should just pop in place like that. Now I'm gonna do the other one and I'll show you another way to do that as well. Now, another way to do this is you can just take your fingers here and just kind of get it to where it's seated on there just a little bit. It should kind of just stay in the upright position here and then you can come back with a set of pliers. It doesn't really matter what kind but just kind of grab on the top of it and on that pin and with a little bit of pressure, we should be able to get it to snap on like that. Next we'll grab our end caps and you're gonna see it's actually got the slot here where the track goes, so it really goes in just one way. They already have the holes drilled, which is really nice and there's holes actually on the end cap. So getting these screws started is really easy. So you can go ahead and just use a phillips head screwdriver and we should be able to get these nice and tightened in. Now there's gonna be one screw per side, so make sure you put two screws on each end cap and then you're gonna have an end cap on the other. And so that's gonna be pretty much the basic of one of the actual sliding rails and you're just gonna repeat that same process for the other three. So now that we have one actually put together, we can go ahead and slide our rollers into those rails. And I'm gonna go ahead and get all of these on, just slid on and then we can get our end caps on here. And just like we put the end caps on our sliding rails here, we're gonna go ahead and do the same on our main rails. So let's get all four of those installed. So we have it all installed. Now we just need to test it by actually hanging our bikes. So raising this up, it just slides around the wheel and you can see it pivots, which is great and I can also slide this along to make contact with the other actual hanging hook here and then I can make room for my next bike by just sliding this down. We'll just get our larger bike here. Now the great thing too is if you're worried about your bikes making contact, you're gonna be able to move these around as necessary and they're doing a great job of holding this all up. It's gonna be easy to gain access to these by just sliding them down to a point where it's easy to lower 'em and now I can actually get my car back in the garage. And that was a look at the Saris Cycle Glide Ceiling Mount Bike Storage Solution for four bikes or six bikes..
Average Customer Rating: 4.9 out of 5 stars (10 Customer Reviews)
The Cycle Glide allows you to hang 6 bikes from the ceiling of your garage or basement. Gliding rails let you quickly access each bike individually, or slide them all together for compact storage. Adjustable hooks fit most bike wheelbases.Great rack for overhead storage. It allowed for storage in an area of the garage that was basically dead space.

Adds so much space to our garage floor. Sturdy ceiling mount system.
First, it shipped faster than expected (thanks eTrailer).
Then I got the instructions out and was pleasantly surprised to see the estimated installation time was only 1 hour. Wow! Went up even quicker. Can't say enough good things about this thing. I'm using it to store the bikes in the winter in the back of the garage. Probably buying another next spring to hang them in the front for quick grab and go.
This rack works great. Easily adapts to whatever bike we hang and allows them to slide in close to the wall once they are hung up. Well built and worth the price.
UPS lost the package twice but Etrailer was excellent to work with to get the issue resolved.
I bought this rack about a year ago. It is high quality and easy to slide the bikes once racked. The only issue is if your bike is heavy and you have a high ceiling it can be very hard to rack a bike. My wife cannot do this and with a heavier mountain bike it can be difficult even for me. But the rack is well built and operates as needed.
great bike rack to get clutter off of the garage floor. easy installation. need a step stool to remove bikes with a 10 foot ceiling.
Very nice for storing bikes - easy to install and makes keeping the bikes out of the way until you are ready to use them. Then it is easy to get them down - like the feature that allows you to take one wheel off and then move the bike towards you to get the other wheel off.
Easy install...works great...kids use it all the time. I haven't run over a bike since I installed it.
Info for this part was:
At etrailer.com we provide the best information available about the products we sell. We take the quality of our information seriously so that you can get the right part the first time. Let us know if anything is missing or if you have any questions.


Thank you! Your comment has been submitted successfully. You should be able to view your question/comment here within a few days.
Error submitting comment. Please try again momentarily.