
Summer Starts Here - Save up to 70%
This wiring kit lets you hook up a Redarc BCDC battery charger to the batteries in your truck. Designed to work with start and auxiliary batteries that are on opposite sides of your truck's engine bay.
Features:

California residents: click here
Videos are provided as a guide only. Refer to manufacturer installation instructions and specs for complete information.
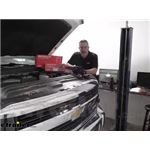
Hi John with etrailer. Today we're taking a look at the Redarc in vehicle battery charger in conjunction with the BCDC wiring kit that's available here at etrailer. This is going in on our 2017 Chevrolet Silverado 2500. So this is how we installed the charger on our Silverado today. This system is great for charging an auxiliary battery that you have it, it can take multiple inputs. This can even regulate solar panels.
If you wanted to do like a solar panel roof on this thing, it'll charge that. It can charge from your vehicle alternator. It isolates the auxiliary battery, meaning you can power equipment or you know a cooler in the back, or LED lighting in your truck, and you can run this battery down, and you'll still be able to start your truck because it isolated the starting and charging battery from your auxiliary battery. I do like the LED display on top here. It lets you know what charge profile you have.
Basically we can explain that later as well. It depends on what battery type you have as to what the maximum charging voltage level would be. So in our instance it's flashing A, that's the charging profile that we have set up. Also, it lets you know the charge status here, whether it's solar or vehicle, and what stage it is. This unit will choose solar over anything else first as long as it has it.
Say if it gets cloudy or dark and it's not getting enough from the solar, it will go in conjunction with the battery to power whatever equipment you have. So it is nice that it uses green energy first and then it steps it down from there. So just as an example, right now the vehicle is off and we do have a freezer fridge combo that's running off of our auxiliary battery in the back of the truck right now. Now it's isolated from our starting and charging battery. If we go to start our vehicle, (engine revving) you'll see the LED status light up, and we'll know that the vehicle is now charging the auxiliary battery.
The charger has sensed vehicle voltage coming in and now it's taken this opportunity to charge our auxiliary power source. So you may notice in our video we've been using different battery types. We started the video with a sealed lead acid battery. This is an AGM or absorbed glass mat battery. That's one nice thing about the charger, it can do different types of batteries including the LiFePO4s. So what I like about these two kits, the charger and then the under hood vehicle wiring here is that it kind of brings like motor home stuff to the pickup truck market. Like you know, you can take this truck to a off the grid camping site and you're able to power whatever you want with, you know with solar panels, if you got a refrigerator freezer, you're not running for ice, you're not doing stuff like that, you can power basically whatever you want. This kit is really open-ended. We kept it kind of simple with the pickup, but there's so many different things you can do with the accessories out there that are available. So this is how we installed this on our truck. It installed fairly easily. I mean it was kind of a new and different process and your truck may be a little different, but if you wanna see how we did this and how we hooked it up and how we're powering our refrigerator freezer in the back, stick around. So before we get the install started we need to kind of set some stuff up here. Like will this kit work for you How is it gonna work for you Our truck today has a six liter gas motor in it, which means it only has one battery over on the passenger side. So we already have a spot. These Chevy trucks are designed to have a second battery if you get a Duramax option, the diesel option. So in this instance we have another battery that we have put in here that we're gonna be charging with our Redarc unit. Now if you have a diesel, if you did get the Duramax, you're already gonna have another battery up here that's tied in with your starting and charging system, so this won't necessarily work for you. You may be looking at locating both the Redarc unit and your battery banks either in the carrier truck or the bed of your truck. Now another thing to keep in mind is this unit needs to be as close as possible to your auxiliary battery or your battery bank, it's just gonna work better that way. So keep that in mind. In this instance here we're gonna be installing this under the hood, this is rated for a harsh environment like this under the hood. Now if you have your batteries either in the cabin, or the back, or if you're looking at this for a motor home application just that's something to keep in mind, this unit needs to stay with your auxiliary battery banks as close as possible. Now as far as installing the charger, we do highly recommend getting one of the wiring kits from Redarc. We found for the Silverado here the number two kit, the under hood wiring kit is gonna work the best for us. These are for applications where your batteries are more than two feet apart but less than 11 feet apart, and typically in different locations in the engine bays like opposite corners like ours here. These kit come with six gauge wire, plenty of wire to do all of your connections. It comes with fuse blocks with mounting blocks, fuses, everything you need to install one of these under the hood is gonna be the right gauge wire, so you don't have any problems. Now when you're choosing auxiliary batteries for under your hood, if I didn't mention it already, remember that you can use just about anything, just don't use a lithium polymer battery or a LiFePO4. They're not rated for under the hood, it's just too hot for under here. But you can go ahead with lead acid batteries, with AGM batteries, every other battery that's typically found in an automotive setting like this. We're looking around the engine bay trying to find a decent spot to where it's not gonna pick up a lot of heat or vibration, or dirt and it's still close to our auxiliary battery. So I was looking at these cables here, I went ahead and took them loose with a trim panel tool. And it opened up this line on this fender well here. And I think what we're gonna do, we'll end up mounting it over here. This way we'll be able to route the wires down and away from the hood hinge. You can still have access to the fuse panel here. So overall I think this is gonna be the location we're looking for. Well, I'm gonna get this mounted and we'll show you what we did here. So we ended up just using a couple of self tapping screws and we mounted it vertically here right next to the battery. We we're able to still have a little bit of room even though this is a huge battery for this battery tray here. And this will enable us to, when we run our wires, we still haven't quite decided if we're gonna be running them out here, or if we're gonna turn them back up against the firewall yet. But we just want to at least show you the location of the charger. Now we can begin running some wires. We're back over here on the passenger side where the factory battery is and if we take this panel off, you're gonna see some lugs that we can tie into for power. The kit's gonna come with a lead, with a fuse holder and this fuse holder, and these are all included with the kit. It takes these fuses here. These are MIDI fuses where they just go across here. We're not gonna install these yet. We'll do this the very last minute. So for right now you can see the two different sizes. This will attach to the battery side and this side attaches to the fuse holder side. And then on the other side of that is gonna be the supplied wire, the red wire. And this is gonna run across the intricate compartment and then over to the power block on the other side that we haven't mounted yet. We're gonna do that a little bit later. I'll start with the fuse holder. And these nuts are five sixteenths. And then later on when we're finished with this connection we'll actually place the fuse on top of the two leads, and then tighten down everything. But like I said, for right now we're just mocking it up. And since this is gonna be hot with the battery right now, I'm gonna cover it. And then on these lugs you can go on one that's already occupied or like this, this one's empty, but GM doesn't supply the nuts to go on there. You could in theory just add your own right here. Since we have this one here already tapped in, we're gonna go ahead and use that. (driver whirring) (driver whirring) Now in this kit, this wire your different wires are gonna be color coded and we are gonna take the red wire. This is the wire that comes over to our, what is now the starting and charging battery. And I'm gonna route this along the firewall. I'm gonna thread it through the firewall over to the other side. So I'm gonna do that now and we'll show you what I've done. So you can see that we ran our power wire, and it's just hanging loose right now. We'll go ahead and clean this up once it's fully installed, but we ran it along the firewall and I have it in a coil right here. We will be tying this in to our terminal block. One thing to keep in mind is that we're gonna have quite a few wires coming in and out of this. They're gonna be coming in from the sides, and exiting the sides. So we need to watch how we mount this, in what orientation. Obviously this wouldn't be good for us here, because of the hood closing. We have moving parts here with the hood hinge. Nice thing is the kit does come with plenty of wire as you can see. So finding a spot for this that's gonna work for us and be accessible if we ever have to come back in here, or for maintenance or anything. Now let's turn our attention to the six gauge wires that are coming from our charger here. Okay, now these are color coded. This yellow's gonna be for solar. We won't be using this in our application here. So I'll end up cutting this and capping it off. But it's nice to have in the future if we decide to add solar panels to the roof of our Sierra here. But we ran the red wire over, and that came from our starting and charging battery. And so we'll take our power distribution block. We're gonna end up mounting the block down here. It's gonna be below the hood hinge, so it'll be out of the way. And it's really is, this is a four millimeter hex head. This is really as simple as just matching up your colors here. This is coming in from our starting and charging battery. And this set screw, you just tighten it down. I'm just doing it by hand right now. And we'll connect that to the red wire coming from our charger. Now each of these banks are isolated from the next one down, and the next one down and so on and so forth. So the other two colors that we're gonna be dealing with right now gonna be the black and the brown. The black will be connected to the negative on our auxiliary battery. The brown wire from our charger will be connected to the positive terminal on our auxiliary battery. So we'll go ahead and do this now. Now we're on the inside of the fender well, close up to the firewall. You can see we mounted the power distribution block just using some self-tapping screws, and we've got the wires connected. So we're gonna have the power wire coming from our starting and charging battery. We're gonna have the power wire coming from our auxiliary battery. That's gonna be the brown. And then the black wire will be the ground wire that's coming from our auxiliary battery. Now one thing to keep in mind with our wiring kit, we have a ground wire for our auxiliary battery, and that goes to the terminal block and that's for the charger. But one thing the kit doesn't have is a ground wire, like a chassis ground wire. And that would go from our auxiliary battery negative to a ground on our truck. For some reason with the kit it's not included. They probably due to the fact that they're not quite sure what type of auxiliary battery you would use. And so they don't know what type of terminal top that you would need, so that's just one thing to keep in mind that when you're buying your auxiliary battery make sure you also buy a chassis ground cable for it. Now speaking of auxiliary batteries, this charger can be configured in many different ways for many different battery types. It's all going to depend on how you hook up, or don't hook up, the green and the orange wire. In our instance, on this application, we have a sealed lead acid battery. And so we are gonna set our charging voltage the maximum charging voltage to 14.6. That's the most common under the hood application. This is gonna be consistent with the manufacturer set up for the starting and charging battery. So if you have say an AGM or a different style of battery, you can find the maximum voltage in the literature that comes with your battery, and then you'll be able to set the maximum charging to the specification. It tells you how in the instruction manual for this charger. And that will bring us to the blue wire hookup for the charger. If you have a standard alternator, the blue wire is not gonna be used. Now if you have a variable voltage alternator, then the blue wire needs to be hooked up to an ignition on source. And we're going to go ahead and show you what we did here in the fuse box to find that source. One quick way to be able to tell that if you have a variable voltage on these Chevy trucks, if you come over to the passenger side of the truck you will see your battery cables coming down. And there is a sensor right here, it looks like a circle. And this is a wireless AM meter sensor. And if you have this on your truck then you have a variable voltage alternator, and you'll have to hook the blue wire up. We are using a mini fuse tap, we have these available on our website. And this is what I'm using today. We also have a micro style and that's going to be for these smaller fuses here. I chose the mini version today, because I am using the 20 amp trailer parking light circuit. We can go ahead and plug that in and I'll show you with the test light that with the truck off right now, there is no power to that circuit and that's what we want. And when the key is turned to be on position, we have power. So that's the circuit we're looking for. We have the blue wire hooked up and the fuse is in. Now you'll need to get an extra 20 amp fuse if you're gonna use the same circuit I did. The top fuse is gonna be for the original circuit, and or the bottom fuse, I'm sorry, is for the original circuit. The top fuse will be for the new circuit here. We'll go ahead and plug that in, and we can take our lid. On our lid you're gonna see little cutouts in the front or back. I'm gonna run the blue wire out of this cutout right here. This is still gonna seal out dirt and moisture, but with the lid it's gonna be easier on the wire to run it out this. I'm gonna leave the butt connector on the inside of the fuse box. One quick note, if you choose not to tie in at the fuse panel like we did, or if you can't and you need to go somewhere else, the kit does come with fusible link and wire to hook up your blue wire. So there's plenty here if you need to run it inside the cab, or just a different location. The kit does include this. Tighten up our connections on the fuse block with all the wires run. This is a thing where it's just gonna be by feel. You don't want to over tighten it, but you don't want it loose. You just want those wires snug. Now with all of our connections secure, we can install the 40 amp MIDI fuse, both at the auxiliary battery and at the starting and charging battery. This is a five 16th wrench. I like to install these upside down. That way you can visually see if the fuse is good or not. That spark that you saw was the circuit on the charger powering up, totally normal. I'd rather have it spark here than at the connection at the battery. This is why we do it this way. Go ahead and snug these up and repeat the process for the starting and charging side with the other battery. And go ahead and replace your cover. As far as the install on the charger goes, this is pretty much it. This system is gonna be all self-contained here. It will monitor our auxiliary battery, and keep it charged up for when we use it. Now what you would like to do with it is gonna be up to you with different applications. Like I said if you wanted to add solar down the road to charge this unit, to charge this battery when the unit's not running, that's something you can do and it's easy to tie into. As far as applications for us, we're gonna be running a refrigerator in the bed off of this battery. So we're gonna kind of overview that. Basically adding a dedicated 12 volt power supply in the bed that can run all night, and you don't have to worry about discharging your starting battery and in the morning when you start your truck up it's gonna go ahead and recharge this battery and keep your systems running. Great, so that's gonna be next. So we did just kind of a quick install here with things that we have and offer on our website like this duplex wire. This is gonna be a positive and negative. We hooked this up to our auxiliary battery up in the engine bay and we ran it back to the bed here. And we used this 12 volt auxiliary power outlet. And we installed this in the bed of the truck flush, and that is powering our freezer refrigerator unit back here. It's also powering our LED lights up there and it's just one of those things, it's a neat little setup. You could sit here and run this all night, and your truck is still gonna start in the morning, because the two batteries are isolated. And that was a look at the Redarc in vehicle battery charger and the BCDC wiring kit on our 2017 Chevrolet Silverado 2500.
Info for this part was:
At etrailer.com we provide the best information available about the products we sell. We take the quality of our information seriously so that you can get the right part the first time. Let us know if anything is missing or if you have any questions.


Thank you! Your comment has been submitted successfully. You should be able to view your question/comment here within a few days.
Error submitting comment. Please try again momentarily.