
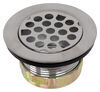
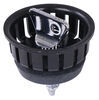
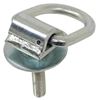
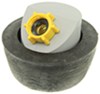
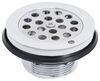
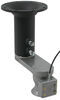
LaSalle Bristol RV Kitchen Sink Drain w/ Strainer Basket - 1-13/16" Diameter - Chrome
(24 reviews)
Price: $19.34
In Stock
LaSalle Bristol RV Kitchen Sink Drain w/ Strainer Basket - 1-13/16" Diameter - Chrome
Item # 34433JN1201
Retail:$58.60
Our Price: $19.34
You Save: 67%
In Stock


- All Info
- Reviews (24)
- Q & A (0)
- Videos (2)
- Photos
LaSalle Bristol Accessories and Parts - 34433JN1201
- RV Sinks
- Sink Drain
- 2-5/8 Inch Outer Diameter
- 1-7/8 Inch Tube Diameter
- LaSalle Bristol
- 1-1/2 Inch Inner Diameter
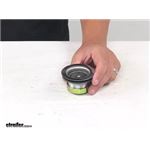
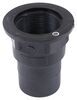
Durable steel RV kitchen sink drain has a strainer basket that prevents large objects such as silverware and food from obstructing the drain. Includes 1 adapter for non-threaded drain pipes, 1 gasket, and 1 mounting nut.
Features:
- Drain replaces or upgrades the existing kitchen sink drain in your RV or camper
- Includes 1 adapter for non-threaded drain pipes, 1 foam gasket, and 1 mounting nut
- Strainer basket prevents silverware, food, and other large objects from obstructing the drain
- Durable steel construction with chrome finish
- Made in the USA
Specs:
- Overall dimensions: 2-13/16" diameter x 1-5/8" tall
- Interior drain diameter: 1-1/4"
- Tube diameter at threaded section: 1-13/16"
- 1-Year warranty
33JN1201 La Salle Bristol RV Kitchen Sink Drain with Strainer Basket - 1-13/16" Diameter - Chrome


Video of LaSalle Bristol RV Kitchen Sink Drain w/ Strainer Basket - 1-13/16" Diameter - Chrome

Videos are provided as a guide only. Refer to manufacturer installation instructions and specs for complete information.


Video Transcript for LaSalle Bristol RV Kitchen Sink Drain with Strainer Basket Review
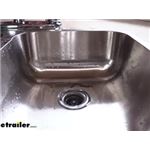
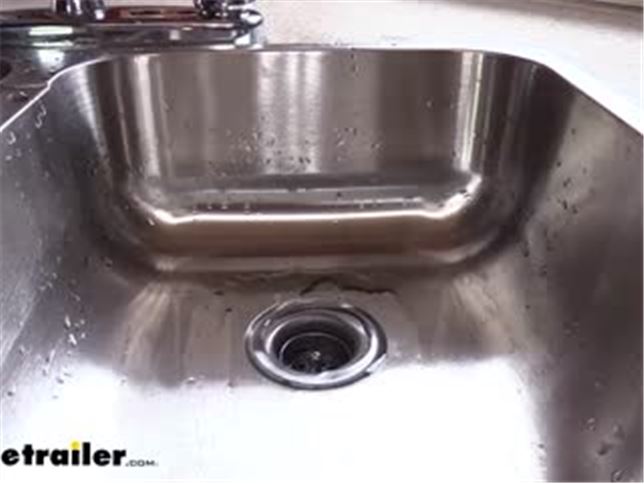
Hi there RV and camper owners, today we're going to be taking a look at LaSalle Bristol's replacement kitchen sink drain with strainer. This is the 1 13/16ths diameter size in a chrome finish. When performing repairs on a leaky sink or upgrading from old outdated sink and faucet fixtures to new modernized ones, when replacing your sink assembly, you're going to need new drains. Or if the drains that you have in your current sink are leaking and you've got moisture down in the cabinetry below, and you can tell that it's coming from around your piping there, it's likely coming from the drain here. You can just reseal those, but your gaskets and stuff can get worn out. You're going to have to likely replace those anyway.
So with this unit, you're going to get the gaskets and all the hardware you need to get this installed.The only thing you're going to need is some plumbers putty to seal around the outside here where the top lip sits down inside of your sink. And if you're replacing your sink, the new sink's likely not going to have your drains in it, and while you can reuse your old ones as long as there is the right size, they're likely not going to match with your nice new clean sink. So why have a stained old drain in there when you can get yourself a nice new one and have a nice beautiful new setup in your RV or camper These do come as a quantity of one. So if you have a double sink, you'll want to make sure you get one for each side, the included strainer basket will help keep small debris and food particles and things like that from getting down and clogging up the pipes in your system. After you're done in here, you can just pull the little cup out and you can empty out any of the debris inside.You can see we've got holes down at the bottom to let moisture pass through, but it's not a very big gap there so most of the debris is going to stay in the basket and the water is going to pass through.
And we've also got slits here on the side and you can see it's a pretty good fit around the outside. So most of that debris is going to stay inside this basket while the water passes through the side slits and goes down, which gives us pretty quick draining when we've got it in the release position. We're going to go ahead and turn the water on full blast here.And we can see that our sinks not really going to fill up, it's going to be able to drain nice and quick. And if we're wanting to fill this up so we can put some dishwashing liquid in and get some dishes cleaned up, on the bottom, we have these little raised sections here. We did have it just in the open position, which has the raised sections sitting on the cross section.
We twist it just a little bit, those will drop down inside, and the seal is now up against the bottom, which will allow it to fill up with water. You'll receive everything you need except for the plumber's putty to get this installed. You can see here on the bottom, we've got the gaskets that go on the bottom side, those little black ones there, as well as the paper washer and the nut that secures it to the sink. There's also a gasket that comes with it that goes down inside of our pipe here.And it does come with a nut here as well. If you have a pipe that you need this with to slide over your pipe to screw on here, but in most cases, your pipes down here is already going to have one made onto it.
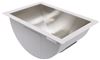
And this is just a standard size. It's going to thread right onto there. We went ahead and replaced our sink drains and faucet fixtures here to modernize this RV. So if you want to stick along with us to see how we've got everything installed and give you the confidence so you can do it at home yourself.Today we're going to be putting new drains in, but we're not just going to put them in this sink, we're going to be replacing it with another sink as well as our faucet. So you can see why we're replacing our components here. The silicone that's around our sink is starting to deteriorate. It really doesn't look very pleasing to the eye. And once it starts to deteriorate like this, moisture can get down behind the sink and leak down behind your cabinets and you won't even know it. If you have moisture around up here, when you're washing dishes or anything, and you get some splashes, that can all lead to mold and mildew behind your cabinets there. Down inside we also have our seals here around our drains that really look pretty cruddy. And you can get some leakage around these as well. And that also leads to that mildew and damage from water intrusion back behind our sink.Our faucet is also old and outdated, so we're going to go ahead and modernize that while we take care of these sealing issues that we've got. We're going to be modernizing everything by replacing the sink drains and the faucet. We're going to go ahead and need to get our sink disconnected. Our sink doesn't have anything attached to it except for our drains here. You're going to need to access the bottom of your sink. Oftentimes you can just pull out a drawer, open a cabinet in order to get here. And these just unscrew. And now that we've got those both loose, it'll come down just a little bit. We don't need to pull on it or do anything like that since we don't have any faucets or anything else that attaches to our sink, that's really all we need to take loose there.Underneath your sink, you'll have attachment points. These can either be a screw head or a nut. Ours has a wing nut on it that we're going to be twisting to remove it, but you may have just a nut that you can just use a screwdriver or a socket on. We've got all of our little wing nuts off everything underneath. There was one in each corner, so there was total of four on ours. Just make sure you check and get all of them all the way around. We now need to break the silicone all the way around, and we're just going to run our razorblade right around the edge, just carefully and gently just bringing that along right along the seam there.This will just make it a little bit easier to separate our sink from our countertop. Now that we've got it trimmed all the way around, we're just going to come underneath and we're just going to kind of give some pressure on it, looking to see if we have any spots that want to lift up. And this corner right here, we've got wanting to lift up some when we push on it. So we're just going to take our putty knife now and just run that underneath of it, keeping some pressure on it as we push out to help break the rest of the seal and get the sink separated.Once you've got it worked all the way around and it'll just pop off of there, we can pull it up. We're going to go ahead and set this aside and get everything cleaned up here on top. We can go ahead and use our putty knife, razor blade to clean that up, and you can use any chemicals. Just be careful not to scratch the countertop. Now our new sink is going to be hanging over just like our old sink was, so if you get a little scratch or something there, it's likely going to be covered up just try to be careful here on the outside edges.So now that we've got everything cleaned up around our sink. At this point, you could be ready to put your sink back in. We're going to remove our faucet because we're going to be replacing that as well. So if you're just doing the sink, you can follow along with us right after we get this out here. To remove our faucet, the first thing you'll want to do is make sure that you've got all your water turned off. We checked that before we took our sink out. See here if we turn it, we got nothing.Down below, you'll have two lines go into it. You have your hot and your cold line. These just unscrew. And it's never a bad idea, especially if you've used it recently, just to have a rag around because there maybe a little bit of water in there. We're going to undo the other one. And then once you get your hoses out of the way, we can remove the plastic nuts that secure the faucet in place. There's going to be one on your hot end and one on your cold side.Now in most cases, it's going to lift up. You may have some silicone that you may need to run a knife around to break the seal or not. Ours is just going to lift out of there. The bottom plate here is siliconed onto it, so we will have to remove that, but as far as the sink mechanism here, that just comes right off. And then just check this piece. You may or may not need to remove the silicone from it to get it off. Ours didn't have a whole lot going on there so it came off pretty easily. We're going to go ahead and clean this up now and get all this ready for our new faucet. Now I've got it all cleaned up, we want to check to make sure everything fits. Our new faucet does drop down in there. Make sure you're putting down the correct sides on there, blue on the right for our cold and hot on the left. That's how ours was set up. So just make sure you're just matching those lines back up.So everything looks like it fits. We want to seal this bottom piece up to the top of our surface so that way moisture can't get down underneath of it. You can see on this one here, this one wasn't properly sealed so that's why this wood is bulging in different areas here due to the moisture that already got down in there. So we're going to make sure we seal that up to prevent it from getting any more saturation. So the bottom piece here that we just went ahead and slid it off, just because it'll be a little bit easier. We're just going to run a bead of 100% clear silicone all the way around here. You can pick that up at your local hardware store if you need some. And we just need a light bead around the inside. Don't worry if you get a little on the outside, we can clean that up afterwards.So now that we've got that bead on there, we're just going to slide it back on to our faucet and then we can drop it down into place. I did clean up the surface with some alcohol after I scraped everything off of it to help ensure we get good adhesion. Once you slide it through on the bottom, we're going to take the rubber washers that come in your kit, slide it over, and then use the nuts that come in your kit to tighten those down. We're going to do the same thing over on the other side. Then you just want to tighten it down until it's snug. You don't want to overdo. It is just plastic. And then we can reattach our hoses. Our new drain here, we're going to have to remove the nut here off the backside. There's also a steel there, make sure you keep those together. And below that you're going to have another nut, we're going to also unthread this one. We're going to set that aside. You'll have a paper as well as a rubber gasket there. Save both of those, you're going to need those as well.Now that we're down to just the top part here, we're going to need to use some plumbers putty. It's kind of like a Play-Dohey substance, and we're going to use this to make a seal. So I just went ahead and rolled it out there so I can make a gasket that's going to wrap around this here. And that's really just what we need to do is just wrap it around there and try to make it even if you can going around. And this way when we go to tighten this down, this is going to squish out and give us a good seal. We can peel off the excess once we've got it tightened down. So I'm going to take this now, I'm just going to go from the bottom up, slide it through, just give it a little push and a pull there just to make sure it's in there. And then we can take our gaskets, put those back how we removed them. So rubber first followed by paper. Then our nut.And we're just going to tighten this down on there. It is a large nut, you may want to use a pair of channel locks when tightening it to make sure you get it all the way secure. We can now tighten it down to squish the seal as well as the plumber's putty that we've put on there. We went ahead and replaced both of them. So we've got those snugged down. So we're just going to flip it over here so you can see the other side. I'm just going to temporarily set it into place. And the excess that we've got here, we can just peel this right off.Now that we've got it all cleaned up up top, if you we're just replacing the drains, you can go ahead and hook those back up. I'd recommend using the new seal and the new nut if you can, depends on your line whether or not you can slide this over it or not. If you can take the pipe off and slide this on. In our case, we're not going to be able to slide this over our pipe due to the way the pipe is designed, it won't fit over it. But we will be using our seal, but we're replacing our sink, so we're going to go ahead and get the sink prepared and set back down before we attach ours. Our new sink does come with some new studs, so we're going to grab those and we're just going to thread those into the attachment points, there's six of them, three in the front and three in the back.So just thread these guys in there. Before we drop our sink in, the entire way around, we're going to be putting a bead of 100% silicone. We're going to be using the clear color because we have a stainless sink. It's going to help it blend in and look a lot nicer. If you had like a porcelain or a white one, then you might want to go with a white instead of a clear. You could pick this up at your local hardware store. And we're just going to give ourselves a generous bead around the outside, because we want this to seal up against our countertop. So we don't want moisture getting underneath, that's going to damage our countertop and can leak moisture into the cabinets down below causing water damage there as well.If you we're replacing your faucet, this is the same silicone that we used when we put that in place. Now that we've got that in place, real quick, before we drop it down in there, we're going to just pull the old gaskets out from our pipe down there and make sure that we set our new gaskets in place so we don't forget those. We'll now gently set it down into place, and then we'll head underneath so we can get our attachments made. You want to make sure your drains are facing toward through the sink. That's where it's going to line up best with our pipe as well. We can now take the wing nuts that come in your kit, as well as the L brackets, slide those over the studs to make sure that this portion here is going to catch onto the counter, similar to what it would be like there, so it snugs our sink down.Thread those wing nuts on there, and then just snug them down. I like to get this one touch in, put just a little bit of twist on it and then go to the next one and then make sure you tighten these down evenly all the way around to ensure it pulls it down flat up against the countertop so that silicone can seal. There's a total of six, so we're just going to go ahead and snug down the remaining five. After you come up top, if it's still wet, you can run your finger along the edge to smooth it out. Depending on the set time of the silicone you got, it maybe become and tacky. And in that case, when you try to do it, it's just going to turn into a little boogers. And that's what happened to ours here.It got a little tacky. It's okay if it does just get that stuff cleaned off out of the way, if it does get all tacky on you, and then you can just put some fresh stuff on the outside and then use your finger to smear that down. So we're just going to give it just a little real, just real light bead right along the outside there. We're going to do this all the way around to make sure it seals up. And then I'm just using my finger to smooth this out. We can clean up the excess. We're trying to push it down in that groove where the two surfaces meet to make sure we're sealing it up. And we're just cleaning up any excess around the outside that we had. So now that we've got it all sealed up, we're going to give it 20 or 30 minutes to dry, it's starting to get a little tacky when we're wiping it off, our paper towels ripping off here. You can see on the front on some of it.So if we let it stick up a little bit longer, you can actually just take your thumb and just rub it across it like that, and all these little bit here would start to peel right off of there. So once we've got it set up though, then we'll test out and make sure that we have no leaks. So while that's setting up and drying up top, we're going to come back down here below and we're going to thread our pipes back on. Got to get them both started at the same time here because we don't want one putting pressure on the other. And you want it to feel nice and even when your pipes are going back up, because the positioning of a new sink, the drain holes might be slightly further forward or backward or off to one side just a little bit. So your pipe, you just want to be careful when going back up that you don't overstretch it or damage it.So we've gone ahead and finish cleaning everything up and we tested it out to make sure we didn't have any leaks. The plugs here, if you look, it's got these little raised sections, if you set it down in there with the raised sections resting on the cross, that holds it up and allows water to pass through. So it's not going to hold water, like you see now. If you give it a little twist, it'll drop down in there further, and that will seal against the bottom and that'll fill it up. So we can turn it on, let our sink fill up, and then we can check down below to make sure we don't have any leaks coming around our pipe around any of our seals.So you want to let us sit in there. I would recommend to let it sit for about 15 minutes, just to make sure you don't have any seepage or anything. Just check around here for any wetness that you might have. If you have any wetness down here, then you may have a leak and you may need to tighten up your nut a little bit more. If you don't have it all the way tightened, same with of your fittings, check all of your connections to make sure everything's nice and snug. If you still continue to have a leak, then you may need to disassemble and reapply the plumber's putty and re-tighten it back down. We don't have any leaks over here. So we're just going to go ahead and fill up the other side and then make sure there's nothing on this side. As long as we don't have any leaks over here, then we're good to go. And that completes our look at LaSalle Bristol's kitchen sink replacement drain.
Customer Satisfaction Score:
98% were satisfied with this product
2% of customers were not satisfied
- Product did not meet expectations
- Wrong item was ordered
- etrailer mistake
Customer Reviews
LaSalle Bristol RV Kitchen Sink Drain w/ Strainer Basket - 1-13/16" Diameter - Chrome - 34433JN1201
Average Customer Rating: 4.9 out of 5 stars (24 Customer Reviews)
Durable steel RV kitchen sink drain has a strainer basket that prevents large objects such as silverware and food from obstructing the drain. Includes 1 adapter for non-threaded drain pipes, 1 gasket, and 1 mounting nut.by: Victor 09/16/2023
Great quality. I used these to replace ones in my 1976 GMC Palm Beach that Im refurbishing and they fit great.
by: Seamus07/25/2022
I needed to replace the lower drain on my '83 Jayco Jay pop-up and this worked perfectly. I now also have a strainer for the sink drain!
by: Gail08/03/2022
Kind of disappointed it took 6 days to get an item from Missouri to Ohio. USPS must be using three legged pack mules as a shipping method.
by: Robert 09/15/2021
Excellent and highest quality sink drain for our motorhome. And eTrailer is the best!
by: Bob 02/06/2023
Perfect fit. Thanks for including all the pieces to make the connection
by: Jennifer 12/11/2022
Great product. Made of metal and replaced cheap plastic drain.
by: Larry07/25/2022
exactly what I ordered and fast service, looks like original equipment
by: Kevin07/13/2020
I am very pleased with the items that I got from you.
by: William 07/08/2021
Good stuff if they were car parts i would say OEM
by: Michelle 04/19/2021
Super customer service! Product fits like a glove.
by: Patrick08/27/2019
Nicely made product for a 1 3/4" drain, works well.
by: Fred 08/19/2021
Just what the wife was looking for
by: Ed07/30/2021
fits good
by: Deborah 05/31/2021
Just what I needed!!! Fit perfectly!
by: Scott 05/08/2020
everything perfect
by: Ed10/29/2020
Received quick and product is high quality. Very pleased.
by: James 12/10/2020
Perfect
by: Gary 08/24/2020
Recieved ok
by: Lisa 03/14/2023
by: Jimmy 03/08/2023
by: Melvin 07/19/2022
by: Ken 08/12/2023
by: Robert 07/06/2022
by: Christine 08/07/2021
24
24
See what our Experts say about this LaSalle Bristol Accessories and Parts
- Replacement Three Prong Sink Strainer BasketI have a work around but I am unable to find anything in the three prong design also. You can switch the sink drain out relatively easily to accomplish this however. Using the Valterra Sink Drain with Strainer Basket part # A01-2011VP for 2 1/8" drain holes, the LaSalle Bristol RV Kitchen Sink Drain w/ Strainer Basket part # 34433JN1201 for 1 13/16" drain holes or the LaSalle Bristol RV Kitchen Sink Drain w/ Strainer Basket [art # 34439166 for 3 7/8" drain holes. I do understand that...
view full answer... - Drain Strainer Compatible with Camco RV Drain Trap to 3/4 Inch HoseThe Camco RV Drain Trap # CAM37262 or # CAM37420 is designed to be used with a 1-1/2 inch - 11.5 threaded drain fitting. I recommend the Valterra Sink Drain with Strainer Basket # A01-2011VP or the LaSalle Bristol RV Drain with Strainer Basket - Metal - 1-1/2" Diameter # 34433JN1201 for this compatibility.
view full answer... - Basket That Fits Better Bath RV Kitchen Sink # LC426017Yes we have the Lasalle Bristol RV Kitchen Sink Drain part # 34433JN1201 which fits the Better Bath RV Kitchen Sink # LC426017.
view full answer...
Do you have a question about this Accessories and Part?
Info for this part was:

Video by:
Dustin K

Installed by:
Cole B

Installed by:
David F

Video Edited:
Chris R

Written by:
Mary K

Edited by:
Amanda M
At etrailer.com we provide the best information available about the products we sell. We take the quality of our information seriously so that you can get the right part the first time. Let us know if anything is missing or if you have any questions.
Product Experts Available Now!
Call 1-800-940-8924
Thank you! Your comment has been submitted successfully. You should be able to view your question/comment here within a few days.
Error submitting comment. Please try again momentarily.