bing tracking image
  1. Wiring
  2. Deka
  3. Wire Connectors
  4. Ring Terminals
  5. 16-14 Gauge
  6. 1/4 Inch Diameter
Ring Terminal -16-14 Gauge - 1/4" Ring ID - Qty. 1

Ring Terminal -16-14 Gauge - 1/4" Ring ID - Qty. 1

Item # DW05702-1
Our Price: $1.53
Wiring
Shipping Weight: 0.01 lbs
Add to cart
zoom in icon
slider vertical icon
zoom out icon
Comment field cannot be left empty.
Name field cannot be left empty.

Thank you! Your comment has been submitted successfully. You should be able to view your question/comment here within a few days.

Error submitting comment. Please try again momentarily.
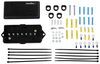
Product Images

Need help with installation?
Locate installers near me
Great Prices for the best wiring from Deka. Ring Terminal -16-14 Gauge - 1/4" Ring ID - Qty. 1 part number DW05702-1 can be ordered online at etrailer.com or call 1-800-940-8924 for expert service.
  • All Info
  • Reviews (18)
  • Q & A (0)
  • Videos (2)
  • Photos

Deka Wiring - DW05702-1

  • Wire Connectors
  • Ring Terminals
  • 16-14 Gauge
  • Deka
  • 1/4 Inch Diameter


Features:

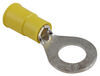
Ring terminals are used for all types of electrical work where wires need fastening

  • For use with 16-14 gauge wire
  • Stud size: 1/4"
  • Vinyl insulation sleeve is blue

05702 Deka Wiring Ring Terminal - Blue


Video of Ring Terminal -16-14 Gauge - 1/4" Ring ID - Qty. 1

Videos are provided as a guide only. Refer to manufacturer installation instructions and specs for complete information.


Video Transcript for Deka 16-14 Gauge Ring Terminal Review

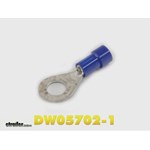
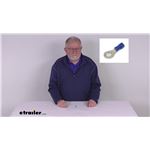
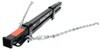
Today on this old trailer, we're going to review an install. The Deka 14-16 gauge 1/4" ID ring terminal. Part number DW05702-1. The hole or 1/4" ring terminal is designed to fit over posts, such as on a battery or a junction box. These ring terminals are a super simple construction. We've got a metal ring that goes into the terminal inside the plastic sheathing.

We're looking inside the plastic portion of the terminal. You can see the metal piece inside. That's where we want to the feed the wire into and crimp down. We look here at the side profile of it. You can see there's just a little indention here, about half way, on the plastic.

That means we want to crimp down on the half closest to the large end of our ring terminal. That's where the solid portion of the metal on the inside of the plastic will be to crimp down the wire. Slide that ring terminal onto the wire. See, we've just a little bit peeking it out there Crimp it down. A nice solid connection.

That will do it for the review and install of the Deka 14-16 gauge ring terminal, part number DW05702-1. .


Customer Reviews

Ring Terminal -16-14 Gauge - 1/4" Ring ID - Qty. 1 - DW05702-1

Average Customer Rating:  4.8 out of 5 stars   (18 Customer Reviews)


by:

Best for non environmental exposure use. Use of sealed heat shrinkable terminals is recommended for maximum resistance to environmental exposure.

Jim

5/2/2017

This trailer is used in rustbelt America. Needed to replaced 1 of 2 terminals as it failed due to corrosion in the conductor crimp area. Replacement terminal was crimped, soldered, and an adhesive lined heat shrink tube was applied over the terminal crimp onto the cable insulation.


by:

These worked fine. I used them to terminate LED lighting. No issues in the last year or so.


by:

No issues here. Well made with thick in sulation.


by:

What can I say, its a ring terminal


by:

All the parts fit. Everything works well.


by:

No issues worked just like it should ha ve.


by:

Works well


by:

Worked like it should


by:


by:

Well made and as described.


by:

Received on time, and as advertised. Great job!!


by:

Product delivered within days and as or dered.


by:


by:

Used these for the junction box fit and work great.


by:


by:


by:

great price for items


by:


18
18

See what our Experts say about this Deka Wiring

  • Lance Camper Wiring Harness Recommendation
    There is not a plug and play adapter for your Lance connector that we are aware of. Typically this is installed by the Lance dealer. A junction box/7-way plug kit like # HS381-9000 is an option you have to convert the camper to match the 7-way RV blade type connector format. This avoids the extra connection points and potential trouble spots from using separate adapters. These items use different wire colors so be sure to follow the wiring guide for the specific kit you select. The...
    view full answer...
  • Parts Needed To Install The Thinline LED Trailer Lights # STL64RB
    The Thinline LED Trailer Tail Light # STL64RB is pretty easy to install, you'll just need some butt connectors # DW05744-10, self tapping screws to mount the lights, a couple of ring terminals # DW05702-1 to easily mount the ground wires to the frame of the trailer, and possibly some extra wiring # 16-1-1 to bridge the gap between the lights and trailer wiring. You'll need some wire strippers # PT43ZR and crimpers # PTW30764 to secure the wires to the butt connectors and ring terminals....
    view full answer...
  • How to Install a Three Wire Trailer Light
    It sounds like your current lights with 2 wires ground to the trailer by the mounting hardware. The One LED RV Passenger Tail Light # RVSTL0060 has three wires, the white wire is the ground, the black wire is the taillight and the green wire is for your stop lights and turn signals. To hook up your lights you will need to splice together the taillight and stop/turn wires. Then you will need to take the white wire and ground it to the trailer itself. To ground your wire you will want to...
    view full answer...
  • Recommended Parts For Changing Surge Coupler To Electric Over Hydraulic Disc
    When changing your trailer over you will need to do the complete change at one time since some of the parts are made for specific type brakes. I have attached a drawing that shows how the Titan BrakeRite EHB Electric-Hydraulic Actuator for Disc Brakes, part # T4813100 is attached. The # T4813100, has 5 wires that are blue, black, white, brown and purple. You will want to splice the blue wire from the adapter to the blue wire from the actuator. This allows the adapter to intercept the...
    view full answer...
    Image 1 for
  • How to Wire a Trailer for Tail Lights
    First, lets make sure you have all of the parts you need to wire a trailer for lights. If you have an old trailer and want to replace everything, I recommend using a kit like our Optronics Tail Light Kit, # TL29BK and our trailer wiring installation kit # HM51020. We also have an LED kit, # TLL9RK. Step 1 - The trailer connector should extend 2 - 3 feet past the tongue. Attach the ground wire directly to the tongue of the trailer using a self tapping screw # 101131802 and a ring terminal...
    view full answer...
    Image 1 for Image 2 for
  • Parts List to Re-Wire a Trailer w/ Electric Brakes
    To completely rewire your 20' trailer from start to finish I recommend using the following parts: 7-Way Connector and Cable - Hopkins Molded Cable 8' Long item # H20046 Junction Box - Trailer Wiring Junction Box - 7 Color Coded Terminals item # 3375601101 10 Gauge Wiring for Brakes and 12v Power Sold by the Foot - 10 Gauge Primary Wire item # 10-1-1 16 Gauge Wiring for Lights Sold by the Foot - Bonded 4 Wire item # 16-4B-1 3/16 Inch Ring Terminals item # 44-5310A 1/4 Inch Ring Terminals...
    view full answer...
    Image 1 for
  • Troubleshooting Trailer Lights with Nissan Frontier Using 7-Way to 6-Way Adapter
    There are two likely possibilities for the lighting issue you're having. It sounds like you may be using an adapter to match up your Frontier's factory 7-way trailer socket to the 6-way plug on your trailer. It is possible that the adapter you're using is causing the issue with your lights since 6-ways can be wired in two different ways. It may also be that there is a bad ground connection either on the vehicle's harness or on the trailer's harness. A weak ground can cause all sorts of...
    view full answer...
  • Installation of Ventline Vanair Vent on Ford Transit Connect Van with Corrugated Roof
    Installing a roof vent on a vehicle that has a corrugated roof, especially a smaller vent like the Ventline # VP-543SP which requires a mounting hole only 6-1/2-inches in diameter, will mean that you'll need to fill the gaps between the vent and roof caused by those corrugations. The easiest way to do this is to use a pure silicone sealant/adhesive such as # 0160297 which is white or a similar product from a local hardware store that is often available in a clear colorless form or in...
    view full answer...
    Image 1 for
  • What is Needed to Wire Replacement LED Trailer Lights for Separate Turn and Stop Light Functions
    A standard 4-pole flat trailer connector carries brake light and turn signals on the same wires. Typically the yellow wire carries both left turn and stop light signals and the green wire carries both right turn and stop light signals. The brown wire carries the running light signal for both sides of the trailer and the white wire is the ground. Please refer to the photo attached. In order to separate the turn and brake signals so they can be sent to separate lights you will need a vehicle-to-vehicle...
    view full answer...
    Image 1 for
  • 7-Way and Light Kit Recommendation for Boat Trailer
    The cleanest way to install the # HM20048 would be to use a junction box like part # 38656. The junction box is weatherproof to protect the wiring connections from the elements. You'd also need some ring terminals, one 10 gauge # DW05741-1 and four 14 gauge, part # DW05702-1. I've linked you to a video showing the junction box being installed. The part # TL16RK is a submersible trailer wiring kit that would work well on your trailer as well.
    view full answer...
  • Best Place To Set A Ground On A Utility Trailer
    You should have no problems connecting the ground wire from your light to the main ground circuit on your utility trailer. Though we typically recommend using a Ring Terminal # DW05702-1 and a Self Tapping Screw # FA1131822 to ground it to your trailer frame as this will give you a better connection. You could also ground through the mounting studs that are in direct contact with the trailer frame or by having a jumper wire ran from the lamp to the trailer frame. If you have any further...
    view full answer...
  • Parts Needed to Add Electric Drum Brakes to 6 x 12 Single-Axle Trailer
    Adding electric drum brakes to your single-axle trailer requires a few components, including brake flanges, brakes, hub/drums, wiring, a breakaway kit and a brake controller. Each of these is detailed in the linked article which covers the entire process. Brake flanges must be welded on perfectly straight and concentric or you can have trailer tracking problems, premature tire wear or other issues. Specialized jigs are required. Since you have welding experience as long as you have the...
    view full answer...
  • Parts Needed to Totally Rewire Trailer
    The Trailer Wiring 7-Way Kit # HS381-9000 is a good place to start. It gives you a new 7-way and wiring to a junction box where you can then wire all of the circuits to. Additional hardware that you may need is 3/16 Inch Ring Terminals, # 44-5310A, 1/4 Inch Ring Terminals, # DW05702-1, 12-10 Gauge Butt Connectors, # 05732-2, 16-14 Gauge Butt Connectors, # 05731-5, and electrical tape. And finally 10 gauge wire like part # 10-1-1 which is sold by the foot and 12 gauge wire # 12-1-1. The...
    view full answer...
    Image 1 for Image 2 for
  • Parts Needed To Install Electric Trailer Brakes On Nationcraft LLC 6x12 Enclosed Trailer Single Axle
    To upgrade your Nationcraft LLC trailer to electric brakes you will need the following parts. Electric Trailer Brake Kit # AKEBRK-35-SA Qty 1 Trailer Hub & Drum Assembly # 84546UC3-EZ Qty 2 Trailer Wiring Junction Box # 3375601101 Qty 1 Bargman 7-Way # WG54006-043 Qty 1 Ring Terminal # DW05702-1 Qty 8 Ring Terminal # 44-5310A Qty 6 Trailer Breakaway Kit # 3802346 Qty 1 You will need to determine how much 12 Gauge Wire # 12-1-1 you will need to run to both the brake assemblies from where...
    view full answer...
  • Converting Hydraulic Brakes to Electric Over Hydraulic Brakes Pulled by 2012 Ram 1500
    For an electric over hydraulic actuator, I recommend a Cargo Towing Solutions HydraStar Electric-Hydraulic Brake Actuator. If you have disc brakes, you will want part # HBA16. For drum brakes, you will want # HBA-10. If you have a factory brake controller in your 2012 Ram 1500, you will want the # HBA-CAM adapter for the HydraStar Brake Actuator. The actuator isn't compatible with the factory brake controller installed in 2010 and later Rams without the adapter. Both disk and drum brake...
    view full answer...
  • How To Install Trailer Light With Green, Black, Red, And Two White Wires On Trailer With Two Wires
    I would be happy to help! Even though your old lights grounded through the mounting hardware, the new lights you have ground through the white wire. You will need to either add a ring terminal like # DW05702-1 and secure each one to the frame, or run a wire from the main ground on the tongue to each white wire using # 16-1-1. Now for the other wires you will need to confirm the function. You will need to connect the red, green, and black wires to the positive terminal of a 12v battery...
    view full answer...
  • Trailer Lamps Work Fine Until Vehicle Headlights Are Turned On
    You're having a ground problem, what you describe are the classic symptoms. When the vehicle headlights are switched on, the maximum amperage will be drawn through the system which is when the problems show up. There's a few specific areas you'll want to check. 1) Make sure the trailer connector socket on the tow vehicle is grounded to the vehicle frame or chassis, and that the connection is tightly made to metal that isn't rusty. 2) Make certain that the main trailer ground which...
    view full answer...
  • Replacing Wiring on Old Livestock Trailer with Electric Brakes
    To replace the wiring in your old livestock trailer and install a 7-Way connector to use with your tow vehicles, I recommend using a 7-Way harness like the Hopkins 7-Way Molded Trailer Wire Connector # H20046. When installing the connector and harness on the trailer, you will want to use a junction box # 38656 and 10 gauge wire # 10-1-1 (sold by the foot), which will help protect the connection points and also give the installation a more professional look. The 10 gauge wire will be needed...
    view full answer...
  • Replacing Trailer End 4-Pole Connector That Has 8 Wires
    For starters, a quick-fix type connector shown in your photo is typically a good choice for an emergency repair, but I wouldn't use it as a permanent fix. It looks like your trailer wiring has 3 separate grounds and 3 separate running lamp circuits for some reason. This is kind of a strange setup, but if everything worked fine beforehand, there really wouldn't be any need to change that at this point. Your suspicion is correct, I don't believe all those wires will fit in there either. For...
    view full answer...
    Image 1 for
  • Parts Needed to Completely Re-Wire 20-Foot Cattle Trailer with Light and Reflectors
    The cost to re-wire your 20-foot cattle trailer depends on the type and number of lights you choose to install. How many lights you legally need depends on the width of the trailer. A good place to start your project is the linked article on trailer lighting. This explains the lighting requirements based on the trailer's length, width and weight. We offer basic light kits like # TL29BK that are a cost-effective all-in-one option. If your 20-foot trailer is less than 80-inches wide you...
    view full answer...
  • What Wiring Harnesses for Trailers over 80 with a 7-way Plug
    We do have some kits we have put together for this. You start with the 35 Ft 4-Way Trailer Wiring Harness part # A35W42B that you looked at and add etrailer Trailer Wiring 7-Way Upgrade Kit w/ Junction Box part # HS381-9000 this will allow you to run the 4-way wires to the junction where your connections will be made using part # DW05702-1. I also really like this option because it allows you to add anything you want. You will have post there if you want to connect a power jack, reverse...
    view full answer...
  • Junction Box and Trailer Lighting Recommendation for 26 Trailer
    Often times, people will run the wires from a 7-way such as yours to a junction box like part # 38656. From there, they will run the standard wire colors to the trailer lights, brakes and battery. I have attached a photo that shows how this setup works in the junction box. Most molded 7-way pigtails will come wired with the RV style color code. If you ever need to replace your 7-way connector in the future, you could simply open the junction box, remove the connector and wire loom and install...
    view full answer...
  • Ways to Install New 4-Pole Trailer Connector
    Four flat trailer wiring, also called 4-pole wiring, uses four wires and pins configured as shown in the linked photo of a trailer side 4-pole connector. The one pin that is different from the other three (on both trailer and vehicle side connectors) will be the ground pin and this usually has a WHITE wire that will ground to a clean bare metal spot the trailer frame with a ring terminal. The next pin is for the running light circuit and this typically uses a brown wire to activate the...
    view full answer...
    Image 1 for
  • Replacement 4-Pole Trailer Connector for Utility Trailer with 5-Wire Wishbone Wiring Setup
    When a 4-pole (4-pin) flat trailer connector actually has 5 wires this simply means it is a 'wishbone' style connector with dual running light wires. These dual wires just make it easier to connect to the running lights on both sides of the trailer. Examples of such items are # A35W42B, # A20WB and # A10-4225VP. If your trailer wiring is still okay and you just need a new 4-pole plug to re-connect the leads from the trailer you can use Hopkins Endurance Quick-Fix Replacement 4-Way Flat...
    view full answer...
    Image 1 for


< Previous
123. . .5


Do you have a question about this Wiring?


Info for this part was:

Employee Jeff D
Installed by:
Jeff D
Employee Jameson C
Expert Research:
Jameson C
Employee Jacob T
Video Edited:
Jacob T

At etrailer.com we provide the best information available about the products we sell. We take the quality of our information seriously so that you can get the right part the first time. Let us know if anything is missing or if you have any questions.